 by
by Lovely — here’s a clear, ready-to-crochet, step-by-step text tutorial for “Perfect — Crochet Heart Multipurpose Pattern” (Crochet with Nese style). Two easy options so you can use the heart as a small appliqué (Option A) or as a framed, joinable motif (Option B) that becomes a medallion for blouses, runners, shawls or cushions.
All instructions use US terms. I give exact round/row stitch sequences, quick checks, blocking/finishing, joining tips and troubleshooting.
Materials & tools
- Yarn: fingering → DK (cotton for crisp hearts; a soft blend for wearable pieces).
- Hooks: 1.75–3.5 mm for small/appliqué hearts; 3.5–4.5 mm for framed motif (match yarn).
- Notions: tapestry needle, blocking pins/towel/mat, scissors.
- Finished sizes (approx): Appliqué heart ≈ 3–5 cm; framed motif ≈ 9–13 cm (DK + 3.5–4 mm).
Abbreviations (US)
- ch = chain
- sc = single crochet
- hdc = half double crochet
- dc = double crochet
- tr = treble crochet
- sl st = slip stitch
- pic = picot (ch 3, sl st into same st)
- rep = repeat
- sp = space

OPTION A — Simple Heart Appliqué (fast)
Great for collars, hats, pockets, gifts.
- ch 4.
- Work across one side of the chain (the “top” of the heart): in 2nd ch from hook sc, hdc, 3 dc, hdc, sc — all into that same chain.
- Without cutting, turn and work into the opposite side of the foundation chain: sc, hdc, 3 dc, hdc, sc (mirror).
- Sl st into first sc to close the heart. Fasten off; weave ends to the back.
Check: two equal lobes (3 dc in each lobe) and a pointed bottom where the two sides meet.
Notes / variations (A):
- Make it firmer: use smaller hook or thicker yarn? use thread + small hook.
- Make larger: use thicker yarn or work foundation ch 6 and increase dc cluster to 5 dc per lobe.
- To attach: sew on with matching yarn/needle or tack in three points (top of each lobe + bottom point).
OPTION B — Framed Heart Motif (heart inside joinable medallion)
This is the multipurpose version: a centered heart inside a round medallion that you can block and join-as-you-go into garments or home pieces.
You can choose to (1) sew the little heart onto the medallion after making it, or (2) crochet the heart into the center and continue rounds. Sewing is easiest for exact placement — I show the medallion rounds assuming you’ll sew the heart on afterward.
Framed Motif — Round-by-round
Round 0 — (optional) make the Small Heart Appliqué (Option A) and set aside
Round 1 — small center ring
- Make a magic ring. ch 3 (counts as dc). Work 11 dc into ring (so ch-3 + 11 dc = 12 dc).
- Pull tight, sl st to top of ch-3 to join.
Check: 12 dc (gives 6 nice loop spaces next round).
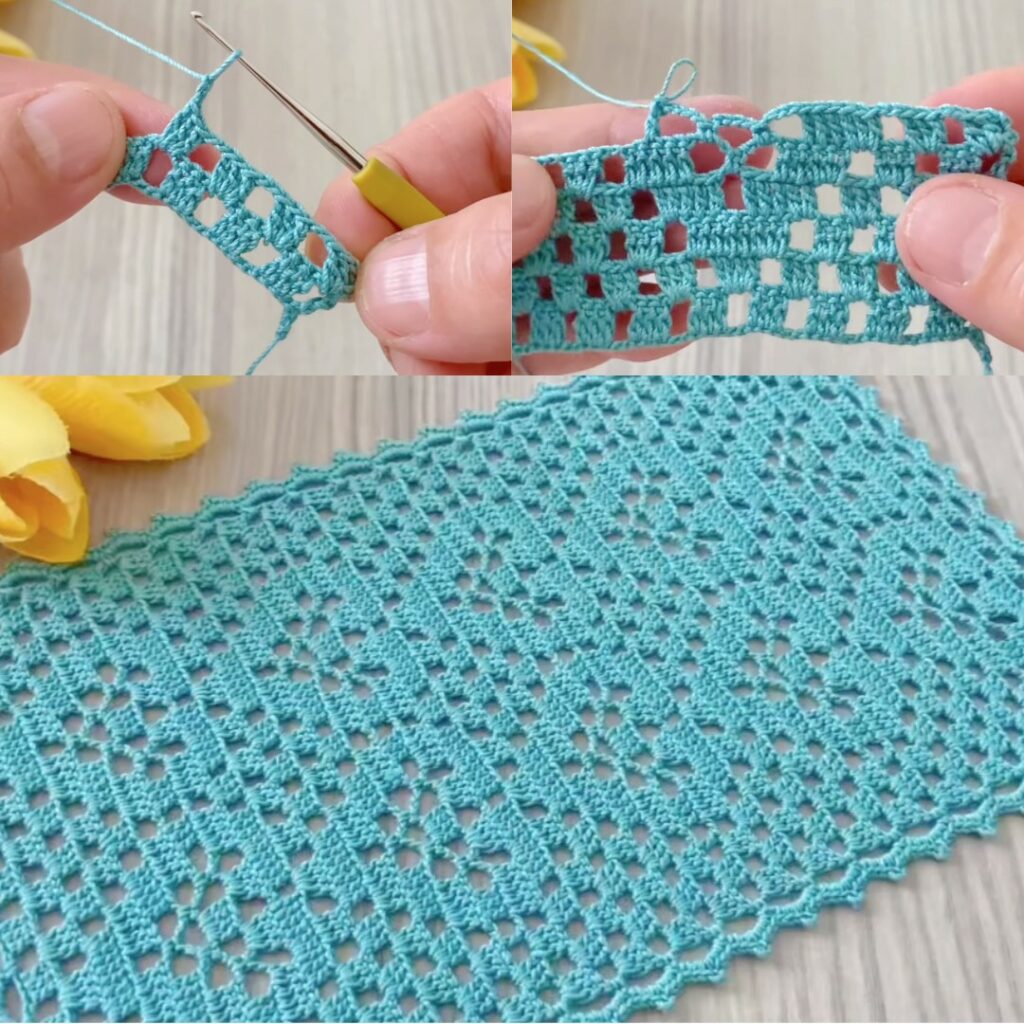
Round 2 — loop foundation (6 loops)
- ch 4, skip next dc, sc in next dc — rep around.
You will have 6 ch-4 loops + 6 sc. Join with sl st.
Check: 6 loop spaces (one for each heart petal zone).
Round 3 — small petals (frame for heart)
- Into each ch-4 loop work: sc, hdc, 5 dc, hdc, sc (all into same loop).
- Repeat across all 6 loops. Join.
Check: 6 petals forming a circular frame.
Round 4 — tidy sc round
- Rejoin between petals and work sc evenly around the petal bases to make a smooth outer boundary — distribute ~8–10 sc per petal area so the round sits flat. Join.
Check: even circular base.
Round 5 — lacy arches (connect petals)
- From petal tip: sl st to tip → ch 6 (or ch7 for a more open look) → sl st into the base between the next petals — repeat so you make 6 arches around. Use ch-6 for tighter arches or ch-7 for lacy space. Join.
Check: 6 arches evenly spaced.
Round 6 — decorate arches (optional)
- Into each arch work a small fill: sl st to arch base → ch 3 → 3 dc separated by ch-1 (or dc, ch1, dc, ch1, dc) → ch 3 → sl st into arch base.
- Repeat for all arches and join.
Check: each arch has 3 little ribs.
Round 7 — make motif joinable (square-ish conversion — optional)

(Do this if you plan to join motifs in a grid; otherwise skip to Round 8 and finish round.)
- Mark 3 or 4 quarter-ish points to balance (with 6 petals you might choose 3 sides for triangle-ish join or do 4 quarters by letting two petals share a corner — for simplicity we’ll make four corner points: mark four spots evenly around).
- Work each side between corners: sc X, (sc, ch 4, sc) repeated Y times, sc X then make ch 6 at the corner. Choose X/Y so all sides are identical — e.g., sc 6, (sc,ch4,sc)×2, sc 6 → ch6 corner. (The exact numbers depend on your motif size — the key is consistency.)
- Join and fasten off.
Check: equal side-loop counts and 4 corner loops so motifs align when joined.
Round 8 — outer scallop & picot finish (join round)
- Rejoin and work a neat scallop: sc 3, (pic: ch 3 + sl st into same st), sc 4 across each small curve around the outside; adjust sc counts to keep edge flat.
- Place picots at regular intervals for that dotted edge. Join, fasten off and weave in ends. Block.
Check: scallops and picots even; motif lies flat after blocking.

Joining motifs (if you made framed motifs)
Join-As-You-Go (JAYG) — recommended:
- Crochet first motif fully. When making the next motif, work through Round 7 and start Round 8. Each time you reach a spot that meets a previously finished neighbour, replace the picot or sl st with a sl st into the corresponding stitch/picot of the finished motif to join. Attach at side loops & corner loops (the places you prepared in Round 7). This makes almost invisible flat joins — ideal for blouses and runners.
Sew-after:
- Block all motifs, lay them out and sew with matching yarn & tapestry needle (mattress stitch or whipstitch) through the outer sc round or side loop anchors.
Blocking & finishing
- Pin motif to blocking surface, shape evenly, pin picots and (if used) pull corner loops outward. Mist with water or steam lightly and allow to dry thoroughly.
- If you used Option A hearts you can sew them centered onto the framed motif after blocking for perfect placement.
Ideas & uses
- Single appliqué hearts for baby garments, hats, pockets, gift tags.
- Framed motifs joined into panels for a lacy blouse or shawl.
- Runner (1×N or 2×N motifs) with scalloped outer border.
- Cushion front (3×3 or 4×4 framed hearts).

Troubleshooting & tips
- Heart looks lopsided: make sure you mirror stitches evenly on both sides of the foundation chain (Option A) or sew carefully to center the applique (Option B).
- Motif cups: loosen tension on petals/arches or use a slightly larger hook for those rounds; block firmly.
- Arches sag: shorten ch counts (ch-6 instead of ch-7) or tighten chain tension.
- Joints gap: add an extra sl st at join points or block motifs before joining; JAYG joins better when joining motifs are blocked.
Quick stitch summary (compact)
Option A (appliqué): ch4 → in 2nd ch: sc, hdc, 3dc, hdc, sc → work mirror on opposite side → sl st to close.
Option B (framed motif rounds):
R1: magic ring, ch3 + 11 dc (=12 dc).
R2: ch4, sk1, sc around → 6 loops.
R3: in loop: sc, hdc, 5 dc, hdc, sc (×6).
R4: sc evenly around.
R5: arches ch6/ch7 (×6).
R6: arch ribs (3 dc groups).
R7: optional side loops & ch6 corners.
R8: scallop + picots (join round).
VIDEO: