 by
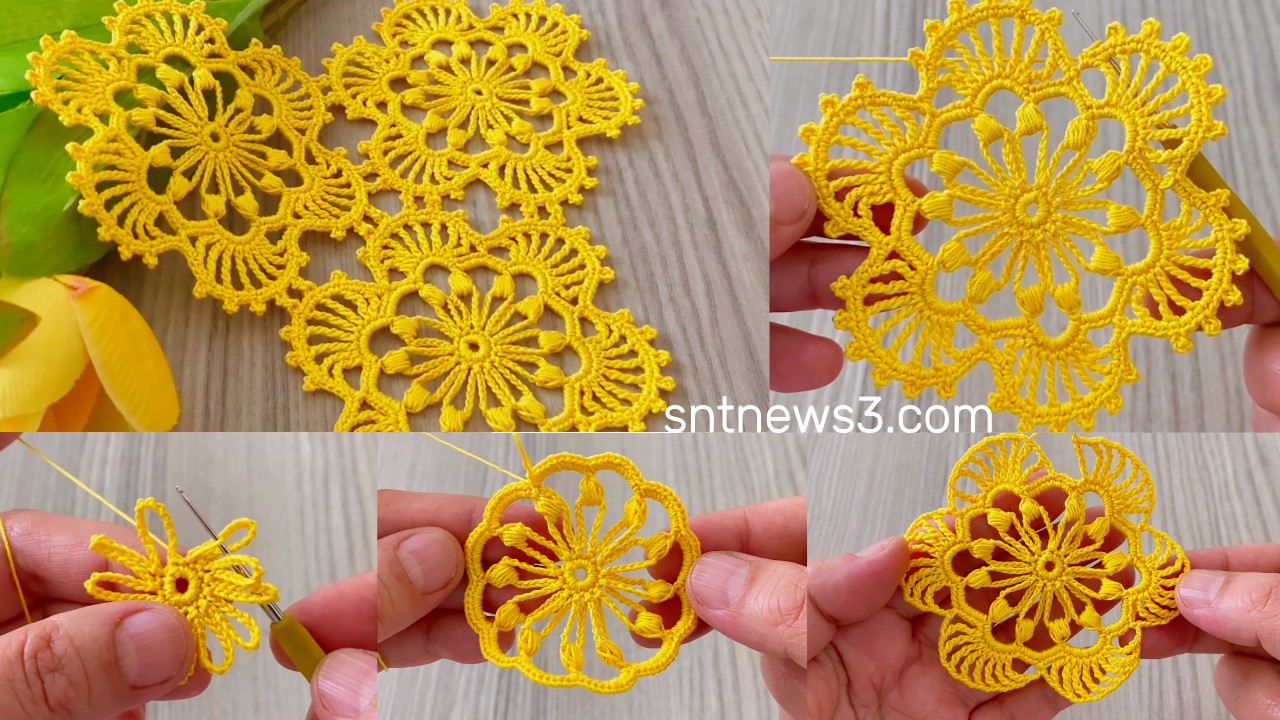
by Nice — here’s a clear, beginner-friendly, step-by-step text tutorial for a “Like a Sweet Snowflake” crochet motif inspired by Crochet with Nese. It’s written so you can crochet it straight away: exact round instructions, short checks after each round, blocking/stiffening tips, and a few variations. All US terms.
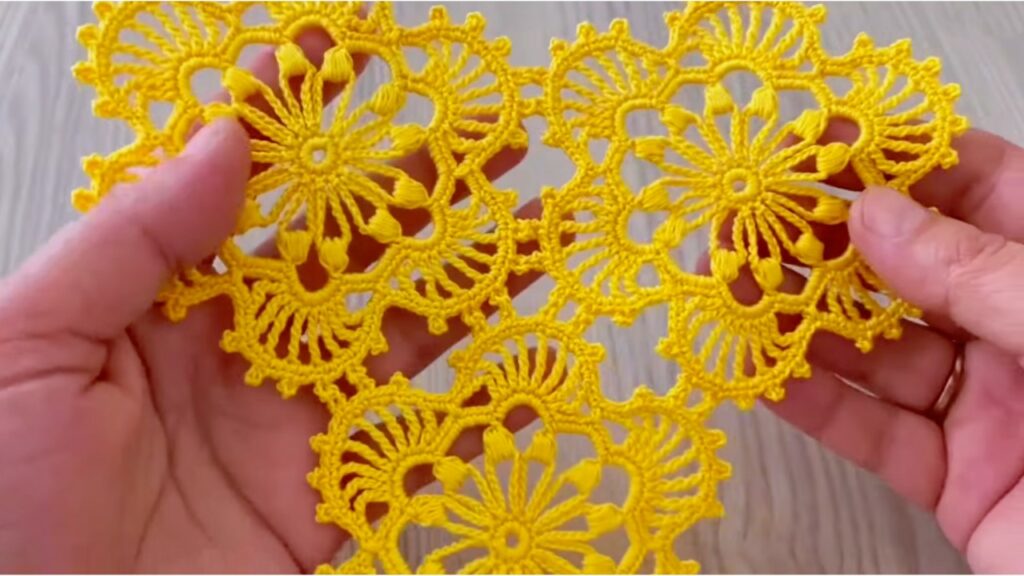
❄️ Like a Sweet Snowflake — Step-by-Step Tutorial
Finished size (approx.): 8–12 cm (3–4.7 in) depending on yarn & hook
Yarn: crochet thread (size 10) or fingering / sock yarn for a chunkier snowflake
Hook: 1.75–2.5 mm for thread; 3.0–3.5 mm for fingering yarn
Notions: tapestry needle, rust-proof pins, blocking board or towel, optional spray starch or diluted PVA for stiffening
Abbreviations (US)
- ch = chain
- sl st = slip stitch
- sc = single crochet
- hdc = half double crochet
- dc = double crochet
- tr = treble crochet
- pic = picot (ch 3, sl st into base)
- sp = space
- st(s) = stitch(es)
- rep = repeat
Pattern notes
- Work fairly firm on chain rounds and a little looser on the tall stitch rounds so the snowflake blocks flat.
- This makes a 6-point snowflake. After each major round I give a simple check so you can confirm stitch counts before moving on.
ROUND-BY-ROUND
Round 1 — tiny neat center
- Make a magic ring.
- ch 3 (counts as first dc), work 5 dc into the ring. (ch-3 + 5 dc = 6 dc total.)
- Pull the ring closed, sl st to top of ch-3 to join.
Check: 6 dc around the center.
Round 2 — loop foundation (6 loops)
- ch 5, sc in next dc — repeat around into the 6 dc.
- You will make 6 ch-5 loops (and 6 sc anchors).
- Join with sl st to first sc.
Check: 6 loop spaces for the points.
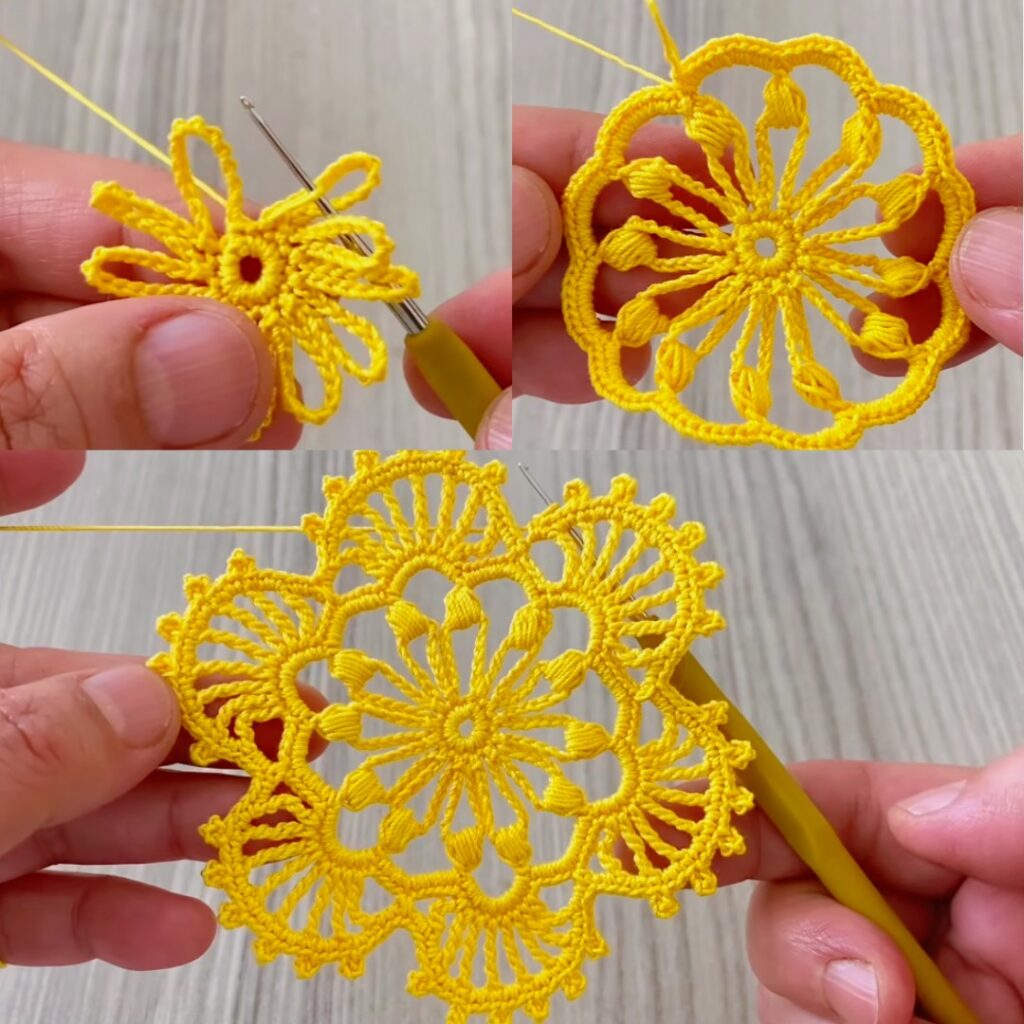
Round 3 — long points (6 points)
- Into each ch-5 loop work the point cluster all in the same loop:
(sc, ch 3, 7 dc, ch 3, sc).- That is: sc → ch3 → dc ×7 → ch3 → sc.
- Sl st to the next ch-5 loop and repeat for all 6 loops. Join with sl st.
Check: 6 long points; each point has 7 dc as the central spine.
Variation: for a smaller/shorter point use 5 dc instead of 7 dc.
Round 4 — tidy base round (flatten the motif)
- Rejoin at any point base (between two points). Work sc evenly across the bases to make a smooth circular boundary.
- Aim for about 8 sc per point area (so roughly 48 sc total); adjust by ±1–2 per segment so the round lies flat.
- Join with sl st.
Check: circle looks even (not cupped or ruffled).
Round 5 — large chain arches (outer ring)
- From the tip area of a point: sl st to the outer tip → ch 9 → sl st to the outer tip of the next point — repeat around so you form 6 large arches connecting each point to the next.
- If ch-9 looks too long/short with your yarn/hook, use ch-8 or ch-10 for an even visual spacing.
- Join with sl st.
Check: 6 graceful arches around the snowflake.
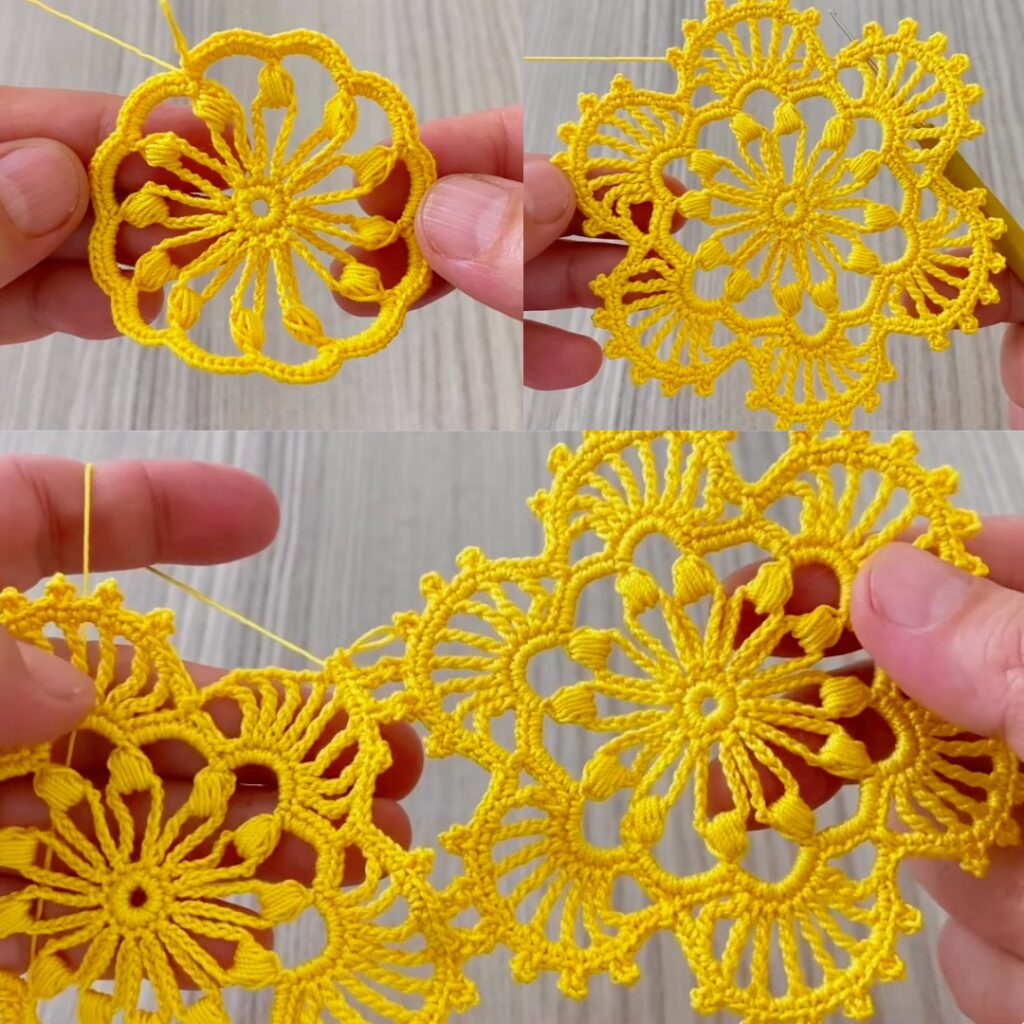
Round 6 — ribs/decoration inside each arch
- Into each chain arch add three little ribs for texture:
- sl st into arch base → ch 3 → dc, ch 1, dc, ch 1, dc → ch 3 → sl st into arch base.
- (Simpler: work 3 dc separated by ch-1 across each arch.)
- Repeat for all 6 arches and join.
Check: each arch shows 3 small ribs — gives the snowflake its lacey web look.
Round 7 — outer picot scallop & finishing round
- Rejoin and work a delicate scallop with picots around the outer edge: a simple repeat works well: sc 3, (pic: ch 3, sl st into same st), sc 4 — adjust the small sc counts so the scallops sit evenly on each arch.
- Place a picot regularly (every scallop) to create tiny sparkling points. Join, fasten off, and weave in ends.
Check: scallops and picots are evenly spaced; snowflake lies flat when unblocked.
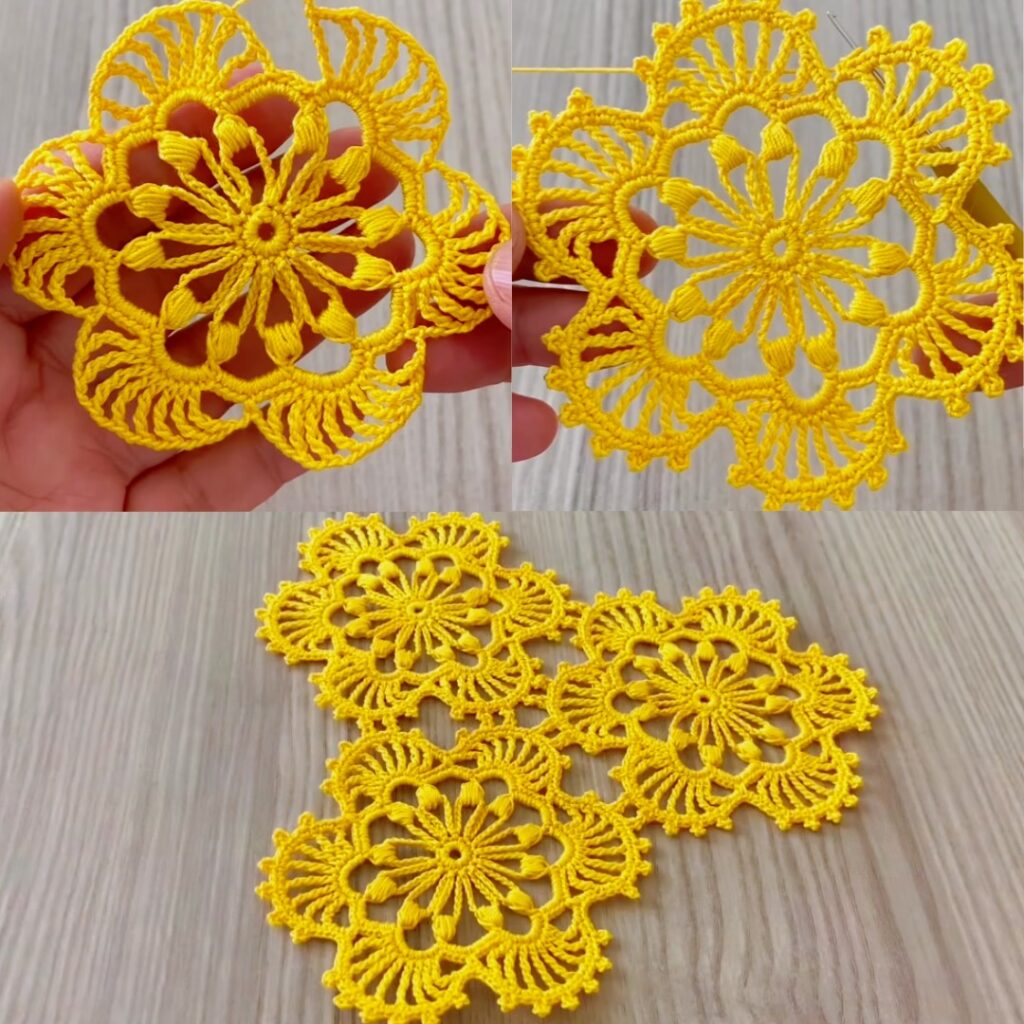
BLOCKING & STIFFENING (important for ornaments)
- Pin the snowflake to a blocking board or towel, stretching each point and arch to a pleasing, symmetrical shape. Pin picots for sharp tips.
- Mist lightly with water and let dry fully. For a firmer ornament, after drying brush or spray lightly with spray starch or a diluted PVA (1 part PVA glue : 3 parts water), shape again and leave to dry.
- Trim loose ends on the back.
HANGING LOOP (optional)
- Attach yarn at any picot: ch 12 (or desired hanger length), sl st to the same picot, fasten off & weave in. This makes a neat loop for hanging on a tree.
TROUBLESHOOTING & TIPS
- If the snowflake cups (points curl up): use a slightly larger hook on the petal/arch rounds or block more firmly.
- If the arches sag: shorten chain length in Round 5 by 1–2 (e.g., ch-7 or ch-8) or tighten tension on chains.
- If the snowflake ruffles: remove 1–2 sc from the Round 4 tidy round so there’s not excess fabric.
- For a crisp look use cotton thread and small hook; for cozy decor use fingering yarn.
VARIATIONS & IDEAS
- Make a delicate ornament in white mercerized cotton and stiffen for a classic look.
- Use sparkly thread or stitch a tiny bead into each picot for holiday sparkle.
- Create a garland by stringing several snowflakes on ribbon.
- For a bigger motif, change 7 dc → 9 dc in Round 3 and ch-11 arches in Round 5.
VIDEO: