by
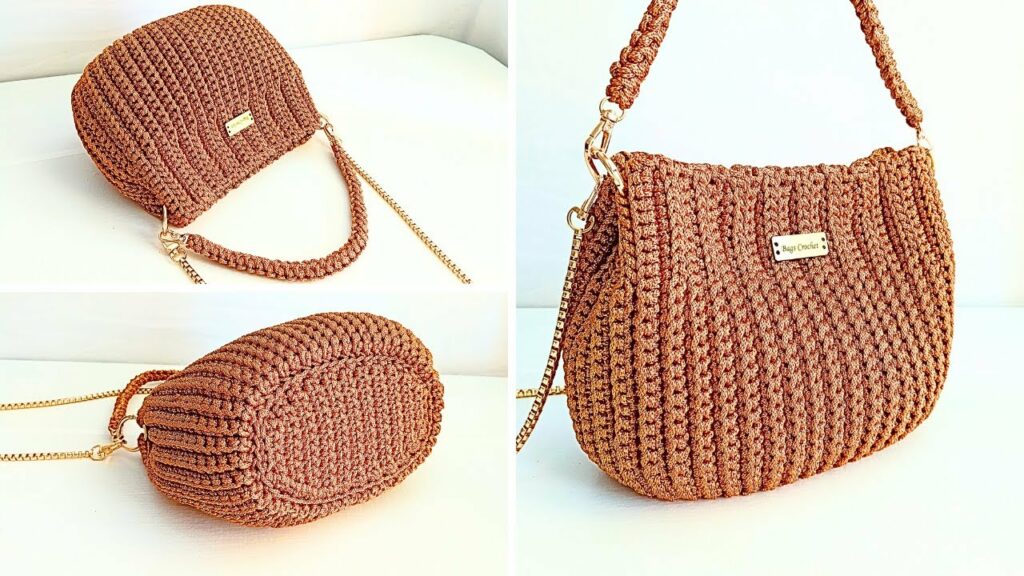
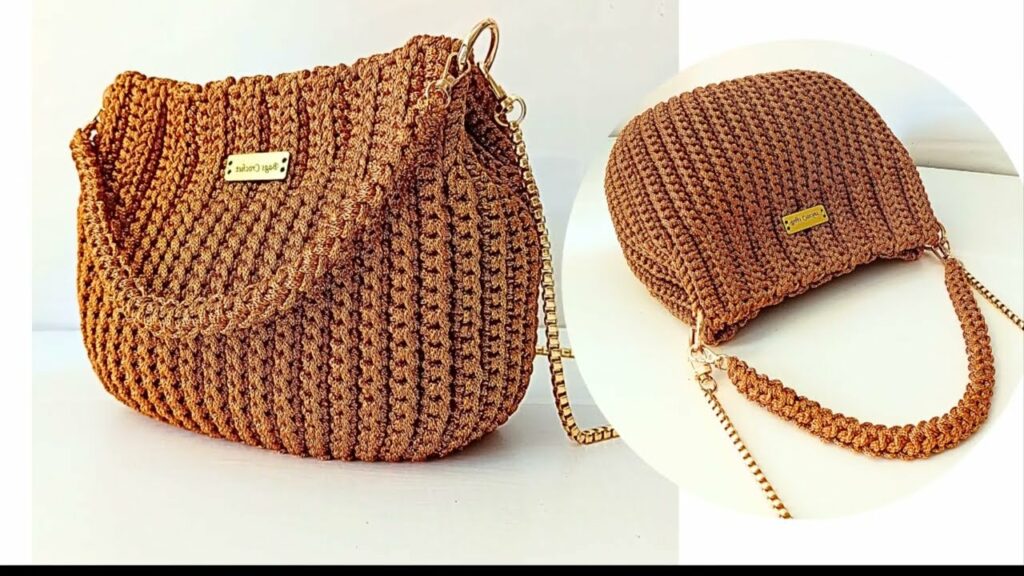
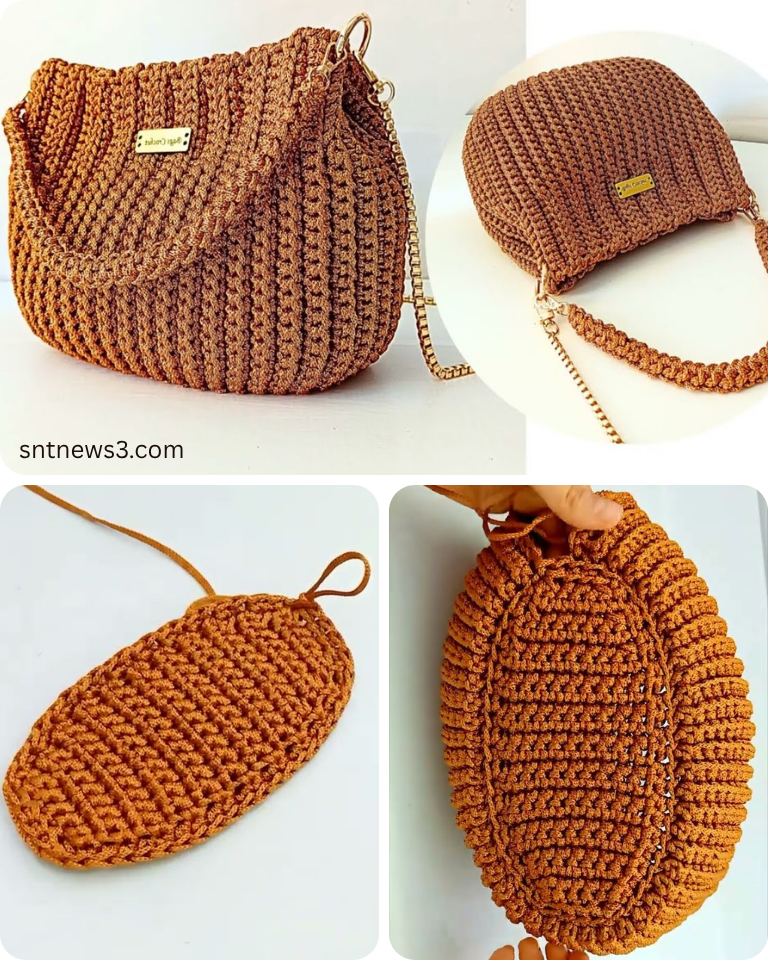
by Imagine stepping out with a bag that perfectly matches your unique style, one that you crafted with your own hands. A crocheted bag is not just a practical accessory; it’s a statement piece, a testament to your creativity, and a sustainable choice. And the best part? Creating a truly stylish crochet bag doesn’t have to be complicated!
This detailed, step-by-step tutorial is designed for crocheters of all levels, proving that “easy” can absolutely go hand-in-hand with “elegant” and “fashionable.” We’ll focus on a versatile, medium-sized tote or shoulder bag that’s perfect for carrying your daily essentials, trips to the market, or casual outings. Get ready to crochet your next favorite accessory!
Why Crochet This Stylish Bag?
- Fashion-Forward & Versatile: This bag design is simple enough to complement any outfit, yet chic enough to add a touch of handmade elegance. Use it for everyday errands, as a casual tote, or even for a beach day.
- Beginner-Friendly: While the result looks impressive, the techniques involved are basic: primarily single crochet (sc) and half double crochet (hdc), with straightforward shaping.
- Endless Customization: You have complete creative freedom over color, yarn texture, and added embellishments. Make it minimalist, bold, or rustic!
- Practical & Durable: When made with the right yarn and tension, this bag will be sturdy enough to hold your essentials securely. Adding a lining further enhances its functionality and lifespan.
- Skill Building: Learn essential garment construction techniques like creating a sturdy base, working in the round, and forming integrated handles.
- Sustainable & Eco-Friendly: Choose natural fibers and create a durable bag that reduces reliance on fast fashion.
Key Considerations Before You Start:
- Bag Size & Functionality:
- This tutorial will guide you in creating a medium-sized tote/shoulder bag, approximately 12 inches (30 cm) wide and 10 inches (25 cm) tall (excluding handles). This size is perfect for a wallet, phone, keys, a small book, and other daily necessities.
- You can easily adjust the size by changing your starting chain and the number of body rounds.
- Yarn Choice (Crucial for Style & Durability!):
- Fiber: For bags, you need something sturdy that won’t stretch out excessively.
- Cotton or Cotton Blends: Excellent choice! They offer good stitch definition, minimal stretch, and durability. Mercerized cotton has a lovely sheen.
- T-Shirt Yarn: Creates a bulky, quick-to-work-up bag with great structure.
- Macrame Cord/Raffia: For a very firm, structured, and rustic look.
- Sturdy Acrylic: Look for acrylics designed for accessories or home decor, as some can be quite soft and stretchy.
- Weight: Worsted (Category 4) or Bulky (Category 5) yarn is recommended for a quick project with good structure. T-shirt yarn falls into the Super Bulky category.
- Colors: Neutrals (beige, gray, cream, black), earthy tones (terracotta, olive), or classic denim shades offer timeless style. Bold solids or subtle variegated yarns can also create a chic effect.
- Fiber: For bags, you need something sturdy that won’t stretch out excessively.
- Hook Size:
- Match your hook to your chosen yarn, but generally, go down one half or even a full size from the yarn label’s recommendation. This creates a denser, firmer fabric that helps the bag hold its shape and prevents items from poking through.
- For Worsted yarn, try 4.0 mm (US G/6) or 4.5 mm (US 7).
- For Bulky yarn, try 6.0 mm (US J/10).
- Gauge (Important for Structure!):
- Make a test swatch (e.g., 4×4 inches in sc or hdc) with your chosen yarn and hook. The fabric should feel firm and tight, not loose or flimsy. If it’s too loose, go down a hook size.
- Stitch Pattern:
- Simple, dense stitches are best for bags. We’ll use single crochet (sc) or half double crochet (hdc), often in conjunction with working in the back loop only (BLO) or the third loop to add texture and definition.
- Construction Method: We’ll start with an oval base and then work the sides of the bag in continuous rounds, minimizing seaming for a cleaner finish.
- Handles/Straps: This tutorial will integrate crocheted handles directly into the bag’s top edge for a seamless look.
- Lining (Highly Recommended for Functionality & Longevity!):
- A fabric lining prevents stretching, adds durability, contains small items, and gives your bag a professional, finished look. It’s an extra step but well worth it.
- Closure (Optional): Magnetic snaps or large buttons can be added for security.
Materials You’ll Need:
- Yarn: Approx. 200-300 yards of Worsted (Category 4) or Bulky (Category 5) cotton/acrylic blend yarn. (Adjust based on bag size and yarn weight).
- Crochet Hook: Size G/6 (4.0 mm) to J/10 (6.0 mm) (choose based on yarn and desired firmness).
- Yarn Needle (Tapestry Needle): For weaving in ends.
- Scissors: For cutting yarn.
- Stitch Marker: Essential for working in continuous rounds.
- For Lining (Highly Recommended):
- Matching or contrasting fabric (e.g., cotton canvas, quilting cotton).
- Matching sewing thread.
- Sewing machine (or hand-sewing needle).
- Fabric scissors, pins.
- (Optional) Magnetic Snap or Large Decorative Button.
Essential Crochet Abbreviations:
- ch: chain
- sl st: slip stitch
- sc: single crochet
- hdc: half double crochet
- sc inc: single crochet increase (2 sc in same st)
- hdc inc: half double crochet increase (2 hdc in same st)
- st(s): stitch(es)
- BLO: back loop only
- FO: fasten off
- (): indicates instructions to be worked into the same stitch/space
- ***…***: repeat instructions within asterisks
- []: indicates stitch counts at the end of a round
Easy & Stylish Crochet Bag: Step-by-Step Tutorial (Approx. 12″ W x 10″ H)
We’ll use single crochet (sc) for a dense, sturdy fabric, and half double crochet (hdc) for the base.
Gauge Swatch (Achieving a Firm Fabric): Using your chosen yarn and hook, ch 15. Row 1: Sc in 2nd ch from hook and in each ch across. (14 sc) Rows 2-10: Ch 1, turn. Sc in each sc across. Your swatch should be about 4 inches (10 cm) wide and 3.5-4 inches (9-10 cm) tall. The fabric should feel dense and hold its shape. Adjust hook size if too loose.
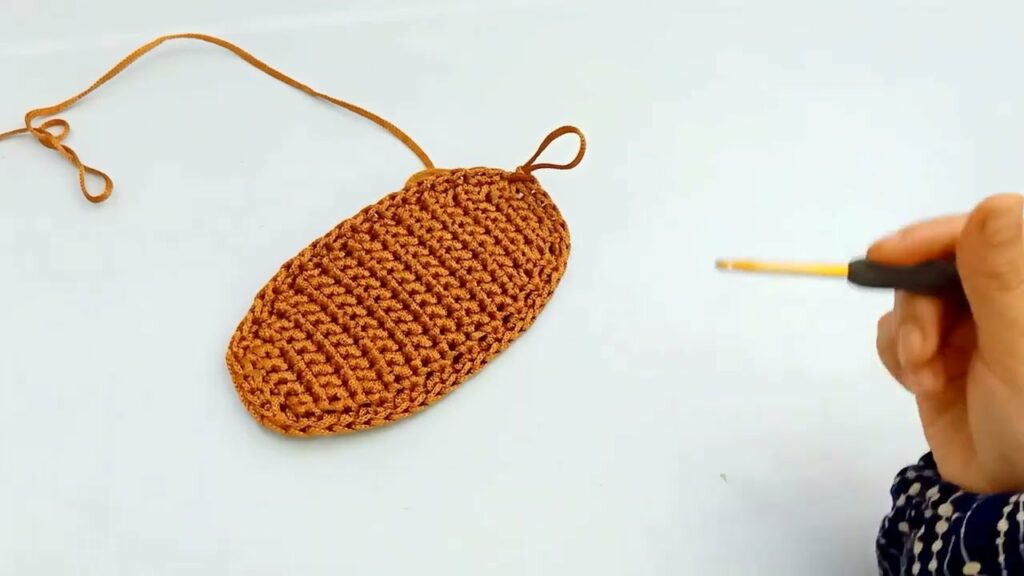
Part 1: The Base (Sturdy Foundation)
This oval base gives the bag a good foundation.
- Start with your chosen yarn.
- Round 1: Ch 27.
- Hdc in 3rd ch from hook (counts as 1st hdc). Hdc in next 23 ch.
- (5 hdc) in last ch (this forms one curved end).
- Now, working along the opposite side of the foundation chain: Hdc in next 23 ch.
- (4 hdc) in the very first ch where you made your first hdc (this forms the other curved end).
- Join with a sl st to the top of the beginning Ch 2.
- [55 hdc] (23+23+5+4 = 55)
- Round 2: Ch 2 (does NOT count as a st). Hdc in first st. Hdc in next 23 sts.
- (Hdc inc) in next 5 sts.
- Hdc in next 23 sts.
- (Hdc inc) in next 4 sts.
- Join with a sl st to the top of the first hdc.
- [64 hdc]
- Round 3: Ch 2. Hdc in first st. Hdc in next 23 sts.
- (Hdc inc, hdc in next st). Repeat from * 5 times.
- Hdc in next 23 sts.
- (Hdc inc, hdc in next st). Repeat from * 4 times.
- Join with a sl st to the top of the first hdc.
- [73 hdc]
- Your base should now measure approx. 12 inches (30 cm) long and 4-5 inches (10-12.5 cm) wide. It should lay flat.
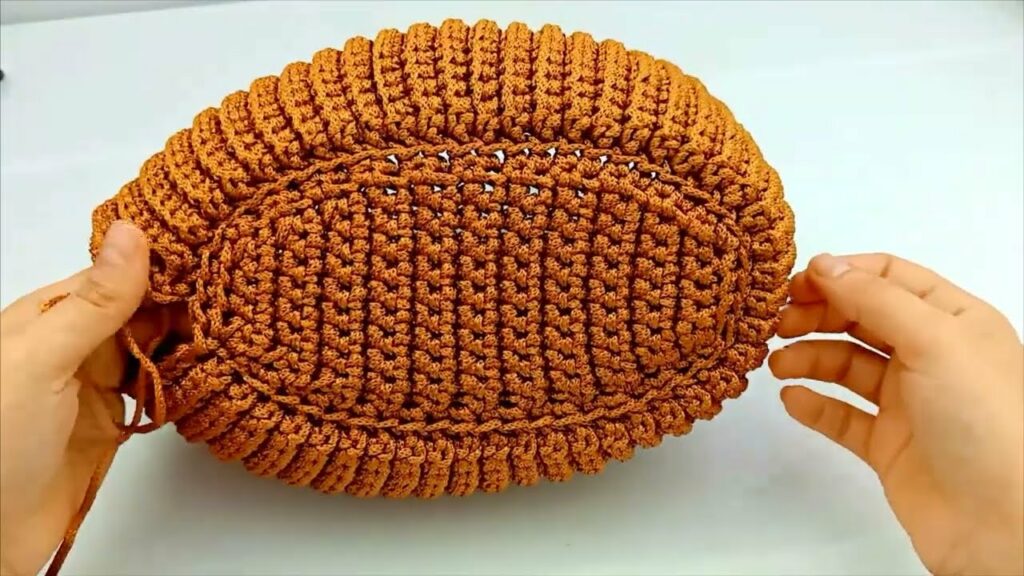
Part 2: Building the Bag Body (Sides)
This section forms the main height of your bag.
- Round 4 (Establish Wall): Ch 1 (does NOT count as a st). Sc in the back loop only (BLO) of each st around. Join with a sl st to the first sc.
- [73 sc]
- This BLO round creates a neat ridge that clearly defines the bottom of the bag and helps it stand up.
- Rounds 5 – 30 (Body Height): Ch 1. Sc in both loops of each sc around. Join with a sl st to the first sc.
- [73 sc]
- Continue working these straight rounds until the bag reaches your desired height (approx. 9-10 inches / 23-25 cm from the base).
- You can add more or fewer rounds for a taller or shorter bag.
Part 3: Creating the Handles
We’ll create integrated openings for comfortable handles.
- Round 31 (Handle Openings): Ch 1. Sc in first 10 sts.
- Ch 15 (this will be the chain for the first handle opening). Skip next 16 sts.
- Sc in next 21 sts (this is the front of the bag).
- Ch 15 (second handle opening). Skip next 16 sts.
- Sc in last 10 sts.
- Join with a sl st to the first sc.
- [41 sc + 2 ch-15 sps]
- Adjust chain length (ch 15) for desired handle drop. Make sure your skipped stitches are even.
- Round 32 (Handle Definition): Ch 1. Sc in first 10 sc.
- Sc in each of the 15 ch sts of the first handle chain.
- Sc in next 21 sc.
- Sc in each of the 15 ch sts of the second handle chain.
- Sc in last 10 sc.
- Join with a sl st to the first sc.
- [71 sc]
- Round 33 (Reinforce Handles): Ch 1. Sc in each sc around. Join with a sl st to the first sc.
- [71 sc]
- FO, leaving a short tail to weave in.
Part 4: Finishing Touches
- Weave in All Ends: Use your yarn needle to meticulously weave in all yarn tails. For a stylish bag, visible ends are a no-go!
- Blocking (Optional but Recommended): Lightly mist your bag with water and gently shape it, ensuring the bottom is flat and the sides are even. Allow it to air dry completely. This helps the bag hold its shape better.
- Add a Fabric Lining (Highly Recommended!):
- Measure: Measure the finished crocheted bag’s width, height, and depth.
- Cut Fabric: Cut two main rectangular pieces for the body (width of bag + 1″ seam allowance by height of bag + 2″ for top hem) and one rectangular piece for the bottom (width of bag base + 1″ seam allowance by depth of bag base + 1″ seam allowance).
- Sew: Sew the side seams of the main body pieces, then sew the bottom piece to create a fabric box. Hem the top edge.
- Insert: Carefully insert the fabric lining into your crocheted bag.
- Hand Stitch: Hand-stitch the top edge of the fabric lining securely to the inside top edge of your crocheted bag, just below the handles.
- Add Closure (Optional):
- If using a magnetic snap, sew one half to the inside front top edge of the bag and the other half to the inside back top edge.
- If using a button, sew it onto the center front of the bag, and crochet a small chain loop onto the center back of the bag’s opening to create a buttonhole.
Your Stylish Crochet Bag is Complete!
You’ve created a functional, beautiful, and personalized accessory that’s sure to garner compliments.
Tips for Success & Styling Your Bag:
- Tension is Your Friend: For a sturdy bag, maintain consistent and relatively tight tension. This prevents sagging and helps the bag hold its shape.
- Yarn Choice Impact: A smooth cotton yarn will give a crisp, modern look. A T-shirt yarn will yield a chunky, casual vibe. Raffia or macrame cord creates a bohemian, structured feel.
- Lining is the Secret Weapon: Don’t underestimate the power of a good lining! It protects your crochet work, adds structure, and makes the bag truly functional.
- Handle Variations: Instead of integrated handles, you can sew on pre-made leather handles, or crochet a separate flat strap and attach it with D-rings for a more polished look.
- Embellishments: Personalize further with a contrasting tassel, a handmade pompom, a unique bag charm, or even some simple surface embroidery.
- Care: Refer to your yarn label for specific washing instructions. Most crocheted bags are best hand washed and laid flat to dry to maintain their shape.
- Styling Advice: This simple, rectangular tote pairs beautifully with casual jeans and a t-shirt, a flowy sundress, or even smart casual office wear. Choose a color that acts as a neutral or a pop of color for your wardrobe.
Enjoy carrying your beautiful, handmade creation with pride!
Video tutorial: