 by
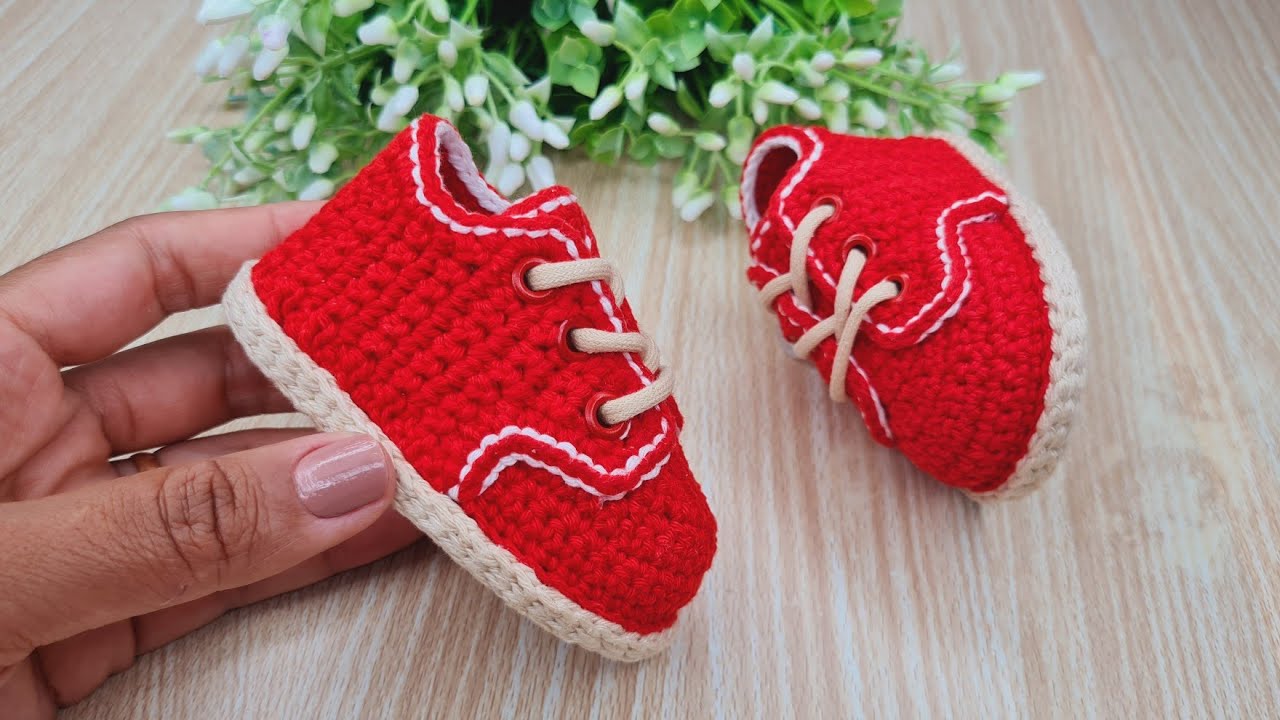
by When it comes to baby gifts or preparing for a little one, handmade booties are always a heartwarming choice. But what if you’re keeping the gender a surprise, or simply prefer a versatile, timeless look? Enter the Unisex Crochet Baby Bootie! These booties are designed for comfort, ease of construction, and a clean aesthetic that suits any baby.
This detailed, step-by-step tutorial will guide you through crocheting a perfect pair of gender-neutral booties with a 9 cm (approximately 3.5 inches) sole, ideal for infants aged 1 to 3 months. Using only basic stitches and simple shaping, you’ll create a practical, cozy, and utterly adorable accessory that’s sure to be cherished.

Why Crochet Unisex Baby Booties?
- Versatile & Gender-Neutral: Perfect for baby showers when the gender is unknown, or for parents who love a classic, understated look for their little one. No need to worry about pinks or blues!
- Comfort & Warmth: Keep tiny toes snug and protected in all seasons, whether at home or out and about.
- Beginner-Friendly: This pattern uses fundamental crochet stitches (single crochet, half double crochet) and straightforward increases and decreases.
- Quick Project: Being a small item, these booties work up surprisingly fast, offering immediate satisfaction and making them ideal for last-minute gifts.
- Customizable: While the design is gender-neutral, you can easily personalize them with different yarn textures, simple color blocking, or subtle, non-gendered embellishments.
- Skill Building: Practices essential techniques like working in the round to form a sole and shaping for a three-dimensional item.
- Practical Gift: Hand-crocheted booties are always appreciated by new parents for their warmth and handmade charm.
Key Considerations Before You Start:
- Target Size (9 cm Sole / 1-3 Months):
- This pattern is designed to result in a finished sole length of 9 cm (approximately 3.5 inches), which typically fits babies aged 1 to 3 months.
- It’s a very common size for small infants. If you need a slightly larger or smaller size, adjust your initial chain length and the number of increase rounds in the sole accordingly (e.g., for 1 cm larger, add 2-3 chains to the starting chain and potentially an extra increase round).
- Yarn Choice:
- Fiber: Prioritize softness, durability, and washability.
- Baby Acrylic: Very soft, affordable, widely available, and machine washable. An excellent practical choice.
- Cotton or Cotton Blends: Breathable, good stitch definition, and durable. Great for warmer climates or sensitive skin.
- Superwash Merino Wool: Luxuriously soft, warm, and often machine washable, but typically pricier.
- Weight: DK (Light Worsted / Category 3) or Worsted (Category 4) are both versatile and work up well for booties. DK will give a slightly finer stitch, while Worsted will be quicker.
- Colors (Unisex Palette): Opt for gender-neutral shades like:
- Classic whites, creams, ivory.
- Soft grays or charcoal.
- Earthy tones like sage green, mustard yellow, or terracotta.
- Muted blues or gentle purples.
- Subtle variegated yarns with mixed pastels.
- Fiber: Prioritize softness, durability, and washability.
- Hook Size:
- Match your hook size to your chosen yarn weight. For booties, it’s often best to go down half a size from the yarn label’s recommendation. This creates a denser fabric, which helps the bootie hold its shape and offers better warmth.
- For DK yarn, a 3.5 mm (US E/4) or 4.0 mm (US G/6) hook is usually a good starting point.
- For Worsted yarn, a 4.0 mm (US G/6) or 4.5 mm (US 7) hook.
- Gauge (Important for Fit!):
- Making a sole swatch and measuring its length is crucial to ensure the bootie fits the intended size. If your sole is too big or too small, adjust your hook size accordingly.
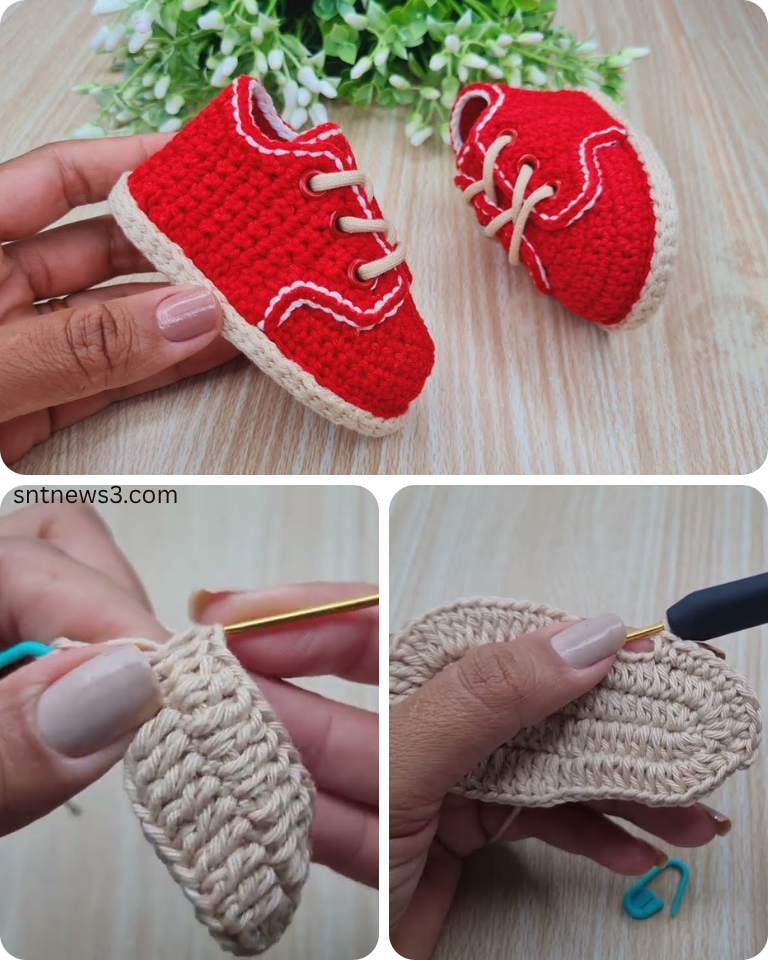
- Construction Method: We’ll use the standard method: crocheting a flat oval for the sole, then building up the sides, shaping the toe with decreases, and finishing with a simple ankle cuff.
Materials You’ll Need:
- Yarn: Approx. 40-60 yards of DK (Category 3) or Worsted Weight (Category 4) soft baby yarn in your chosen unisex color.
- Crochet Hook: Size E/4 (3.5 mm) to G/6 (4.0 mm) (adjust to achieve desired fabric density and sole length).
- Yarn Needle (Tapestry Needle): For weaving in ends.
- Scissors: For cutting yarn.
- Stitch Marker (optional but helpful): To mark the beginning of rounds.
Essential Crochet Abbreviations:
- ch: chain
- sl st: slip stitch
- sc: single crochet
- hdc: half double crochet
- sc inc: single crochet increase (2 sc in same st)
- hdc inc: half double crochet increase (2 hdc in same st)
- sc2tog: single crochet 2 together (decrease)
- st(s): stitch(es)
- BLO: back loop only
- (): indicates instructions to be worked into the same stitch/space
- ***…***: repeat instructions within asterisks
- []: indicates stitch counts at the end of a round/row
Unisex Crochet Baby Booties Tutorial (9 cm Sole – 1 to 3 Months)
All parts are worked in rounds. Use a stitch marker to mark the first stitch of each round if desired.
Gauge Swatch (Sole Check): Work Part 1: The Sole. Measure the length. It should be approximately 9 cm (3.5 inches). If significantly different, adjust your hook size and re-do.
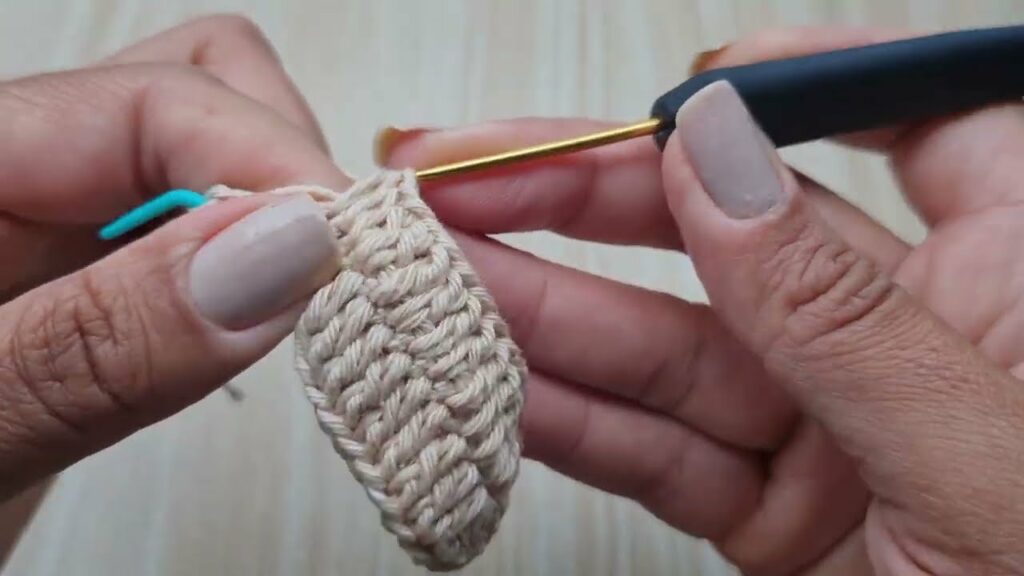
Part 1: The Sole (The Foundation of the Bootie)
We begin by crocheting a flat oval that forms the bottom of the bootie.
- Starting Chain: Ch 11.
- Round 1:
- Hdc in the 3rd ch from hook (counts as 1st hdc).
- Hdc in each of the next 7 ch.
- Work (5 hdc) in the very last ch (this forms the curve for the toe end).
- Now, working along the opposite side of your starting chain: Hdc in each of the next 7 ch.
- Work (4 hdc) in the very first chain stitch where you made your first hdc (this forms the curve for the heel end).
- Join with a sl st to the top of the beginning Ch 2.
- [24 hdc]
- Round 2:
- Ch 2 (does NOT count as a st).
- Hdc inc in the first st.
- Hdc in the next 7 sts.
- Hdc inc in the next 5 sts.
- Hdc in the next 7 sts.
- Hdc inc in the next 4 sts.
- Join with a sl st to the top of the first hdc.
- [34 hdc]
- At this point, your sole should measure approx. 9 cm (3.5 inches) in length. If not, adjust your hook size and re-do.
Part 2: Building the Sides/Upper (Establishing the Wall)
This round creates the defined vertical edge of the bootie, allowing the sides to stand up.
- Round 3 (Establishing Wall):
- Ch 1 (does NOT count as a st).
- Sc in the back loop only (BLO) of each st around.
- Join with a sl st to the first sc.
- [34 sc]
- Working in BLO creates a neat ridge that visually separates the sole from the upper.
Part 3: Shaping the Toe
Now we’ll work upwards and introduce decreases at the front to form the rounded toe.
- Round 4 (Body Height):
- Ch 1. Sc in each sc around.
- Join with a sl st to the first sc.
- [34 sc]
- Round 5 (Initial Toe Decrease):
- Ch 1. Sc in first 10 sts.
- (Sc2tog) 7 times.
- Sc in remaining 10 sts.
- Join with a sl st to the first sc.
- [27 sc]
- Round 6 (Further Toe Decrease):
- Ch 1. Sc in first 7 sts.
- (Sc2tog) 5 times.
- Sc in remaining 10 sts.
- Join with a sl st to the first sc.
- [22 sc]
- You should now see the distinct shaping of the bootie’s toe.
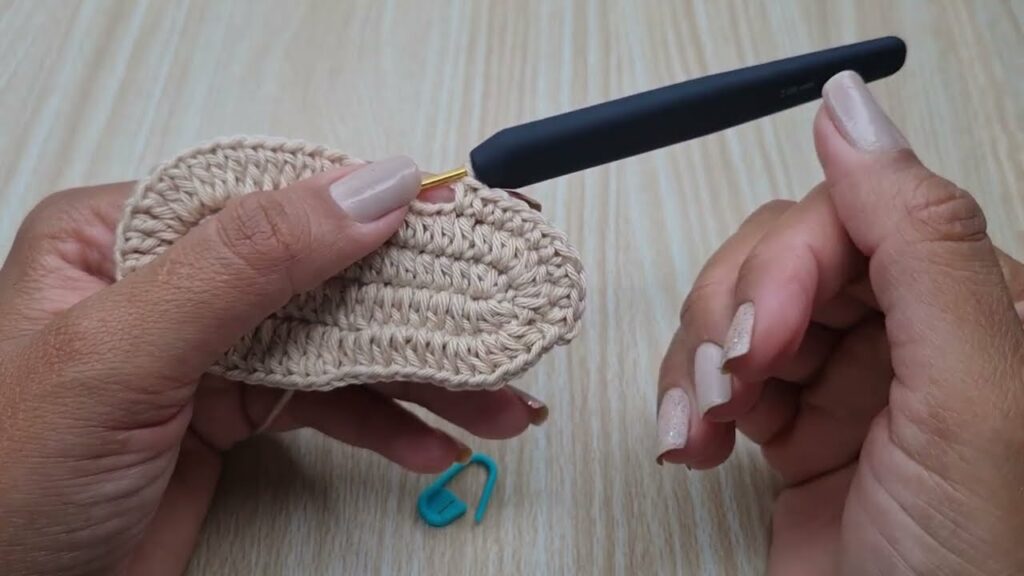
Part 4: The Ankle/Cuff (For Comfort and Finish)
This completes the opening of the bootie.
- Round 7 (Ankle Height):
- Ch 1. Sc in each sc around.
- Join with a sl st to the first sc.
- [22 sc]
- You can add an extra round here if you prefer a slightly taller bootie.
- Round 8 (Simple Cuff/Border):
- Ch 1. Sl st in each sc around. (This creates a neat, non-stretchy finish).
- Join with a sl st to the first sl st.
- FO, leaving a short tail to weave in.
Part 5: Finishing Touches
- Weave in All Ends: Use your yarn needle to carefully weave in all starting and ending tails. For baby items, make sure ends are very secure so they won’t unravel or poke the baby.
- Make a Second Bootie! Repeat all steps to create a matching pair.
- Optional Gender-Neutral Embellishments:
- Contrasting Trim: Use a different color yarn for Round 8 (the sl st border) or for Round 7 (the last full sc round) before the border.
- Simple Buttons: Sew a small, flat, sturdy button onto the side of the ankle for decoration (ensure it’s very securely attached and baby-safe).
- Textured Patch: Crochet a small, simple textured square or circle (e.g., using a puff stitch) and sew it securely onto the top of the toe.
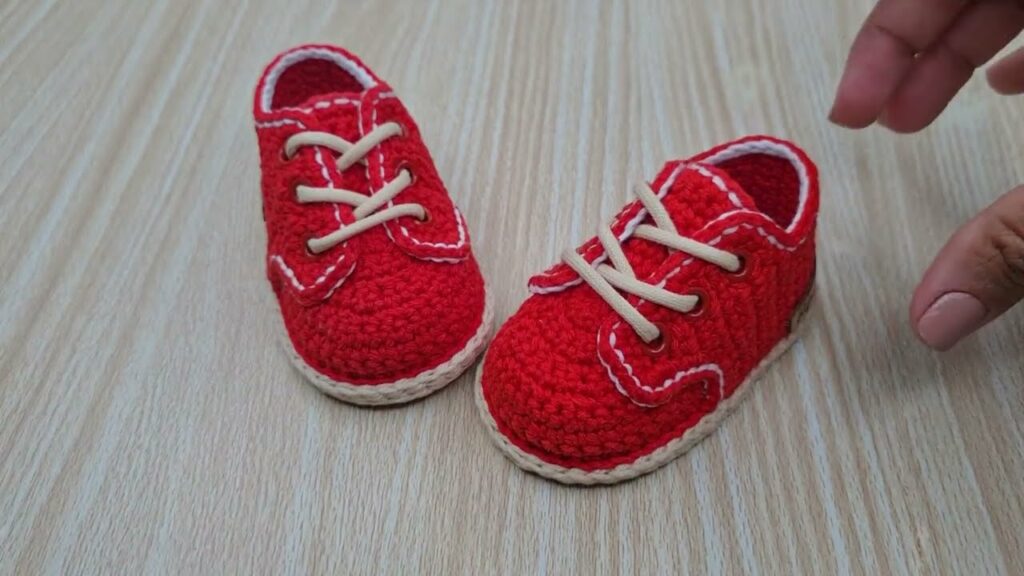
Your Unisex Crocheted Baby Booties are Complete!
You’ve successfully created a practical, comfortable, and charming pair of booties that are perfect for any little one!
Tips for Success & Customization:
- Consistent Tension: Maintaining even tension throughout the project is key for neat stitches and for achieving the correct size and shape.
- Adjusting Size: To make the bootie larger, you can:
- Increase your initial chain length.
- Add an extra increase round to the sole.
- Add more “straight” rounds for body height (like Round 4 or 7).
- Yarn Choices: Explore different yarn textures. A heathered yarn can add subtle interest, while a smooth, solid yarn gives a very clean look.
- Washing Instructions: Always refer to your yarn label for specific care instructions. Most baby yarns are machine washable on a gentle cycle, but laying flat to dry helps maintain the booties’ shape.
- Making them Truly Unisex: Stick to colors like white, cream, gray, yellow, green, or multi-color pastel yarns without a strong gender bias. Avoid traditional bows or ruffles, opting instead for clean lines or simple textures.
Enjoy the satisfaction of crafting these cozy and versatile little treasures!
Video tutorial: