by
by Crocheting your own bag is an incredibly rewarding experience, combining creativity with practicality. Whether you’re looking for a versatile everyday tote or a sleek, hands-free sling bag, the good news is that “easy” doesn’t mean sacrificing “style”! With a few basic stitches and clear instructions, you can craft a beautiful and functional accessory that perfectly suits your needs.
This detailed article will provide you with easy, step-by-step tutorials for both a stylish everyday tote/shoulder bag and a chic sling bag, demonstrating how simple techniques can yield impressive results.

Why Crochet Your Own Easy Bag (Tote or Sling)?
- Cost-Effective: Often, crocheting a bag is more affordable than purchasing a similar handmade or designer piece.
- Customizable Style: You have complete control over the yarn color, texture, size, and added embellishments, ensuring your bag is uniquely yours and perfectly matches your wardrobe.
- Eco-Friendly & Sustainable: Choose natural fibers and create a durable, long-lasting accessory that promotes sustainable fashion.
- Skill Building: Even basic bag patterns allow you to practice fundamental crochet techniques like working in the round, creating sturdy fabric, and attaching straps or closures.
- Practical & Functional: A handmade bag is a reliable companion for carrying your essentials, whether for daily errands, work, or casual outings.
- Incredibly Satisfying: There’s immense pride in carrying something you’ve created with your own hands!
Key Considerations for Any Easy Crochet Bag
Before diving into the tutorials, understanding a few key principles will ensure your crocheted bag is both stylish and durable.
- Yarn Choice (Crucial for Bag Structure!):
- Fibers: Opt for yarns that are sturdy and have minimal stretch to help your bag hold its shape.
- Cotton or Cotton Blends: Excellent for their durability, crisp stitch definition, and minimal stretch.
- Sturdy Acrylic: Look for acrylics designed for accessories or home decor, as they tend to be firmer than softer garment-grade acrylics.
- T-Shirt Yarn: Creates a bulky, quick-to-work-up bag with fantastic inherent structure.
- Macrame Cord or Raffia: For a very firm, structured, and rustic/bohemian look.
- Weight: Worsted (Category 4) or Bulky (Category 5) are ideal. They work up quickly and contribute to a good, firm structure. T-shirt yarn often falls into the Super Bulky category.
- Colors: The world is your oyster! Neutrals (beige, gray, black, white), earthy tones (olive, terracotta), bold solids, or subtle variegated yarns can all create a stylish effect.
- Fibers: Opt for yarns that are sturdy and have minimal stretch to help your bag hold its shape.
- Hook Size: Generally, use a hook size that is one half to a full size smaller than what the yarn label recommends for garments. This creates a denser, firmer fabric that prevents your bag from stretching out or sagging.
- Gauge (Important for Firmness): Make a small test swatch (e.g., 4×4 inches in single crochet or half double crochet). The fabric should feel firm and tight, not loose or flimsy. If it’s too loose, go down a hook size. This is vital for a bag that holds its shape.
- Stitch Pattern: Simple, dense stitches are best for bags as they provide structure and durability.
- Single Crochet (sc): Creates a very dense, sturdy fabric.
- Half Double Crochet (hdc): Slightly taller than sc, but still dense and works up quicker.
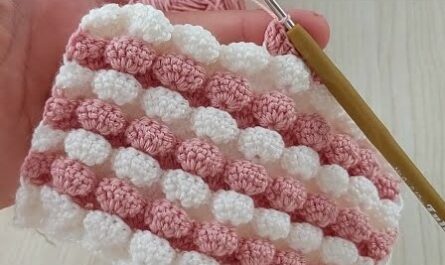
- Moss Stitch (sc, ch 1, skip 1): Creates a beautiful, woven-like texture that is surprisingly dense and elegant.
- Construction Method: We’ll primarily use an oval base worked in continuous rounds, then build up the sides. This method minimizes seaming, which is great for beginners and results in a clean finish.
- Handles/Straps: For ease, we’ll focus on crocheted straps that are either integrated directly into the bag’s top or crocheted separately and securely sewn on. Purchased leather or metal straps are also an option for a more polished look.
- Lining (Optional but Highly Recommended): A fabric lining adds durability, prevents stretching, contains small items, and gives your bag a professional, finished appearance. While optional for an “easy” tutorial, it significantly elevates the final product.
- Closure (Optional): Consider adding a simple magnetic snap or a large decorative button for security.
Materials You’ll Need:
- Yarn: Approx. 200-400 yards of chosen yarn (Worsted/Bulky weight, cotton/acrylic blend recommended).
- Crochet Hook: Size G/6 (4.0 mm) to J/10 (6.0 mm) (adjust based on yarn and desired firmness).
- Yarn Needle (Tapestry Needle): For weaving in ends.
- Scissors: For cutting yarn.
- Stitch Marker: Essential for working in continuous rounds.
- (Optional) For Lining: Matching or contrasting fabric, sewing thread, sewing machine (or hand-sewing needle), fabric scissors, pins.
- (Optional) Closure: Magnetic snap or large decorative button.
Essential Crochet Abbreviations:
- ch: chain
- sl st: slip stitch
- sc: single crochet
- hdc: half double crochet
- sc inc: single crochet increase (2 sc in same st)
- hdc inc: half double crochet increase (2 hdc in same st)
- st(s): stitch(es)
- BLO: back loop only
- FO: fasten off
- (): indicates instructions to be worked into the same stitch/space
- ***…***: repeat instructions within asterisks
- []: indicates stitch counts at the end of a round
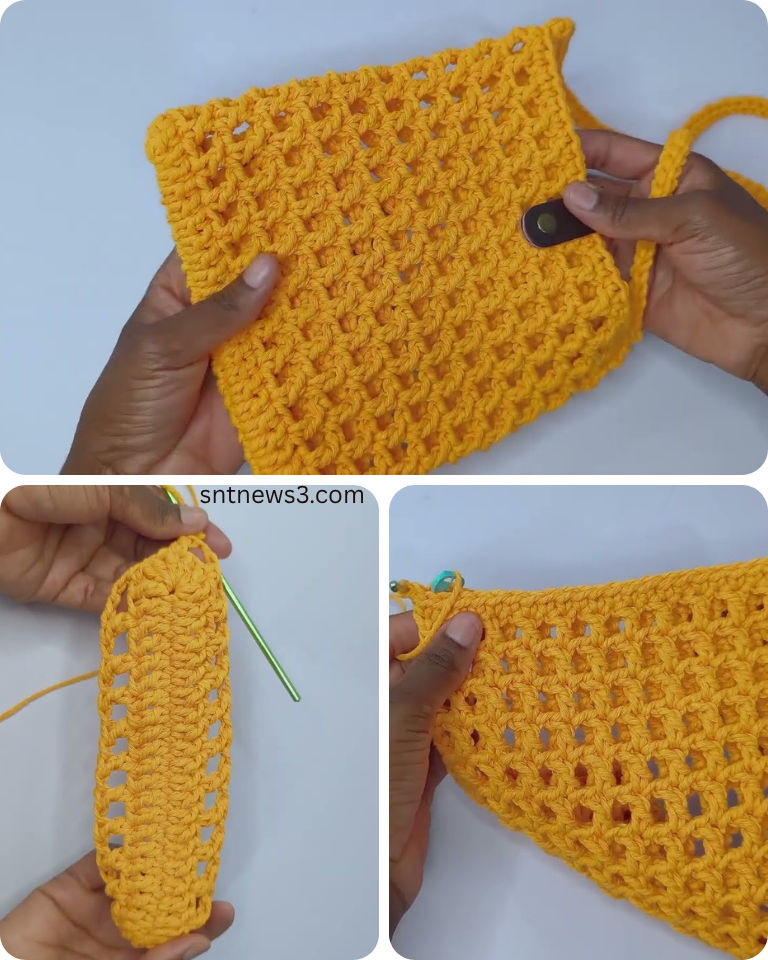
Section 1: Easy DIY Crochet Tote/Shoulder Bag Tutorial
This versatile bag is perfect for everyday use, shopping, or carrying your essentials with style. We’ll make it approximately 12 inches (30 cm) wide and 10 inches (25 cm) tall, with integrated handles.
Gauge Swatch: Using your chosen yarn and hook, ch 15. Row 1: Sc in 2nd ch from hook and in each ch across. (14 sc) Rows 2-10: Ch 1, turn. Sc in each sc across. Your swatch should be about 4 inches (10 cm) square, and the fabric should feel firm. Adjust hook size if too loose.
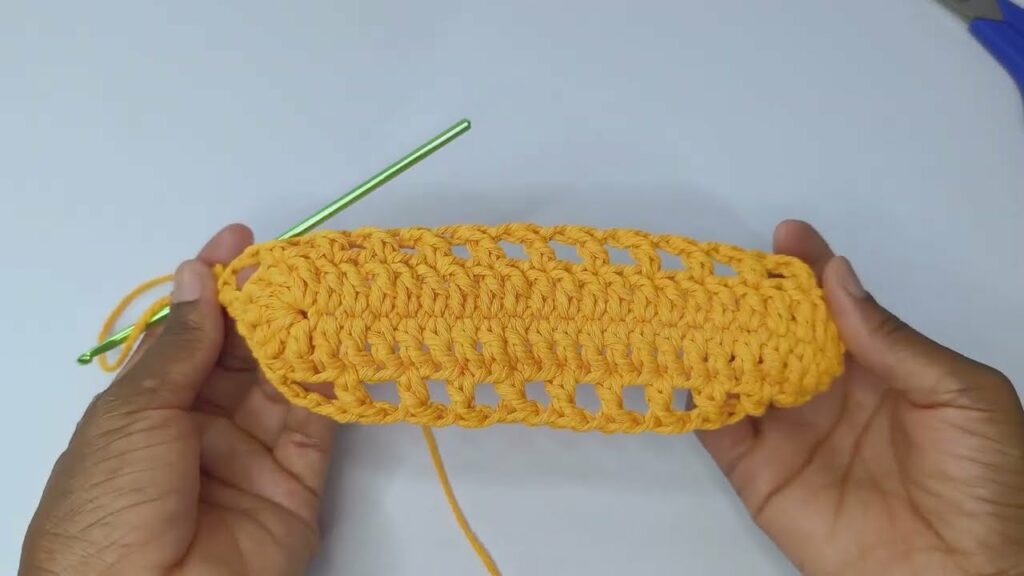
Part 1: The Base (Sturdy Oval Foundation)
- Start: Ch 27.
- Round 1: Hdc in 3rd ch from hook (counts as 1st hdc). Hdc in next 23 ch. Work (5 hdc) in last ch. Working along the opposite side of the chain: Hdc in next 23 ch. Work (4 hdc) in the very first ch where you made your first hdc. Join with a sl st to the top of the beginning Ch 2. [55 hdc]
- Round 2: Ch 2 (does NOT count as a st). Hdc inc in the first st. Hdc in next 23 sts. (Hdc inc) in next 5 sts. Hdc in next 23 sts. (Hdc inc) in next 4 sts. Join with a sl st to the top of the first hdc. [64 hdc]
- Your base should now measure approximately 12 inches (30 cm) long and 4-5 inches (10-12.5 cm) wide, and lie flat.
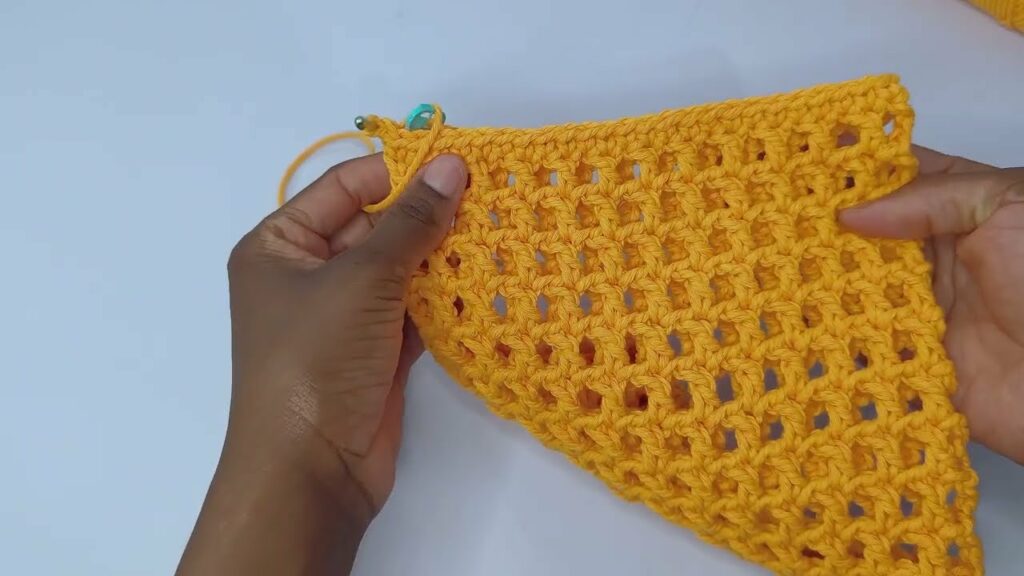
Part 2: Building the Bag Body (Sides)
- Round 3 (Establish Wall): Ch 1 (does NOT count as a st). Sc in the back loop only (BLO) of each st around. Join with a sl st to the first sc. [64 sc]
- This BLO round creates a distinct ridge, helping the bag’s sides stand up.
- Rounds 4 – 28 (Body Height): Ch 1. Sc in both loops of each sc around. Join with a sl st to the first sc. [64 sc]
- Continue working these straight rounds until your bag reaches the desired height (approx. 9-10 inches / 23-25 cm from the base).
Part 3: Creating the Handles (Integrated)
- Round 29 (Handle Openings): Ch 1. Sc in first 10 sts. Ch 15 (for handle opening, adjust for desired drop). Skip next 12 sts. Sc in next 20 sts. Ch 15 (second handle opening). Skip next 12 sts. Sc in last 10 sts. Join with a sl st to the first sc. [40 sc + 2 ch-15 sps]
- Round 30 (Handle Definition): Ch 1. Sc in first 10 sc. Sc in each of the 15 ch sts of the first handle chain. Sc in next 20 sc. Sc in each of the 15 ch sts of the second handle chain. Sc in last 10 sc. Join with a sl st to the first sc. [70 sc]
- Round 31 (Reinforce Handles): Ch 1. Sc in each sc around. Join with a sl st to the first sc. [70 sc]
- FO, leaving a short tail to weave in.
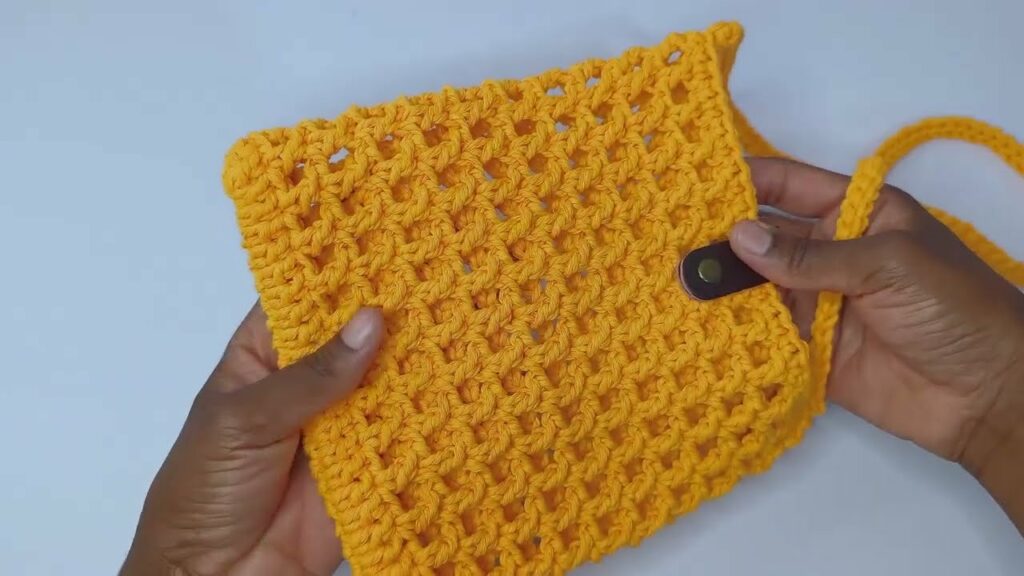
Part 4: Finishing Touches for the Tote/Shoulder Bag
- Weave in All Ends: Use your yarn needle to meticulously weave in all yarn tails for a clean, professional finish.
- Blocking (Optional): Lightly mist your bag with water and gently shape it to ensure the bottom is flat and the sides are even. Allow it to air dry completely.
- Add a Fabric Lining (Recommended for Durability):
- Measure your finished crocheted bag (width, height, depth of base).
- Cut fabric pieces to match, adding seam allowances and a generous top hem.
- Sew the fabric pieces into a bag shape, then hem the top.
- Insert the fabric lining into your crocheted bag and hand-stitch it securely to the inside top edge, just below the handles.
- Add Closure (Optional): Sew a magnetic snap onto the inside top edges of the bag, or a decorative button on the front with a small crocheted loop on the back.
Section 2: Easy Crochet Sling Bag Tutorial
A sling bag (or crossbody bag) is typically smaller, more compact, and designed to be worn across the body, keeping your hands free. The key differences from the tote are its size, often more secure closure, and, crucially, a single, long strap.
Key Differences to Adapt from the Tote Pattern:
- Size: For a sling bag, you’ll generally want a smaller starting point.
- Smaller Base: Begin with a shorter initial chain (e.g., Ch 15 instead of Ch 27 for a bag that’s about 7-8 inches / 18-20 cm wide). Adjust increase rounds accordingly to keep the oval flat.
- Taller Body (Relative to Width): You’ll typically work more straight rounds for the body to make it taller and narrower, which is characteristic of a sling bag.
- The Strap: This is the defining feature of a sling bag. Instead of two short handles, you need one very long and sturdy flat strap.
- Closure: Sling bags often benefit from a more secure closure like a flap with a magnetic snap, or even a zipper if you’re comfortable with sewing.
How to Adapt the Tote Pattern for a Sling Bag (Example Dimensions: ~7.5″ W x 8.5″ H)
Part 1: The Base (Slightly Smaller Oval)
- Start: Ch 15.
- Round 1: Hdc in 3rd ch from hook. Hdc in next 11 ch. (5 hdc) in last ch. Hdc in next 12 ch. (4 hdc) in first ch. Join with sl st. [34 hdc]
- Round 2: Ch 2. Hdc inc in first st. Hdc in next 11 sts. (Hdc inc) in next 5 sts. Hdc in next 11 sts. (Hdc inc) in next 4 sts. Join with sl st. [44 hdc]
- Your base should be approx. 7.5 inches (19 cm) long.
Part 2: Building the Bag Body (Taller & Narrower Sides)
- Round 3 (Establish Wall): Ch 1. Sc in BLO of each st around. Join with sl st. [44 sc]
- Rounds 4 – 30 (Body Height): Ch 1. Sc in both loops of each sc around. Join with sl st. [44 sc]
- Work these rounds until your bag reaches approx. 8-8.5 inches (20-21.5 cm) in height from the base.
Part 3: The Sling Bag Strap (Long & Sturdy)
- Crochet a Flat Strap:
- Using your main yarn, Ch 5 (adjust width as desired).
- Row 1: Sc in 2nd ch from hook and in each ch across. (4 sc)
- Rows 2-Any Length: Ch 1, turn. Sc in each sc across.
- Continue crocheting until the strap reaches your desired crossbody length (e.g., 45-55 inches / 115-140 cm, or longer/shorter depending on preference and body type). Remember it will stretch slightly.
- FO, leaving a long tail at each end for sewing.
- Attach the Strap: Securely sew each end of the strap to the top corners of the bag using your yarn needle. Stitch multiple times for durability.
Part 4: Adding a Flap (for Security and Style)
- Create the Flap: Attach yarn to the center back top edge of the bag (find the middle of the 44 stitches).
- Row 1: Ch 1. Sc in next 22 sts. Turn. [22 sc]
- Rows 2-10: Ch 1. Sc in each sc across. Turn.
- Work until the flap is long enough to cover the bag’s opening and extend slightly over the front.
- Shaping (Optional): For a rounded flap, in the last 1-2 rows, work decreases (sc2tog) at the beginning and end of the rows. For a pointed flap, work decreases more sharply.
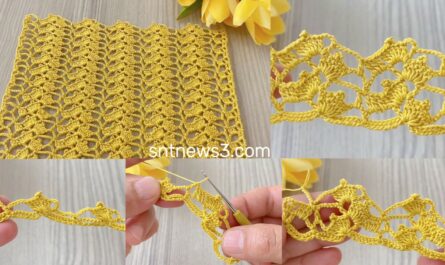
- Edging (Optional): Ch 1. Sc evenly around the entire flap for a clean finish. Sl st to join.
- FO, weave in ends.
Part 5: Finishing Touches for the Sling Bag
- Weave in All Ends: Meticulously hide all yarn tails.
- Add Magnetic Snap: Sew one half of the magnetic snap to the underside of the flap and the other half to the corresponding spot on the front of the bag body.
- Add a Fabric Lining (Highly Recommended): Follow the same lining instructions as for the tote bag, adjusting measurements for the sling bag’s dimensions. A lining is particularly beneficial for sling bags to maintain their shape and prevent stretching.
Tips for Success & Styling Your Bag:
- Tension is Your Best Friend: For any crocheted bag, consistent and relatively tight tension is crucial. It ensures your stitches are even, the fabric is dense, and the bag holds its shape without sagging.
- Yarn Makes a Difference: The type of yarn you choose dramatically impacts the bag’s final look and feel. A smooth cotton gives a crisp, modern finish, while a chunky T-shirt yarn creates a casual, sturdy vibe.
- Don’t Skip the Lining: While it adds an extra step, a fabric lining significantly enhances the durability, functionality, and professional appearance of your crocheted bag. It also prevents small items from slipping through stitches.
- Embellish Thoughtfully: For a stylish look, consider adding a contrasting tassel, a handmade pompom, a unique bag charm, or even some subtle surface embroidery.
- Care Instructions: Always refer to your yarn label for specific washing instructions. Most crocheted bags made with cotton or acrylic are best hand-washed or machine-washed on a gentle cycle, then laid flat to dry (you can stuff them gently to help maintain their shape).
Enjoy the immense satisfaction of creating your own custom, stylish, and functional crochet bag – perfect for carrying your essentials and showcasing your handmade talent! It’s a beautiful Saturday, June 14, 2025, here in Phnom Penh, Cambodia. What a perfect day to embark on a fun and practical crochet project: your very own custom bag! Whether you’re looking for a simple tote to carry your essentials or a stylish sling bag for hands-free convenience, crocheting your own bag is a rewarding DIY endeavor that allows for endless customization.
Hooked on Bags: Your Easy DIY Crochet Bag & Sling Bag Tutorial
Crocheting your own bag is an incredibly satisfying experience. Not only do you get a unique, handmade accessory tailored to your exact preferences, but it’s also a fantastic way to practice your stitches and create something truly functional. From a spacious tote for your everyday carry to a compact sling bag for adventures, these tutorials will guide you through creating stylish bags with ease.
Why Crochet Your Own Easy Bag?
- Customization: Choose your exact color, yarn type, and even add unique embellishments to match your personal style.
- Cost-Effective: Often more affordable than buying a comparable handmade or boutique bag.
- Eco-Friendly: A sustainable choice that reduces reliance on mass-produced items and can utilize eco-friendly or recycled yarns.
- Skill Building: Reinforce foundational crochet skills like working in the round, shaping, and managing stitch tension.
- Practical & Functional: Design a bag that perfectly suits your needs, whether it’s for groceries, daily essentials, or travel.
- Rewarding: There’s immense satisfaction in creating something beautiful and useful with your own hands.
Key Considerations for Any Easy Crochet Bag:
Before you begin, a few choices will define your bag’s look and durability.
- Yarn Choice (Crucial for Bag Structure!):
- Fibers: For a bag that holds its shape and can withstand daily use, sturdy fibers are key.
- Cotton or Cotton Blends: Excellent for durability, minimal stretch, and clear stitch definition. “Kitchen cotton” or mercerized cotton are great.
- Sturdy Acrylic: Look for acrylics that aren’t too soft or stretchy. They are affordable and come in a vast array of colors.
- T-Shirt Yarn: Made from recycled fabric strips, this creates a very sturdy, chunky bag that works up quickly.
- Macrame Cord/Raffia: For a very stiff, structured, or rustic look (can be harder on hands).
- Weight: Worsted (Category 4) or Bulky (Category 5) are generally recommended for bags. They provide good structure and help the project work up faster.
- Fibers: For a bag that holds its shape and can withstand daily use, sturdy fibers are key.
- Hook Size: Always use a hook size slightly smaller than the yarn label recommends (e.g., if the yarn suggests 5.0mm, try 4.0mm or 4.5mm). This creates a denser fabric, crucial for preventing your bag from stretching out or sagging when in use.
- Gauge: While not as critical as for garments, crocheting a small swatch (e.g., 4×4 inches in single crochet with your chosen yarn and hook) will help you assess the fabric’s firmness. It should feel sturdy and hold its shape well.
- Stitch Pattern: Simple, dense stitches are your friends!
- Single Crochet (sc): Creates a very dense, sturdy fabric.
- Half Double Crochet (hdc): Slightly looser than sc, but still holds shape well and works up faster.
- Moss Stitch (sc, ch 1, skip 1): Offers a beautiful woven-like texture and good structure.
- Construction Method:
- For beginners, starting with an oval base worked in continuous rounds is often the easiest approach. This builds the bag upwards with minimal seaming.
- Alternatively, you can crochet flat panels (front, back, sides) and then seam them together.
- Lining (Optional but Recommended): A fabric lining adds durability, prevents stretching, and ensures small items don’t fall through stitches. It also gives your bag a professional, finished look.
- Closure (Optional): Magnetic snaps, simple buttons, or zippers (more advanced) can be added for security.
Materials You’ll Need (General List):
- Yarn: Approx. 200-400 yards of Worsted or Bulky weight yarn (amount varies greatly depending on bag size).
- Crochet Hook: Appropriate size for your yarn (e.g., 4.0mm – 6.0mm).
- Yarn Needle (Tapestry Needle): For weaving in ends.
- Scissors:
- Stitch Marker (optional but helpful): To mark the beginning of rounds.
- Optional for Lining: Matching fabric, sewing machine (or hand-sewing needle, thread, pins).
- Optional for Closure: Magnetic snap or a decorative button.
Essential Crochet Abbreviations:
- ch: chain
- sl st: slip stitch
- sc: single crochet
- hdc: half double crochet
- sc inc: single crochet increase (2 sc in same st)
- hdc inc: half double crochet increase (2 hdc in same st)
- st(s): stitch(es)
- BLO: back loop only (working into the back loop only of a stitch)
- ch-sp: chain space
- (): indicates instructions to be worked into the same stitch/space
- ***…***: repeat instructions within asterisks
- []: indicates stitch counts at the end of a round
Section 1: Easy DIY Crochet Tote / Shoulder Bag Tutorial
This versatile bag is perfect for everyday use, whether as a shoulder bag or a handheld tote. We’ll use a sturdy half-double crochet stitch (hdc) for the body for quick work and good structure.
Target Dimensions: Approx. 12 inches (30 cm) wide, 10 inches (25 cm) high (excluding handles).
Part 1: The Base (Oval Foundation)
We’ll create an oval base to give the bag a flat bottom.
- Round 1: Ch 26.
- Hdc in 3rd ch from hook (counts as 1st hdc). Hdc in next 22 ch.
- (5 hdc) in last ch (this curves around the end).
- Working along the opposite side of the starting chain: Hdc in next 23 ch.
- (4 hdc) in the very first ch where you made your first hdc (this curves around the other end).
- Join with a sl st to the top of the beginning Ch 2. [58 hdc]
- Round 2: Ch 2 (does NOT count as a st).
- Hdc inc in first st. Hdc in next 23 sts.
- (Hdc inc) in next 3 sts.
- Hdc in next 23 sts.
- (Hdc inc) in next 2 sts.
- Join with a sl st to the top of the first hdc. [64 hdc]
- Your base should now be a flat oval, approx. 12 inches long and 3-4 inches wide.
Part 2: Building the Bag Body (Sides)
This creates the main walls of the bag.
- Round 3 (Establishing Wall): Ch 1 (does NOT count as a st). Sc in the back loop only (BLO) of each hdc around. Join with a sl st to the first sc. [64 sc]
- This BLO round creates a defined ridge, making the bag stand up straight from the base.
- Rounds 4 – 20 (Body Height): Ch 2 (does NOT count as a st). Hdc in each st around. Join with a sl st to the top of the first hdc. [64 hdc]
- Continue working these rounds until your bag reaches approx. 10 inches (25 cm) in height, or your desired height.
Part 3: Creating the Handles (Integrated)
We’ll crochet the handles directly into the bag opening.
- Round 21 (Handle Placement): Ch 2.
- Hdc in first 10 sts (first side of bag).
- Ch 20 (for handle opening). Skip next 12 sts.
- Hdc in next 20 sts (back of bag).
- Ch 20 (for second handle opening). Skip next 12 sts.
- Hdc in remaining 10 sts (second side of bag).
- Join with a sl st to the top of the first hdc. [40 hdc, 40 ch]
- Round 22 (Handle Reinforcement): Ch 2.
- Hdc in first 10 hdc.
- Hdc in each of the 20 chs (working over the chain to form the handle).
- Hdc in next 20 hdc.
- Hdc in each of the 20 chs.
- Hdc in remaining 10 hdc.
- Join with a sl st to the top of the first hdc. [80 hdc]
- Round 23 (Final Handle Definition): Ch 1. Sc in each hdc around. Join with a sl st to the first sc. [80 sc]
- FO, leaving a short tail to weave in.
Part 4: Finishing Touches for the Tote/Shoulder Bag
- Weave in All Ends: Use your yarn needle to neatly weave in all loose yarn tails.
- Blocking (Optional): Gently mist the bag with water and shape it (you can stuff it lightly with towels or plastic bags) to define its form. Allow it to air dry completely.
- Adding a Fabric Lining (Recommended for Durability):
- Measure the finished dimensions of your bag (width, height, and base depth).
- Cut fabric pieces to match, adding seam allowances. Sew them into a “bag” shape.
- Hand-stitch the fabric lining securely to the inside top edge of your crocheted bag.
- Add a Closure (Optional): Sew a magnetic snap or a large button with a simple crocheted loop to the inside of the bag opening for security.
Section 2: Easy DIY Crochet Sling Bag Tutorial (Adaptation)
A sling bag, also known as a crossbody bag, is characterized by its long strap worn across the body, typically a smaller and more compact size, keeping your essentials close and your hands free.
Key Differences for a Sling Bag:
- Size: Sling bags are generally smaller and more compact than totes.
- Shape: Often a bit taller than they are wide, or a perfect square.
- Strap: The defining feature is a single, long, sturdy strap designed to be worn across the body.
- Closure: Often features a more secure closure like a flap with a magnetic snap, or even a zipper.
How to Adapt the Tote Pattern for an Easy Sling Bag:
You can easily modify the previous tote pattern to create a simple sling bag.
- Smaller Base:
- For a bag that’s approx. 8 inches (20 cm) wide, start with a shorter chain for your oval base.
- Round 1 (Sling Base): Ch 14. Hdc in 3rd ch from hook, hdc in next 10 ch. (5 hdc) in last ch. Working along opposite side: Hdc in next 11 ch. (4 hdc) in first ch. Sl st to join. [32 hdc]
- Round 2 (Sling Base): Ch 2. Hdc inc in first st. Hdc in next 11 sts. (Hdc inc) in next 3 sts. Hdc in next 11 sts. (Hdc inc) in next 2 sts. Sl st to join. [38 hdc]
- This will give you a base approx. 8 inches long and 2-3 inches wide.
- Taller Body (Relative to Width):
- Follow Part 2 (Building the Bag Body) from the tote tutorial, starting with the BLO sc round.
- Work more straight rounds in hdc (or sc for extra density) to make the bag taller. For an 8-inch wide bag, you might want it 9-10 inches high. Continue Rounds 4-X until desired height is achieved.
- The Sling Strap: This is the biggest change! Instead of integrated handles, you’ll crochet one long, sturdy strap.
- Method 1: Simple Flat Strap (Recommended):
- Ch 6 (or more for a wider strap).
- Row 1: Sc in 2nd ch from hook and in each ch across. Turn. [5 sc]
- Row 2: Ch 1, sc in each sc across. Turn. [5 sc]
- Repeat Row 2 until your strap reaches the desired length for a crossbody bag (typically 40-50 inches / 100-125 cm, but measure yourself for best fit). FO, leaving a long tail for sewing.
- Attachment: Securely sew each end of the strap to the top corners of your sling bag using your yarn needle. Stitch multiple times through the bag fabric for maximum durability.
- Method 2: Non-Stretchy Slip Stitch Chain (for a thin but strong strap): Ch enough stitches for your desired length (40-50 inches). Sl st in 2nd ch from hook and in each ch across. FO. This creates a thin, rope-like strap that has very little stretch. Securely attach to bag corners.
- Method 1: Simple Flat Strap (Recommended):
- Closure for a Sling Bag:
- A magnetic snap is ideal for a sling bag. Sew one half to the top center front and the other half to the inside top center back.
- Alternatively, you can crochet a small flap (e.g., a few rows of hdc) extending from the back of the bag, then add a decorative button and a crocheted loop on the front.
Finishing Touches for a Sling Bag:
- Weave in all ends meticulously.
- Lining: Highly recommended for sling bags to prevent stretching and keep items secure, as they often hold heavier items like phones and wallets.
- Blocking: Always a good idea for crochet projects to set the shape.
Conclusion: Your Custom Creation Awaits!
From a practical tote to a chic sling, crocheting your own bag is an empowering and creative journey. With these easy techniques and a little patience, you’ll soon have a handmade accessory that perfectly fits your needs and showcases your unique style. Happy crocheting!
Video tutorial: