 by
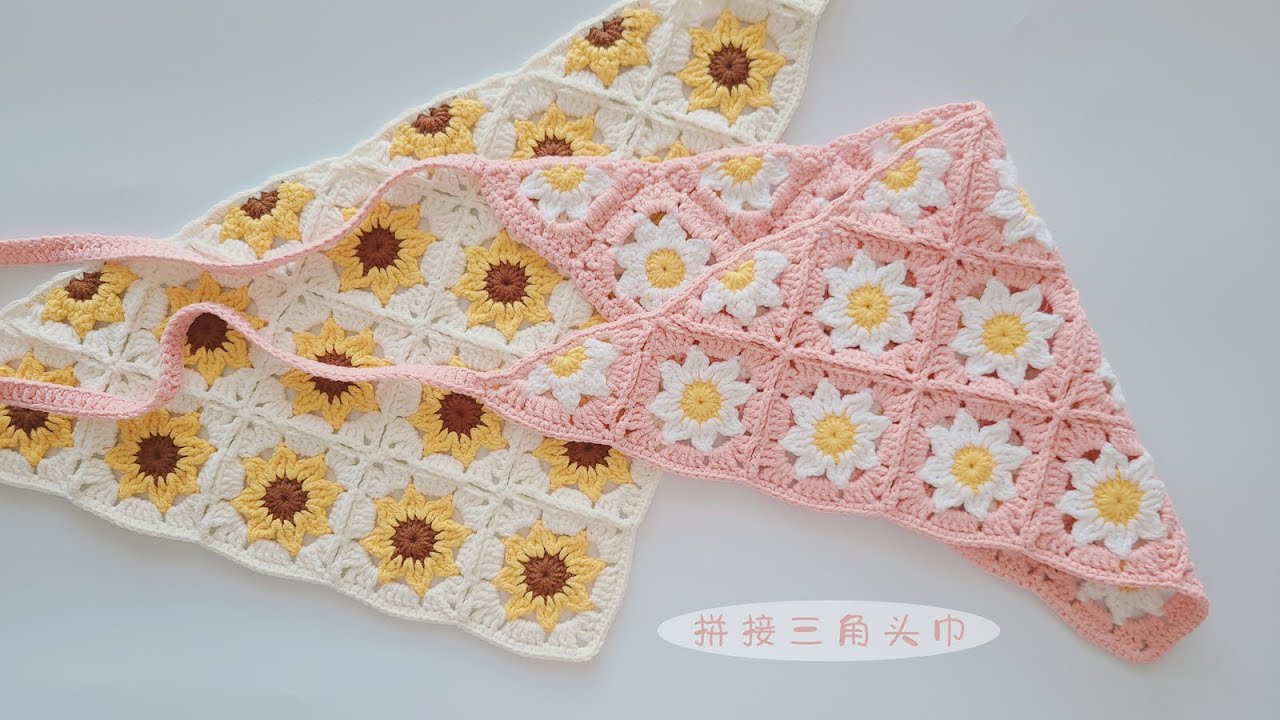
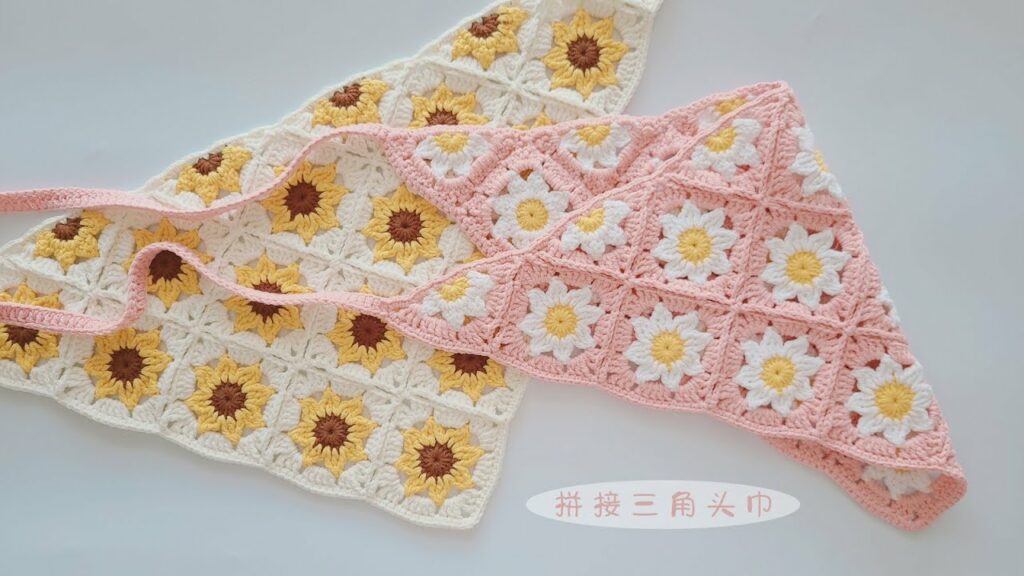
by Imagine the gentle breeze, the scent of blooming meadows, and the subtle warmth of a handmade accessory that evokes the beauty of a countryside garden. The Crochet Pastoral Triangle Scarf with Fresh Flower Patchwork is more than just a head covering; it’s a wearable piece of art, a fresh and artistic decorative headscarf that brings a touch of idyllic charm to any outfit.
This detailed guide will take you through the steps of creating such a captivating accessory. It’s a project that combines the classic triangle scarf shape with the whimsical appeal of individual floral motifs, joined together to form a unique, eye-catching patchwork. Perfect for adding a bohemian flair, a cottagecore touch, or simply a burst of personalized color, this scarf is a delightful journey into the heart of crochet artistry.

Why Crochet a Pastoral Triangle Scarf with Flower Patchwork?
- Artistic Expression: It’s a canvas for your creativity, allowing you to play with color combinations and floral designs.
- Unique Accessory: Stand out with a one-of-a-kind piece that reflects handmade charm and individuality.
- Versatile Styling: Can be worn as a headscarf, neck scarf, bandana, or even a decorative accent on a bag.
- Skill Enhancer: Develops your skills in creating individual motifs, joining techniques, and working with multiple colors.
- Mindful Crafting: The process of creating individual flowers and assembling them can be a meditative and enjoyable experience.
- Perfect for Gifting: A thoughtful and personal gift for anyone who appreciates handmade beauty and a touch of nature-inspired fashion.
Key Considerations Before You Start:
- Yarn Choice:
- Fiber: Lightweight and soft yarns are ideal for a decorative headscarf that will drape beautifully and be comfortable against the skin. Cotton, cotton blends, bamboo, or even a delicate merino wool are excellent choices. Avoid anything too bulky or stiff.
- Colors: This is where the “fresh flower patchwork” truly comes alive!
- Flower Colors: Select a variety of cheerful, naturalistic floral hues – soft yellows, delicate pinks, sky blues, lavender, coral, cream, and vibrant greens for leaves.
- Connecting/Border Color: A complementary neutral like cream, beige, light green, or even a very light grey will allow your floral patchwork to pop, creating a cohesive backdrop reminiscent of a field.
- Weight: Sport (Category 2) or DK (Light Worsted/Category 3) yarn weights are highly recommended for a delicate, artistic look that isn’t too heavy.
- Quantity: You’ll need small amounts of many different colors for the flowers (perfect for stash busting!) and a larger quantity of your connecting/border color (approximately 200-300 yards, depending on scarf size).
- Hook Size:
- Match your hook to your yarn weight. You generally want a hook that creates a soft, drapey fabric for a scarf, not a stiff one.
- For Sport/DK yarn: C/2 (2.75 mm) to E/4 (3.5 mm).
- Gauge:
- While not strictly critical for a decorative scarf, aiming for a consistent gauge will ensure your motifs are roughly the same size and the overall drape is even. Make a small swatch of your chosen flower motif to check sizing.
- Flower Motif Variety:
- To achieve a “patchwork” effect, consider learning 2-3 different simple flower patterns (e.g., a simple 5-petal flower, a flat rosette, a small daisy). This adds visual interest.
Materials You’ll Need:
- Yarn:
- Sport or DK weight cotton or cotton blend yarn in various “flower” colors (small amounts).
- Sport or DK weight cotton or cotton blend yarn in your “connecting/border” color (approx. 250 yards).
- Crochet Hook: Size D/3 (3.25 mm) or E/4 (3.5 mm) – adjust based on your yarn and tension.
- Yarn Needle (Tapestry Needle): For weaving in ends and joining motifs.
- Scissors: For cutting yarn.
- Stitch Markers (optional): Helpful when laying out and joining.
Essential Crochet Abbreviations:
- ch: chain
- sl st: slip stitch
- sc: single crochet
- hdc: half double crochet
- dc: double crochet
- tr: treble crochet (for taller petals)
- ( ): indicates instructions to be worked into the same stitch/space
- ***…***: repeat instructions within asterisks
- st(s): stitch(es)
- ch-sp: chain space
- MR: magic ring
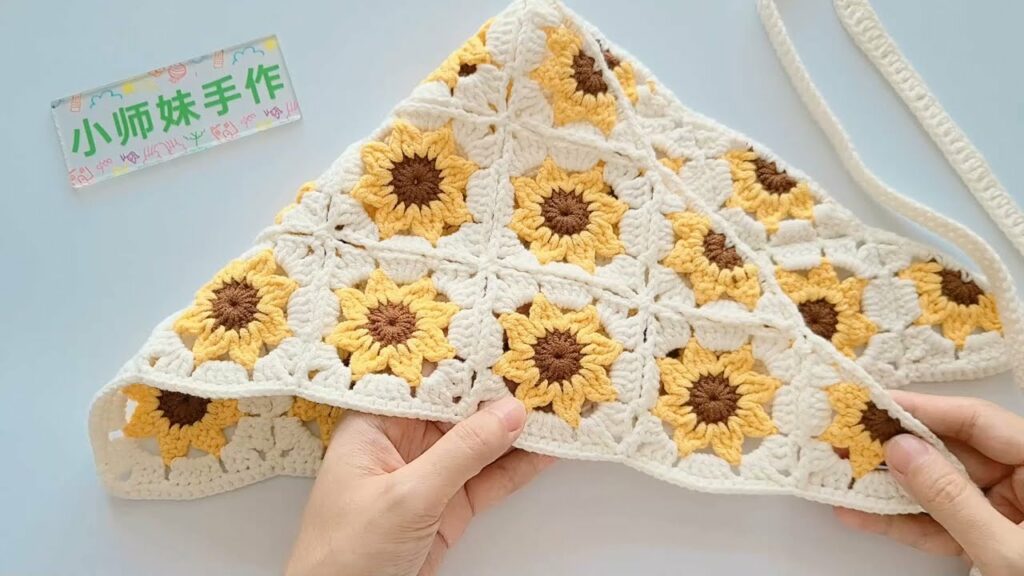
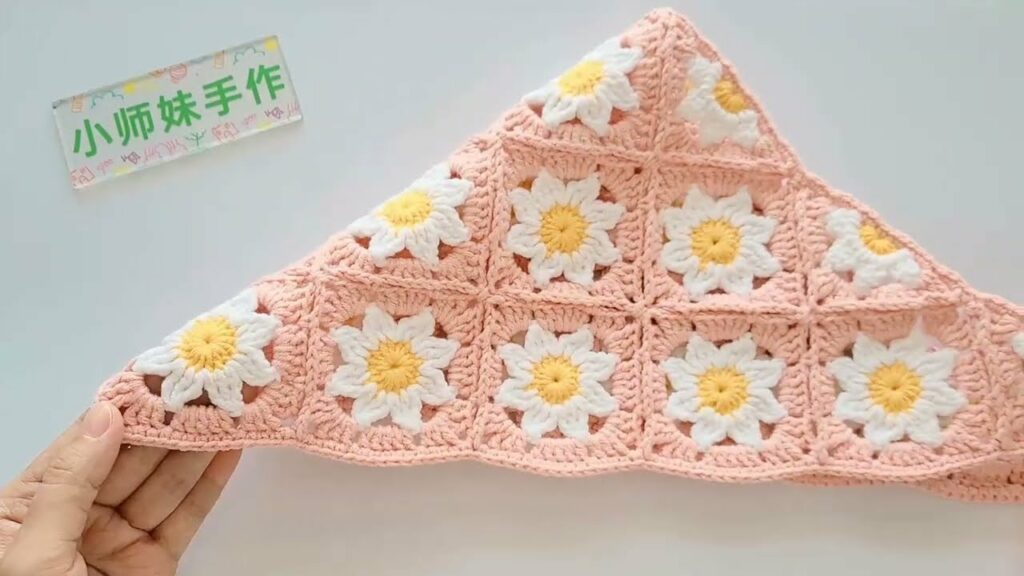
Pattern Instructions: Crochet Pastoral Triangle Scarf
The process involves making numerous individual flower motifs, then joining them together with your connecting color to form the triangle shape, and finally adding a border.
Part 1: Crocheting Your Fresh Flower Motifs
You will need to make many flowers! Aim for at least 15-20 small flowers to start, then make more as needed to complete your desired scarf size. Mix and match your “flower” colors.
Simple 5-Petal Flower (Example Motif):
- Start: Using a “flower” color, create a MR (or ch 4, sl st to first ch to form ring).
- Round 1: Ch 1 (does NOT count as a st). Sc 10 into the MR. Sl st to first sc to join.
- (10 sc)
- Round 2 (Petals):Ch 2, (dc, ch 2, sl st) into the same sc. Sl st into the next sc. Repeat from * to * 4 more times to create 5 petals.
- (5 petals)
- Fasten off, leaving a tail for weaving in.
Simple Flat Rosette (Example Motif):
- Start: Using a “flower” color, ch 30 (or desired length for a larger rosette).
- Row 1: (Dc, ch 1, dc) in the 4th ch from hook. Skip 2 ch, (dc, ch 1, dc) in the next ch. Repeat from * across the row.
- Form Rosette: Fasten off, leaving a long tail. Starting from one end, roll the strip up tightly to form a rose shape. Use the long tail to sew through all layers at the base to secure the rosette.
Leaf (Optional, but adds to “fresh flower” feel):
- Start: Using a “green” color, ch 7.
- Round 1: Sl st in 2nd ch from hook. Sc in next ch. Hdc in next ch. Dc in next ch. Hdc in next ch. Sc in last ch.
- Continue around other side of chain: Ch 2 (forms point). Working into the back loops of the initial chain: Sc in next ch. Hdc in next ch. Dc in next ch. Hdc in next ch. Sc in next ch. Sl st into first sl st to join.
- Fasten off, leaving a tail for weaving.
- Make variety: Create different sizes of the 5-petal flower by adjusting the initial stitch count in the MR and the height of the stitches in the petals (e.g., using hdc or tr).
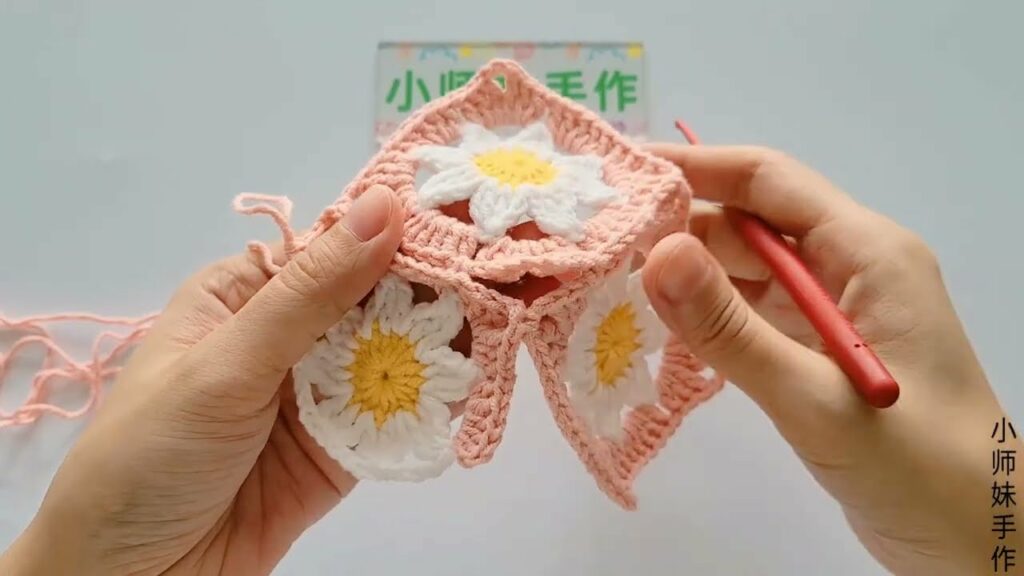
Part 2: Planning and Joining Your Patchwork
This is the artistic part! Lay out your finished flower motifs on a flat surface to plan your arrangement.
- Layout: Arrange your flowers into a rough triangle shape. Start with a single flower at the top point, then rows of 2, 3, 4, etc. flowers below it. Fill in gaps with smaller leaves or simple circles if desired.
- Connecting Color Strategy: You will use your “connecting/border” color to join these motifs together, creating a delicate web that forms the scarf’s base. The easiest way is to use a “join-as-you-go” method around the motifs, or to individually crochet around each motif and then sew them together.
- Method 1 (Recommended – Join-As-You-Go):
- Start by crocheting a border around one flower motif using your connecting color (e.g., a round of sc stitches or (sc, ch 1) around). Fasten off.
- Then, begin the border on a second motif. When you reach a point where it touches the first motif, use slip stitches or single crochets to join them together as you crochet. This creates seamless joins.
- Method 2 (Sewing):
- Crochet a simple border (e.g., a round of sc or hdc stitches) around each flower motif using your connecting color.
- Once all motifs have a border, use your yarn needle and connecting yarn to whip stitch or mattress stitch the motifs together, following your planned layout.
- Method 1 (Recommended – Join-As-You-Go):
- Filling Gaps: As you join, you might find small gaps between motifs. You can either:
- Simply connect: Use chains and slip stitches with your connecting color to bridge the gaps.
- Fill with small motifs: Crochet tiny circles or leaves with your connecting color or a floral color and strategically sew them into the gaps.
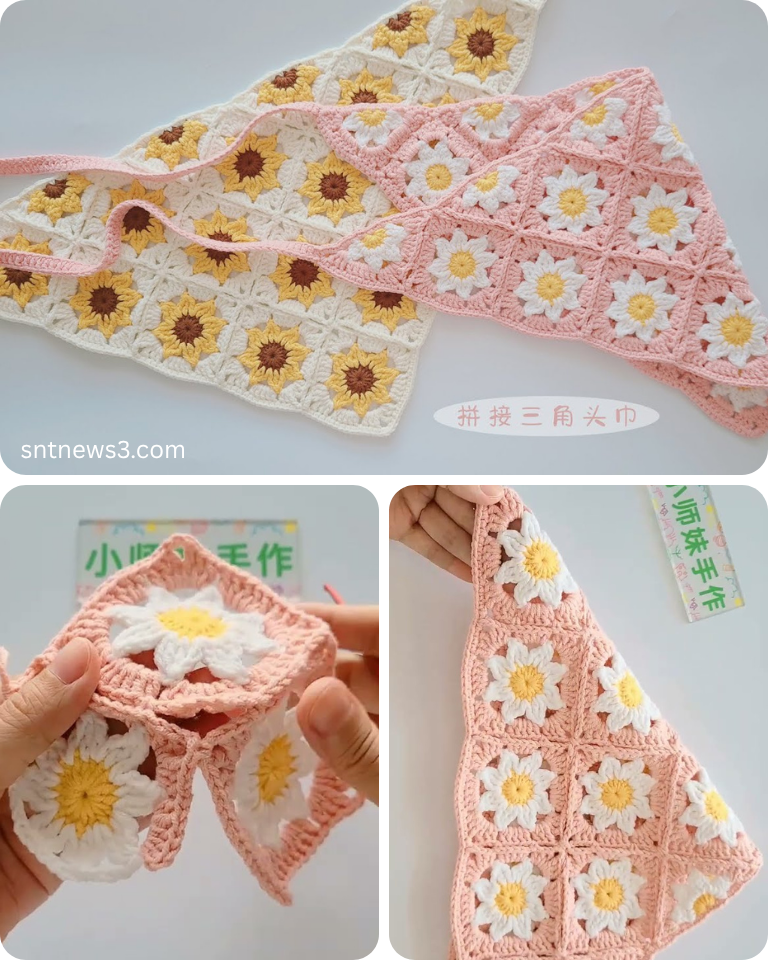
Part 3: Shaping the Triangle and Adding a Border
Once your flower patchwork forms a general triangle shape, you’ll formalize it and add a beautiful edge.
- Establish the Triangle Edge:
- Using your connecting color, start at one corner of your patchwork (the widest part of your triangle).
- Row 1: Ch 1 (does NOT count as a st). Sc evenly across the bottom straight edge of your patchwork, working into the stitches of your joined motifs and chain spaces. Aim for a consistent stitch count to maintain a straight edge.
- Ch 1, turn.
- Building the Triangle Shape:
- Now, you’ll work rows that gradually decrease to form the point of the triangle.
- Row 2: Sc2tog (single crochet 2 together – a decrease) over the first 2 sts. Sc in each st across until the last 2 sts. Sc2tog over the last 2 sts.
- Ch 1, turn.
- Row 3: Sc in each st across.
- Ch 1, turn.
- Repeat Rows 2 and 3: Continue alternating a decrease row and a straight sc row until you have only a few stitches left (e.g., 2-3 sc).
- Final Point: Sc2tog (if 2 sts remain) or sc3tog (if 3 sts remain). Fasten off.
- Adding a Decorative Border (Around the Entire Scarf):
- Attach your connecting color with a sl st to the very tip of your newly formed triangle.
- Round 1: Ch 1. Sc evenly around the entire perimeter of the scarf, working into the side of rows and around the motifs.
- Corners: Work (sc, ch 1, sc) in the single stitch at the very top point of the triangle. For the two wide corners at the base, also work (sc, ch 1, sc).
- Round 2 (Optional, for a fancier edge): Ch 1. Work a simple shell stitch border. For example: Skip 1 st, (dc 3, ch 1, dc 3) in next st, skip 1 st, sc in next st. Repeat around. Adjust shells for corners.
- Fasten off and weave in all remaining ends.
Finishing Touches & Styling:
- Weave in ALL ends securely. This is paramount for a neat, durable scarf that will last.
- Blocking (Highly Recommended!): Gently wet your finished scarf, stretch it to your desired shape (especially the triangle), and pin it down on a foam mat or cork board. Let it air dry completely. Blocking will open up your stitches, even out the drape, and make your patchwork truly shine.
- Styling Ideas:
- Headscarf/Bandana: Fold it in half to create a narrower band, or tie it around your head with the point hanging down your back.
- Neck Scarf: Tie it loosely around your neck for a casual, artistic look.
- Bag Accessory: Tie it onto the handle of a tote bag or purse for a pop of handmade charm.
- Hair Tie: A smaller version can even be tied around a ponytail or bun.
Embrace the beauty of slow crafting and the joy of creating something truly unique. Your Crochet Pastoral Triangle Scarf with Fresh Flower Patchwork will not only be a delightful accessory but a testament to your creativity and love for the handmade. Happy crocheting!
Video tutorial: