by
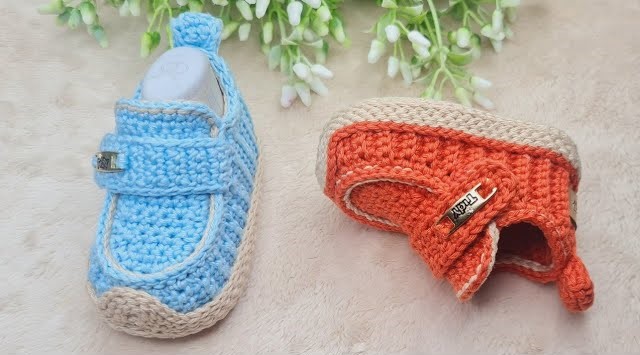
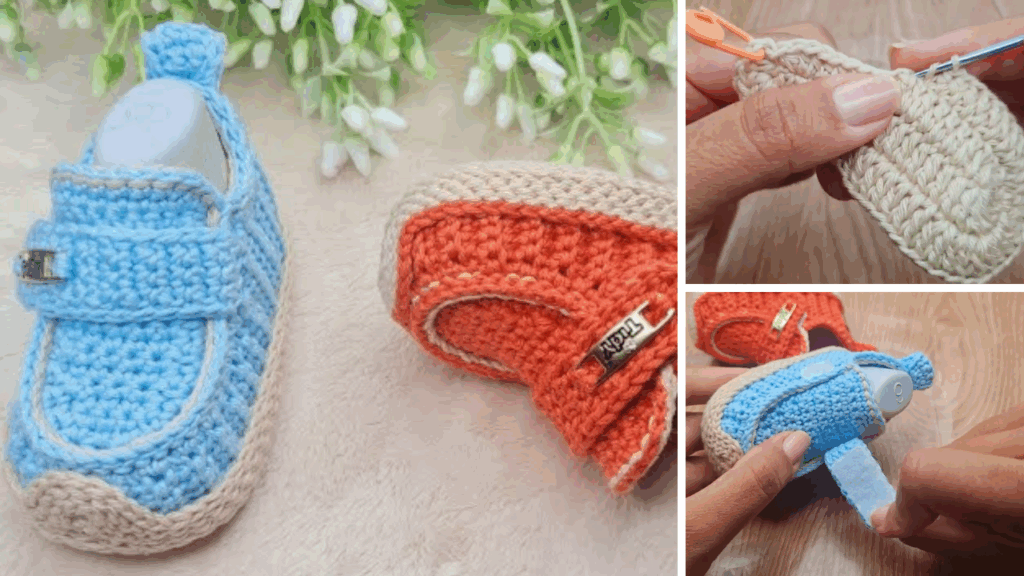
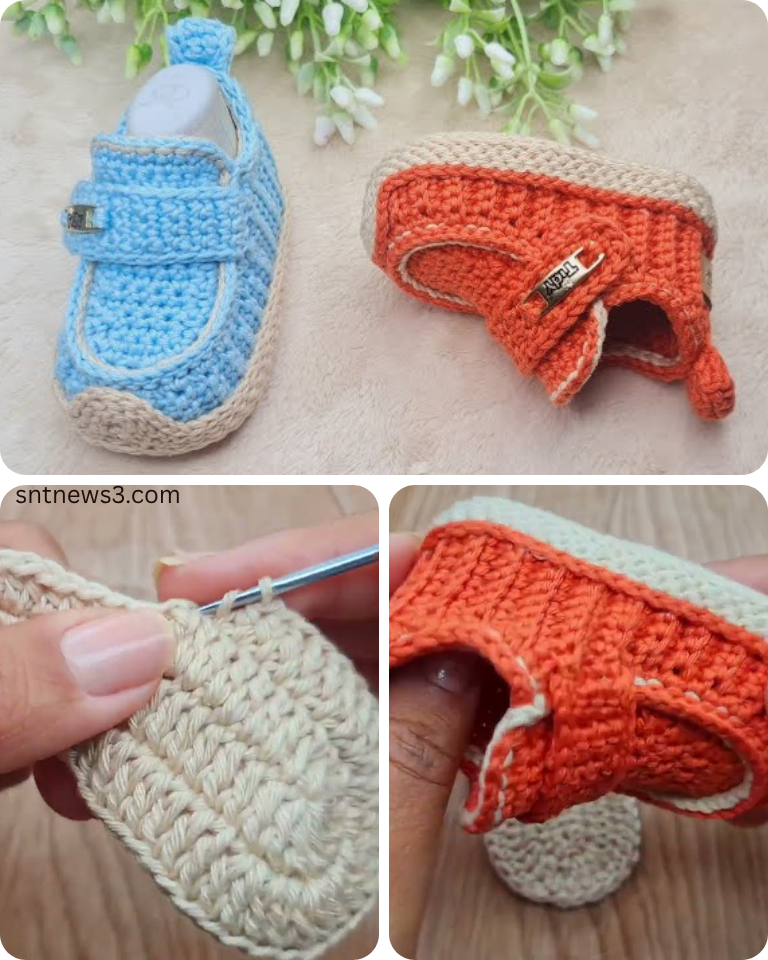
by There’s something uniquely charming about tiny handmade footwear, and baby moccasins, with their classic design and comfortable fit, are a firm favorite. Ideal for non-walking infants, these soft booties provide gentle warmth and a touch of timeless style. This detailed guide will walk you through crocheting a pair of baby moccasins with a 9 cm (approximately 3.5 inches) sole, perfect for little feet aged 1 to 3 months.
Why Crochet Baby Moccasins?
- Comfort & Warmth: Hand-crocheted moccasins are incredibly soft and cozy, keeping tiny feet warm without being restrictive. They’re perfect for indoor wear or as an extra layer in a car seat or stroller.
- Stylish & Classic: The moccasin design is inherently cute and gender-neutral. It’s a classic style that complements any baby outfit.
- Ideal for Non-Walkers: These soft-soled shoes are designed for comfort and gentle protection, not for gripping surfaces, making them perfect for infants who aren’t yet on their feet.
- Photography Prop: Moccasins add an adorable, textural element to newborn and infant photo shoots, creating memorable images.
- Thoughtful Handmade Gift: A pair of handmade moccasins is a unique, personal, and cherished gift for baby showers, christenings, or welcoming a new arrival.
- Skill Building: This project helps you master working in the round to create a sole, crafting separate components (the vamp), and neatly joining pieces – all valuable crochet skills.
- Customizable: Easily personalize them with different yarn colors, a touch of simple embroidery, or adding cute fringe or faux laces.
Key Considerations Before You Start:
- Target Size (9 cm Sole / 1-3 Months):
- This pattern aims for a finished sole length of 9 cm (approximately 3.5 inches). This size generally fits babies aged 1 to 3 months.
- Gauge is CRITICAL: Babies’ feet grow quickly, and even a small deviation in gauge can significantly affect fit. Your sole must be 9 cm to ensure the moccasin fits as intended.
- Yarn Choice (Crucial for Comfort & Structure):
- Fiber: Choose yarns that are incredibly soft, breathable, and non-irritating against delicate baby skin. They should also be durable enough for wear and machine washable for easy care.
- Baby Merino Wool (Superwash): Luxuriously soft, warm, and often machine washable.
- High-Quality Baby Acrylic: Many modern baby acrylics are wonderfully soft, affordable, and durable.
- Soft Cotton or Bamboo Blends: Breathable, gentle, and great for sensitive skin.
- Weight: DK (Light Worsted / Category 3) or Sport (Category 2) are ideal. They create a fabric that is comfortable, soft, and still has enough structure to hold the moccasin shape.
- Colors: Moccasins look great in earthy tones (tan, brown, rust), classic neutrals (cream, gray, off-white), or even gentle pastels.
- Fiber: Choose yarns that are incredibly soft, breathable, and non-irritating against delicate baby skin. They should also be durable enough for wear and machine washable for easy care.
- Hook Size:
- Match your hook to your chosen yarn weight. For booties, it’s often best to go down half a size from the yarn label’s recommendation. This creates a denser fabric that helps the moccasin hold its shape without being too stiff.
- For DK yarn, try a 3.5 mm (US E/4) or 3.75 mm (US F/5) hook.
- For Sport yarn, try a 3.0 mm (US D/3) or 3.25 mm (US D/3) hook.
- Construction Method:
- This pattern uses a common method for moccasins: you’ll crochet a flat oval for the sole, a separate rounded piece for the “vamp” (the top part that covers the toes), and then build the main body/heel directly onto the sole. The vamp is then sewn securely in place for that authentic moccasin look.
- Fringe/Laces (Optional): These classic moccasin details can be added at the end for extra charm.
Materials You’ll Need:
- Yarn: Approx. 40-60 yards of very soft DK (Category 3) or Sport (Category 2) weight yarn in your chosen color.
- Crochet Hook: Size E/4 (3.5 mm) to F/5 (3.75 mm) (adjust to achieve desired fabric density and sole length).
- Yarn Needle (Tapestry Needle): Essential for weaving in ends and, critically, for neatly joining the vamp to the sole.
- Scissors:
- Stitch Marker (optional but helpful): To mark the beginning of rounds.
- Optional: Small amount of contrasting yarn for fringe/laces.
Essential Crochet Abbreviations:
- ch: chain
- sl st: slip stitch
- sc: single crochet
- hdc: half double crochet
- sc inc: single crochet increase (2 sc in same st)
- hdc inc: half double crochet increase (2 hdc in same st)
- sc2tog: single crochet 2 together (decrease)
- st(s): stitch(es)
- BLO: back loop only
- FPDC: front post double crochet (optional, for textured cuff)
- (): indicates instructions to be worked into the same stitch/space
- ***…***: repeat instructions within asterisks
- []: indicates stitch counts at the end of a round
Crochet Baby Moccasin Tutorial (9 cm Sole – 1 to 3 Months)
All parts are worked in rounds unless otherwise specified.
Gauge Swatch (Sole Check): Work Part 1: The Sole. Measure its length. It must be 9 cm (3.5 inches). If not, adjust your hook size and re-do until you achieve the correct sole length.
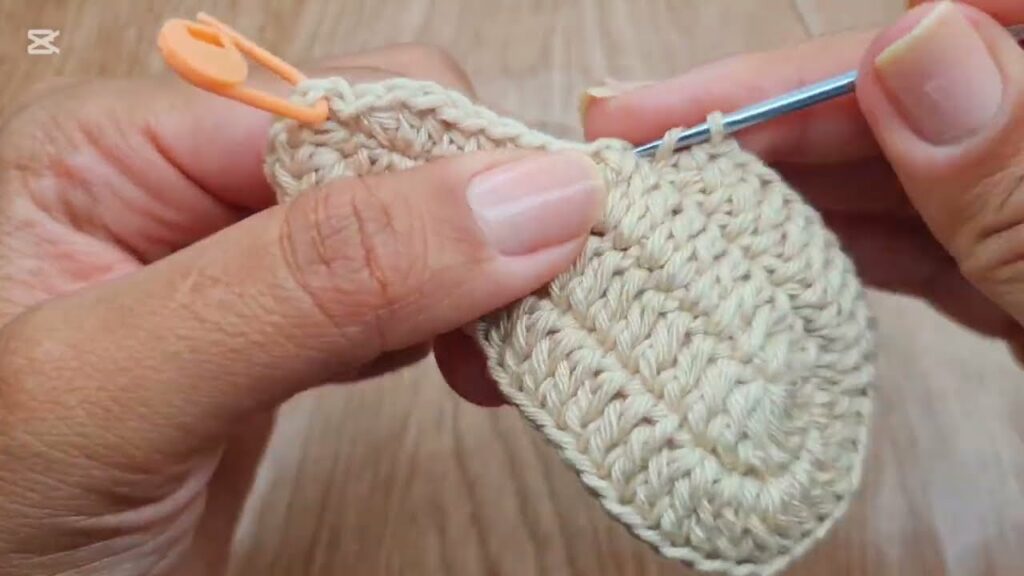
Part 1: The Sole (Foundation – Flat Oval)
This forms the sturdy base of your moccasin.
- Starting Chain: Ch 11.
- Round 1:
- Hdc in 3rd ch from hook (counts as 1st hdc).
- Hdc in each of the next 7 ch.
- Work (5 hdc) in the very last ch (this curves around the toe end).
- Now, working along the opposite side of your starting chain: Hdc in each of the next 7 ch.
- Work (4 hdc) in the very first chain stitch where you made your first hdc (this curves around the heel end).
- Join with a sl st to the top of the beginning Ch 2. [24 hdc]
- Round 2:
- Ch 2 (does NOT count as a st).
- Hdc inc in the first st.
- Hdc in the next 7 sts.
- Hdc inc in the next 5 sts.
- Hdc in the next 7 sts.
- Hdc inc in the next 4 sts.
- Join with a sl st to the top of the first hdc. [34 hdc]
- Your sole should now measure exactly 9 cm (3.5 inches) in length. If not, adjust your hook size and try again. Do not proceed until your sole is the correct size.
Part 2: The Vamp/Toe Piece (The Moccasin’s Defining Feature)
This separate piece will form the top, rounded front of the moccasin.
- Row 1: Ch 2. Work (6 sc) in 2nd ch from hook. Turn. [6 sc]
- Row 2: Ch 1 (does NOT count as a st). Sc inc in first sc. Sc in next 4 sc. Sc inc in last sc. Turn. [8 sc]
- Row 3: Ch 1. Sc in each sc across. Turn. [8 sc]
- Row 4: Ch 1. Sc inc in first sc. Sc in next 6 sc. Sc inc in last sc. Turn. [10 sc]
- Row 5: Ch 1. Sc in each sc across. Turn. [10 sc]
- Optional Row 6 (for slightly larger/wider vamp): Ch 1. Sc inc in first sc. Sc in next 8 sc. Sc inc in last sc. Turn. [12 sc]
- Final Edge: Do NOT turn. Ch 1. Work sc evenly around the entire vamp piece (sides and bottom), placing 3 sc in the two bottom corners. Join with a sl st to the first sc of this edging round.
- FO, leaving a very long tail (approx. 20 inches / 50 cm) for sewing the vamp to the sole.
Part 3: Building the Moccasin Body (Sides & Heel)
Now we’ll build the main body of the moccasin onto the sole.
- Round 3 (Establishing Wall): Attach yarn to the back center of the sole (the very first sc of Round 3 of the Sole, if you re-start counting from there, or where you joined).
- Ch 1 (does NOT count as a st). Sc in the back loop only (BLO) of each st around the sole. Join with a sl st to the first sc. [34 sc]
- This BLO round creates a neat ridge that defines the base of the moccasin.
- Round 4 (Body Height): Ch 1. Sc in each sc around. Join with a sl st to the first sc. [34 sc]
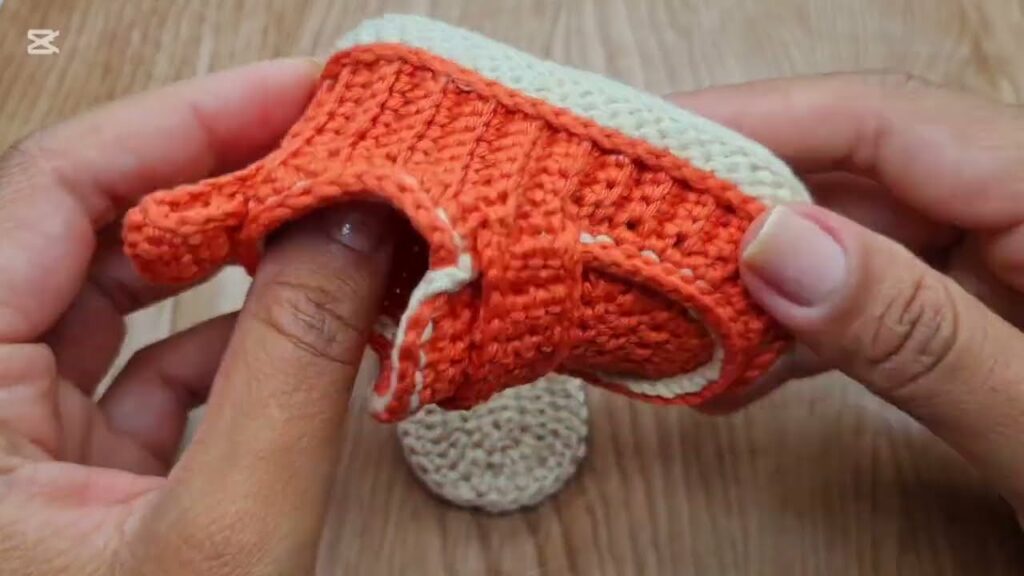
Part 4: Attaching the Vamp
This is where your moccasin truly takes shape!
- Position the Vamp: Place the vamp piece you made in Part 2 onto the top of the moccasin body. It should be centered over the toe area, covering roughly 10-12 stitches of the current round (Round 4 of the body).
- Secure with Pins (Optional but Helpful): Use a few pins to hold the vamp securely in place.
- Sewing: Thread the long tail from the vamp onto your yarn needle.
- Using a whip stitch or a neat slip stitch seam, carefully sew the vamp piece onto the main moccasin body. Stitch through the sc edge of the vamp and through the corresponding loops of Round 4 on the moccasin body.
- Stitch firmly and neatly to create a clean, durable seam that mimics the traditional moccasin construction. Ensure your stitches don’t show through excessively on the right side of the main body.
- Once the vamp is securely attached, weave in any remaining tail.
Part 5: The Cuff/Ankle
Now we’ll finish the ankle opening. The stitch count will now be fewer than 34, as the vamp has taken up some stitches. Count the open stitches around the ankle. It should be approximately 22-24 stitches.
- Round 5 (Ankle Height): Attach yarn to the back center again. Ch 1. Sc in each open stitch around the ankle opening (working both on the sides of the vamp and across the heel). Join with a sl st to the first sc. [Approx. 22-24 sc]
- Round 6 (Optional Ribbed Cuff – FPDC): Ch 2 (does NOT count as a st). Hdc in first st. Work FPDC around next hdc (if previous round was hdc) or sc (if previous round was sc). Hdc in next st. Repeat from * around. Join with a sl st. (This creates a slight ridge).
- Alternative (Simpler Cuff): Ch 1. Sc in each sc around. Join with a sl st.
- Round 7 (Cuff Height): Ch 1. Sc in each sc (or hdc/FPDC) around. Join with a sl st.
- FO, leaving a tail to weave in.
Part 6: Finishing Touches
- Weave in All Ends: Meticulously weave in every loose yarn tail using your yarn needle. For baby items, ensuring tails are securely woven and won’t unravel or poke baby’s skin is paramount.
- Make a Second Moccasin! Repeat all steps to create a matching pair.
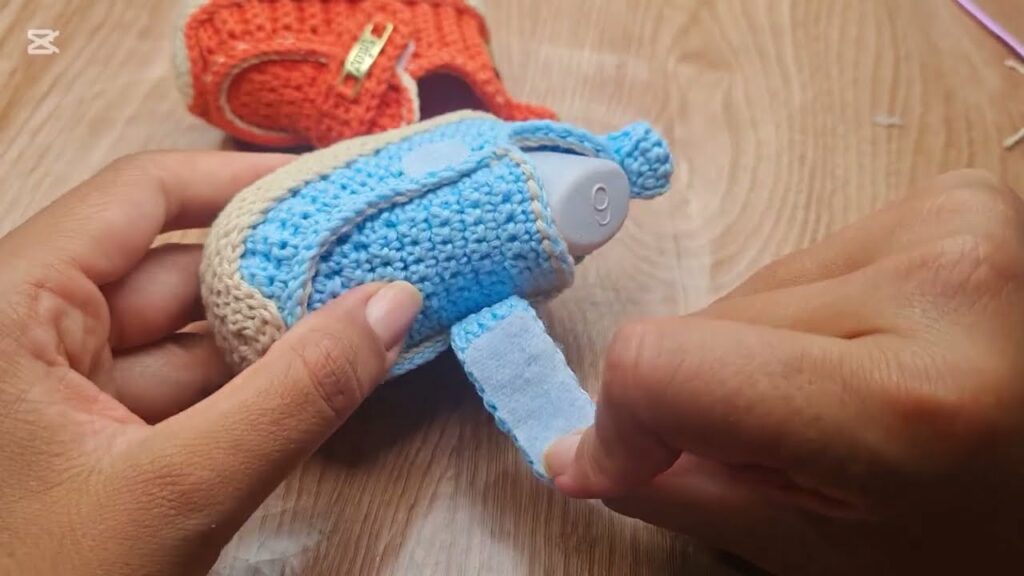
- Optional: Add Fringe or Faux Laces:
- Fringe: Cut several 2-3 inch (5-7 cm) pieces of yarn. Using your hook, loop them through stitches around the top edge of the vamp, or around the ankle cuff, and pull through to create fringe.
- Faux Laces: Thread a piece of yarn or thin cord through stitches around the top edge of the vamp and tie a small bow for decoration.
- Blocking (Optional): Gently wet your finished moccasins, gently stuff them with tissue paper or plastic bags to maintain shape, and allow them to air dry completely. This helps to even out stitches and set the final form.
Tips for Success & Styling:
- Yarn Quality is Key: Because these will be on a baby’s delicate skin, invest in a truly soft yarn.
- Gauge is King: Seriously, measure that sole! It’s the foundation of a well-fitting moccasin.
- Neat Seaming: Take your time attaching the vamp. A clean seam makes all the difference in the finished look.
- Finishing Touches: Even without fringe or laces, a neatly woven-in set of ends makes the moccasin look professional.
- Care Instructions: Always refer to your yarn label for specific washing instructions. Most baby yarns are machine washable on a gentle cycle, but laying flat to dry helps maintain the moccasins’ shape.
Enjoy the sheer satisfaction of seeing these unique, handmade moccasins adorning tiny feet!
Video tutorial: