by
by That’s a fantastic idea! A mini bag tailored for a specific hobby is not only practical but also a charming way to celebrate what you love. Let’s craft an article about crocheting the cutest mini bag for your favorite hobby.
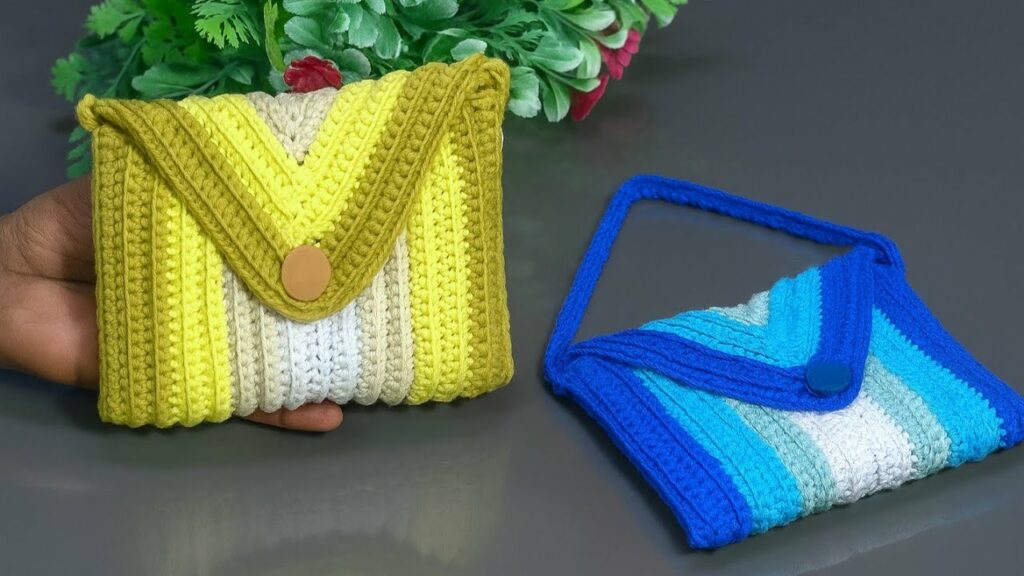
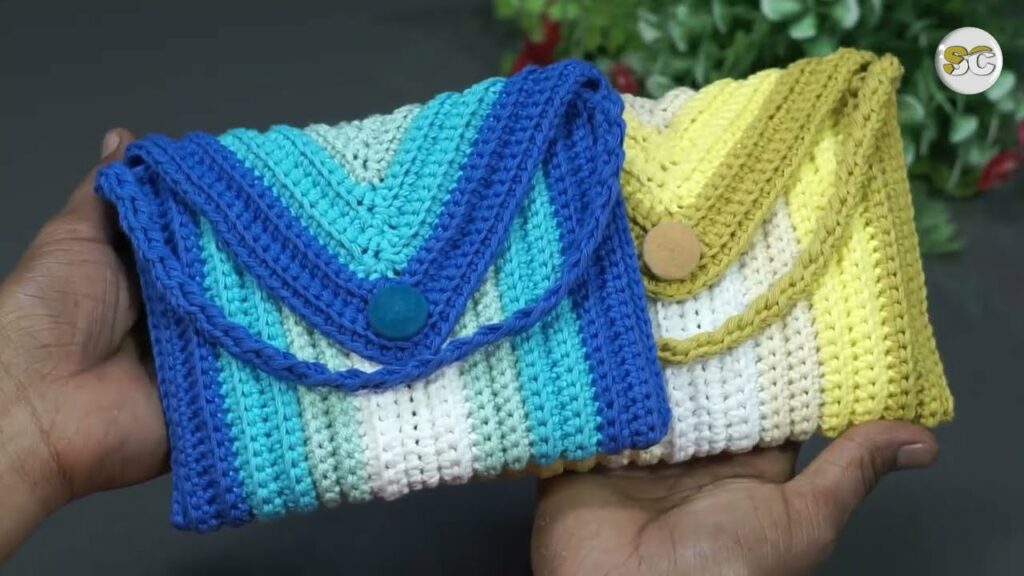
Crochet the Cutest Mini Bag for Your Favorite Hobby
Do you have a beloved hobby that involves small tools, notions, or bits and bobs? Perhaps you’re a knitter with stitch markers, a painter with tiny brushes, a gamer with a handful of dice, or a crafter with embroidery floss. Whatever your passion, a custom-crocheted mini bag is the perfect way to keep your essentials organized, easily accessible, and incredibly cute. It’s a delightful project that combines practicality with personal flair, making it a joy to create and use.
This detailed article will guide you through designing and crocheting an adorable mini bag tailored specifically for your favorite pastime. It’s a super easy project that’s perfect for beginners and a quick, satisfying make for seasoned crocheters.
Why Crochet a Mini Bag for Your Hobby?
- Perfectly Practical: No more rummaging! Keep all your small, essential hobby items neatly contained in one dedicated place.
- Customization is Key: Design your bag to perfectly fit your specific hobby’s needs. Choose colors, add small appliques, or even incorporate elements related to your passion.
- Thoughtful Gift: This makes an incredibly personal and cherished gift for fellow hobbyists in your life.
- Skill Booster: It’s an excellent project for practicing basic stitches, working in the round, creating simple shaping, and adding closures.
- Stash Buster: Mini bags are fantastic for using up those smaller amounts of yarn leftover from other projects, turning scraps into something functional and beautiful.
- Portable & Pretty: Easily toss your mini bag into a larger project tote or purse, ensuring your hobby essentials are always at hand, wherever you go.
Key Considerations Before You Start
Before picking up your hook, think about your specific hobby and how you’ll use your mini bag.
- What’s Going Inside?:
- Size: How big do your items need the bag to be? A few stitch markers will require a smaller bag than a set of travel watercolors.
- Shape: Will a simple pouch work, or do you need a flat-bottomed bag that stands up?
- Structure: Do you need a rigid bag that holds its shape, or is a soft, flexible pouch fine? This will influence your yarn and stitch choice.
- Yarn Choice:
- Fiber: For durability and shape retention, cotton or cotton blends are excellent. They offer good stitch definition and are sturdy. Sturdy acrylic can also work well. Avoid overly stretchy or fuzzy yarns.
- Weight: Worsted weight (Category 4) is versatile and works up quickly, creating a nice, substantial fabric. DK (Category 3) will result in a slightly smaller, finer bag.
- Colors: Choose colors that resonate with your hobby! Rich earthy tones for a nature-inspired hobby, bright neons for a gaming enthusiast, or soft pastels for a fiber artist.
- Hook Size: Match your hook to your chosen yarn weight, but consider going down half a size from the yarn label’s recommendation. This creates a denser fabric, which helps the bag hold its shape and prevents small items from slipping through gaps.
- Stitch Pattern: Use simple, dense stitches like single crochet (sc) or half double crochet (hdc) for the body of the bag. These stitches provide good structure and keep contents secure.
- Closure:
- Drawstring: Super easy, classic, and secure.
- Button and Loop: Simple and decorative.
- Zipper: More advanced, but very secure. (Beyond “super easy” for this tutorial).
- Flap with Snap: A small flap with a sewn-on magnetic snap or regular snap.
Materials You’ll Need
- Yarn: Approx. 50-100 yards of Worsted weight (Category 4) cotton or acrylic yarn (exact amount depends on bag size).
- Crochet Hook: Appropriate for your yarn (e.g., 4.0mm (US G/6) or 4.5mm (US 7)).
- Yarn Needle (Tapestry Needle): For weaving in ends and any sewing.
- Scissors:
- Stitch Marker (optional but helpful): To mark the beginning of rounds.
- For Drawstring Closure: A small piece of contrasting yarn or thin cord (approx. 10-12 inches / 25-30 cm).
- For Button Closure: 1 decorative button (approx. 0.5 inch / 1-1.5 cm diameter).
Essential Crochet Abbreviations
- ch: chain
- sl st: slip stitch
- sc: single crochet
- hdc: half double crochet
- st(s): stitch(es)
- FO: Fasten off (cut yarn and pull through loop)
- BLO: back loop only
- (): indicates instructions to be worked into the same stitch/space
- ***…***: repeat instructions within asterisks
- []: indicates stitch counts at the end of a round
Super Easy Crocheted Mini Bag Tutorial (Flat Bottom Pouch)
This tutorial will create a small, flat-bottomed pouch perfect for storing small hobby items. We’ll use single crochet (sc) for a dense, sturdy bag, and a simple drawstring closure.
Target Dimensions: Approx. 3.5 inches (9 cm) wide x 4 inches (10 cm) tall. (Easily adjustable!)
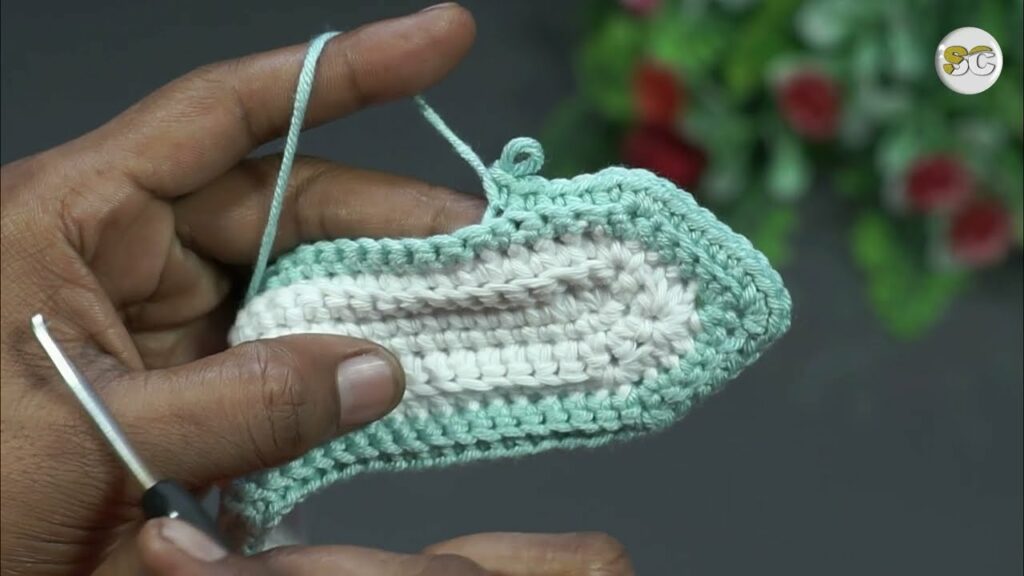
Part 1: The Base (Oval Foundation)
This creates a flat bottom so your bag can stand up.
- Starting Chain: Ch 11. (Adjust this chain length to change the length of your bag’s base.)
- Round 1:
- Sc in 2nd ch from hook. Sc in next 8 ch.
- (3 sc) in last ch (this forms the curve for the end).
- Working along the opposite side of the starting chain: Sc in next 9 ch.
- (2 sc) in the very first chain stitch where you made your first sc (this completes the curve for the other end).
- Do NOT join with a sl st; we’ll work in continuous rounds. Place a stitch marker in the last sc to mark the start of the next round. [23 sc]
- If you’re new to continuous rounds, you can join with a sl st at the end of each round and ch 1, but working continuously avoids a visible seam.
Part 2: Building the Bag Body (Sides)
This builds the walls of your mini bag.
- Round 2: Sc in each sc around. Move your stitch marker up to the last stitch of this round. [23 sc]
- Working in continuous rounds means your stitch marker will always be at the end of the previous round.
- Round 3 (Establishing Wall – Optional, for defined edge): Sc in the back loop only (BLO) of each sc around. Move stitch marker. [23 sc]
- This BLO round creates a neat ridge that defines the base of the bag, making it stand up nicely. If you prefer a smoother transition, skip this BLO round and just continue with regular sc.
- Rounds 4 – 20 (Body Height): Sc in each sc around. Move stitch marker. [23 sc]
- Continue working these rounds until your bag reaches your desired height (approx. 4 inches / 10 cm, or until you’re happy with the height for your hobby items).
Part 3: Creating the Drawstring Channel / Top Edge
This creates the opening for your drawstring.
- Round 21 (Drawstring Channel): Ch 1 (does NOT count as a st). Sc in next st, ch 1, skip 1 st. Repeat from * around. Join with a sl st to the first sc. [Approx. 12 sc, 11 ch-1 spaces]
- This creates the small holes for your drawstring.
- Round 22 (Top Edge): Ch 1. Sc in each sc and each ch-1 space around. Join with a sl st to the first sc. [23 sc]
- FO, leaving a short tail to weave in.
Part 4: Adding the Drawstring
- Cut Drawstring: Cut a piece of yarn (or thin cord/ribbon) about 10-12 inches (25-30 cm) long.
- Weave Drawstring: Using your yarn needle, weave the drawstring in and out of the ch-1 spaces from Round 21. Start and end at the same point on the bag (preferably the side or back).
- Tie & Finish: Tie the ends of the drawstring in a knot. You can add small beads to the ends before knotting for extra charm.
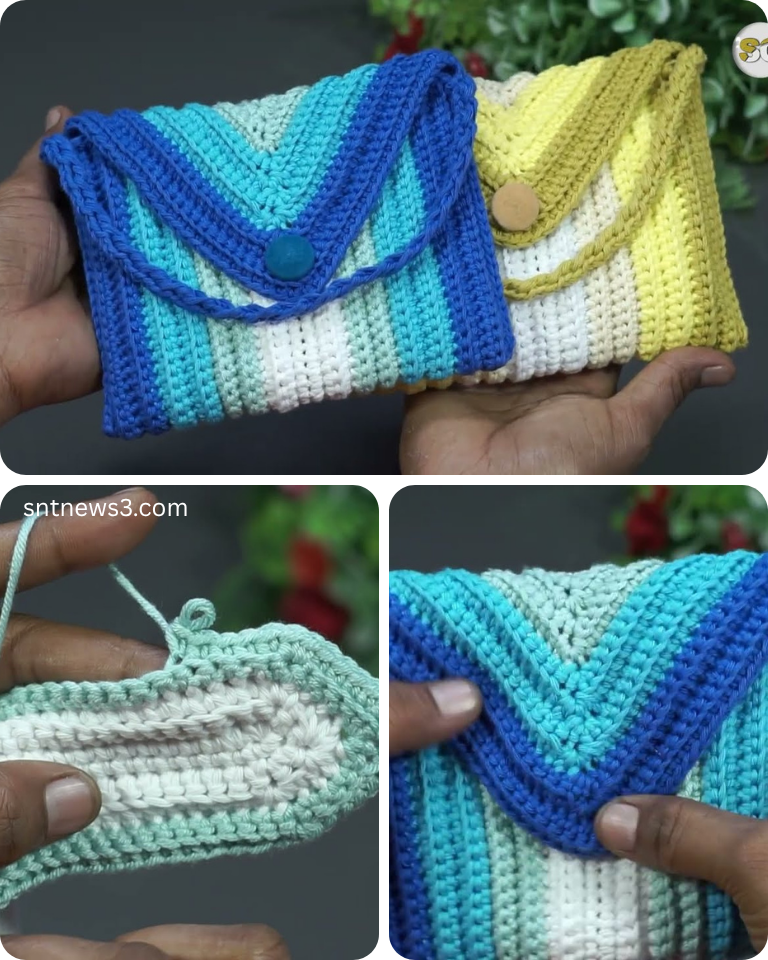
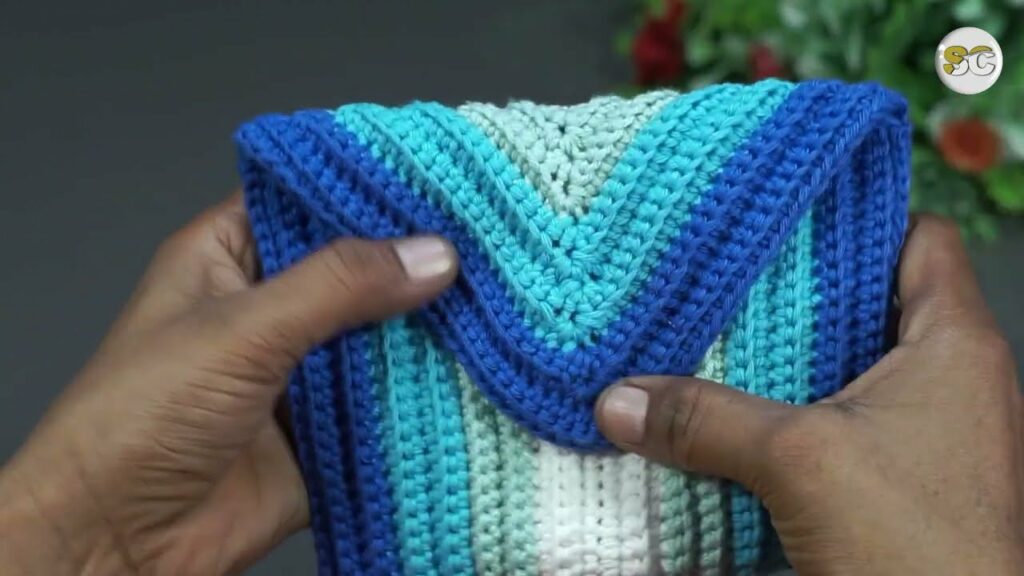
Adapting for Other Closures:
- Button and Loop: Instead of Rounds 21 and 22, simply continue with sc until desired height. Then, for the flap:
- Flap Row 1: Work sc stitches over half the width of the bag (e.g., if bag is 23 sc, work 11-12 sc for flap). Turn.
- Continue sc rows for 3-5 rows for flap length.
- Buttonhole Row: Work sc to center of flap, ch 3 (or enough for button), skip 1-2 sc, sc to end.
- Final Flap Row: Sc across, working sc into buttonhole chain. FO.
- Sew button to front of bag.
- Magnetic Snap: Simply add the snap to the inside of the bag opening after completing your final sc round.
Making It “The Cutest”: Customization Ideas!
- Color Play: Use variegated yarn for a self-striping effect. Work different rounds in contrasting colors.
- Hobby-Specific Appliques:
- Knitting/Crochet: Small yarn ball, tiny hook/needles, a heart.
- Gaming: A tiny pixelated heart, a dice, a sword.
- Art: A mini paintbrush, a palette, a tiny starburst.
- Sewing: A tiny button, a spool of thread.
- These can be crocheted separately and sewn on, or embroidered directly onto the bag.
- Strap/Handle: Instead of a drawstring, you could crochet a simple chain or sc strap and sew it to the sides for a mini carry bag.
- Lining: For a truly polished look and extra durability, sew a simple fabric lining inside your mini bag.
Tips for Success & Bag Mastery
- Consistent Tension: This is key for a sturdy bag that holds its shape and for uniform stitches.
- Counting Stitches: Keep track of your stitch count in each round to ensure your bag remains straight and the correct size.
- Weave Ends Neatly: Securely weave in all your yarn tails for a professional and durable finish.
- Blocking (Optional): Gently mist your finished bag with water and shape it (you can stuff it lightly) as it dries. This can help set the stitches and ensure it holds its intended form.
- Experiment! Once you’ve made one, you’ll feel confident to adjust sizes, experiment with stitches, and add more complex embellishments.
You’ve now created the perfect little home for your cherished hobby essentials! Enjoy carrying your passion in style.
Video tutorial: