 by
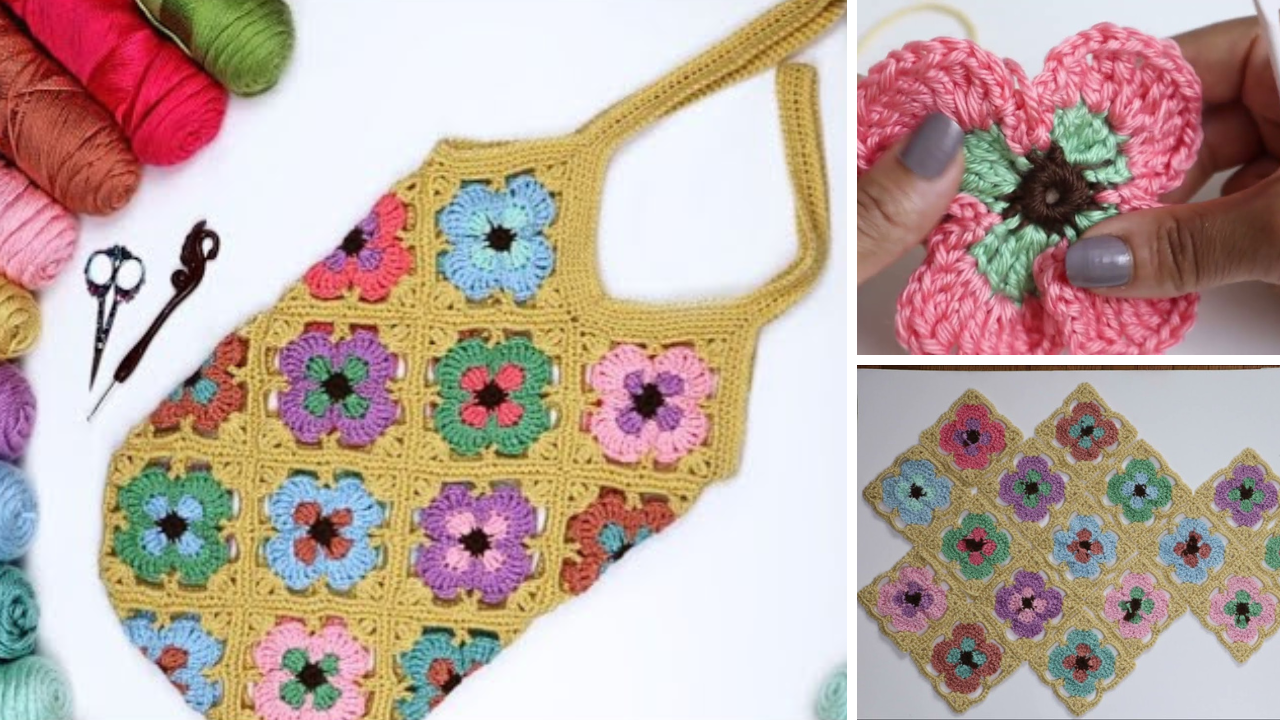
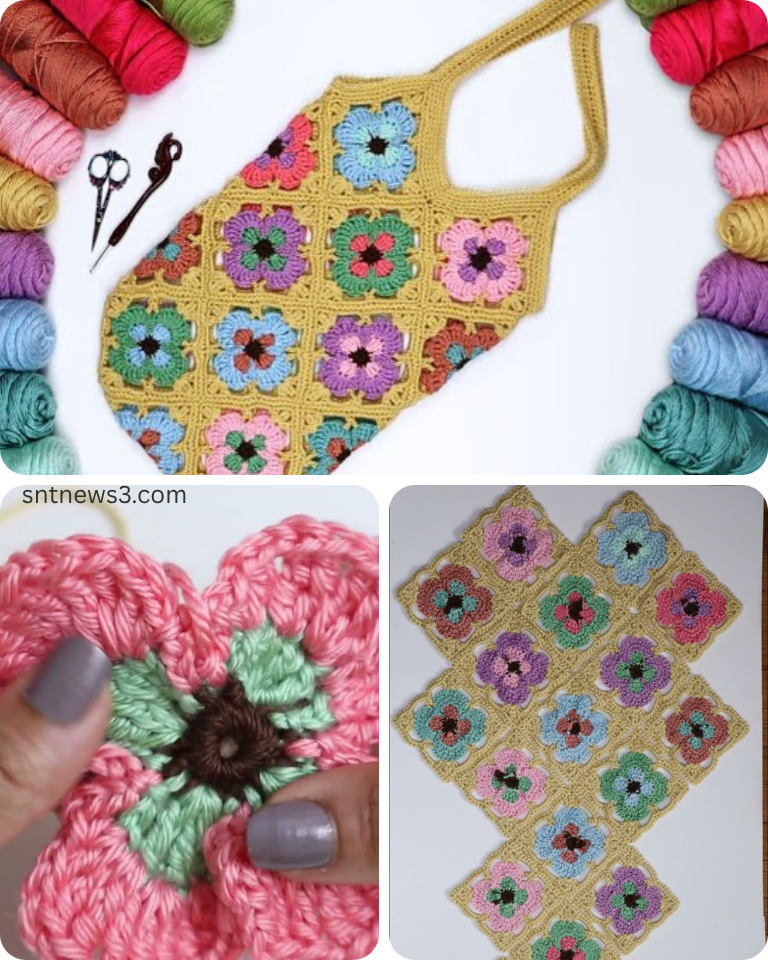
by Stitch by Stitch Style: How to Make a Cute & Easy Crochet Granny Square Tote Bag
The granny square is a timeless crochet classic for a reason. It’s versatile, charming, and endlessly customizable. When transformed into a tote bag, it becomes a perfect blend of nostalgic charm and modern functionality. Imagine carrying a bag that’s not only practical but also a vibrant expression of your handmade style!
This detailed guide will walk you through everything you need to know to create a cute and easy crochet granny square tote bag, from selecting your squares to assembly and finishing touches. It’s a fantastic project for crocheters of all levels, especially those looking to expand beyond basic stitches and create something truly unique.

Why a Granny Square Tote Bag is Your Next Must-Make Project:
- Classic Charm Meets Modern Utility: The granny square adds a touch of vintage appeal, while the tote bag design makes it incredibly practical for everyday use.
- Creative Freedom: This project is a fantastic way to play with color! Mix and match different yarn scraps, create a gradient effect, or stick to a sophisticated monochromatic palette.
- Skill Building: It’s perfect for practicing individual granny squares, seaming techniques, and working in the round.
- Portable Project: You can crochet your granny squares on the go, making it an ideal take-along project for commutes or waiting rooms.
- Personalized Gift: A handmade granny square tote is a thoughtful and customized gift that friends and family will adore.
- Stash Buster: Have a pile of leftover yarn from previous projects? This is the perfect way to turn those odds and ends into a beautiful, cohesive item.
Key Considerations Before You Start
Making a great granny square tote comes down to a few important choices at the outset.
- Granny Square Type:
- Classic Granny Square: The traditional “cluster” style that grows from the center out. This is what we’ll focus on for this tutorial.
- Solid Granny Square: Uses single or half-double crochet for a denser, less lacy fabric. Great for more structured bags.
- Sunburst/Flower Granny Square: More intricate, adds a lovely texture.
- The beauty of this project is you can mix and match different types of squares if you desire!
- Yarn Choice (Impacts Look & Durability):
- Fiber: For a sturdy and washable tote, cotton or cotton blends are ideal. They hold their shape well and are durable. Acrylic yarn also works beautifully, offering a vast color range and good washability. Avoid overly stretchy or delicate yarns unless you plan on lining the bag extensively.
- Weight: Worsted weight (Category 4) is highly recommended. It creates a good-sized square quickly and results in a robust bag. Using the same yarn weight for all your squares is crucial for consistent sizing.
- Colors: This is where the fun begins! Plan your color scheme:
- Scrapghan Style: Randomly use up all your yarn scraps for a vibrant, eclectic look.
- Controlled Chaos: Limit your palette to a few complementary colors for a more cohesive, modern feel.
- Sophisticated: Choose neutrals, earth tones, or a monochromatic scheme for an elegant bag.
- Hook Size: Use the hook size recommended for your chosen yarn weight, or go down one size if you want a slightly denser fabric for your squares to minimize gaps. For worsted weight yarn, a 5.0mm (H/8) or 5.5mm (I/9) hook is a common choice. Consistency is key for all your squares.
- Bag Construction:
- How Many Squares? The simplest tote often uses 2 large squares for the front and back, or 4-6 smaller squares for each side. This tutorial will use a simple construction that utilizes multiple squares.
- Seaming Method: How you join your squares affects the look. Common methods include:
- Slip Stitch Join: Creates a flat, often invisible seam.
- Single Crochet Join: Creates a slightly raised, decorative seam.
- Whip Stitch: A simple sewing technique using a yarn needle.
- Handles & Closure:
- Handles: Crocheted straps (simple rows of SC or HDC), fabric straps, or pre-made leather/wooden handles.
- Closure: A simple magnetic snap, a button and loop, or no closure for an open tote.
- Lining (Recommended for a Polished Finish): While not part of the crochet, adding a fabric lining to your granny square tote significantly enhances its durability, prevents stretching, protects your belongings, and gives it a truly professional, finished look.
Materials You’ll Need
- Yarn: Worsted weight (Category 4) yarn in your chosen colors. (Amount will depend on the size and number of squares, but 2-4 standard skeins should be sufficient for a medium tote).
- Crochet Hook: 5.0mm (H/8) or 5.5mm (I/9).
- Yarn Needle (Tapestry Needle): For weaving in ends and seaming.
- Scissors:
- Stitch Markers (optional): Helpful for marking corners or beginnings of rounds.
- Optional: Fabric for lining, matching thread, sewing needle, magnetic snap or button.
Essential Crochet Abbreviations
- ch: chain
- sl st: slip stitch
- sc: single crochet
- dc: double crochet
- sp: space
- ch-sp: chain space
- st(s): stitch(es)
- FO: Fasten off (cut yarn and pull through loop)
- (): indicates instructions to be worked into the same stitch/space
- …: repeat instructions within asterisks
Cute & Easy Granny Square Tote Bag Pattern
This pattern uses 13 classic granny squares: 12 for the body and 1 for the bottom.
Finished Size: Approximately 12 inches (30 cm) wide x 13 inches (33 cm) tall (excluding handles).
Part 1: Crocheting Your Classic Granny Squares
You’ll need to make 13 identical granny squares. Each square should be approximately 4 inches x 4 inches (10 cm x 10 cm).
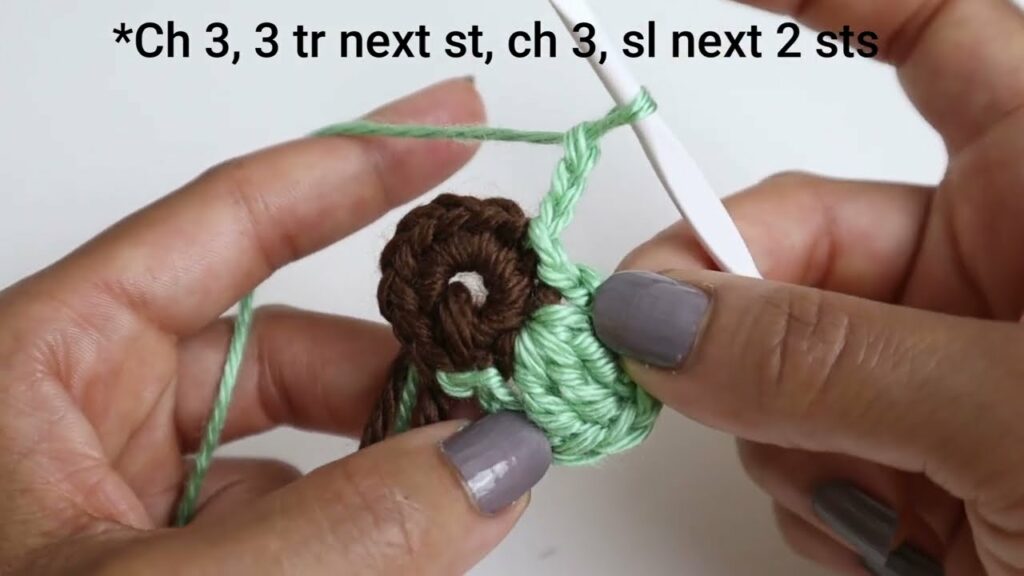
- Round 1: Make a Magic Ring (or ch 4, sl st to first ch to form a ring). Ch 2 (does NOT count as a st here, but a ch 3 would if you prefer). Work (3 dc) into the ring. Ch 2. (3 dc) into the ring. Ch 2. Repeat from * 2 more times. Join with a sl st to the top of the first dc (or to the 2nd ch of the beginning ch-2). [4 groups of 3 dc, 4 ch-2 sps]
- You’ve made your first color block! FO and weave in ends now if changing colors.
- Round 2: Attach new color (if desired) with a sl st into any ch-2 corner space. Ch 2 (or ch 3 for a taller start, counts as 1 dc). Work (2 dc, ch 2, 3 dc) into the same ch-2 sp. *Ch 1. Work (3 dc, ch 2, 3 dc) into the next ch-2 sp.* Repeat from * 2 more times. Ch 1. Join with a sl st to the top of the beginning ch-2 (or 3). [8 groups of 3 dc, 4 ch-2 sps, 4 ch-1 sps]
- You’ll notice the ch-1 spaces between the 3-dc clusters now.
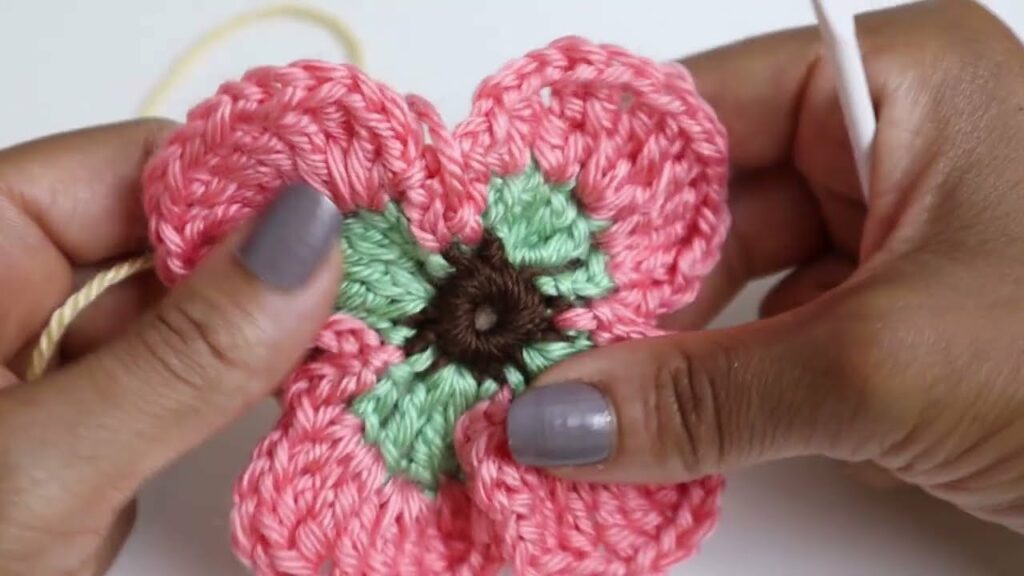
- Round 3: Attach new color (if desired) with a sl st into any ch-2 corner space. Ch 2. Work (2 dc, ch 2, 3 dc) into the same ch-2 sp. *Ch 1. Work (3 dc) into the next ch-1 sp. Ch 1. Work (3 dc, ch 2, 3 dc) into the next ch-2 sp.* Repeat from * 2 more times. Ch 1. Work (3 dc) into the last ch-1 sp. Ch 1. Join with a sl st to the top of the beginning ch-2. [12 groups of 3 dc, 4 ch-2 sps, 8 ch-1 sps]
- Each round adds another (3 dc, ch 1) cluster along each side.
- Repeat: Continue adding rounds (FO and change colors at the end of each round if desired) until your squares reach approximately 4 inches x 4 inches (10 cm x 10 cm). Make 13 identical squares.
- Weave in ALL Ends: Before assembly, take the time to neatly weave in every single yarn tail on all 13 squares. This makes assembly much easier and results in a cleaner finish.
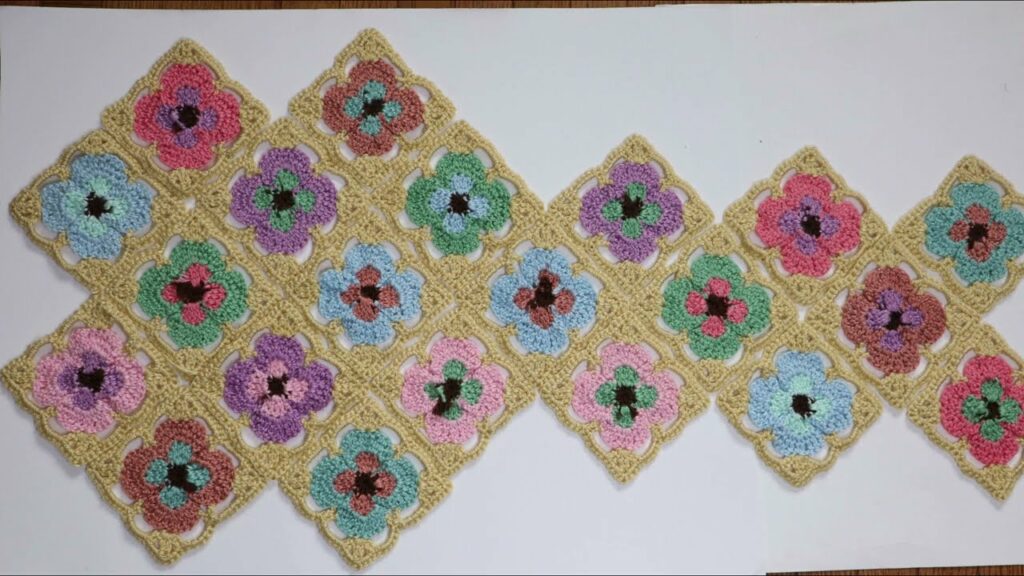
Part 2: Assembling Your Tote Bag
We’ll arrange and join the squares to form the bag’s structure.
- Layout (Front/Back/Sides):
- Lay out 3 squares in a row. This will be the front panel (or back).
- Lay out another 3 squares in a row. This will be the back panel.
- Lay out 2 squares in a row. This will be one side panel.
- Lay out another 2 squares in a row. This will be the other side panel.
- The remaining square will be the bottom of the bag.
- You should have 4 rows of squares if you arrange them visually: Front (3), Side 1 (2), Back (3), Side 2 (2). The last square is the base.
- Join Squares: Using your yarn needle and a long strand of matching yarn (or a slip stitch join with your hook), carefully join the squares.
- Option A: Single Crochet Join (More defined seam): Hold two squares right sides together. Ch 1, sc through both loops of both squares along the edges to be joined.
- Option B: Whip Stitch (Less visible seam): Hold two squares right sides together. Use a yarn needle to whip stitch through both loops of both squares.
- Join 3 squares for the Front Panel: Join the short edges of 3 squares together to create a strip of 3 (e.g., Square A to Square B, Square B to Square C).
- Join 3 squares for the Back Panel: Do the same for another strip of 3 squares.
- Join 2 squares for each Side Panel: Do the same for two strips of 2 squares.
- Join Body Panels:
- Take your “Front Panel” (strip of 3) and one “Side Panel” (strip of 2). Join one long edge of the Side Panel to one long edge of the Front Panel.
- Continue joining all 4 panels (Front, Side 1, Back, Side 2) into a large rectangular loop. You’ll join the last side panel to the front panel, creating an open tube.
- Attach the Bottom:
- Take your remaining single square (the base).
- Align the edges of this square with the bottom opening of your crocheted “tube” body.
- Carefully join all four sides of the bottom square to the corresponding edges of the tube, closing off the bottom of the bag.
- This is the trickiest part; take your time to align corners and stitch counts.
Part 3: Crocheting the Top Edge & Handles
Now we’ll refine the top of the bag and add the straps.
- Top Edging:
- Attach yarn with a sl st to any stitch on the top edge of the bag.
- Round 1: Ch 1. Sc evenly around the entire top opening of the bag. Join with a sl st to the first sc.
- Round 2-3: Ch 1. Sc in each sc around. Join with a sl st to the first sc. [Maintain stitch count]
- This creates a neat, sturdy rim for the bag.
- Crocheted Handles (Make 2 identical straps):
- Strap 1: Ch 6.
- Row 1: Sc in 2nd ch from hook and in each ch across. Turn. (5 sc)
- Row 2: Ch 1. Sc in each sc across. Turn. (5 sc)
- Repeat Row 2 until your strap reaches your desired length (approx. 18-24 inches / 45-60 cm for a shoulder bag).
- FO, leaving a long tail for sewing. Make a second identical strap.
- Attaching Handles:
- Flatten your bag and decide where you want the handles to sit (usually over the center of the front/back panels).
- Using your yarn needle, securely sew each end of a strap to the inside top edge of the bag. Ensure they are sewn very firmly and symmetrically.
- Repeat for the second strap.

Part 4: Finishing Touches
- Weave in Remaining Ends: Double-check and weave in any last loose tails. For a bag, secure ends prevent unraveling and add to durability.
- Optional: Blocking: While not as critical as for lace, a gentle steam block can help your granny squares lay flatter and make the bag sit more evenly.
- Optional: Add a Fabric Lining:
- Measure the inside dimensions of your finished crocheted bag.
- Cut fabric pieces to create a simple fabric pouch that fits snugly inside. Hem the top edge.
- Carefully hand-stitch or machine-stitch the fabric lining to the inside top edge of your crocheted bag. This significantly enhances durability, prevents stretching, and gives it a professional finish.
- Optional: Closure: Sew a magnetic snap or a large decorative button and crocheted loop to the inside top center of the bag.

Tips for Success & Making Your Bag Even Cuter:
- Consistent Tension: This is key for squares that are the same size and for smooth seaming.
- Color Planning: Lay out your squares before joining them to ensure your color arrangement is pleasing.
- Seaming Matters: Take your time with joining. A neat seam makes a huge difference in the final look.
- Embellishments: Add a fun tassel, a crocheted charm, or even a few buttons to the bag’s exterior for extra flair.
- Practice Squares: If you’re new to granny squares, make a few practice ones before you start your 13 “official” squares.
- Care: Refer to your yarn label for specific washing instructions. Most cotton or acrylic bags can be machine washed on a gentle cycle and laid flat to dry.
With your adorable and functional Granny Square Tote Bag complete, you have a stylish accessory that’s as unique as you are. Enjoy showing off your beautiful handmade creation!
Video tutorial: