 by
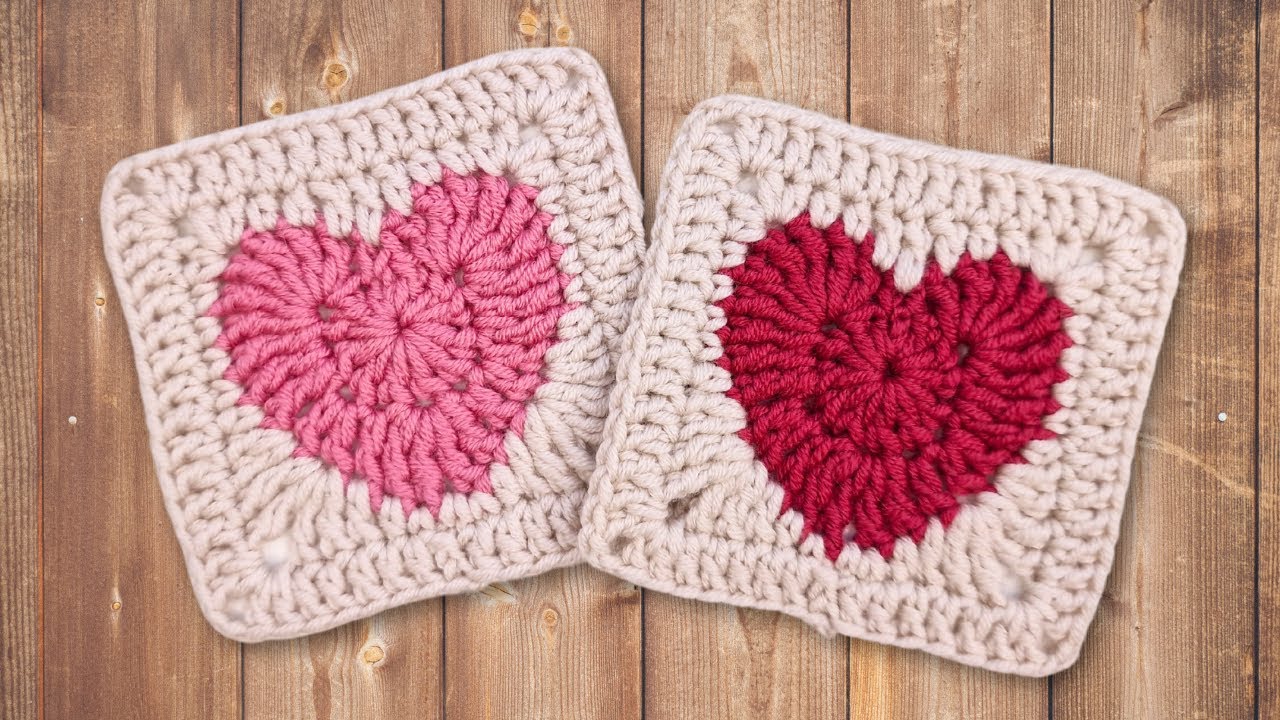
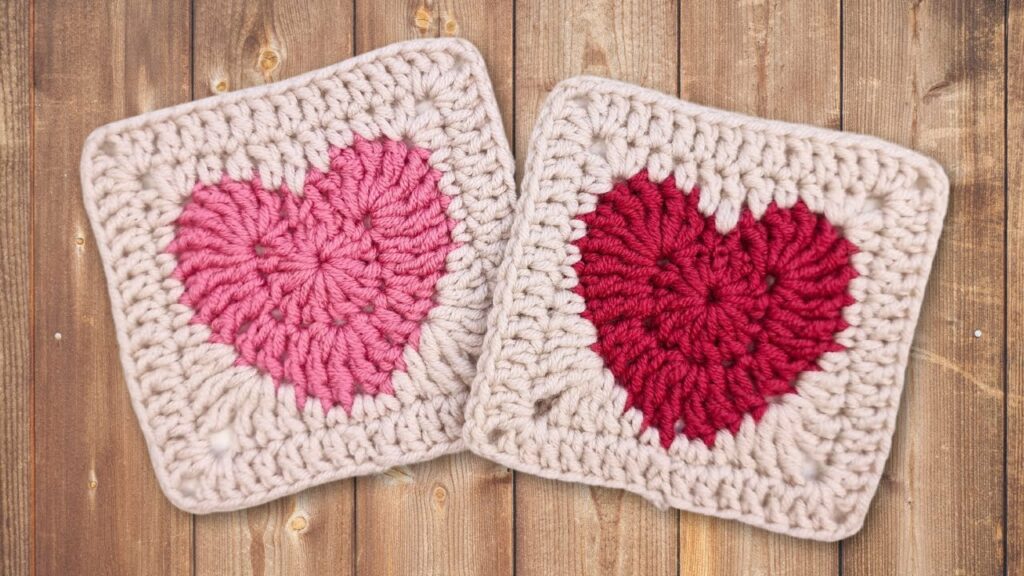
by The classic granny square is infinitely adaptable, and one of its most charming transformations is into a Heart Granny Square. This delightful variation combines the beloved structure of a traditional granny square with the universal symbol of love, creating a uniquely beautiful motif. Whether you want to add a touch of romance to a blanket, create adorable coasters, or craft a heartfelt gift, learning how to crochet a perfect Heart Granny Square is a rewarding skill.
This detailed guide will walk you through each step, ensuring your heart-shaped squares turn out beautifully, perfectly formed, and ready to spread some crochet love.
Why Crochet a Heart Granny Square?
- Charming & Unique: It’s a delightful twist on a classic, making your projects stand out.
- Versatile: Perfect for blankets, cushions, bags, garlands, clothing accents, and even unique wall art.
- Skill Building: Learn to combine different stitch types within a square, manage increases, and understand shaping within a traditional granny square framework.
- Personalized Gifts: A heart motif adds a special, heartfelt touch to any handmade item, making it an ideal gift for loved ones.
- Stash Buster: Great for using up smaller amounts of yarn in various colors.
- Mindful Making: The repetition, combined with the joy of seeing the heart emerge, makes for a relaxing and satisfying crochet experience.
Key Considerations for a Perfect Heart Granny Square
Achieving a beautifully shaped heart square comes down to understanding a few crucial elements:
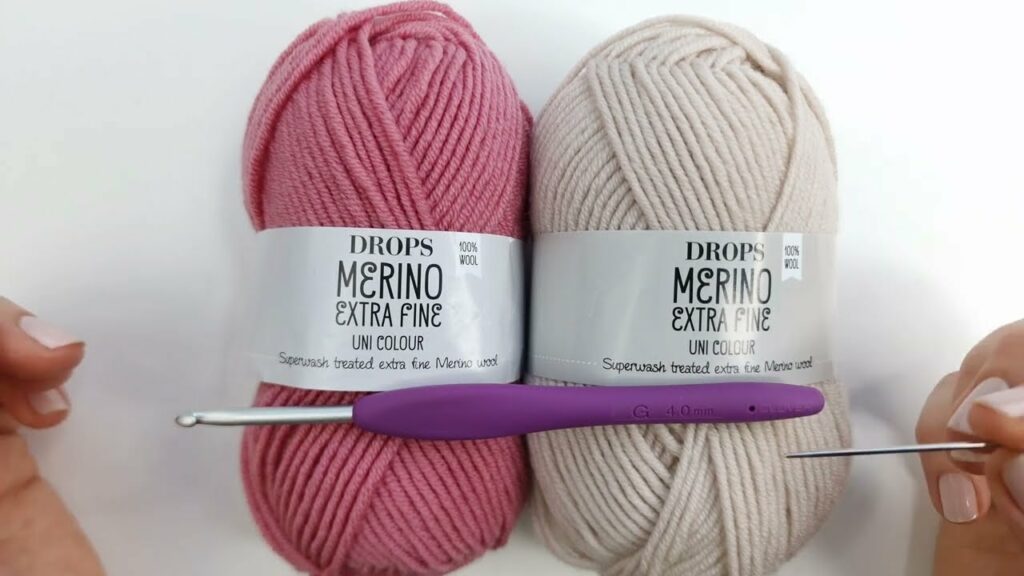
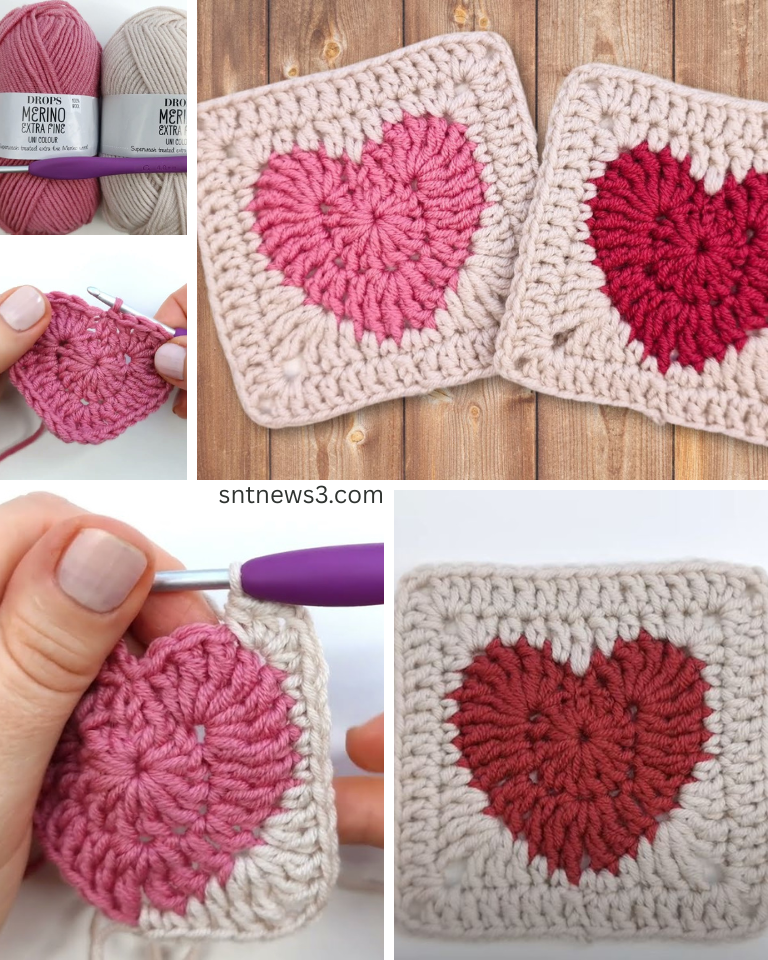
- Yarn Choice:
- Weight: Worsted weight (Category 4) is highly recommended. It’s easy to work with, readily available, and produces a good-sized square. You can also use DK (Category 3) for smaller, more delicate hearts, or bulky (Category 5) for a chunkier look.
- Fiber: Acrylic or cotton blends are excellent choices. They provide good stitch definition, come in a vast array of colors, and are easy to care for. Cotton will give a slightly crisper finish, while acrylic will be softer.
- Colors: You can make the entire square one color for a subtle effect, or use different colors for the heart and the background rounds to make the heart pop!
- Hook Size: Choose the hook size recommended for your yarn weight. For worsted weight yarn, a 5.0mm (H/8) or 5.5mm (I/9) hook is generally suitable. The key is to achieve a fabric that’s dense enough to hold the heart’s shape but not so tight that it’s difficult to work.
- Tension: Consistent tension is crucial for a symmetrical heart and a flat, even square. Practice is the best way to achieve this.
- Understanding the Stitching: This pattern combines several basic stitches (chains, slip stitches, single crochet, half double crochet, double crochet, and treble crochet) to create the heart shape within the granny square structure. Don’t be intimidated; each stitch is simple, and the combination is what creates the magic!

Essential Crochet Abbreviations
- ch: chain
- sl st: slip stitch
- sc: single crochet
- hdc: half double crochet
- dc: double crochet
- tr: treble crochet (or triple crochet)
- st(s): stitch(es)
- sp: space
- ch-sp: chain space
- FO: Fasten off (cut yarn and pull through loop)
- yo: yarn over
- (): indicates instructions to be worked into the same stitch/space
- …: repeat instructions within asterisks
Perfect Heart Granny Square Pattern
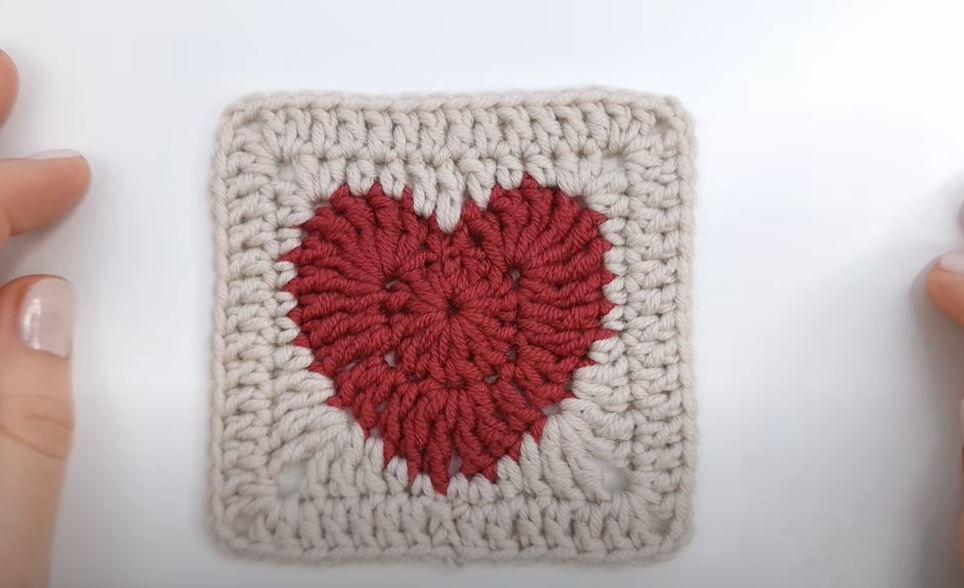
This pattern creates a heart shape within a classic granny square framework. The heart is formed in the center, and subsequent rounds build the square around it.
Finished Size: Approximately 4.5-5 inches (11-13 cm) square, using worsted weight yarn and a 5.0mm hook.
Coloring Suggestion:
- Color A: For the heart
- Color B: For the first background round (Round 3)
- Color C: For the outer background round (Round 4)
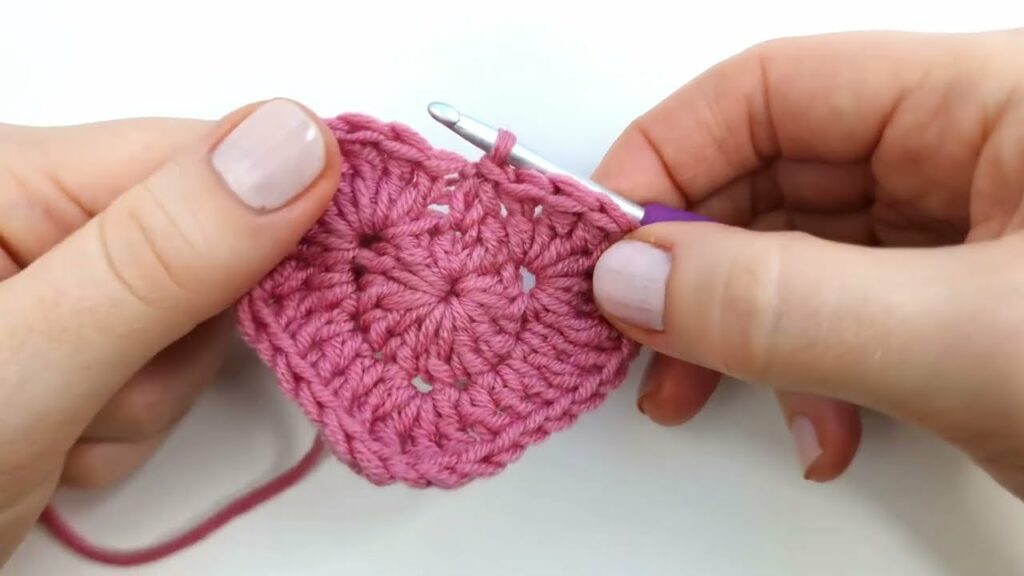
Part 1: Crocheting the Heart Motif (Color A)
- Start: Make a Magic Ring (recommended for a tight center).
- Round 1: Ch 2 (does NOT count as a st). Work (3 dc) into the ring. Tr in the ring. Ch 1. Tr in the ring. (3 dc) in the ring. Ch 2. Sl st in the ring. Pull Magic Ring tail tight to close. [6 dc, 2 tr, 1 ch-1 sp, 1 ch-2 sp, 1 sl st]
- You should see a basic heart shape forming.
- FO Color A, leaving a tail to weave in.
—
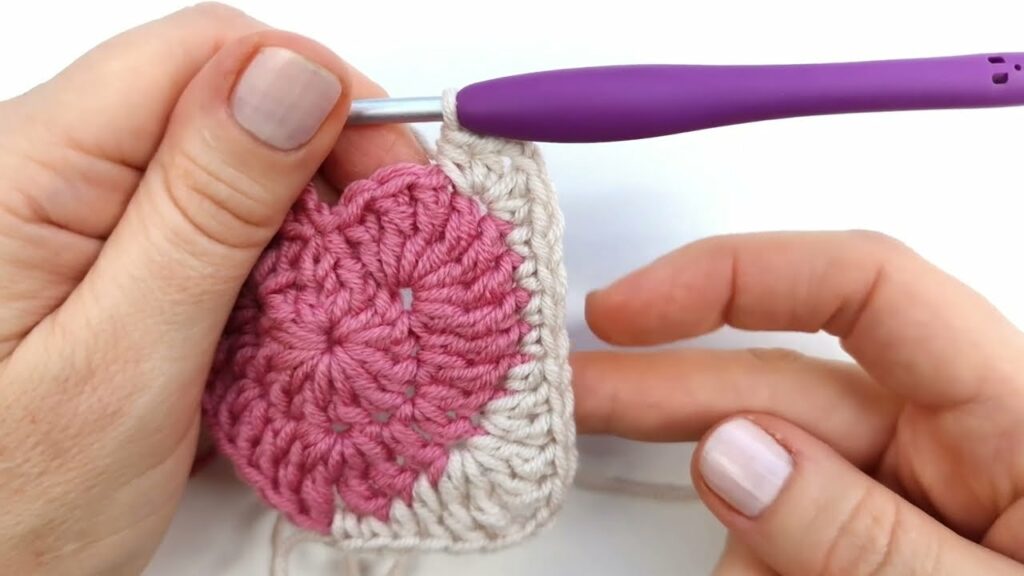
Part 2: Squaring Up the Heart (Color B)
Now we’ll start creating the square shape around your heart.
- Attach Color B: Attach Color B with a sl st to the ch-2 space at the bottom point of the heart.
- Round 2: Ch 2 (does NOT count as a st). Work (2 dc, ch 2, 3 dc) into the same ch-2 sp (this is your first corner).
- Sc in the top of the next 3 dc. Sc in the top of the next Tr. Sc in the ch-1 space. Sc in the top of the next Tr. Sc in the top of the next 3 dc.
- Work (3 dc, ch 2, 3 dc) into the ch-2 sp where you joined Color B (this forms your second corner and encloses the bottom point of the heart).
- Join with a sl st to the top of the first dc. [4 groups of 3 dc, 14 sc, 2 ch-2 sps]
- FO Color B, leaving a tail to weave in.
—
Part 3: Completing the Square (Color C)
This round finishes off the square and gives it a classic granny square border.
- Attach Color C: Attach Color C with a sl st to any ch-2 corner space.
- Round 3: Ch 2 (does NOT count as a st). Work (2 dc, ch 2, 3 dc) into the same ch-2 sp (your first corner).
- *Ch 1. Sk 3 sts. Work (3 dc) into the next st. Ch 1. Sk 3 sts. Work (3 dc) into the next st. Ch 1. Sk 3 sts. Work (3 dc, ch 2, 3 dc) into the next ch-2 sp.*
- Repeat from * 1 more time. Ch 1. Sk 3 sts. Work (3 dc) into the next st. Ch 1. Sk 3 sts. Work (3 dc) into the next st. Ch 1. Join with a sl st to the top of the beginning ch-2. [12 groups of 3 dc, 4 ch-2 sps, 8 ch-1 sps]
- FO Color C, leaving a tail to weave in.
—
Part 4: Finishing Touches
- Weave in All Ends: This is crucial for a neat and professional finish. Take your time to securely weave in every single yarn tail using your yarn needle. For multi-colored squares, this step is vital to prevent unraveling.
- Blocking (Recommended): For a truly perfect square that lays flat and has crisp edges, blocking is key.
- Gently mist your finished square with water (or wet block if using cotton).
- Pin it out onto a blocking mat, stretching gently to define the corners and ensure it’s a perfect square.
- Allow it to air dry completely.
Tips for a Perfect Heart Granny Square:
- Consistent Tension: This is the most important factor for a beautiful, symmetrical heart and a flat square. Practice helps a lot!
- Stitch Counts: Double-check your stitch counts for each round, especially the beginning of Round 2 where the heart forms and Round 3 where the square is completed.
- Magic Ring vs. Chain Ring: While the chain ring is easier for beginners, the Magic Ring creates a much tighter, neater center for the heart, which is preferable for a “perfect” look. It’s worth learning!
- Weave as You Go: If changing colors frequently, weaving in ends after each color change can save you a tedious task at the end.
- Corner Chains: Always use the
ch 2for your corners to maintain the square shape. - Side Chains: Don’t forget the
ch 1between the 3-dc clusters along the sides, as this creates the classic granny square spacing. - Color Play:
- Contrasting Heart: Use a bright color for the heart (Color A) and a light or dark neutral for the background (Colors B and C) to make the heart pop.
- Subtle Heart: Use similar shades for the heart and background for a more blended, textural effect.
- Scrap Buster: Get creative with all your leftover yarn bits!
By following these steps and focusing on consistent tension, you’ll be able to crochet beautifully designed and perfectly formed Heart Granny Squares that are sure to add a touch of handmade love to any project. Happy crocheting!
Video tutorial: