 by
by Nice day! Here’s a clear, step-by-step written tutorial in English version. I’ve written it as a needle-friendly pattern you can follow without watching the video, including two common methods for adding seed beads so you can choose the one you prefer.
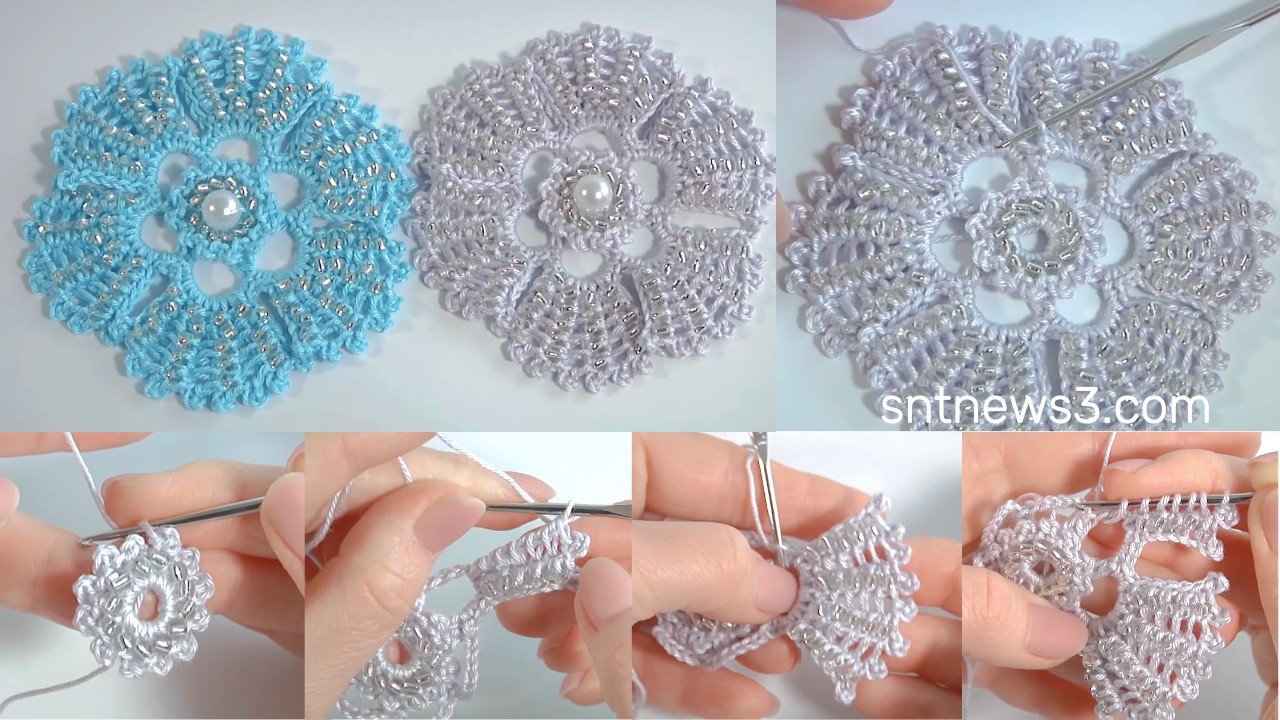
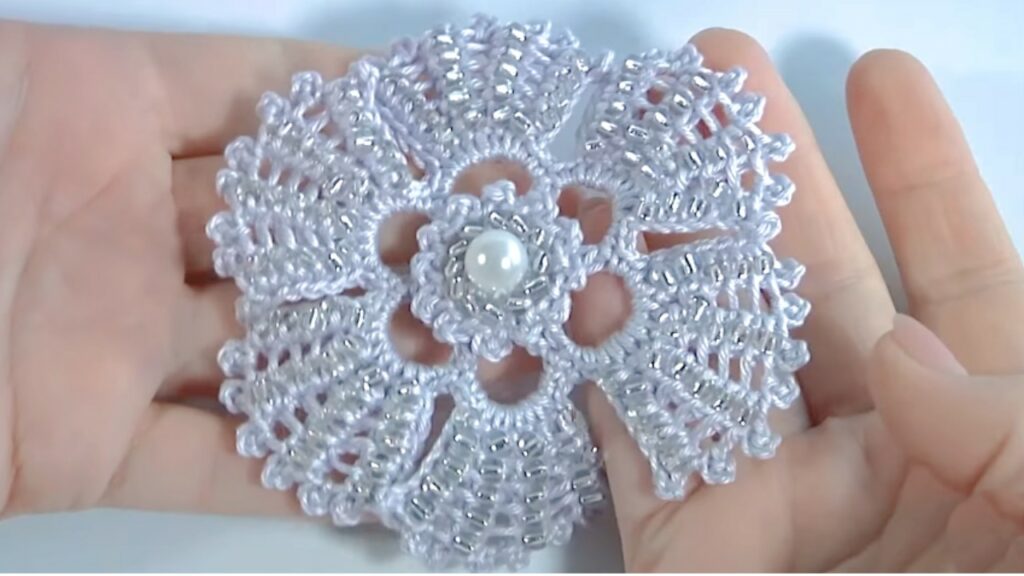
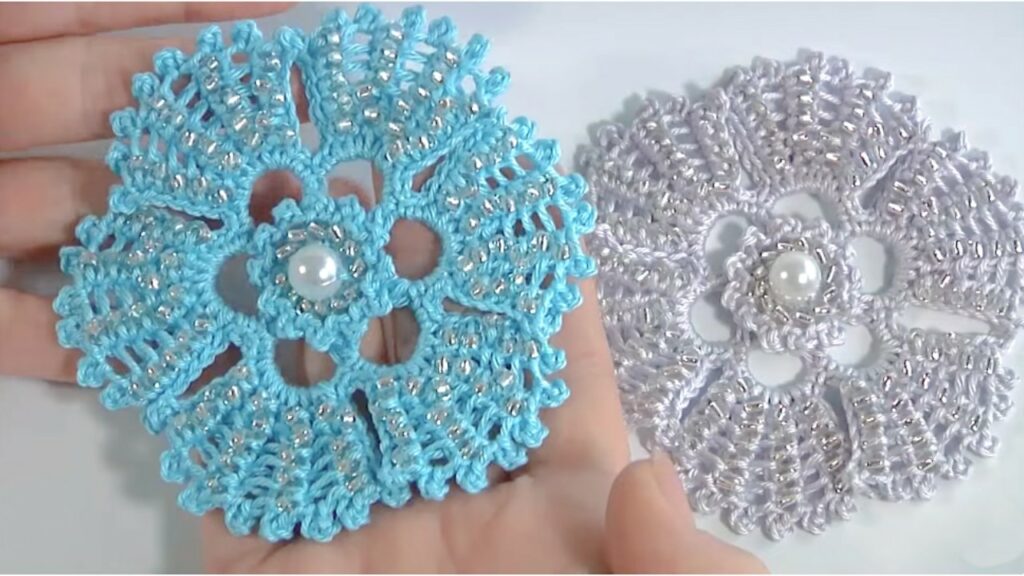
This pattern makes one beaded flower (flat, decorative motif). It’s written in US terms.
Ravishing Beaded Crochet Flower — Step-by-Step Tutorial
Difficulty: intermediate (basic crochet + working beads)
Finished size: approx. 6–8 cm diameter (depends on yarn/hook)
Beads used: size 11/0 seed beads (clear/crystal for sparkle) — about 40–60 beads per flower depending on placement
Materials
- Cotton, mercerized cotton, or fine acrylic yarn (sport/fingering or thread size depending on desired size)
- Crochet hook to match yarn (example: 2.5–3.5 mm for fingering / 1.5–2.5 mm for thread)
- Seed beads size 11/0 (crystal, silver-lined, or your choice)
- Beading needle (or fine tapestry needle) OR prepare to pre-string beads onto yarn
- Scissors, tapestry needle for weaving ends
- Blocking pins and mat (optional)
Two bead methods (choose one):
A. Pre-string beads on the working yarn before you begin (recommended for neat control).
B. Use a beading needle to add beads as you work (useful if you don’t want many beads on the tail).
Abbreviations (US)
- ch = chain
- sl st = slip stitch
- sc = single crochet
- hdc = half double crochet
- dc = double crochet
- tr = treble crochet
- st(s) = stitch(es)
- sp = space
- sk = skip
- BLO = back loop only
- = repeat instructions in brackets as directed
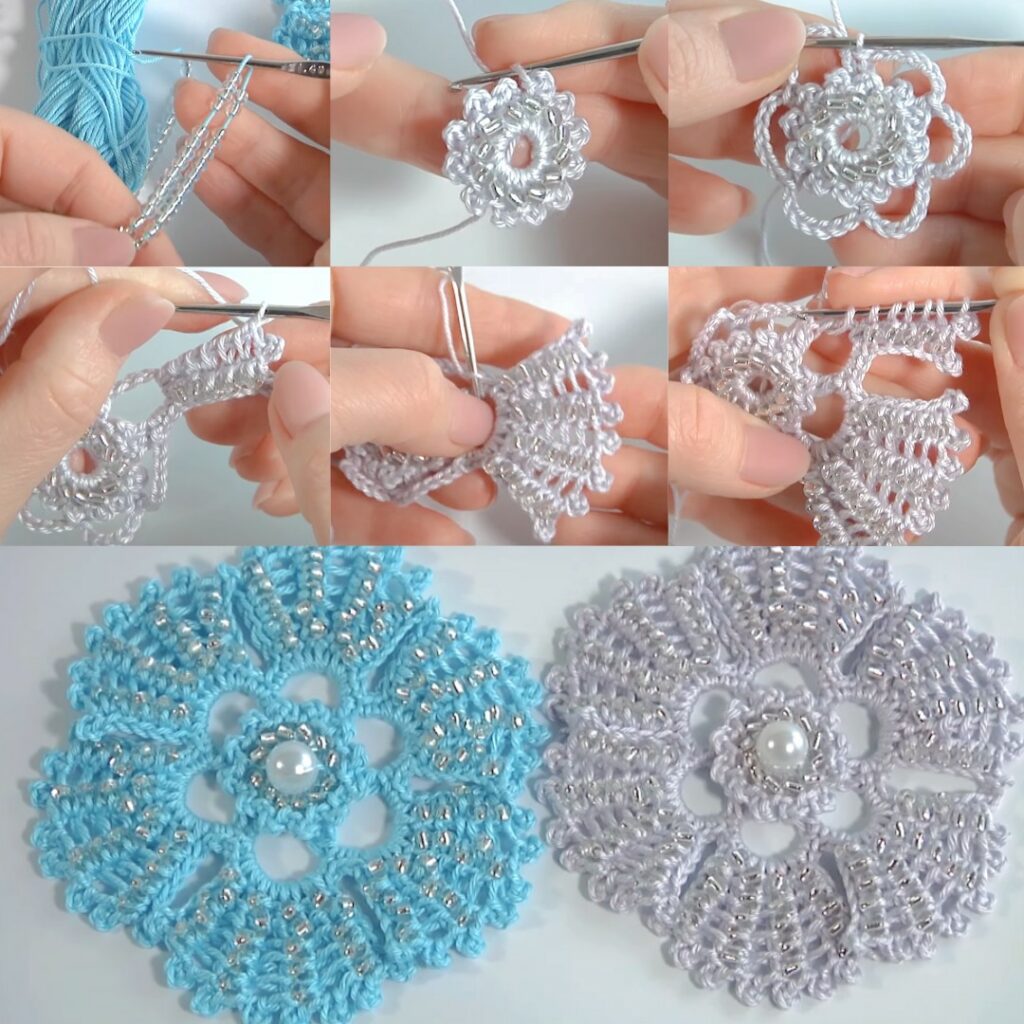
Preparation (if pre-stringing beads)
- Decide bead placement: common placements are (A) ring of beads in the center, (B) one bead at petal tip, (C) beads along petal edges.
- Pre-string enough beads onto yarn before you start (use beading needle or slide them on). For this pattern string ~50 beads if you plan center + petal tips. Leave several extra. Secure beads by sliding them down near your starting tail; you’ll slide them into position as you work.
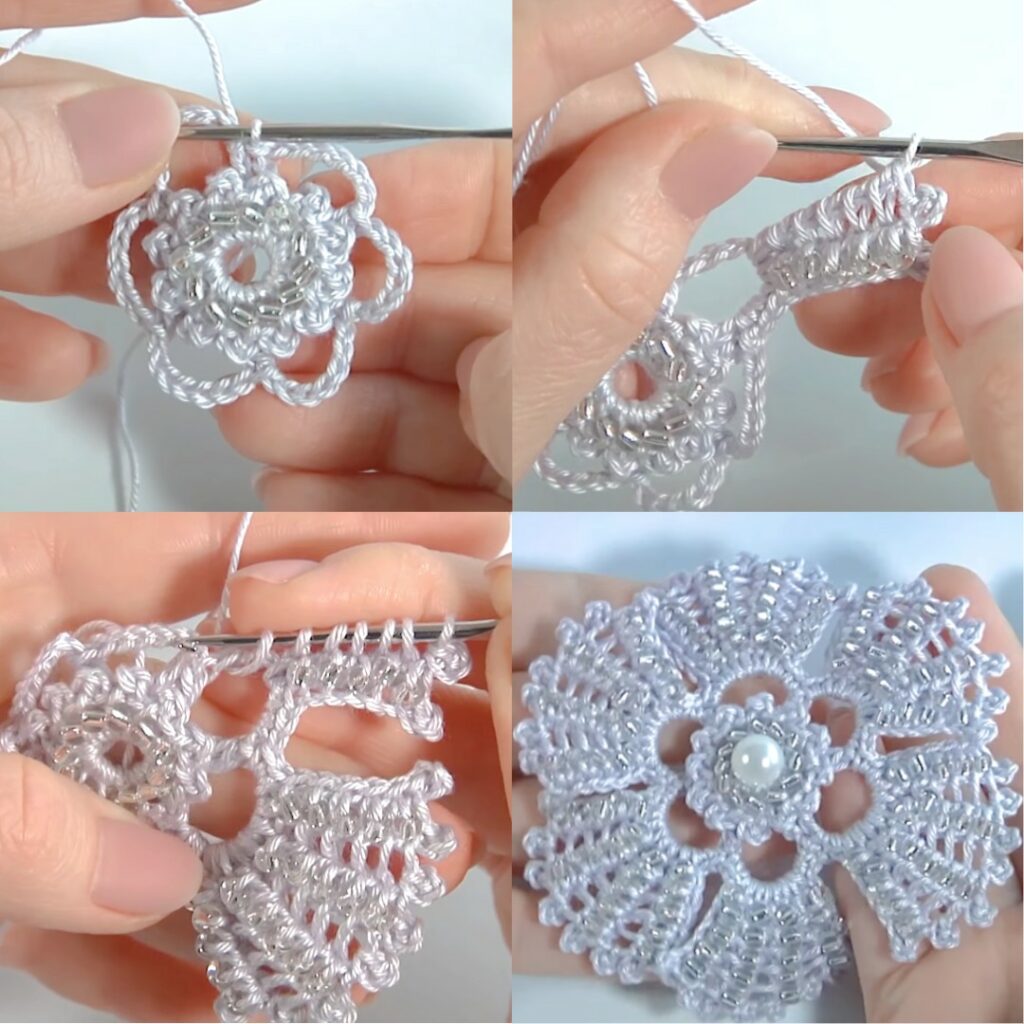
Overview of structure
- Small beaded center ring (rounds 1–2)
- A textured inner round forming a small star or disk (round 3)
- Petal foundation rounds (rounds 4–5) — petals are textured fans / clusters
- Optional picot or bead-tipped outer edge (round 6)
Pattern — detailed
Center & Round 1 — magic ring with beaded center
- Make a magic ring (or ch 4 and sl st to form ring).
- If you pre-strung beads and want a bead ring center: slide 8–10 beads down to sit onto the magic ring now. If using beading needle method, add a bead before each st below where indicated.
- ch 1 (does not count), work 8 sc into the ring, but if adding a bead in front of each sc: [slide 1 bead up to hook] then sc — the bead will sit on top of the sc. Repeat 8 times. (You’ll have 8 small beaded sc around the center.)
- Tighten ring; join with sl st to first sc.
Result: small beaded ring (8 beads) forming a sparkling center.
Round 2 — increase disk (optional beaded accent)
- ch 1, 2 sc in each sc around — 16 sc total. If you’d like more beads in the center, you can add a bead in every other sc: [sc with bead], sc, repeat.
- Join with sl st to first sc.
This gives a firm base for petal anchors.
Round 3 — textured star / base for petals
- ch 2 (counts as hdc), [hdc in next st, ch 1] across to make a textured ring with small chain loops between hdc. Or, for a more pronounced star: [dc, ch 1] repeat across. Aim for 16 to 24 little loops spaced around (match your stitch count from Round 2).
- Join with sl st.
These little chain loops will be the anchor points for the petals.
Round 4 — petal foundations (small fans)
We’ll create 8 petals (adjust if you prefer more — use evenly-spaced anchor points).
- If you have 16 anchors, group them in pairs so each petal uses 2 anchors. For each petal:
- Skip to the anchor loop for petal #1. Into the loop, work: sl st, ch 1, (sc, hdc, dc, tr, dc, hdc, sc) all worked into the same loop to form a tapered fan petal.
- After the fan, ch 1 and sl st into the next anchor loop (this closes and anchors the petal).
- Repeat for each petal around (8 petals).
- Join with sl st to the base stitch.
Tips:
- Build petals symmetrically: sc and hdc at the base, tallest stitch (tr) at the center of the petal, then mirror.
- If using beads on petal edges, slide a bead onto yarn and work it into the stitch where you want it to sit (see Round 6 for bead-tips).
Round 5 — petal height & shaping
- ch 2, turn the work so petals are upright. For each petal: work around the outer edge of the petal to give height and shaping. Example: [sc around outer edge across 3–4 stitches of fan, ch 2, dc at petal center tip] then return along the other side with sc cluster to complete the outline.
- Aim to put 2–3 stitches across the base and a taller dc or tr at the tip so petals become dimensional.
- Join with sl st.
This round makes the petals stand out and gives volume.
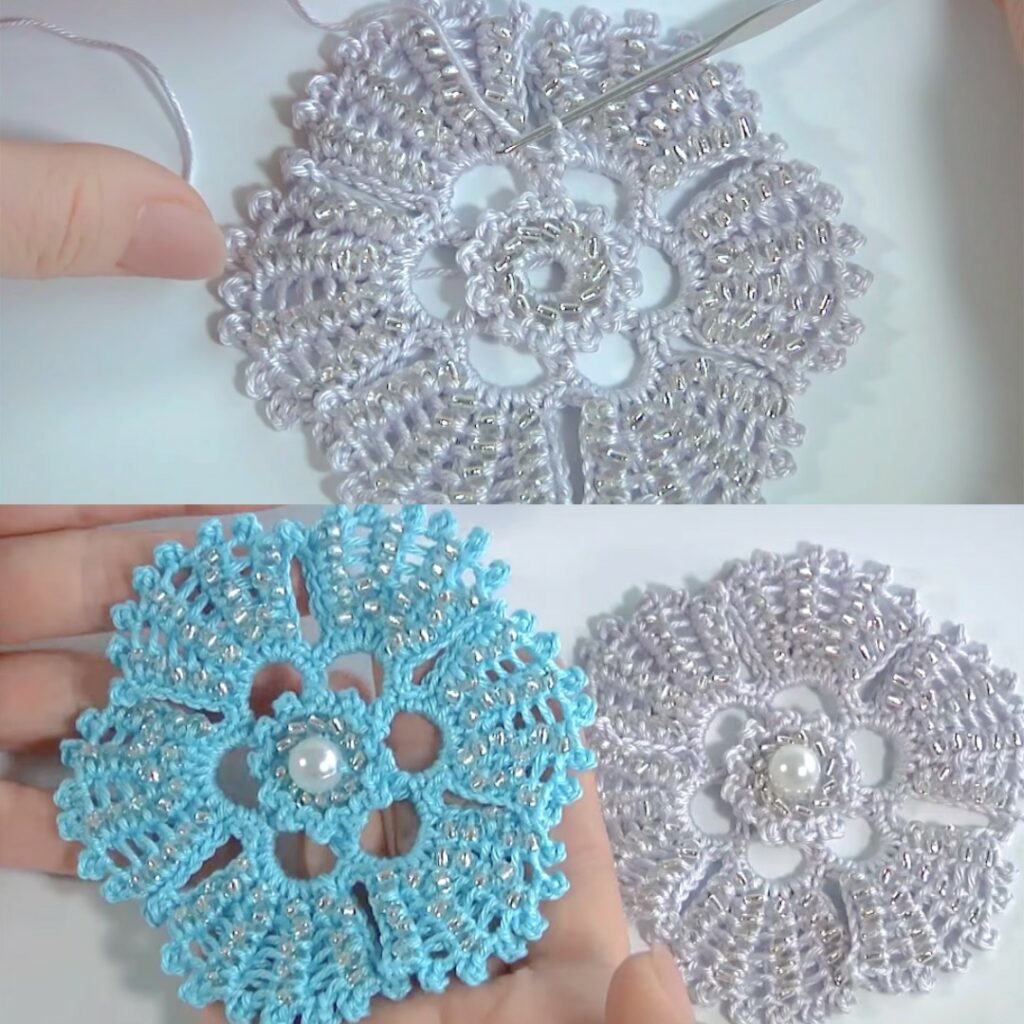
Round 6 — bead tips & outer picot (finishing edge)
Two options for sparkle on outer edge:
Option A — Bead at petal tip (pre-strung):
- When you reach the tip stitch (the central tr or dc), slide 1 bead up to the hook so it sits on the yarn in front of your stitch, then work a sl st or sc (or work a bead-over-stitch: [put bead on yarn, insert hook through stitch, pull loop through, pull bead into place, complete stitch]) so the bead seats at the tip. Continue to finish the rest of petal edge.
Option B — Beaded scallops / picots along edge (add as you go):
- Around the edge between petals work: (sc, ch 3, sl st in base) then sc in next petal side; where you want a bead, slide a bead on and work sl st through bead into ch-space so bead is locked into the picot. Repeat between each petal.
Option C — Tiny bead ring around center (if not done earlier):
- Use beading needle to pick up tiny beads and stitch them onto the outer edge of Round 2 with a tapestry needle, sewing beads into the fabric for extra sparkle.
Finish with a neat sl st, fasten off, weave ends.
Assembly & Variations
- Motif cluster: Make multiple flowers and sew them together by overlapping petal edges to create a garland, headband applique, or shawl yoke. Use whipstitch with matching thread so beads face outward.
- Layered flower: Make a smaller flower (same pattern with thinner thread) and sew it into the center of a larger flower to get a layered look. Add tiny beads between layers.
- Brooch / button center: Instead of seed beads in the center, stitch on a small crystal button or vintage bead for a focal point.
- Hanging ornament: Add a ring or chain at the back and hang from a mobile or as a window sparkle.
Blocking & Finishing
- Gently steam or wet block the flower: pin each petal to the desired shape on a blocking mat and allow to dry — this opens stitches and makes petals even.
- Use a fine mist of water and shaping pins. For stiffening (if making ornaments), use diluted fabric stiffener after blocking.
Troubleshooting & Tips
- Petals too floppy: Use a smaller hook or add an extra row of hdc around the petal base. Stiffer yarn (cotton) will hold shape better.
- Beads slipping: Make sure to seat beads tightly when pre-stringing and pull yarn snug after sliding bead into place. Use a tiny knot in the tail if necessary and trim excess.
- Uneven petals: Count anchor loops and ensure equal number of stitches per petal — use stitch markers to mark petal start points.
- Running out of beads mid-flower: string more than you think you’ll need, especially if you plan bead-dense designs.
Sample stitch counts (example for 8-petal version, using Round counts above)
- Round 1: 8 sc into magic ring (8 beads if beaded)
- Round 2: 2 sc in each sc = 16 sc
- Round 3: hdc in each sc with ch-1 loops = 16 anchors (pairs for 8 petals)
- Round 4: 8 petals formed by fans into pairs of anchors
- Round 5: shaping round to add height (outline each petal)
- Round 6: bead/picot edging (8 beads at tips + optional picot beads between petals)
Adjust counts if you want 6 or 10 petals — distribute anchors evenly.
Video: