 by
by Quick overview
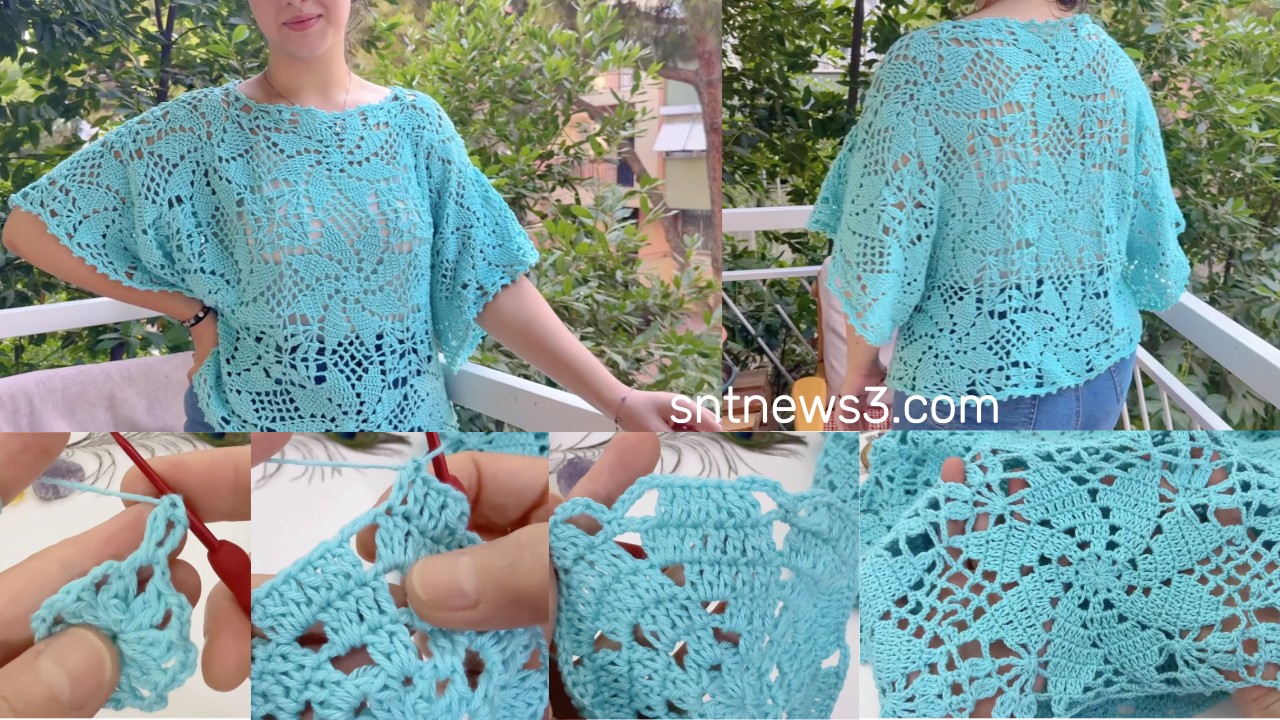
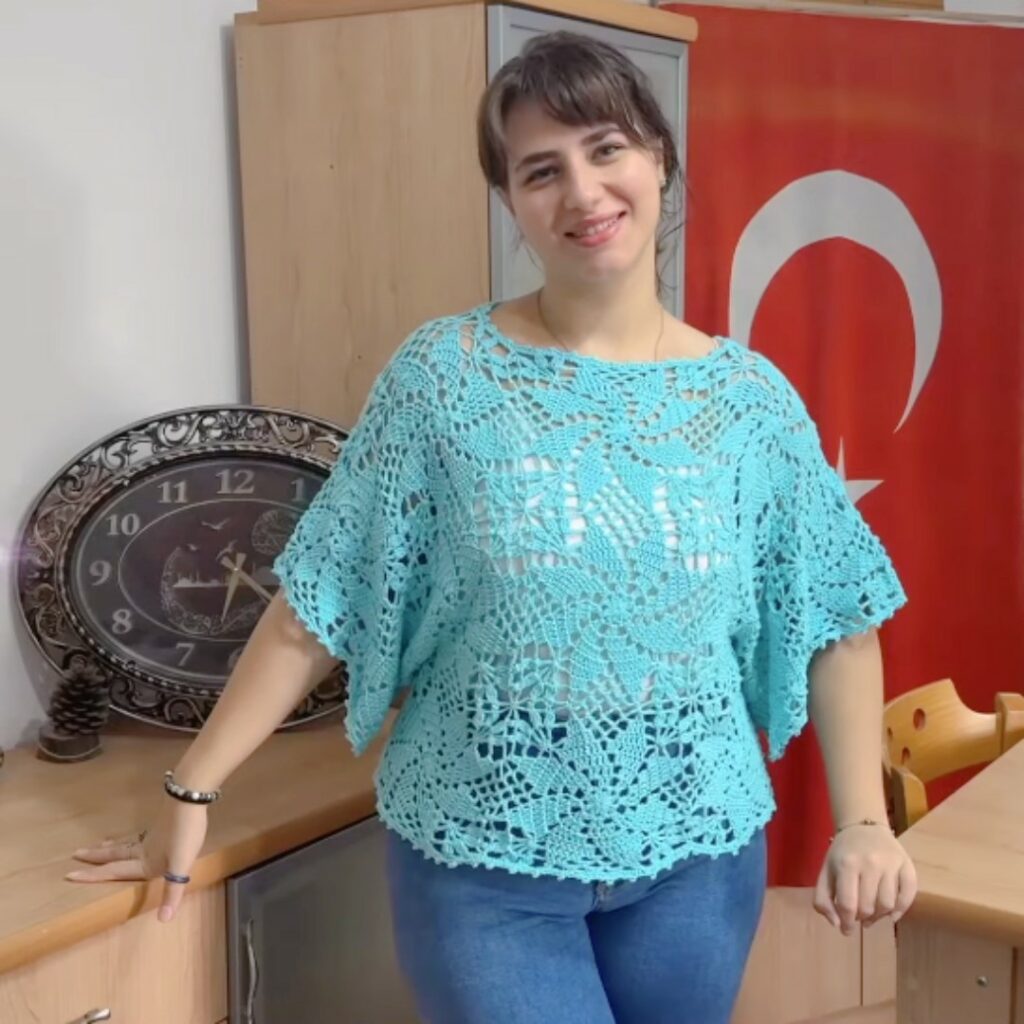
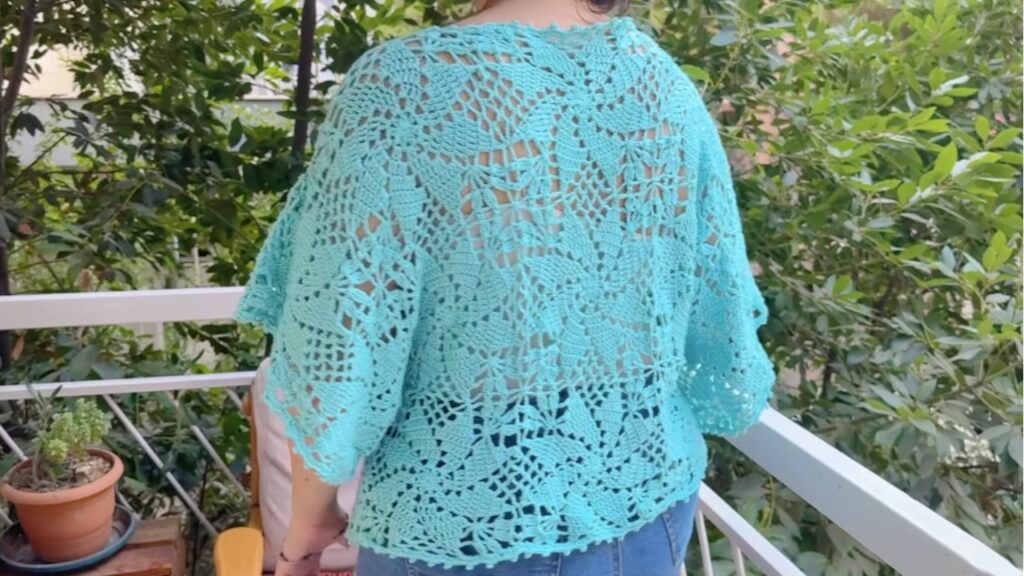
What you’ll make: a feminine crop blouse made of identical lacy square motifs joined into a front and back panel (plus small shoulder/sleeve motifs).
Skill: beginner → intermediate (motifs + joining).
Sample sizing (finished bust): S (34″), M (36–38″), L (40″), XL (42–44″). I provide motif counts for each. Adjust by using different yarn/hook or adding/removing motifs.
Materials
- Yarn: DK/light worsted or sport (cotton or cotton blend for summer wear). Example: 150–300 g depending on size.
- Hook: 3.0–4.0 mm (match to yarn and desired drape) — sample uses 3.5 mm DK.
- Tapestry needle, scissors, blocking pins.
- Stitch markers (optional).
- Optional: small buttons, beads, or ribbon for decoration.
Gauge: make one blocked motif to measure motif size — the pattern uses motif counts rather than strict gauge so you can scale.
Abbreviations (US)
- ch = chain
- sl st = slip stitch
- sc = single crochet
- hdc = half double crochet
- dc = double crochet
- tr = treble crochet
- sp = space
- st = stitch
- rep = repeat
- Rnd = round
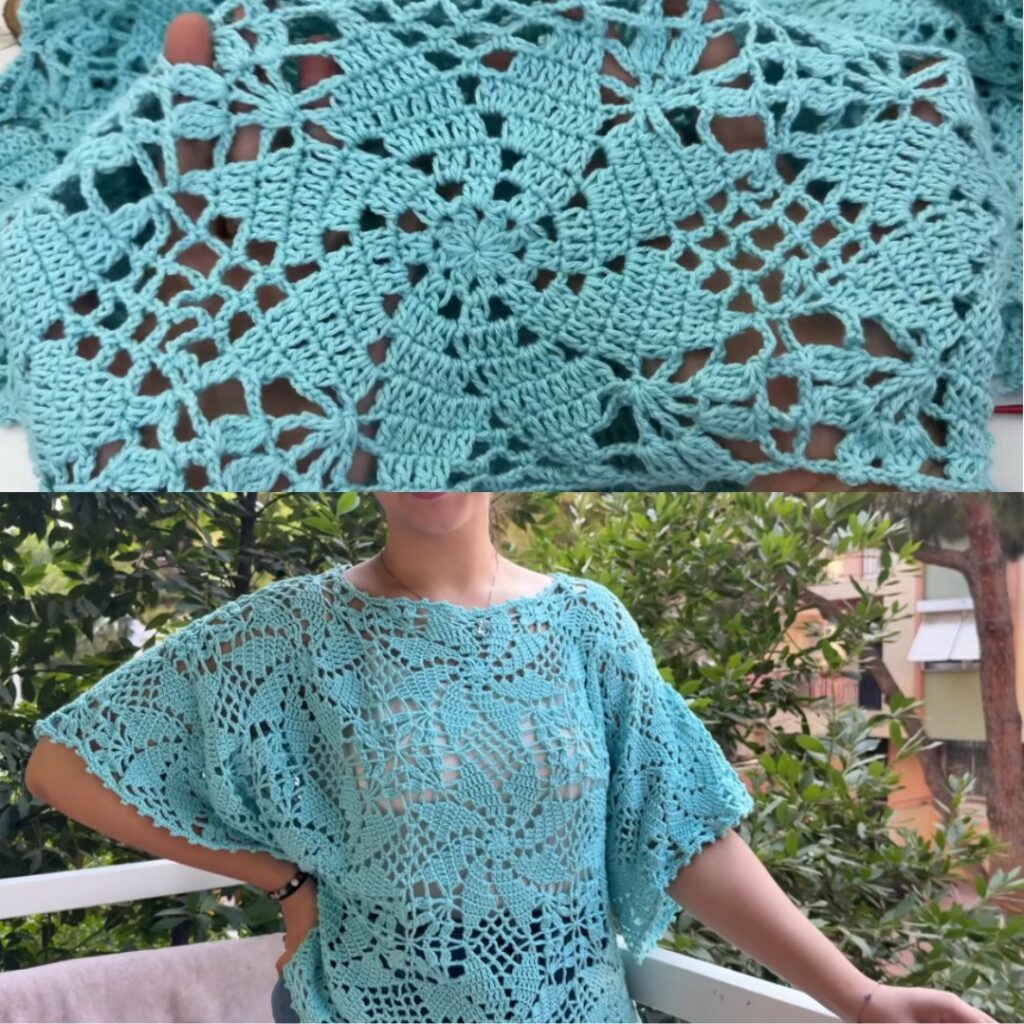
Motif — lacy square (one motif)
This lacy square motif is a 9-round pineapple/fan-style square that tiles neatly. Make a test motif and block it; measure width (W) — we’ll use that to plan size.
Finished motif (sample)
- With DK + 3.5 mm hook → ≈ 10–12 cm (4–4.7″) square blocked. If your motif differs, use your measurement to calculate motif counts.
Motif pattern (US terms)
Rnd 1 — center ring
- Magic ring. ch 3 (counts as dc), work 11 dc into ring. (12 dc total). Join with sl st to top of ch-3.
Rnd 2 — picot anchors (or sc anchors)
- ch 1, sc in next dc, ch 3 — repeat around (12 sc + 12 ch-3 loops). Join.
Rnd 3 — small petals
- Sl st into first ch-3 loop. In each loop work: (sc, ch1, hdc, 3 dc, hdc, ch1, sc). Repeat into all loops (12 petals). Join.
Rnd 4 — arch connectors
- ch 1, sc in outer sc of petal, ch 4 — repeat around (12 ch-4 arches). Join.
Rnd 5 — larger petals
- Into each ch-4 arch work: (sc, ch1, hdc, 5 dc, hdc, ch1, sc). Between larger petals make a small ch-3 connector where needed to balance spacing. Join.
Rnd 6 — tall loops
- ch 1, sc in first sc, ch 7, sc in next sc — repeat (12 ch-7 loops). Join.
Rnd 7 — top fans
- In each ch-7 loop work: (sc, ch2, 3 dc, ch2, sc). Join.
Rnd 8 — squareing round
- ch 3 (counts dc), 3 dc in next space, 3 dc in next space, in the 3rd space of each trio work (3 dc, ch 3, 3 dc) to make a corner — repeat to make 4 sides (group every 3 petal tops). Join.
Rnd 9 — tidy sc round
- ch 1, sc evenly around; place 3 sc in each corner ch-3. Join and fasten off. Block to square.
(Optional Rnd 10: scallop shell round — skip or add a shell round if you want decorative edge.)
Motif layout & how many motifs you need
Decide your desired finished bust measurement (F). Decide how much of the bust will be covered by motifs (crop blouses are shorter; use waist-high or just below bust). Crop style: make a front panel and back panel each composed of a grid of motifs.
Common motif layouts (blocked motif ≈ 10 cm)
- S (34″): chest ≈ 86 cm → front half ≈ 43 cm. Motif width 10 cm → front ≈ 4–5 motifs across. Typical layout: 4 motifs across × 3 rows for front (4×3 = 12), same for back = 24 motifs total + 2–4 extra small motifs for shoulders/sleeves = ~26 motifs.
- M (36–38″): chest ≈ 92–96 cm → front half ≈ 46–48 cm → 5 motifs across × 3 rows (front 15 motifs, back 15 = 30 motifs) total ~32–34 motifs with extras.
- L (40″): chest ≈ 102 cm → front half ≈ 51 cm → 5 motifs × 4 rows (front 20, back 20 = 40 motifs) total ~42–44 motifs incl extras.
- XL (42–44″): scale up more motifs across or add a row.
Use your measured motif width to compute exactly:
- motifs_across = round(half_chest_cm / motif_width_cm)
- motifs_down = decide crop height in motifs (usually 2–4 rows depending on how cropped you want).
Multiply for front and back, add a few motifs for shoulder/sleeve details.

Making the panels
- Make the required number of motifs and lightly block them to the same size.
- Arrange motifs flat into two identical panels (front and back). For symmetrical patterns keep centers matching.
- Join motifs using either join-as-you-go (JAYG) or seam after blocking.
Join option A — Join-As-You-Go (recommended)
- On the final round (Rnd 9 tidy sc round) of a motif you can attach it to adjacent completed motifs: when you reach a sc that should line up with the neighbor, replace that sc with: sc in your motif, ch1, sl st into corresponding sc of neighbor, ch1 — continue. This creates a neat lacy seam. For corners touching two neighbors sl st into both neighbors corner spaces symmetrically. Work one side at a time and pin motifs to align.
Join option B — Sew after blocking
- Block all motifs. Lay them RS up, align edges, and mattress stitch through back loops only for flatter seams. Whipstitch is fine too but a bit bulkier.
Shoulder & neck shaping
- Decide how wide the neck opening will be. Typical neck opening: 18–22 cm. Which corresponds to leaving 1 – 1½ motif column(s) unseamed at top center or partially unsewn to create the scoop.
- For small neck opening: when joining top row do not join the center two motifs fully — leave enough space to create neck. For larger necks, leave more motifs unjoined or remove a full motif column.
Practical approach:
- Join motifs across the top row but leave center column(s) unjoined for the neck gap. After joining shoulders, add a single crochet neckline band to tidy.
Sleeves / straps
Crop blouse in video often has short cap sleeves or just motif extension.
Options:
- Cap sleeve: attach 1–2 motifs on each shoulder edge and seam the outer half to create small cap sleeves.
- Strap / tie: make a long chain strap or crocheted band and sew to shoulder corners.
- Short sleeve panel: add one row of motifs around the armhole and seam.
Edging, bands & finishing
- Neckline band: pick up stitches around neck opening and work 1–2 rounds sc then 1 round shell: skip 2 sc, 5 dc in next sc, skip 2, sc in next sc — fasten off and weave ends.
- Armhole edging: sc around each armhole or add small shells for a feminine finish.
- Bottom hem (crop bottom): if motifs’ bottom edge is raw, sc around bottom or add 1 shell round to make neat edge.
Optional decorative: add small tassels at bottom corners or a narrow lace tie across front.
Weaving in, blocking & care
- Weave in ends on WS neatly.
- Block the assembled blouse again to flatten joins and shape neckline/sleeves.
- Care: follow yarn label; cotton usually hand wash or gentle machine; reshape while damp and dry flat.
Yarn & amount estimate (approx)
- If motif ≈ 10 cm and you need ~30 motifs: estimate per motif ~8–12 g (DK). 30 motifs × 10 g ≈ 300 g + 50 g for trim = ~350 g. Smaller/larger motifs change totals. Always make one motif, weigh it and multiply for accurate estimate.
Troubleshooting & tips
- If motifs don’t align exactly: block them all and, if needed, add or subtract an extra outer sc round to small motifs to match size.
- Neck too narrow/wide: unseam shoulders and adjust number of motifs left open.
- Seams bulky: sew through back loops only or use JAYG for flat joins.
- Want more coverage: add another motif row at the bottom or increase motifs across.
Quick cheat-sheet — the practical workflow
- Make 1 motif, block, measure motif size.
- Calculate motifs across/rows for front & back using your body measurements.
- Crochet all motifs (plus a couple extras).
- Block all motifs.
- Join motifs into front/back panels (JAYG or sew). Leave neck gap.
- Join front & back at shoulders (seam or JAYG).
- Add small shoulder motifs or straps; seam sides.
- Work neckline & armhole edging.
- Block again; weave ends; add optional decoration.
VIDEO: