 by
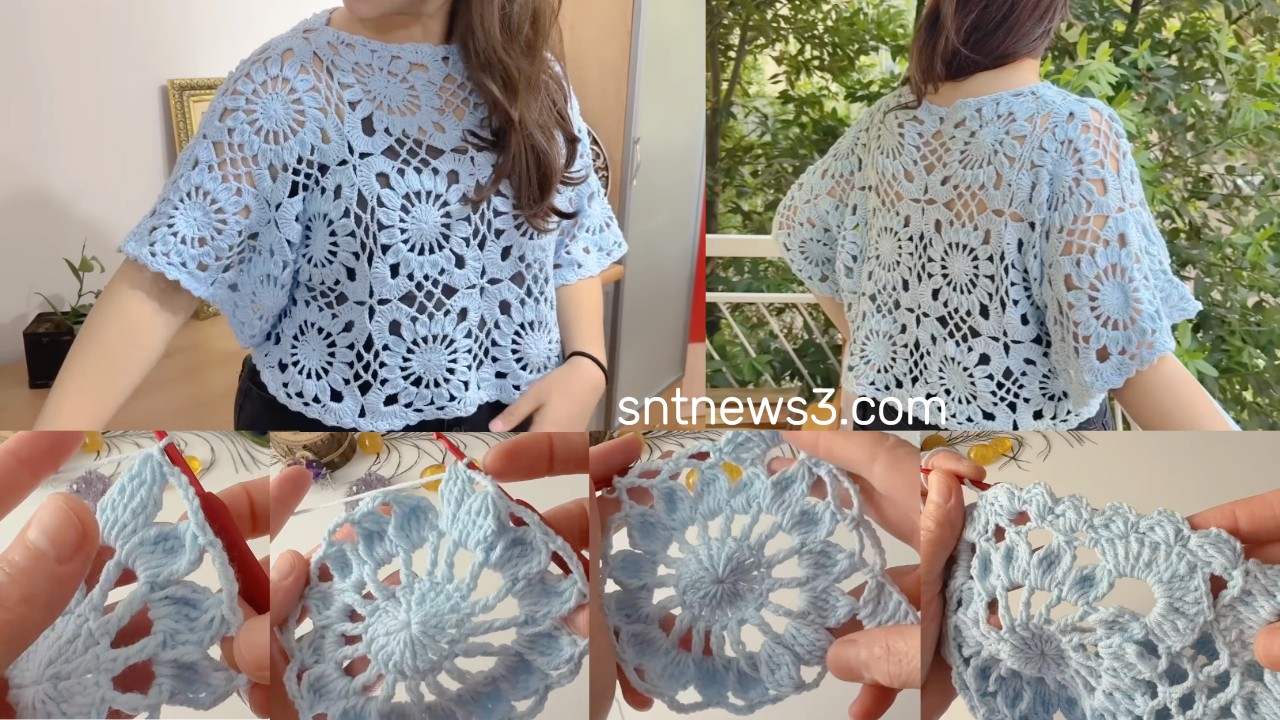
by Great — below is a clear, ready-to-use step-by-step written tutorial (US terms) that recreates a motif crop blouse in the style of the ÖRGÜ MÜ DEDİNİZ video. It tells you everything you need: materials, an exact hex/square-ish motif worked in rounds, how many motifs for common sizes, blocking, join-as-you-go + sewn joins, finishing, and yarn estimates. Use this while you crochet — no video needed.
I assume a blocked motif ≈ 10 cm (4″) across as a working example. If your motifs end up larger/smaller, I explain how to recalc counts. Ready? Let’s go.
Quick summary
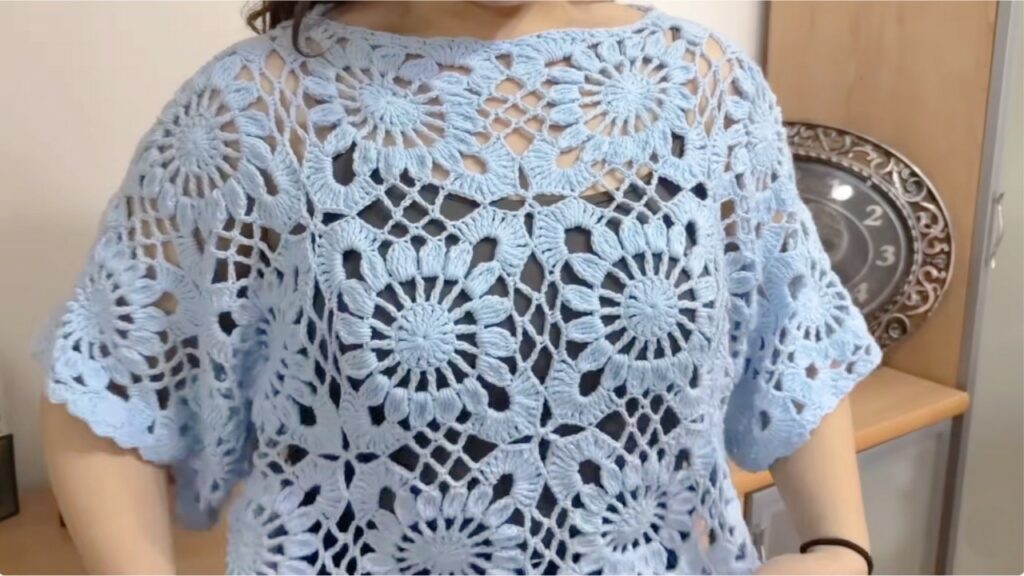
- What: Lacy motif crop blouse made from joined motifs (front + back panels).
- Skill: beginner → intermediate (motifs + joining).
- Tools: US crochet terms in instructions.
- Example finished bust sizes included for S / M / L.
Materials
- Yarn: cotton or cotton blend (sport / DK recommended).
- Hook: 3.0–3.5 mm for sport; 3.5–4.0 mm for DK (use whatever gives you the desired drape).
- Tapestry needle, scissors, blocking pins/mat, stitch markers (optional).
- Optional: small buttons, narrow ribbon for tie straps.
Estimate (example)
- S crop blouse: 250–350 g DK
- M: 350–450 g DK
- L: 450–600 g DK
(We’ll give a more accurate estimate if you tell me your motif weight.)
Abbreviations (US)
- ch = chain
- sl st = slip stitch
- sc = single crochet
- hdc = half double crochet
- dc = double crochet
- tr = treble crochet
- sp = space
- st = stitch
- rep = repeat
- JAYG = join-as-you-go
1) Make and test one motif (VERY IMPORTANT)
Make one motif first and block it. Measure the motif width across flats (W in cm). I’ll use W ≈ 10 cm in the counts below — if yours is different use the recalculation formulas in Section 6.
2) Motif pattern — worked in rounds (one motif)
This motif is a lacy floral/pineapple-ish hex/square that tiles neatly.
Work loosely so lace stays airy.
Round 1 — center
- make a magic ring. ch 3 (counts as dc).
- Work 11 dc into ring. (12 dc total). Pull ring closed. Join with sl st to top of ch-3.
Round 2 — anchors
- ch 1, sc in next dc, ch 3 — repeat around (12 sc + 12 ch-3 loops).
- Join with sl st to first sc.
Round 3 — small petals
- Sl st into first ch-3 loop.
- Into each loop work: (sc, ch1, hdc, 3 dc, hdc, ch1, sc) — tapered petal. (12 petals)
- Join with sl st.
Round 4 — chain arches
- ch 1, sc in outer sc of petal, ch 5 — repeat around to make 12 ch-5 arches. Join.
Round 5 — alternating fans/connectors
- Into every other ch-5 arch work (sc, ch1, hdc, 5 dc, hdc, ch1, sc) (large fan).
- Into the remaining arches work (sc, ch 3, sc) (small connector).
- Repeat alternating around. Join.
Round 6 — tall loops row
- ch 1, sc in first sc, ch 7, sc in next sc — repeat across (12 ch-7 loops). Join.
Round 7 — top fans
- In each ch-7 loop work: (sc, ch2, 3 dc, ch2, sc) — narrow top fan. Join.
Round 8 — create 6 corner points (hex shape)
You have 12 top-fan spaces. Make corners in every 2nd top-fan to get 6 corners.
- Into top fan #1 — work (3 dc); into top fan #2 — work (3 dc, ch 3, 3 dc) (corner); repeat this [3dc][corner] pattern around.
- Join with sl st.
Round 9 — tidy sc round (joinable)
- ch 1, sc evenly around motif; work 3 sc into each corner ch-3. Join and fasten off.
- Block motif to square/hexagon measuring your target W.
Notes: if Round 8 feels confusing, think simply: place a corner every other top fan so you end with six corners evenly spaced.
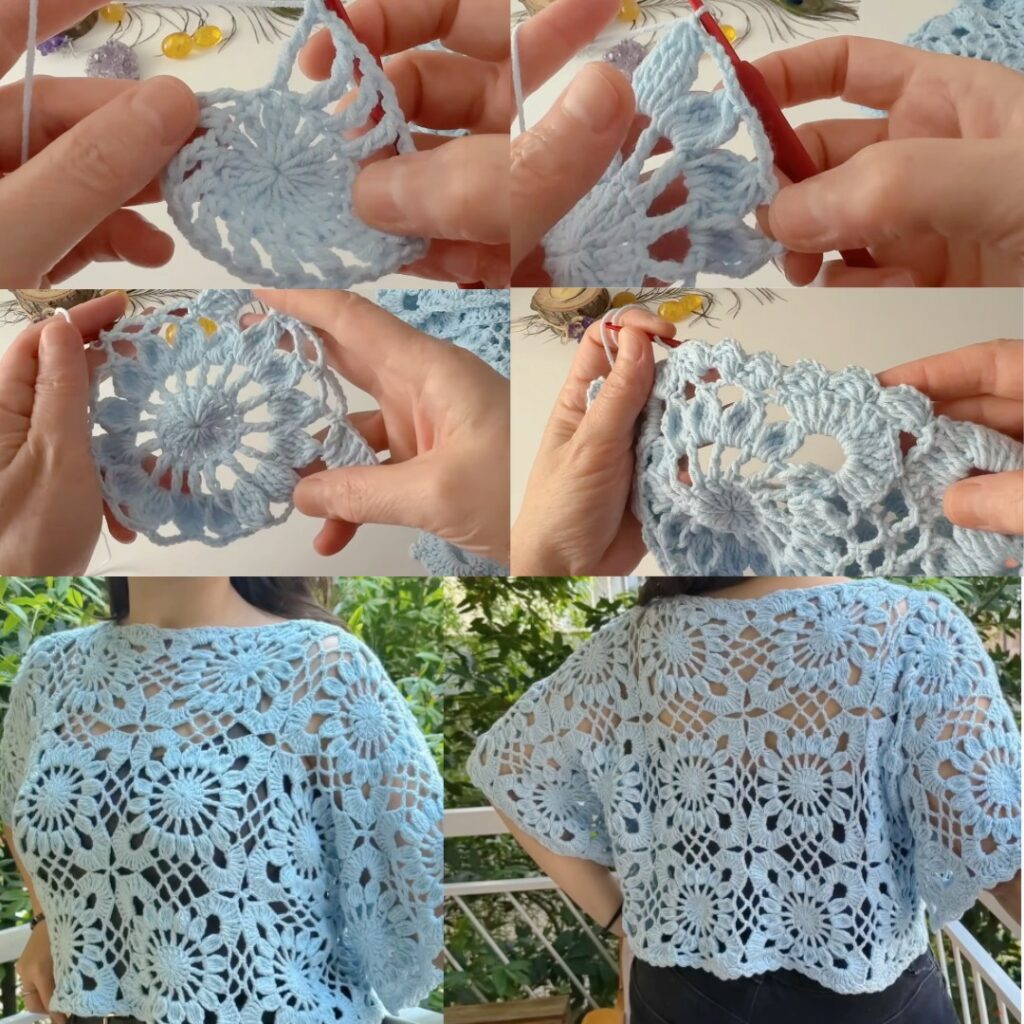
3) How many motifs do you need (S / M / L example)
Using blocked motif width W = 10 cm as example.
Decide finished bust (with ease) and crop height in motifs (rows). Example finished bust targets:
- S ≈ 86 cm (34″)
- M ≈ 96 cm (38″)
- L ≈ 106 cm (42″)
Calculate motifs across (full width) = finished bust ÷ W. We usually split front/back.
Example layouts (common crop length ~ 18–22 cm → 2 rows if W=10 cm; 3 rows gives a longer crop):
Small (S) — modest crop
- motifs across full chest ≈ 86 / 10 ≈ 8.6 → use 9 motifs across total (4 front + 5 back or 4+4 with center seam; easier: front = 4, back = 5).
- rows (height) = 2 rows → front panel = 4 × 2 = 8 motifs, back panel = 5 × 2 = 10 motifs.
- total motifs ≈ 18, plus 2–4 extras for straps/adjustments → ~20 motifs.
Medium (M)
- across ≈ 96 / 10 ≈ 9.6 → use 10 motifs across (front 5, back 5).
- rows = 2 → front = 5 × 2 = 10, back = 5 × 2 = 10 → total 20 + extras → ~22–24 motifs.
Large (L)
- across ≈ 106 / 10 ≈ 10.6 → use 11 motifs across (front 5 + back 6).
- rows = 2–3 depending on desired crop length (2 rows = short crop; 3 rows = longer).
- If 2 rows: front 5×2=10 + back 6×2=12 → 22 motifs (+ extras). If you want more length use 3 rows: 5×3 + 6×3 = 33 motifs.
⚠️ If your blocked motif W ≠ 10 cm, use this formula:
- motifs_across_total = round(finished_bust_cm / W)
- front_motifs = round(motifs_across_total / 2)
- rows = round(desired_height_cm / W)
- total motifs = motifs_across_total × rows (then split into front/back)
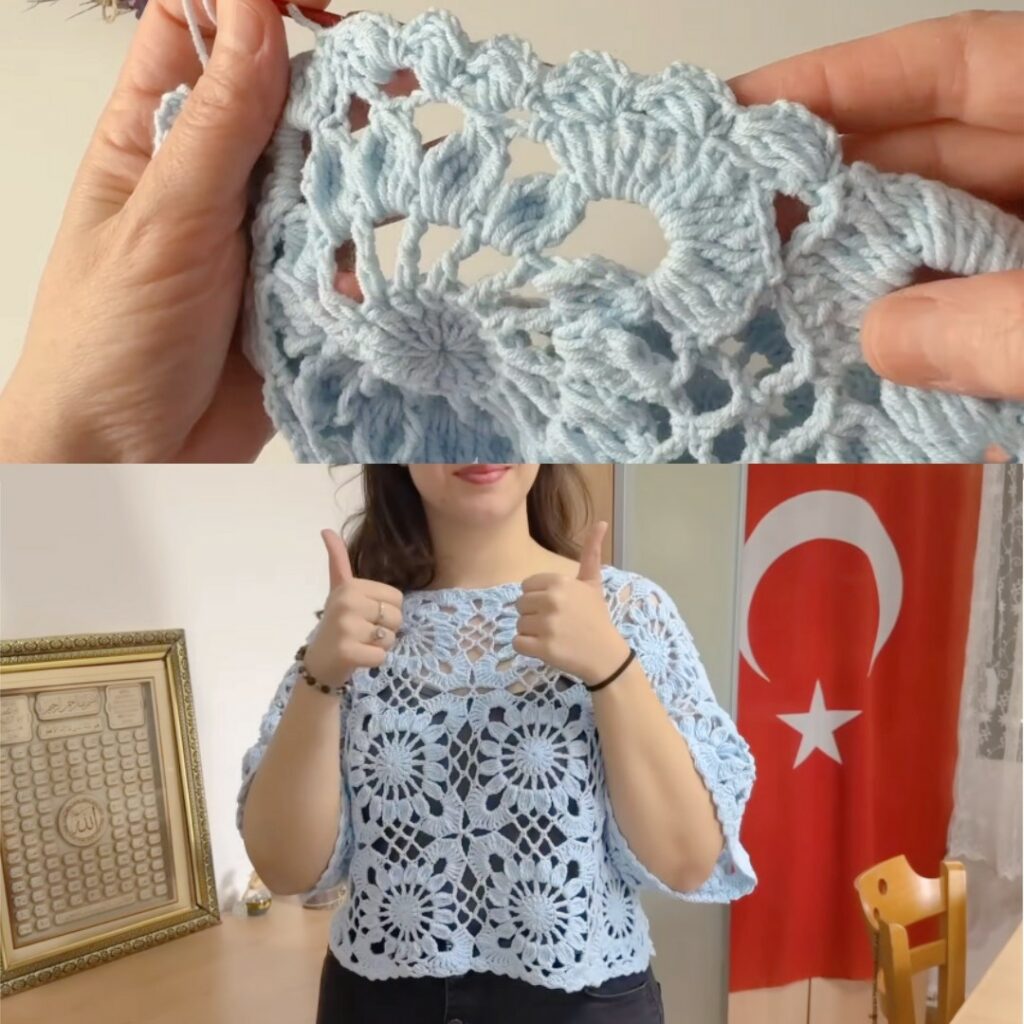
4) Join motifs — options
Recommended: Join-As-You-Go (JAYG)
Join on the final sc round (Round 9):
JAYG quick script (where joining happens):
- On the new motif’s Round 9 when you come to a side that will touch a finished neighbor:
- Instead of plain
scin that stitch, do:sc in your motif st, ch 1, sl st into the corresponding sc (or corner sc) of the finished motif, ch 1. - Continue your sc round. For corners that meet two neighbors, sl st into both neighbors’ corner ch-3 spaces symmetrically.
- Instead of plain
- Work the first row left to right; for the second row, join each new motif to the motif above and the one to the left as you go.
Tips:
- Pin neighbors before joining to make alignment precise.
- If seams feel tight, make the sl st joins looser or use ch-2 instead of ch-1 for more slack.
Alternative: Sew after blocking
- Block all motifs. Lay them on the blocking mat in the layout. Use a tapestry needle and matching yarn to mattress stitch through back loops only for a flatter seam. Whipstitch is acceptable but bulkier.
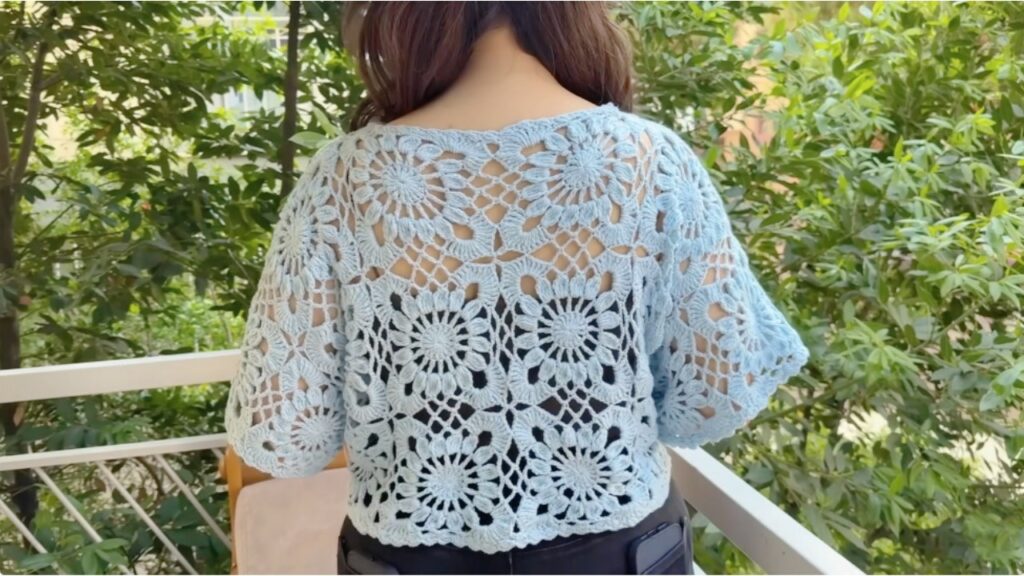
5) Assembly: panels → shoulders → sides → straps
- Join motifs into two panels (front left + front right OR front single + back) according to your layout. Many makers do front-left + front-right (mirror) and one back panel. For simplicity I recommend: make one front panel and one back panel then seam center front if needed.
- Shoulders: join top row motifs of front & back, but leave a neck opening centered. For example leave 2 motif widths at top center open (or whatever neck width you prefer). Pin and try on before finalizing.
- Sides: join side seams from hem up to where you want the armhole to be, typically leaving ~10–15 cm free (one motif height or so) for a cap sleeve or armhole opening.
- Straps / sleeves:
- Straps: chain a long strap (e.g., ch 60–80), fold and sc to make a flat strap, attach under shoulder motifs and tie or sew.
- Short cap sleeve: add 1 motif row around the armhole and sew in.
- No sleeve: leave as a sleeveless crop.
6) Edging & finishing
Neck + armhole band
- Pick up stitches around opening: sc evenly for 1 round; in corners place 3 sc.
- Optional next round: shell scallop skip 2 sc, 5 dc in next sc, skip 2, sc for feminine edge.
Bottom hem
- Add one sc round for stability, then 1 shell round for decoration or leave raw if you like the motif edge.
Final block
- Block assembled blouse to final measurements to even seams and open lace.
7) Yarn estimate method (accurate)
- Crochet one motif and weigh it (in grams).
- Multiply weight per motif × total motifs needed.
- Add ~10–15% for joining, edgings, straps. That gives grams of yarn to buy.
Example: one motif weighs 10 g, you need 22 motifs → 220 g + 15% ≈ 253 g → buy 300 g to be safe.
8) Troubleshooting & tips
- Motifs vary in size: block every motif to same dimensions. If some remain small add an extra sc round to enlarge them.
- Seams pucker: join more loosely or use JAYG but slip-stitch more gently. Sewing with mattress stitch through back loops only often gives the flattest seam.
- Neck too narrow: unseam shoulders and leave more motifs open at center before re-joining.
- Want more coverage: add another motif row at the bottom or increase motif size (larger hook/yarn).
- Edges curling: add a sc stabilizer round before decorative scallops.
9) Quick stitch cheat-sheet (for reference)
- R1: magic ring → 12 dc.
- R2: sc, ch3 anchors.
- R3: (sc, ch1, hdc, 3dc, hdc, ch1, sc) in each loop (12 petals).
- R4: sc, ch5 arches.
- R5: alternate (big fan) / (sc,ch3,sc).
- R6: ch7 loops.
- R7: (sc, ch2, 3dc, ch2, sc) in loops.
- R8: [3dc][corner (3dc,ch3,3dc)] every other top to make 6 corners.
- R9: sc round (3 sc in corners) — block.
VIDEO: