 by
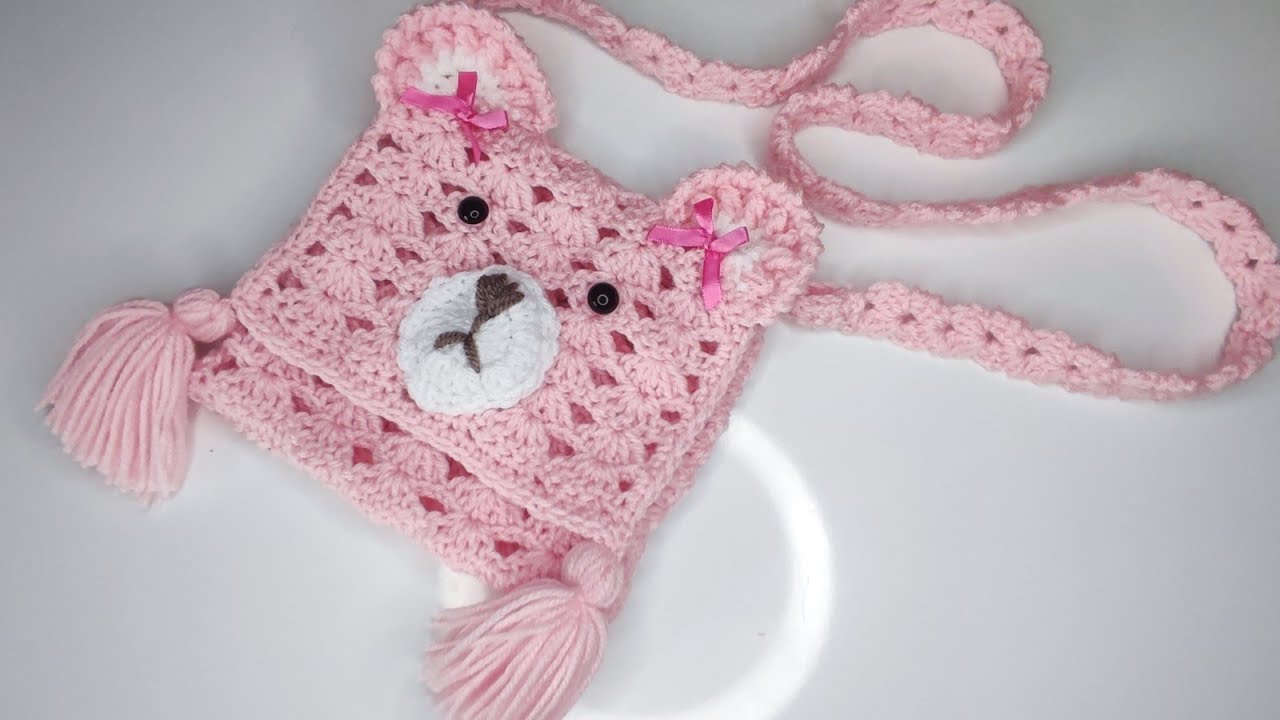
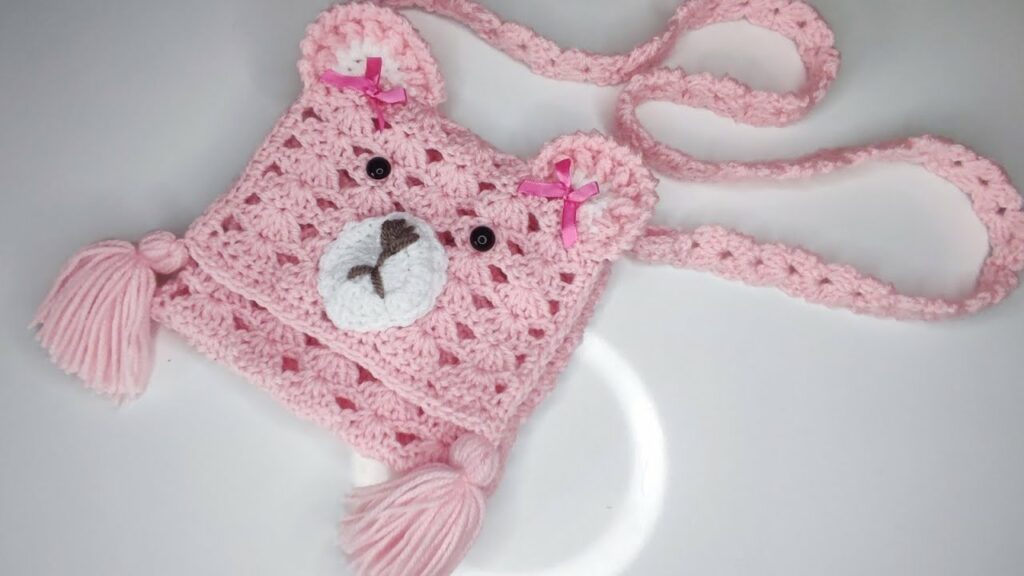
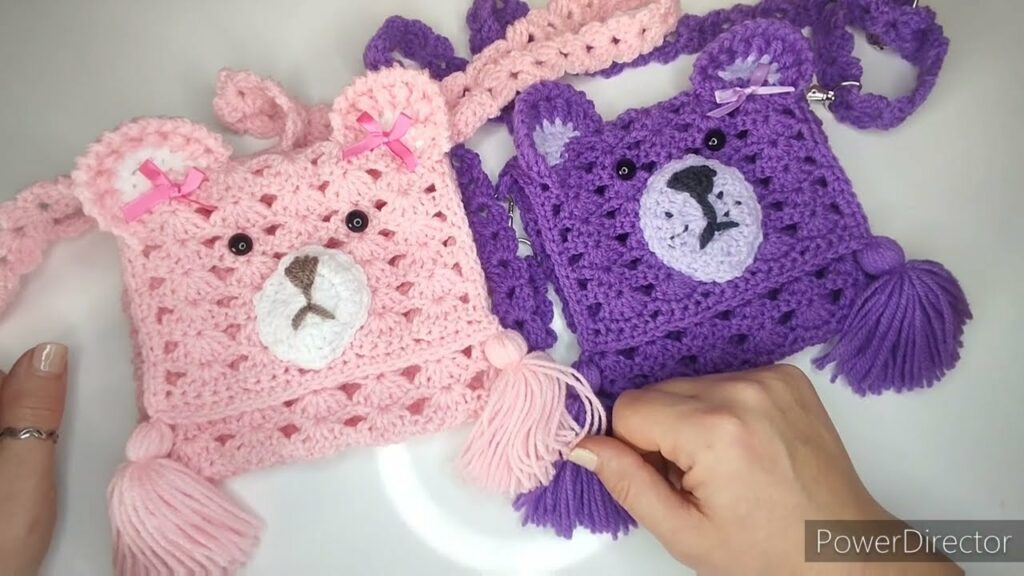
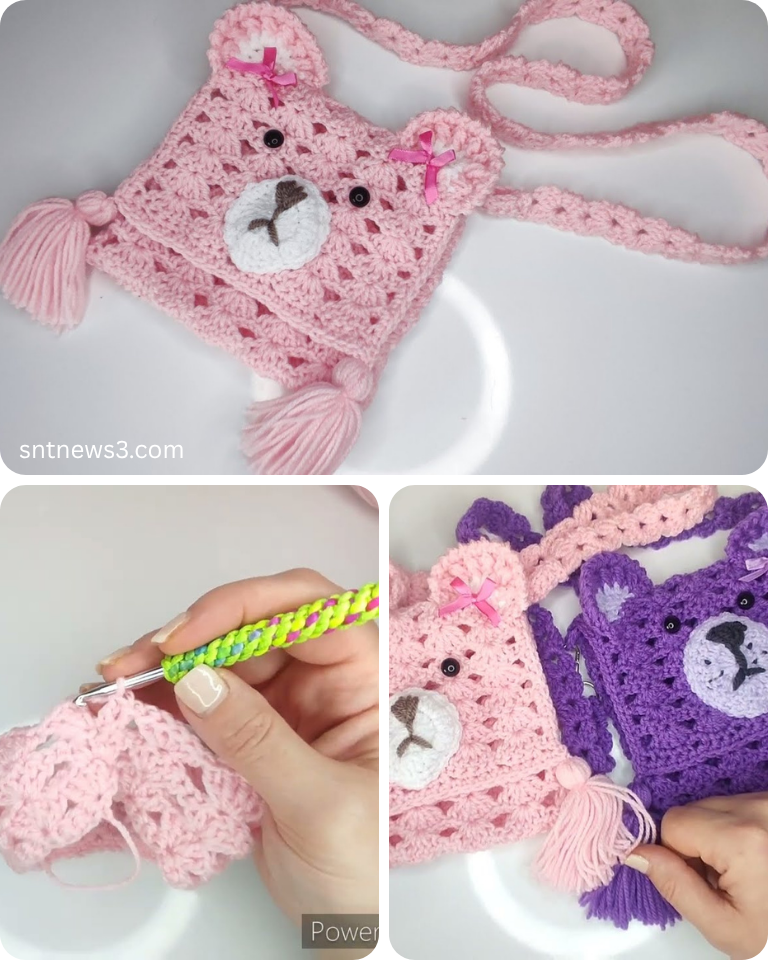
by Who can resist the charm of a cuddly bear? Now imagine that charm translated into a functional and utterly adorable accessory! A crocheted bear bag or purse is a fantastic project that combines the joy of amigurumi (crocheting 3D shapes) with the practicality of a small carrying bag. Perfect for a child’s precious treasures, a unique statement piece for an adult, or a thoughtful handmade gift, this bag is guaranteed to bring smiles.
This detailed article will guide you step-by-step through crocheting your very own bear bag. We’ll focus on creating a round, flat bag body and then adding the essential bear features – ears, a muzzle, and embroidered details – to bring your cuddly companion to life. Get ready to crochet a bag that’s bursting with personality!
Why Crochet a Bear Bag/Purse?
- Adorable & Unique: Stand out from the crowd with a whimsical accessory that showcases your crafting skills.
- Customizable: Endless possibilities for color combinations, bear expressions, and adding little details like bows or scarves.
- Skill Building: Practices fundamental crochet techniques (working in the round, increasing, invisible decreases), basic amigurumi construction, and simple embroidery.
- Great Gift: A thoughtful and playful handmade present for birthdays, holidays, or just because.
- Stash Buster: Ideal for using up smaller amounts of yarn for the facial features or inner ears.
- Functional Art: Not just decorative, but a usable bag for small essentials.
Key Considerations Before You Start:
- Size & Functionality:
- For a Child: A smaller bag (approx. 6-8 inches diameter) is perfect for carrying small toys, snacks, or treasures.
- For an Adult: A slightly larger bag (8-10 inches diameter or more) can comfortably fit a phone, wallet, and keys.
- This tutorial will focus on a child’s small purse (approx. 7 inches diameter), but notes on how to adjust for larger sizes will be included.
- Yarn Choice:
- Main Body (Bear Color): Choose a yarn that’s soft, durable, and holds stitch definition well.
- Acrylic: Affordable, wide color range, durable, and highly washable. Great for a plush, cuddly look.
- Cotton or Cotton Blends: Good stitch definition, sturdy, and breathable.
- Chenille/Velvet Yarn: For an extra fuzzy, super soft bear, but can be trickier for beginners as stitches are harder to see.
- Accent Colors: Small amounts of contrasting colors for the muzzle (e.g., cream, light brown), nose (black/dark brown), and inner ears (pink/white).
- Weight: Worsted weight (Category 4) is highly recommended as it’s easy to work with and creates a good size for this project.
- Main Body (Bear Color): Choose a yarn that’s soft, durable, and holds stitch definition well.
- Hook Size:
- Match your hook size to your yarn weight. For amigurumi or bags, it’s often best to go down half a size from the yarn label’s recommendation to create a denser fabric with no gaps.
- For Worsted weight yarn: 4.0 mm (US G/6) or 4.5 mm (US 7).
- Stitch Patterns:
- The entire bag and features will primarily use single crochet (sc) worked in continuous rounds (unless otherwise specified) to create a dense fabric.
- We’ll use increases (sc inc) and invisible decreases (sc2tog through front loops only) for shaping.
- Construction Method: We’ll crochet two flat circles for the front and back panels, crochet the ears and muzzle separately, assemble the face, and then join the panels.
- Closure: A simple button-and-loop closure or a drawstring are easy options.
- Strap: A basic crocheted strap will be included.
Materials You’ll Need:
- Yarn:
- Main Color (Bear Body): Approx. 100-150 yards of Worsted Weight yarn (e.g., brown, tan, cream, gray).
- Muzzle Color: Small amount (approx. 10-15 yards) of Worsted Weight yarn in a contrasting color (e.g., cream, light brown).
- Nose/Mouth/Eye Embroidery: Small amounts of black or dark brown Worsted Weight yarn.
- Inner Ear Color (Optional): Small amount of pink or white yarn.
- Crochet Hook: Size G/6 (4.0 mm) or H/8 (5.0 mm) (adjust for tension).
- Yarn Needle (Tapestry Needle): For weaving in ends and seaming.
- Scissors: For cutting yarn.
- Stitch Marker: Essential for working in continuous rounds.
- Safety Eyes (Optional): 2 small (approx. 8mm-10mm) safety eyes with washers (ensure they are securely attached if for a small child).
- Stuffing (Optional): Tiny amount for muzzle to give it dimension.
- Button (Optional): One button (approx. 3/4 inch diameter) for closure.
Essential Crochet Abbreviations:
- ch: chain
- sl st: slip stitch
- sc: single crochet
- sc inc: single crochet increase (2 sc in same st)
- sc2tog: single crochet 2 together (decrease – use invisible decrease for neater look)
- st(s): stitch(es)
- MR: magic ring (or magic circle)
- (): indicates instructions to be worked into the same stitch/space
- ***…***: repeat instructions within asterisks
- [ ]: indicates stitch counts at the end of a round/row
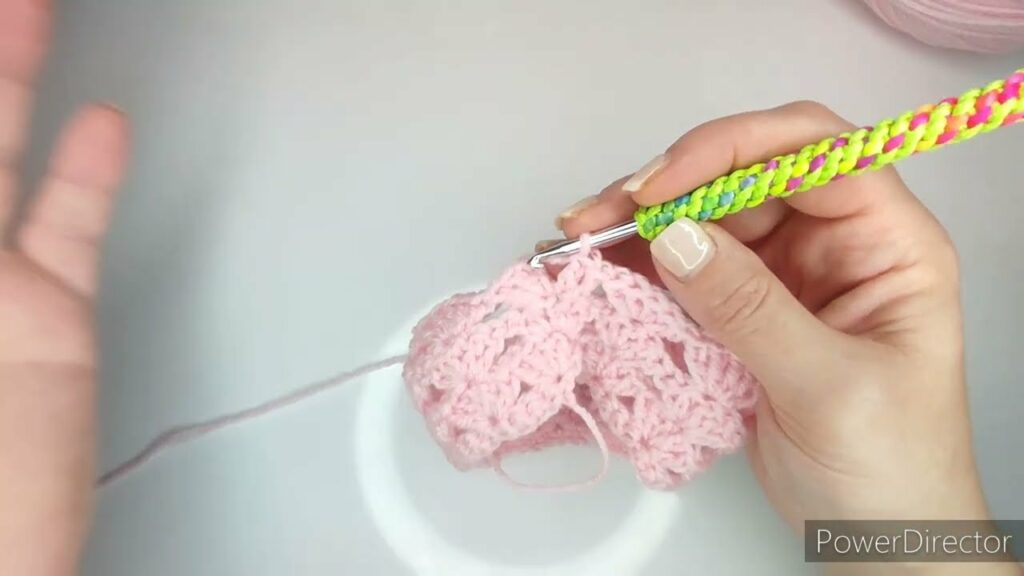
How to Crochet a Bear Bag/Purse: Step-by-Step Tutorial (Child’s Bag Approx. 7″ Diameter)
All parts worked in continuous rounds unless specified. Use a stitch marker to mark the first stitch of each round.
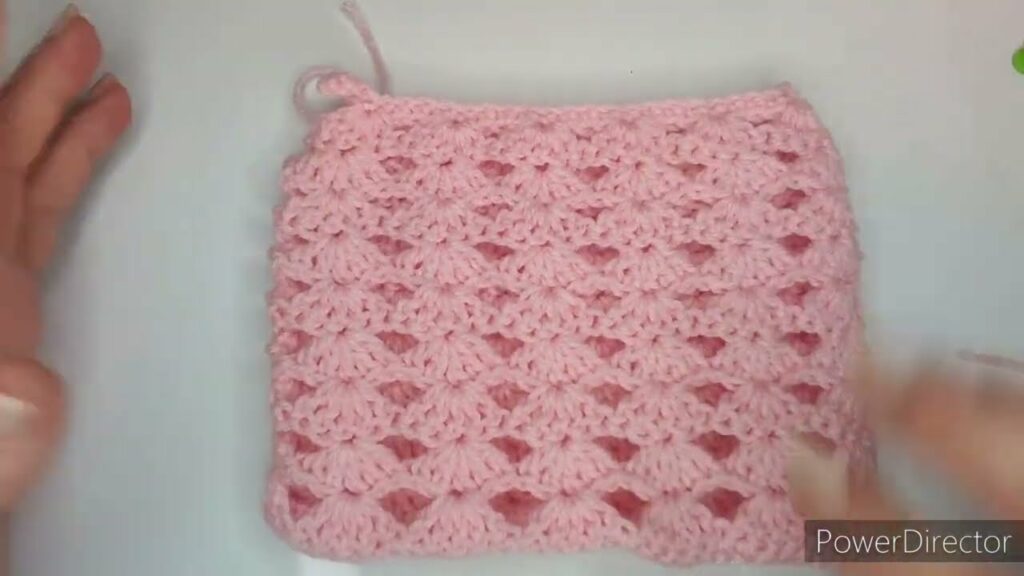
Part 1: The Bag Body Panels (Make 2 – Front & Back)
We’ll create two identical flat circles.
- Start with Main Color yarn.
- Round 1: Make a MR. Sc 6 into MR. Pull tail tight to close ring. Place stitch marker in first sc.
- [6 sc]
- Round 2: Sc inc in each st around.
- [12 sc]
- Round 3:Sc in next st, sc inc in next st. Repeat from * around.
- [18 sc]
- Round 4:Sc in next 2 sts, sc inc in next st. Repeat from * around.
- [24 sc]
- Round 5:Sc in next 3 sts, sc inc in next st. Repeat from * around.
- [30 sc]
- Round 6:Sc in next 4 sts, sc inc in next st. Repeat from * around.
- [36 sc]
- Round 7:Sc in next 5 sts, sc inc in next st. Repeat from * around.
- [42 sc]
- Round 8:Sc in next 6 sts, sc inc in next st. Repeat from * around.
- [48 sc]
- Round 9:Sc in next 7 sts, sc inc in next st. Repeat from * around.
- [54 sc]
- Round 10:Sc in next 8 sts, sc inc in next st. Repeat from * around.
- [60 sc]
- For a larger bag, continue increasing in this pattern (e.g., Round 11: Sc in next 9 sts, sc inc in next st. [66 sc], etc.) until desired diameter.
- FO the first panel, leaving a long tail (approx. 18-24 inches) for seaming later.
- For the second panel: Repeat steps 1-11. Do NOT fasten off the second panel; we will use this yarn for joining.
Part 2: The Bear’s Snout/Muzzle
This will be a slightly raised circle.
- Start with Muzzle Color yarn.
- Round 1: Make a MR. Sc 6 into MR. Place stitch marker.
- [6 sc]
- Round 2: Sc inc in each st around.
- [12 sc]
- Round 3:Sc in next st, sc inc in next st. Repeat from * around.
- [18 sc]
- Round 4: Sc in each st around.
- [18 sc]
- FO, leaving a long tail for sewing to the front panel.
Part 3: The Ears (Make 2)
Simple half-circles for the ears.
- Start with Main Color yarn.
- Row 1: Ch 8. Sc in 2nd ch from hook and in next 6 ch.
- [7 sc]
- Ch 1, turn.
- Row 2: Sc in each sc across.
- [7 sc]
- Ch 1, turn.
- Row 3: Sc2tog, sc in next 3 sts, sc2tog.
- [5 sc]
- Ch 1, turn.
- Row 4: Sc2tog, sc in next st, sc2tog.
- [3 sc]
- FO, leaving a long tail for sewing. (Optional: To make inner ears, repeat first 2 rows with a smaller hook and accent color, then sew inside).

Part 4: Assembling the Bear’s Face
Do this before joining the two bag panels.
- Attach Snout: Place the snout in the lower center of one of your bag panels. Sew securely using the long tail and yarn needle. You can add a tiny bit of stuffing to the snout before fully sewing it down to give it some dimension.
- Embroider Nose & Mouth:
- Using black or dark brown yarn and your yarn needle, embroider an inverted triangle shape for the nose on the upper part of the snout.
- From the bottom center of the nose, make a straight stitch downwards, then two small curved stitches extending to the sides for the mouth.
- Add Eyes:
- Safety Eyes: If using, insert safety eyes above the snout, evenly spaced, ensuring they are symmetrical. Secure with washers on the wrong side.
- Embroidered Eyes: If not using safety eyes (especially for very young children), embroider two small circles or vertical lines for the eyes using black/dark brown yarn.
- Attach Ears: Fold the bottom edge of each ear slightly to create a more rounded shape. Position the ears on the top edge of the front bag panel, evenly spaced. Sew securely using the long tails.
Part 5: Joining the Bag Panels
Now we’ll connect the front (with face) and back panels to form the bag.
- With the second bag panel (the one you didn’t fasten off) still on your hook, place the front panel (with bear face) behind it, so their wrong sides are facing each other.
- Join Round: Ch 1 (does NOT count as a st). Insert hook through both loops of the first stitch on the top panel AND through both loops of the corresponding first stitch on the bottom panel. Sc through both layers.
- Continue making 1 sc through both layers around the entire perimeter of the bag, approximately 3/4 of the way around. Leave about 15-20 stitches (the top section) unjoined for the bag opening.
- Important: Stop at the exact point where you want the bag opening to begin.
- FO, leaving a tail to weave in.
Part 6: The Strap
This creates a sturdy shoulder or crossbody strap.
- Start with Main Color yarn.
- Row 1: Ch 4. Sc in 2nd ch from hook and in each ch across.
- [3 sc]
- Ch 1, turn.
- Repeat Row 1: Sc in each sc across.
- [3 sc]
- Ch 1, turn.
- Continue repeating this row until your strap reaches your desired length (e.g., 20-25 inches for a child’s shoulder bag, 40-50 inches for an adult crossbody).
- FO, leaving long tails (at least 6-8 inches) at both ends for attaching.
- Attach Strap: Using your yarn needle, securely sew one end of the strap to each side of the bag opening. Stitch multiple times for durability.
Part 7: Optional Closure (Button Loop)
- Attach Main Color yarn with a sl st to the center of the back panel’s opening edge.
- Ch 10-15 (adjust chain length to fit your button).
- Sl st back into the same stitch on the bag.
- FO, weave in tail.
- Sew your button onto the corresponding spot on the front panel, aligning with the loop.
Finishing Your Bear Bag/Purse:
- Weave in All Ends: Take your time to neatly weave in every yarn tail using your yarn needle. This is crucial for a clean, professional finish.
- Shape: Gently pat and shape your bag to ensure it looks round and the features are well-defined.
Your Crocheted Bear Bag/Purse is Complete!
You’ve created a functional, charming, and utterly unique accessory that will bring a smile to anyone’s face.
Tips for Success & Customization:
- Yarn Texture: Using a fluffy or chenille yarn for the main body will give your bear a softer, cuddlier feel, but can be harder to see stitches.
- Facial Expressions: Experiment with different eye shapes (embroidered sleepy eyes), eyebrow angles, or mouth positions to give your bear different personalities.
- Add Blush: Use a little pink blush or fabric paint to lightly dab onto the cheeks for extra cuteness.
- Lining (For Durability): For a more robust bag that won’t stretch and where small items won’t fall through, sew a fabric lining. Measure the finished crocheted bag, cut two fabric circles (plus seam allowance), sew them together, and hand-stitch the lining inside the bag.
- Size Adjustments: To make a larger or smaller bag, simply adjust the number of increase rounds for the body panels. Increase the strap length accordingly.
- Different Animals: Use the same basic circular bag shape, but change the ears, muzzle, and facial embroidery to create a cat, panda, fox, or owl bag!
- Add Accessories: Give your bear a tiny crocheted bow tie, a scarf, or a flower pinned to its ear.
- Care: Refer to your yarn label for specific washing instructions. Hand washing and air drying are usually best for handmade crocheted items.
Enjoy your adorable new bear companion!
Video tutorial:

