 by
by Extraordinary Crochet Square Motif — Step-by-step (US terms)
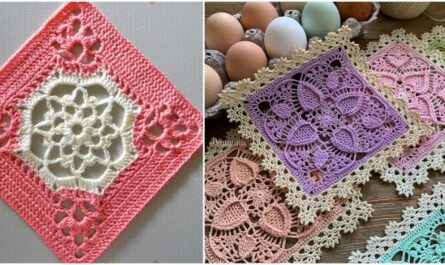
A practical, ready-to-use written tutorial you can follow to make the same kind of lacy square motif shown in the video. Use the motif for a runner, blouse, blanket or panels. Make one test motif and block it first — then scale up.
Quick overview
- What you’ll make: a lacy floral → squared square motif that tiles neatly.
- Use for: runner, blouse/top panels, shawl panels, placemats.
- Skill level: Beginner → Easy-Intermediate.
- Sample finished motif (example): ≈ 10 cm / 4″ blocked with DK yarn + 3.5 mm hook. Adjust hook/yarn to change motif size.
Materials
- Yarn: sport or DK (cotton/cotton blend recommended for crisp motifs; acrylic blend for warmer projects).
- Hook: 3.0–3.5 mm for sample DK (match to yarn/gauge).
- Tapestry needle, blocking pins/mat, scissors, stitch markers (optional).
- Optional: small buttons, ribbon, elastic (for garments).
Abbreviations (US)
- ch = chain
- sl st = slip stitch
- sc = single crochet
- hdc = half double crochet
- dc = double crochet
- tr = treble crochet
- sp = space
- st = stitch
- rep = repeat
- JAYG = join-as-you-go
- RS = right side
Make one test motif (very important)
- Crochet one motif, block it flat and measure:
- W = blocked motif width across flats (cm).
- g = weight of that blocked motif (grams) — useful for yarn estimates.
- Use W to calculate motif counts for your final project (formulas below).
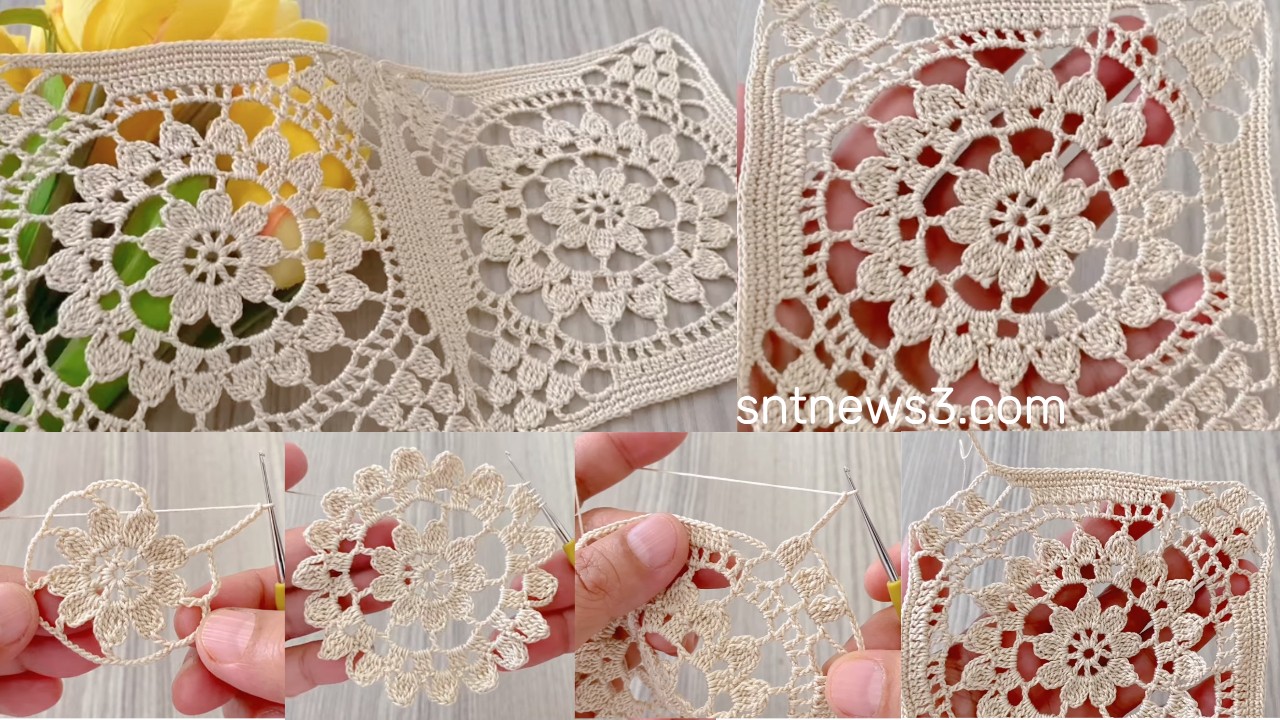
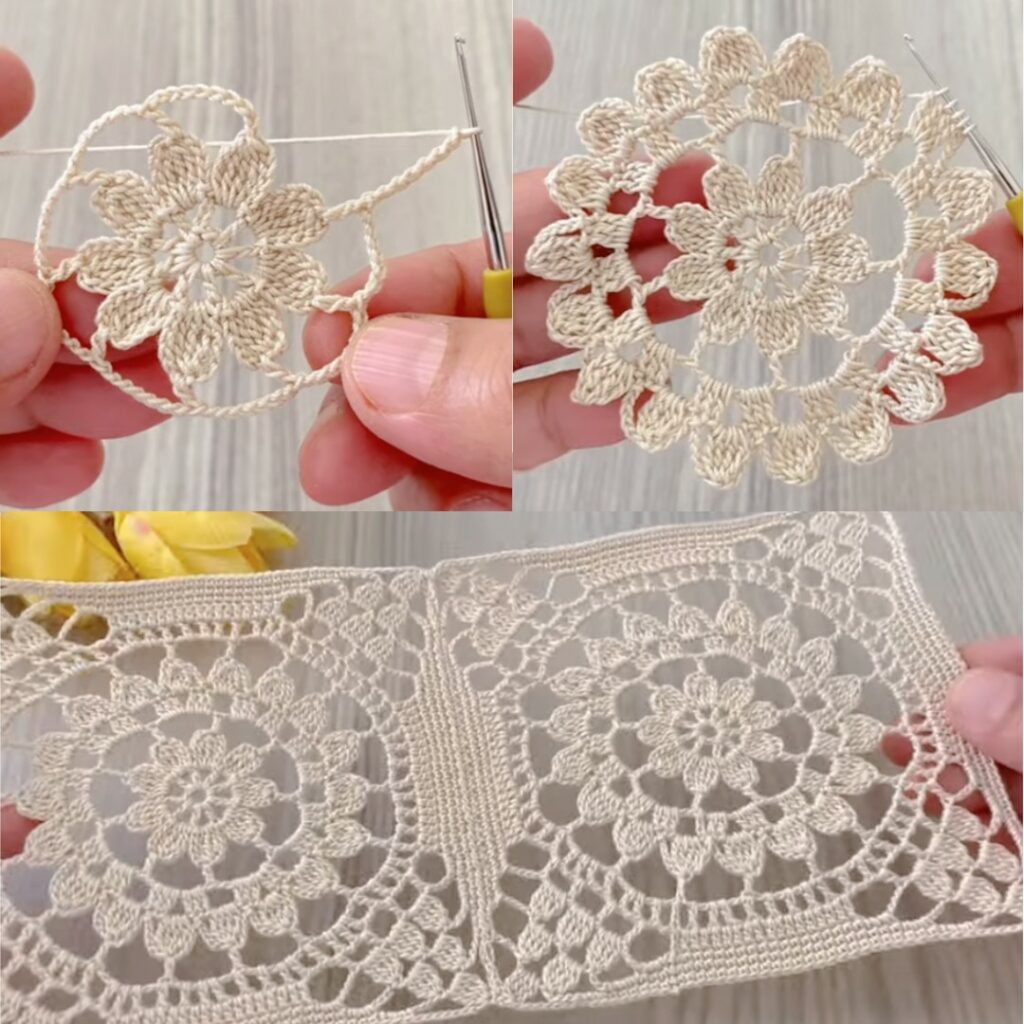
The motif — round-by-round (US terms)
Work loosely for an airy lace; block each motif to the same size.
Rnd 1 — center ring
- Make a magic ring. ch 3 (counts as dc), work 11 dc into ring (12 dc total). Pull ring closed. Join with sl st to top of ch-3.
Rnd 2 — anchor loops
- ch 1, sc in next dc, ch 3 — repeat around (12 sc + 12 ch-3 loops). Join.
Rnd 3 — small petals
- Sl st into the first ch-3 loop.
- In each loop work: (sc, ch1, hdc, 3 dc, hdc, ch1, sc). Repeat around (12 petals). Join.
Rnd 4 — connector arches
- ch 1, sc in outer sc of petal, ch 5 — repeat around to make 12 ch-5 arches. Join.
Rnd 5 — larger fans (alternating)
- Into every other ch-5 arch work: (sc, ch1, hdc, 5 dc, hdc, ch1, sc) (big fan).
- Into the remaining arches work (sc, ch3, sc) (connector). Join.
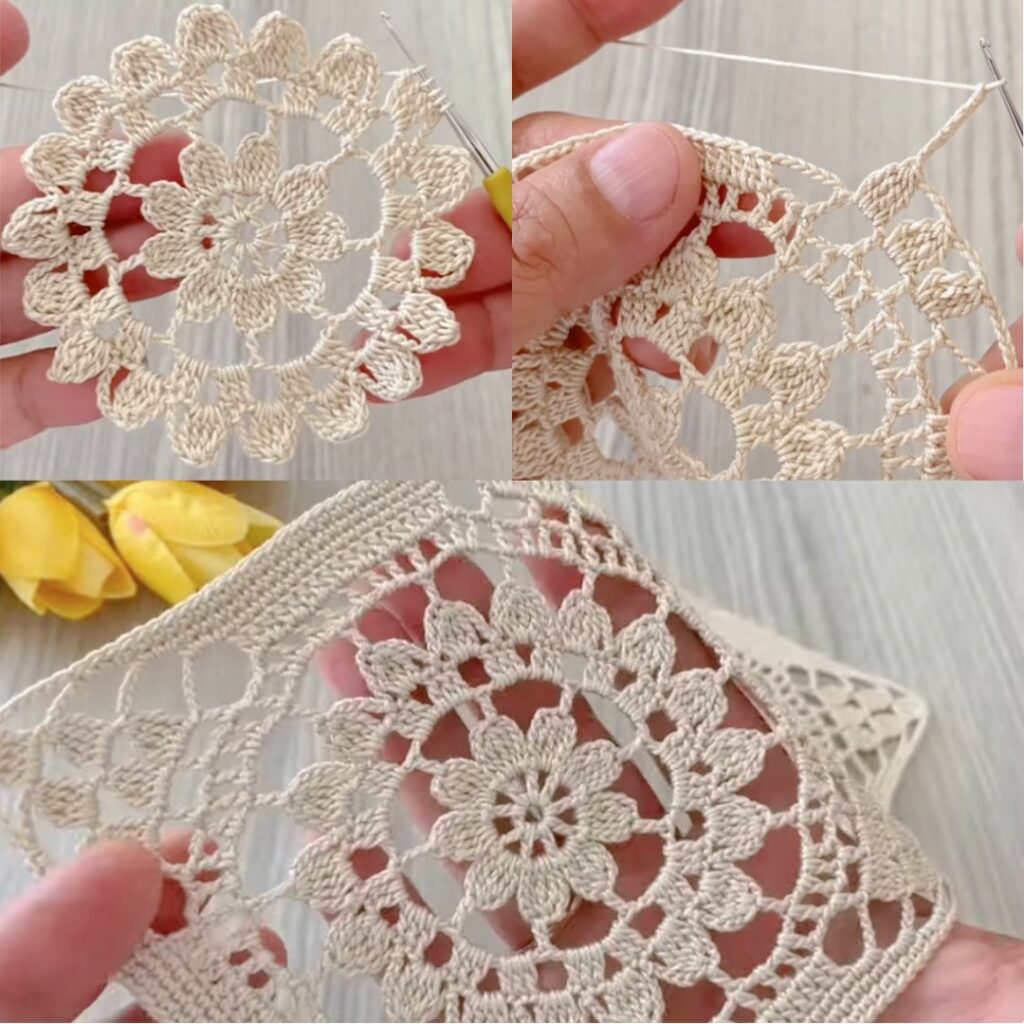
Rnd 6 — tall loops
- ch 1, sc in first sc, ch 7, sc in next sc — repeat around (12 ch-7 loops). Join.
Rnd 7 — top fans
- In each ch-7 loop work: (sc, ch2, 3 dc, ch2, sc). Join.
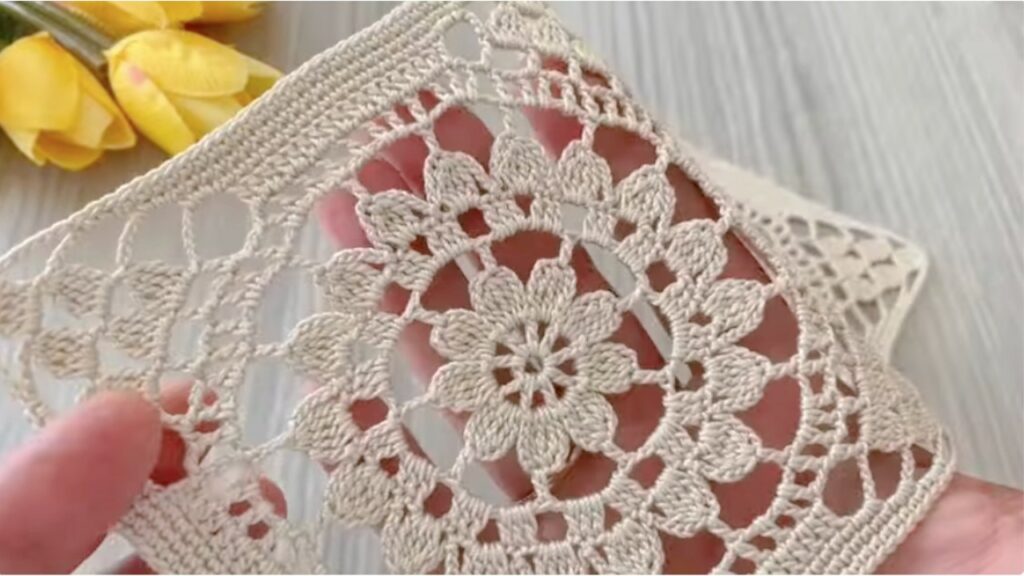
Rnd 8 — squareing round (make 4 sides)
You have 12 top fans; group them so each side has 3 fans and create 4 corner ch-3 spaces.
- ch 3 (counts as dc). 3 dc in next top-fan space; 3 dc in next top-fan space; in the third top-fan space work (3 dc, ch 3, 3 dc) (corner).
- Repeat the [3dc, 3dc, corner] sequence 4 times (consumes all 12 fan tops). Join.
Tip: if the motif looks uneven, shift which top fan becomes a corner so the 4 corners are evenly spaced.
Rnd 9 — tidy sc round (join round)
- ch 1, sc evenly around motif; place 3 sc in each corner ch-3 to round them. Join.
- Optional Rnd 10: scallop edge — skip 2 sc, 5 dc in next sc, skip 2 sc, sc in next sc — repeat around. Fasten off and weave ends.
- Block motif to final size W.
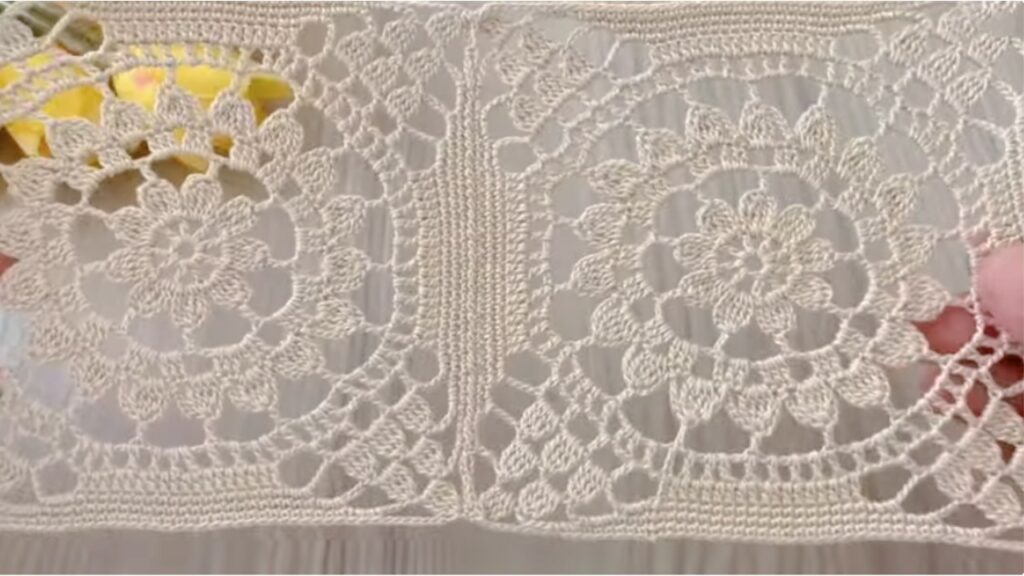
Joining motifs (two main methods)
1) Join-As-You-Go (JAYG) — recommended (do during Rnd 9)
- Make first motif fully and block it. For each new motif work through Rnd 8 and begin Rnd 9. When you reach an edge that will touch a finished neighbor, replace the plain sc with:
sc in your motif st, ch 1, sl st into the corresponding sc (or corner) of the finished neighbor, ch 1
- For a corner that meets two neighbors: sl st into both neighbors’ corner ch-3 spaces while spacing with ch-1 so you don’t flatten the corner.
- Work first row left→right (no joins on the very first motif). For the next row, join each new motif to the motif above and to the left as you progress. Pin motifs to align before joining.
- If joins feel tight, use
ch 2instead ofch 1for slightly slack joins.
2) Sew after blocking
- Block all motifs identically, lay them out, pin and sew with a tapestry needle using mattress stitch through back loops only for the flattest seam. Whipstitch is faster but more visible.
Layout & calculating motif counts
After blocking one motif, use:
motifs_across = round(desired_width_cm / W)motifs_down = round(desired_length_cm / W)total_motifs = motifs_across × motifs_down
Examples (if W ≈ 10 cm):
- Runner 35 × 140 cm → 4 × 14 = 56 motifs
- Crop blouse (96 cm bust, 2 rows tall) → ~10 motifs across (5 front + 5 back) × 2 rows = 20 motifs
Yarn estimate (accurate method)
- Weigh your blocked motif (g_per_motif).
total_grams ≈ g_per_motif × total_motifs + 10–15%(joins + edging).- Convert grams to skeins using label weight.
Example: motif = 10 g, total motifs = 60 → 600 g + 15% ≈ 690 g → buy ~700 g.
Edging options
- Classic scallop: sc round → skip 2 sc, 5 dc in next sc, skip 2, sc → repeat.
- Narrow band (garments): sc round → 3 rounds hdc in BLO for a ribbed band.
- Tiny picot trim: after sc round do (sc, ch 3, sl st in same sc) repeatedly for delicate dots.
Turning motifs into a Runner (step-by-step)
- Decide final runner size and compute motif counts using W.
- Crochet motifs and block them all to the same W.
- Join row by row with JAYG (first row left→right, subsequent rows join to above motifs).
- After full grid, work sc stabilizer round (3 sc in corners) then your decorative border (scallops or ribs).
- Final block and weave ends.
Tip: for dining use choose a washable cotton yarn.
Turning motifs into a Blouse (panel method)
- Decide finished bust & height. Compute motifs across & down. Split motifs across into front/back (e.g., total across 10 → front 5 + back 5).
- Make and block motifs. Join into front and back panels. For an open front split the front into two halves or leave central motifs unjoined to shape neckline.
- Shoulder seams: join top rows leaving a neck opening (e.g., 18–22 cm depending on size). Try on before finishing.
- Side seams: seam up to desired armhole (leave 1 motif height for cap sleeve or more for deeper armhole).
- Finish neck & armholes: pick up and work 1 round sc (3 sc in corners), then optional scallop. Add straps or cap-sleeve motifs if desired. Block and weave ends.
Troubleshooting & tips
- Motifs different sizes? Block them. If some stay small, add a thin sc round to enlarge.
- Seams pucker? Make joins looser (use ch-2) or sew with mattress stitch through back loops only.
- Corners uneven? Adjust which top fan becomes the corner in Rnd 8 so the four corners are evenly spaced.
- Edges ripple? Add stabilizing sc round before decorative shells.
- Want more coverage? Use smaller hook or add a lining for garments.
Quick cheat-sheet (one glance)
- R1: magic ring → 12 dc.
- R2: sc, ch-3 anchors.
- R3: (sc, ch1, hdc, 3dc, hdc, ch1, sc) ×12 (petals).
- R4: sc, ch-5 arches.
- R5: alternate big fan (5dc) / connector (sc,ch3,sc).
- R6: ch-7 loops.
- R7: (sc,ch2,3dc,ch2,sc) ×12.
- R8: [3dc, 3dc, corner(3dc,ch3,3dc)] ×4 → square.
- R9: sc round (3 sc in corners) — join here (JAYG). Optional scallop next.
VIDEO: