by
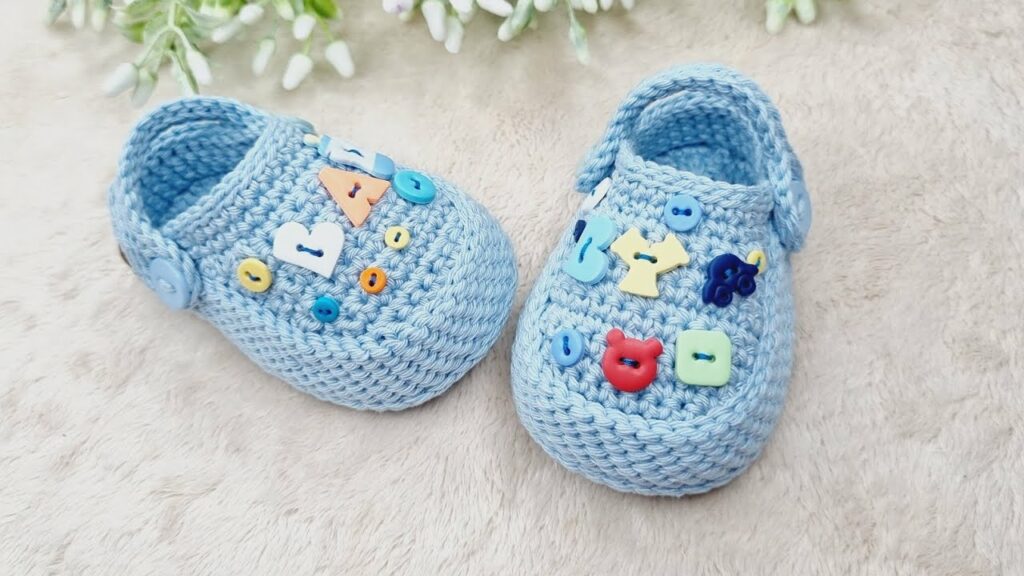
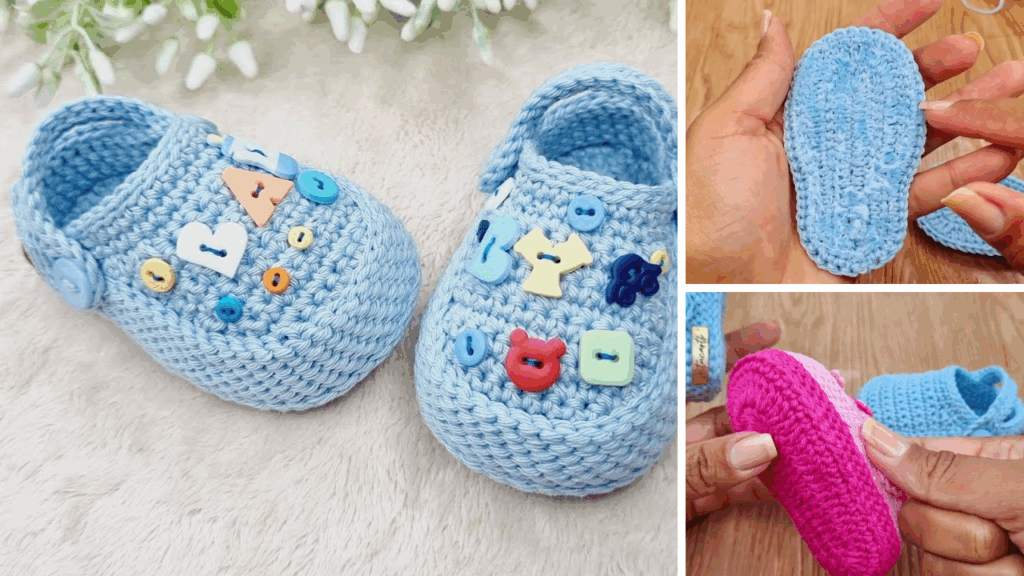
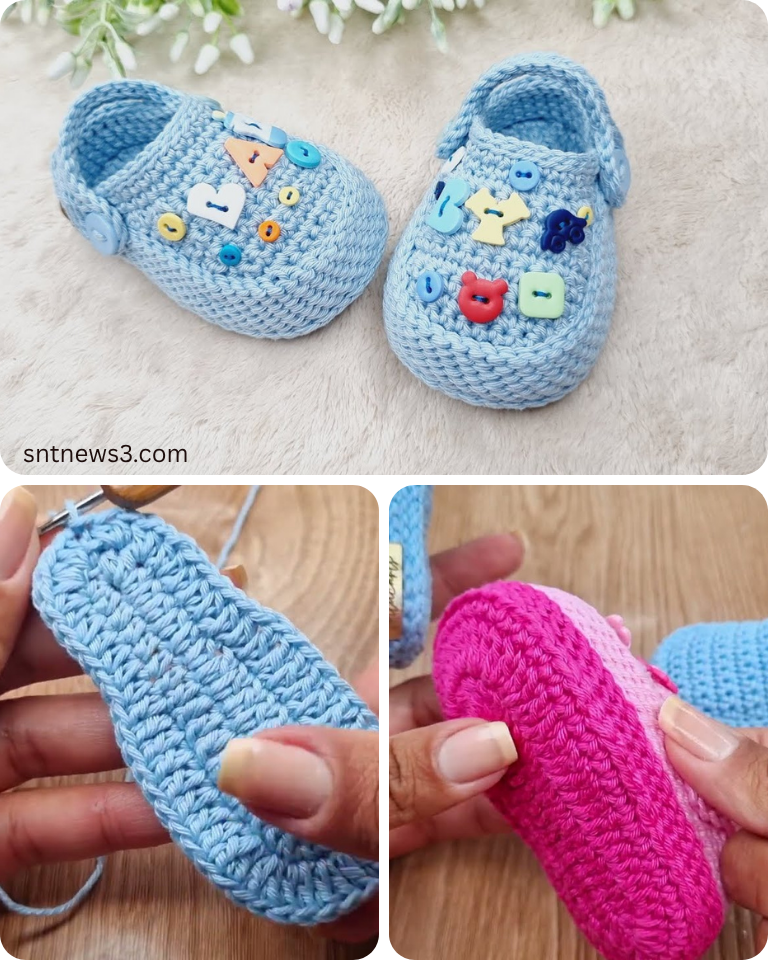
by What a fun and adorable idea! Crafting a pair of crochet Crocs for a baby is a delightful project that combines comfort with a touch of whimsical style. These tiny replicas of the iconic clog shoe make for an incredibly cute and practical accessory for little feet, perfect for both everyday wear and charming photoshoots.
Tiny Toes, Big Style: Crocheting Adorable Baby Crocs
Baby Crocs bring a playful twist to handmade baby footwear. They offer the beloved comfort and unique aesthetic of the popular adult clogs, scaled down to fit the tiniest feet. Whether you’re looking for a unique baby shower gift, a charming photo prop, or simply want to add a touch of fun to your little one’s wardrobe, crocheted baby Crocs are a rewarding and relatively simple project.
Why Crochet Baby Crocs?
- Uniquely Adorable: The distinct shape, holes, and back strap of a Croc translate into an incredibly cute and recognizable baby shoe. They’re sure to bring smiles!
- Comfort for Tiny Feet: Like their inspiration, these crocheted versions are designed to be roomy and comfortable, allowing baby’s feet to move freely without being constricted.
- Photo Perfect: Imagine a baby in a miniature pair of these! They make fantastic props for newborn and infant photography, adding a whimsical touch to any shot.
- Thoughtful Handmade Gift: A pair of handmade baby Crocs stands out from typical booties, showcasing your creativity and thoughtfulness.
- Skill Building: This project helps you practice essential crochet techniques like working in the round for the sole, shaping with increases and decreases for the upper, and adding details like straps and decorative “holes.”
- Customizable: Play with colors! Replicate classic Crocs shades, or go wild with bright, multi-colored designs to match any outfit.
Key Considerations Before You Start:
- Target Size: For baby booties, accuracy is key. A common size for crocheted baby shoes, including Crocs, is often based on the sole length.
- For newborn (0-1 month), aim for a sole of approximately 8-9 cm (3-3.5 inches).
- For 1-3 months, a 9-10 cm (3.5-4 inches) sole is a good target.
- For 3-6 months, 10-11 cm (4-4.5 inches).
- This tutorial will focus on a versatile 9.5 cm sole, suitable for 0-3 months, as it accommodates most newborns and slightly older infants.
- Yarn Choice (Softness & Structure are Key!):
- Fiber: Prioritize extreme softness and non-irritating qualities, as these will be against baby’s sensitive skin.
- Baby Acrylic: Very popular for baby items due to its softness, affordability, wide color range, and ease of care (machine washable!).
- Soft Cotton or Cotton Blends: Breathable and natural, great for warmer climates. Look for very soft varieties.
- Superwash Merino Wool: Luxuriously soft and warm, though often pricier.
- Weight: DK (Light Worsted / Category 3) is often ideal for baby items, providing a good balance of warmth and stitch definition without being too bulky. Worsted (Category 4) can also work for a slightly larger, quicker project.
- Colors: To mimic classic Crocs, choose solid colors like navy, forest green, yellow, pink, or light blue. Or, get creative with bright, bold hues!
- Fiber: Prioritize extreme softness and non-irritating qualities, as these will be against baby’s sensitive skin.
- Hook Size: Match your hook to your yarn weight, but consider going down half a size from the yarn label’s recommendation. This creates a denser fabric, helping the Croc hold its iconic shape and preventing it from becoming too floppy.
- For DK yarn, try 3.5 mm (US E/4) or 3.75 mm (US F/5).
- Gauge (Crucial for Fit!): Making a small swatch for the sole and measuring its length is the most important step to ensure the booties fit. Adjust your hook size until your sole matches the target length.
- Construction Method: Crocheted baby Crocs typically involve:
- An oval sole.
- A main upper body worked directly from the sole.
- A separate, shaped “vamp” (the front part with the holes) that is then attached.
- A back strap (often crocheted in place or sewn on).
- Small details like the “holes” and a textured band.
Materials You’ll Need:
- Yarn: Approx. 50-70 yards of soft DK (Category 3) weight baby yarn in your chosen color.
- Crochet Hook: Size E/4 (3.5 mm) or F/5 (3.75 mm) – adjust based on gauge.
- Yarn Needle (Tapestry Needle): Essential for weaving in ends and sewing pieces.
- Scissors:
- Stitch Marker (optional but helpful): To mark the beginning of rounds.
Essential Crochet Abbreviations:
- ch: chain
- sl st: slip stitch
- sc: single crochet
- hdc: half double crochet
- dc: double crochet
- sc inc: single crochet increase (2 sc in same st)
- hdc inc: half double crochet increase (2 hdc in same st)
- sc2tog: single crochet 2 together (decrease)
- st(s): stitch(es)
- BLO: back loop only (working into the back loop only of a stitch)
- FLO: front loop only (working into the front loop only of a stitch)
- (): indicates instructions to be worked into the same stitch/space
- ***…***: repeat instructions within asterisks
- []: indicates stitch counts at the end of a round
Crochet Baby Crocs Tutorial (Approx. 9.5 cm Sole – 0-3 Months)
We’ll work the sole and body primarily in hdc and sc for a sturdy yet soft fabric.
Gauge Swatch (Sole Check): Work Part 1: The Sole. Measure its length. It should be 9.5 cm (3.75 inches). If not, adjust your hook size and re-do until correct. This is critical for the Croc to fit!
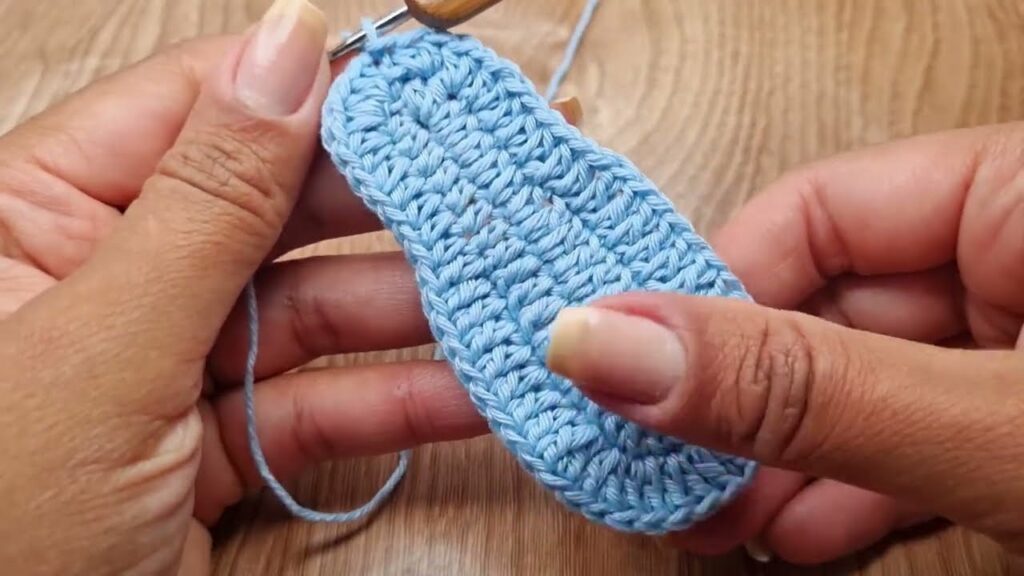
Part 1: The Sole (Foundation)
This creates the flat oval bottom of the Croc.
- Round 1: Ch 13.
- Hdc in 3rd ch from hook (counts as 1st hdc). Hdc in next 9 ch.
- (5 hdc) in last ch.
- Working along the opposite side of the starting chain: Hdc in next 10 ch.
- (4 hdc) in the very first ch where you made your first hdc.
- Join with a sl st to the top of the beginning Ch 2. [30 hdc]
- Round 2: Ch 2 (does NOT count as a st). Hdc inc in first st. Hdc in next 10 sts.
- (Hdc inc) in next 5 sts.
- Hdc in next 10 sts.
- (Hdc inc) in next 4 sts.
- Join with a sl st to the top of the first hdc. [40 hdc]
- Your sole should now measure exactly 9.5 cm (3.75 inches) in length. Adjust hook size and re-do if necessary.

Part 2: Building the Croc Body (Sides & Toe Shaping)
This begins to form the “wall” of the Croc and its distinct toe shape.
- Round 3 (Establishing Wall): Ch 1 (does NOT count as a st). Sc in the back loop only (BLO) of each st around. Join with a sl st to the first sc. [40 sc]
- This BLO round creates a neat ridge that defines the base of the Croc.
- Round 4 (Body Height): Ch 1. Sc in each sc around. Join with a sl st to the first sc. [40 sc]
- Round 5 (Toe Decrease – Beginning the Croc Shape): Ch 1. Sc in first 12 sts.
- (Sc2tog) 8 times (this forms the rounded toe).
- Sc in remaining 12 sts.
- Join with a sl st to the first sc. [32 sc]
- Round 6 (Further Toe Shaping): Ch 1. Sc in first 11 sts.
- (Sc2tog) 5 times.
- Sc in remaining 11 sts.
- Join with a sl st to the first sc. [27 sc]
Part 3: Creating the Croc Vamp (Top Piece with Holes)
This is the iconic front part of the Croc.
- Row 1 (Foundation): Ch 11. Hdc in 3rd ch from hook, hdc in next 8 ch. Turn. [9 hdc]
- Row 2: Ch 2 (does NOT count as a st). Hdc inc in first hdc. Hdc in next 7 hdc. Hdc inc in last hdc. Turn. [11 hdc]
- Row 3: Ch 2. Hdc in each hdc across. Turn. [11 hdc]
- Row 4: Ch 2. Hdc inc in first hdc. Hdc in next 9 hdc. Hdc inc in last hdc. Turn. [13 hdc]
- Row 5: Ch 2. Hdc in each hdc across. Turn. [13 hdc]
- Adding “Holes”: You can now embroider small circle shapes onto the vamp with a yarn needle, or carefully crochet small chains and sl st them down to form circles. Alternatively, you can add small sewn-on plastic “charms” later. For a truly easy version, you can skip the holes entirely.
- FO, leaving a very long tail (approx. 25-30 inches / 60-75 cm) for sewing.
Part 4: Attaching the Vamp & Forming the Ankle
Now we connect the top piece and continue the body.
- Position the Vamp: Carefully place the vamp (Part 3) onto the Croc body (Part 2), aligning the center of the vamp with the center of the toe. The bottom edge of the vamp should sit just above the decrease rows (Round 6) of the main body.
- Sew the Vamp: Thread the long tail from the vamp onto your yarn needle. Using a neat whip stitch or a close running stitch, securely sew the vamp around its entire perimeter to the Croc body. Ensure your stitches are firm but do not pull too tightly. Weave in any remaining tail.
- Round 7 (Ankle Definition): Attach yarn to the center back of the Croc body. Ch 1. Sc in each available stitch around the ankle opening (working around the back of the heel and along the sides of the newly attached vamp). Join with a sl st to the first sc. [Approx. 22-24 sc, depending on vamp placement]
Part 5: Creating the Back Strap & Textured Band
This gives the Croc its signature look.
- Round 8 (Textured Band – Optional): Ch 1. Sc in the front loop only (FLO) of each sc around. Join with a sl st to the first sc. [22-24 sc]
- Working in FLO creates a small ridge, mimicking the band on real Crocs. The back loops remain free for the strap attachment.
- Round 9 (Back Strap): Ch 1.
- Sc in first 4 sts (these are on the right side of the heel).
- Now, you’ll start the strap: Ch 15 (adjust length if needed, for a loose fit over the heel).
- Skip the next 10-12 sts on the Croc body (this forms the gap where the foot goes).
- Sc in the remaining 4-6 sts (these are on the left side of the heel).
- Join with a sl st to the first sc of the round. [Approx. 8-10 sc on body, 15 ch]
- Round 10 (Strap Reinforcement): Ch 1.
- Sc in first 4 sc.
- Sc in each of the 15 chs (working over the chain to form the strap).
- Sc in the remaining 4-6 sc.
- Join with a sl st to the first sc. [Approx. 23-25 sc]
- FO, leaving a tail to weave in.
Part 6: Finishing Touches
- Weave in All Ends: Meticulously weave in every loose yarn tail using your yarn needle. Ensure they are very secure and won’t unravel or irritate baby’s skin.
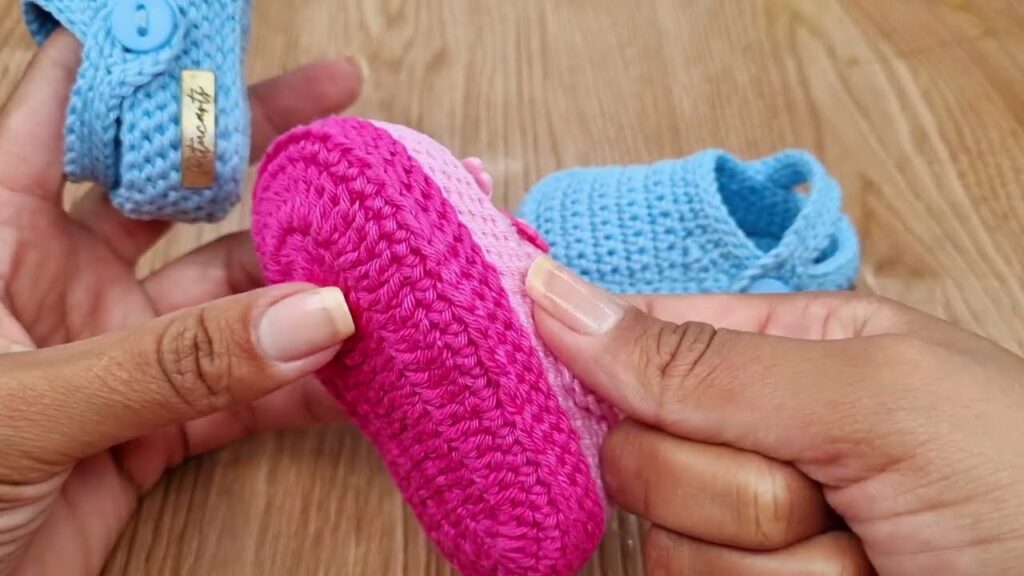
- Make a Second Croc! Repeat all steps to create a matching pair.
- Blocking (Optional): Gently mist your finished Crocs with water. You can lightly stuff them with tissue paper or plastic bags to help them hold their shape as they dry. This helps even out stitches and define the structure.
- Add Charms (Optional): If desired, you can embroider little stars, hearts, or other simple shapes onto the vamp with contrasting yarn, or even sew on tiny flat buttons or baby-safe embellishments to mimic Croc charms.
Tips for Success & Styling Your Baby Crocs:
- Practice Makes Perfect: If you’re new to shaping or joining pieces, practice on scrap yarn first.
- Even Tension: Consistent tension is crucial for a symmetrical and well-fitting Croc.
- Color Play: Experiment with vibrant colors for a fun, playful look, or stick to classic Crocs shades for a more traditional feel. You can even use a contrasting color for the back strap!
- Secure Seams: Take your time sewing the vamp. A neat, secure seam is key to the overall look and durability of the Croc.
- Care Instructions: Always refer to your yarn label for specific washing instructions. Most baby yarns are machine washable on a gentle cycle, but laying flat to dry will help the Crocs maintain their shape.
Enjoy the sheer joy of seeing these delightful, handmade baby Crocs on tiny feet – they’re sure to be a conversation starter and a treasured keepsake!
Video tutorial: