by
by Beautiful crochet lace can seem intimidating, but it’s incredibly rewarding to create. Imagine delicate patterns, airy textures, and intricate designs, all crafted with just a hook and yarn! Lace isn’t just for doilies anymore; it adds elegance to shawls, garments, home decor, and even small accessories.
Unraveling Elegance: Your Step-by-Step Guide to Beautiful Crochet Lace
Crochet lace evokes images of heirloom pieces and delicate craftsmanship. While it might look complex, the magic of lace lies in mastering a few basic stitches and understanding how to create open, airy patterns through strategic chaining and skipping stitches. It’s a wonderful way to add a touch of sophistication and artistry to your crochet projects.
This detailed article will break down the essential elements of crocheting beautiful lace, guiding you step-by-step through the techniques and even a simple pattern to get you started.
Why Dive into Crochet Lace?
- Elegance & Sophistication: Lace instantly elevates any project, giving it a refined and delicate appearance.
- Lightweight & Drapey: The openwork nature of lace creates fabrics that are wonderfully light and have excellent drape, perfect for garments, scarves, and shawls.
- Versatile Design: From traditional floral motifs to modern geometric designs, lace offers endless possibilities for creativity.
- Skill Enhancement: Learning lace techniques will deepen your understanding of stitch placement, tension control, and pattern reading, making you a more versatile crocheter.
- Mindful Crafting: The repetitive nature of lace patterns can be incredibly meditative and relaxing.
- Stash Buster: Small amounts of fine yarn can be transformed into stunning lace edgings or motifs.
Key Considerations for Crocheting Beautiful Lace
To ensure your lace projects are stunning and successful, keep these crucial points in mind:
- Yarn Choice (The Heart of Lace):
- Fiber: For true lace, cotton, linen, bamboo, or silk are often preferred. They have excellent stitch definition, a beautiful drape, and often a subtle sheen. Fine merino wool or alpaca can also work for soft, warm lace. Avoid overly fuzzy yarns that obscure stitch definition.
- Weight: This is paramount for lace.
- Lace weight (0): Very fine, creates delicate, intricate lace.
- Fingering/Sock weight (1): Slightly thicker, still produces fine lace.
- Sport (2) or DK (3): Can be used for “lacier” fabrics that are still open, but won’t have the ethereal quality of true fine lace.
- Color: Solid colors showcase lace patterns best. Variegated yarns can sometimes distract from the intricate stitch work, but subtle shifts can be lovely.
- Hook Size: For lace, you’ll generally use a hook size that is larger than what the yarn label recommends for a dense fabric. This creates those open, airy spaces. The exact size depends on your desired drape and the pattern. For instance, with a fingering weight yarn, you might use a 3.0mm to 4.0mm hook. Experiment with a swatch!
- Gauge (Crucial for Pattern & Size): For lace patterns, especially those that repeat, gauge is extremely important. A small change in tension or hook size can drastically alter the look of the lace and the final size of your project. Always make a swatch.
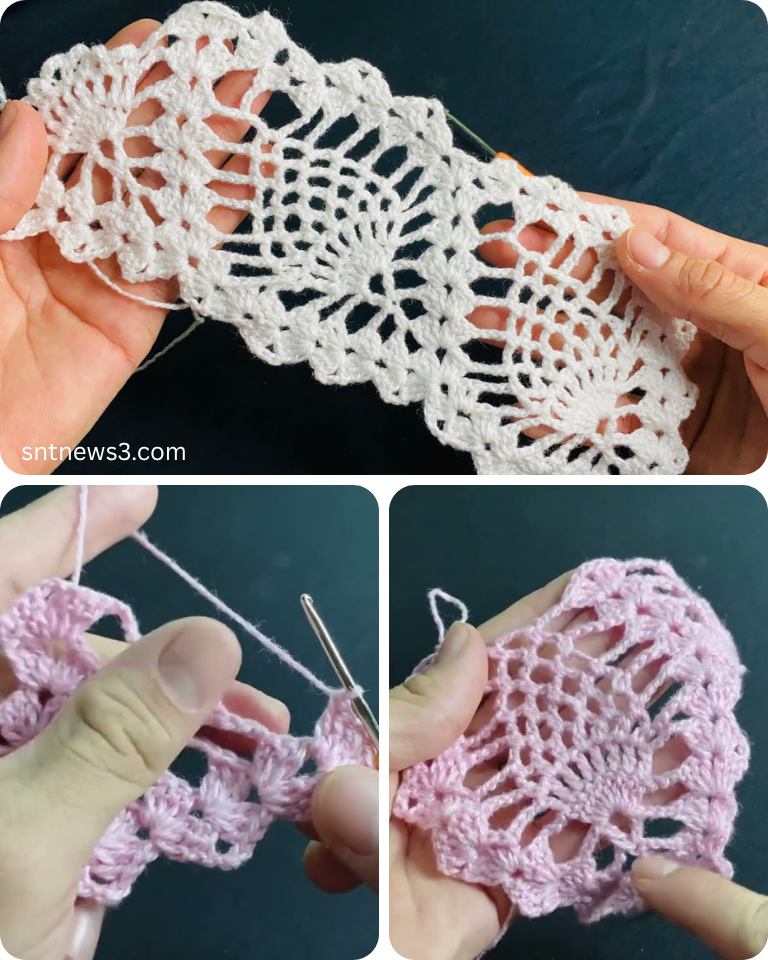
- Stitch Pattern: Lace relies on variations of basic stitches combined with chains (ch) and skipping stitches (sk). Common lace elements include:
- Chain spaces (ch-sp): Created by chaining and skipping stitches, forming the holes.
- Picots: Small decorative loops, often used on edges.
- Clusters/Shells: Groups of stitches worked into one space to create texture and shape.
- Working into chain spaces: Many lace patterns will have you work stitches directly into the large holes created by chain spaces, rather than into individual chains.
- Reading Patterns: Lace patterns are often written clearly, but sometimes charts can be very helpful for visualizing the openwork.
Materials You’ll Need
- Yarn: A skein of fine yarn, such as a Fingering (1) or Sport (2) weight cotton or cotton blend. (Approx. 200-400 yards for a small scarf or sample).
- Crochet Hook: Appropriate for your chosen yarn, usually 1-2 sizes larger than recommended for a solid fabric (e.g., 3.0mm (US D/3) to 4.0mm (US G/6)).
- Yarn Needle (Tapestry Needle): For weaving in ends.
- Scissors:
- Blocking Supplies: Blocking mats, rust-proof pins, and a spray bottle (essential for lace!).
Essential Crochet Abbreviations
- ch: chain
- sl st: slip stitch
- sc: single crochet
- dc: double crochet
- tr: treble crochet (or triple crochet)
- sk: skip
- ch-sp: chain space
- st(s): stitch(es)
- yo: yarn over
- FO: Fasten off
- (): indicates instructions to be worked into the same stitch/space
- ***…***: repeat instructions within asterisks
- []: indicates stitch counts at the end of a row/round
Understanding Key Lace Techniques
Before we dive into a pattern, let’s clarify how lace is formed:
- Creating Open Spaces: This is primarily done with
chainstitches andskippingstitches. For example,ch 3, sk 3 stscreates a noticeable hole. - Anchoring Stitches: Stitches like
sc,dc, ortrare used to anchor the chain spaces and build the structure of the lace.dcstitches often create a light, open fabric suitable for lace. - Working into Chain Spaces: Instead of working into individual chain stitches, lace patterns frequently instruct you to work into the chain space itself (the “hole”). This makes the holes more pronounced.
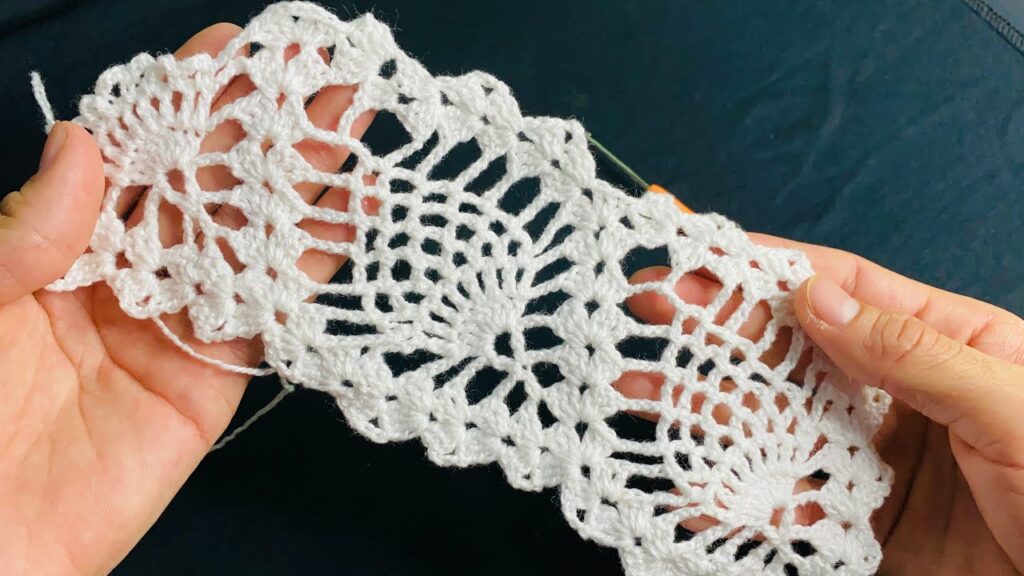
Beautiful Simple Lace Scarf/Edging Tutorial (Step-by-Step)
Let’s make a basic lace pattern that can be used as a scarf or a decorative edging for a larger project. This pattern uses a simple repeat of open squares and solid stitches.
Yarn Suggestion: Fingering weight cotton. Hook Suggestion: 3.5mm (US E/4)
Gauge Swatch: Ch 20. Work Rows 1-4 of the pattern below. Your swatch should measure approximately 3.5 inches wide by 2 inches tall. Adjust hook size if necessary.
Part 1: Starting Chain
- Ch 25. (This will create a narrow scarf or edging. To make it wider, chain more stitches in multiples of 4, plus 1 extra chain at the end.)
Part 2: The Lace Pattern Rows
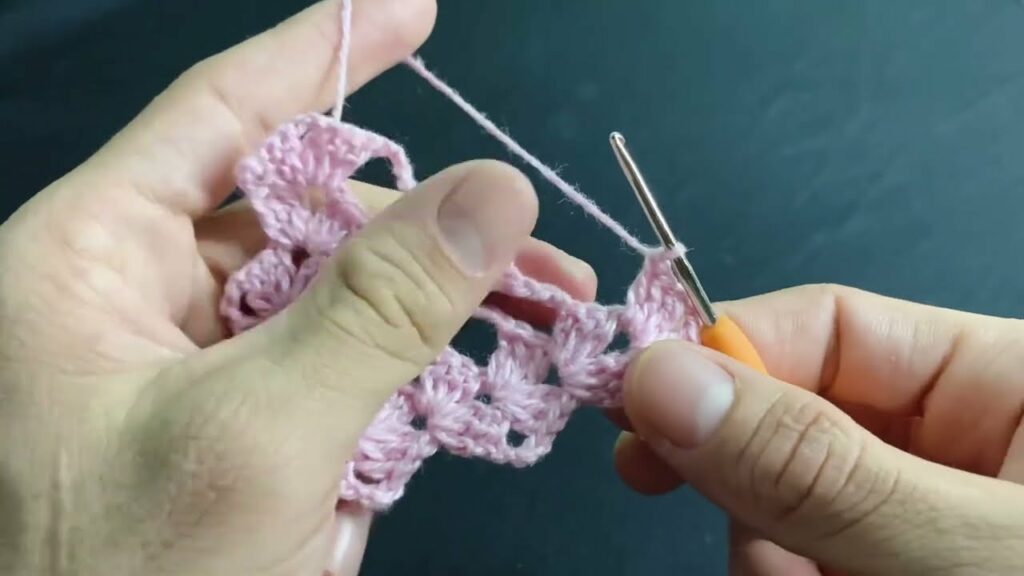
This pattern is a 2-row repeat. The dc stitches will create the solid parts, and the ch 1, sk 1 will create the lace holes.
- Row 1: Dc in 4th ch from hook (the skipped 3 chains count as your first dc). *Ch 1, sk 1 ch, dc in next ch.* Repeat from * across. Turn.
- You should have 11 dc stitches and 11 ch-1 spaces (including the starting ch-3 space).
- Row 2: Ch 3 (counts as first dc). *Dc in next ch-1 space. Ch 1, sk next dc.* Repeat from * until you reach the turning chain of the previous row. Dc in the top of the turning chain. Turn.
- You should again have 11 dc stitches and 11 ch-1 spaces. Notice you’re working the dc into the chain space, not the dc stitch from the previous row.
- Row 3: Ch 3 (counts as first dc). *Ch 1, sk next ch-1 space, dc in next dc.* Repeat from * across. You will end with a dc in the top of the turning chain. Turn.
- This row aligns the holes over the solid stitches from two rows below. Again, 11 dc, 11 ch-1 spaces.
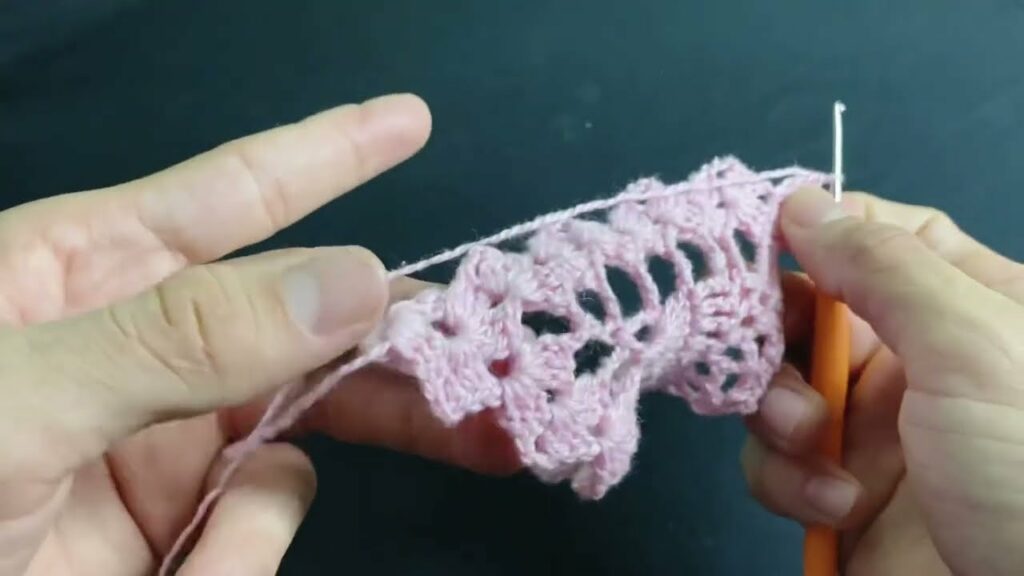
Part 3: Repeating the Lace Pattern
- Repeat Row 2 and Row 3 alternately until your lace piece reaches your desired length.
- For a short scarf, aim for about 40-50 inches (100-125 cm).
- For an edging, make it as long as needed for your project.
Part 4: Finishing Your Lace Piece
- After completing your final row, FO, leaving a 6-inch (15 cm) tail.
- Weave in All Ends: Use your yarn needle to carefully weave in any loose tails. Be meticulous, as lace shows everything!
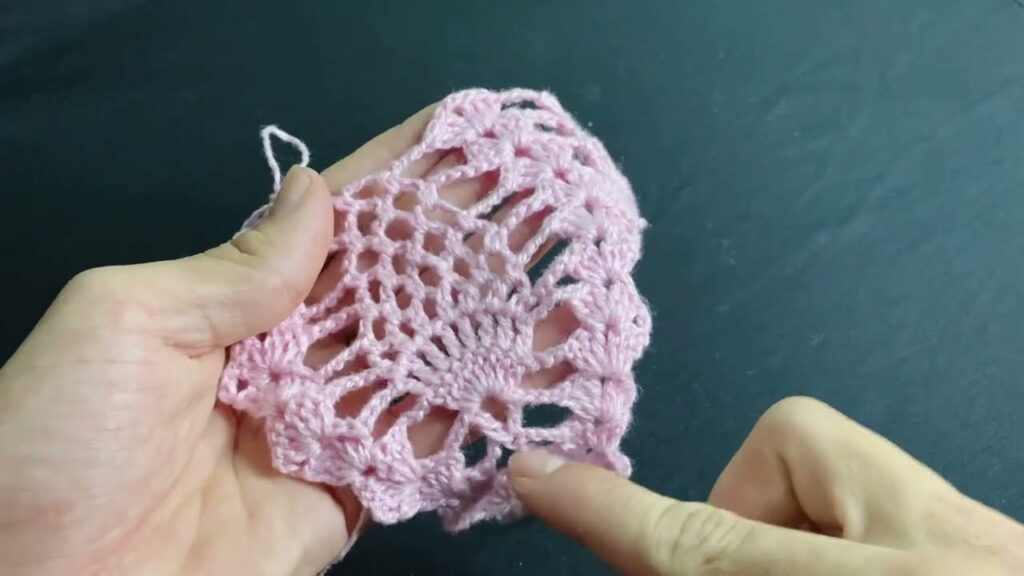
Part 5: Blocking (Absolutely Essential for Lace!)
This is the magic step that transforms your lace from a somewhat crinkled piece into a beautifully open, elegant fabric. Do NOT skip blocking for lace.
- Wet Blocking: Gently immerse your crocheted lace in lukewarm water (with a small amount of wool wash if using wool) for about 20-30 minutes. The fibers need to be thoroughly saturated.
- Remove Excess Water: Gently squeeze out as much water as you can without twisting or wringing the fabric. You can roll it in a clean towel and press firmly.
- Pinning: Lay your damp lace piece flat on a blocking mat (or a clean, dry towel laid over a firm surface like foam board). Using rust-proof pins, carefully pin the lace to the desired shape and dimensions, gently stretching it to open up the lace pattern and ensure all the holes are uniform. Pin along the edges, making sure they are straight.
- Drying: Allow the lace to air dry completely. This can take 24-48 hours depending on humidity. Do not rush this process with heat.
- Enjoy! Once completely dry, remove the pins. Your lace will now be beautifully opened, draped, and perfectly shaped.
Tips for Success & Making Your Lace Even More Beautiful:
- Patience is a Virtue: Lace sometimes requires a bit more focus, especially initially. Take your time, and don’t be afraid to unravel and re-do a section if it doesn’t look right.
- Counting: Always count your stitches and chain spaces, especially at the end of each row, to ensure your pattern stays consistent and your piece doesn’t narrow or widen unintentionally.
- Good Lighting: Working with fine yarn and intricate patterns benefits greatly from good lighting.
- Experiment with Stitches: Once you’re comfortable, explore patterns that use treble crochet (tr) for taller, lacier holes, or combine different stitch heights for varied textures.
- Picots: For a decorative edge, you can add picots. A common picot is:
ch 3, sl st into the first ch. You can place these in sc stitches along the edge or in the peaks of your lace pattern. - Practice Swatches: Always, always make a swatch. It’s not just for gauge; it’s for practicing the pattern repeat and understanding how the stitches work together.

Crocheting lace is a truly rewarding experience that adds a touch of timeless beauty to anything you create. With a little practice, you’ll be crafting stunning, airy designs in no time!
There you have it! From a simple chain to delicate openwork, you’ve now explored the essential techniques for creating beautiful crochet lace, step by step. It’s a skill that might seem daunting at first glance, but with patience, precise stitch placement, and the magic of your hook, those intricate patterns truly emerge.
Remember, the true beauty of lace often unfolds during the blocking process. Don’t skip this crucial step; it’s what transforms your slightly crinkled fabric into a perfectly shaped, ethereal masterpiece. With each practice swatch and every new project, you’ll gain confidence, and your tension will become more consistent, making your lace creations even more stunning.
So go ahead, pick up that fine yarn, and let your hook dance. You’re now equipped to unravel the elegance of crochet lace and craft truly exquisite pieces that will be admired for their delicate charm and artistry.
Video tutorial: