 by
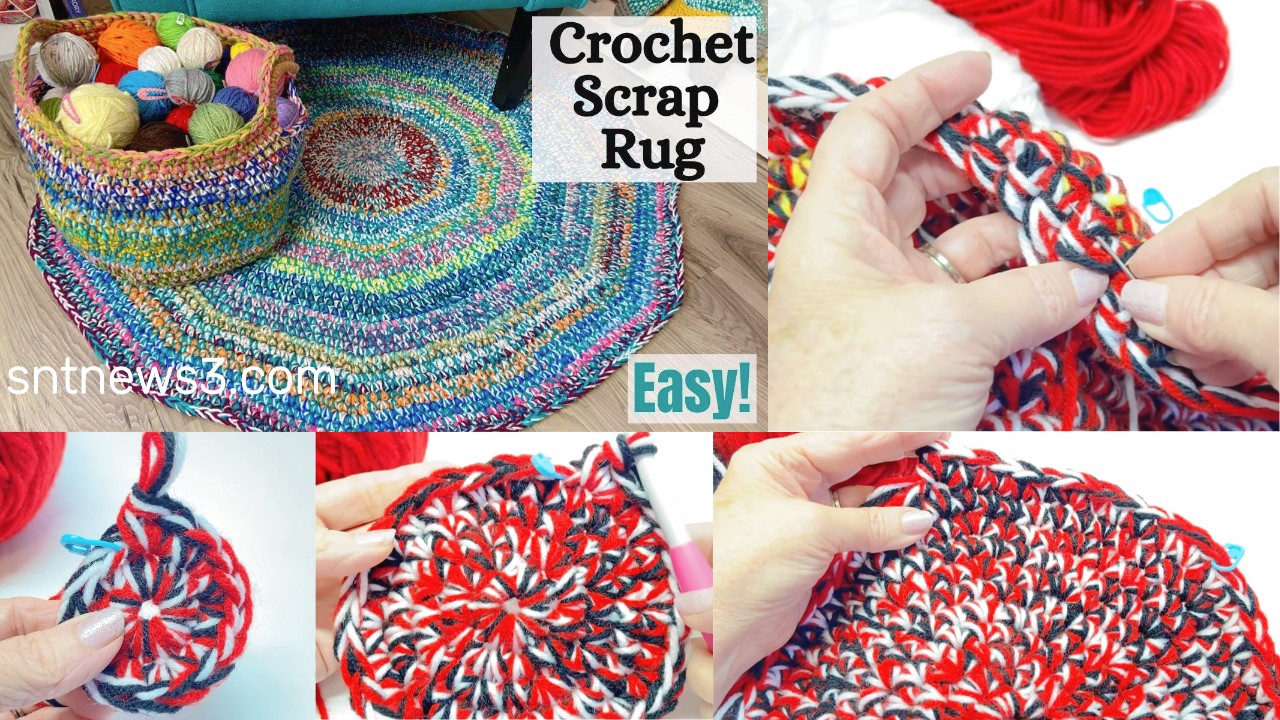
by Crochet Round Scrap Rug — detailed step-by-step tutorial
Quick overview: you’ll make a flat circular rug worked in continuous rounds (or joined rounds) using scrap yarn or fabric strips. Start with a small center (magic ring or ch-4 loop), increase evenly to keep the circle flat, change colors as you wish, add a finishing border, weave ends and optionally attach a non-slip backing. Below is a practical, copy-and-use recipe + tips for troubleshooting and sizing.
Materials & tools
- Scrap yarn / fabric strips / T-shirt yarn — any leftover yarns or cut fabric strips (for rag rugs: sheets, old T-shirts, etc.). Precut strips ~1–3 cm wide for fabric, joined end-to-end.
- Crochet hook to suit your material (for worsted scrap yarn use 5–8 mm; for bulky/t-shirt yarn use 8–12 mm).
- Scissors, tape measure, tapestry needle, and optional stitch marker.
- Optional: non-slip rug pad / hot-glue or sewing supplies for backing if rug will sit on a hard floor.
Abbreviations (US)
- ch = chain
- sl st = slip stitch
- sc = single crochet
- hdc = half-double crochet
- dc = double crochet
- inc = 2 stitches in same stitch
Prep: cutting & joining strips
- Fabric strips: cut fabric into strips ~1–3 cm wide and 30–80 cm long (length can vary; shorter strips are easier to handle). You can join strips by overlapping and sewing, or tie/whip-stitch ends together to make longer continuous lengths. Pre-stretch strips if fabric shrinks.
- Yarn scraps: join small skeins with a weaver’s join, square knot, or by carrying tails and weaving them in as you go. Keep join points tidy and stash tails inside stitches to hide them.
Construction concept (how to keep a flat circle)
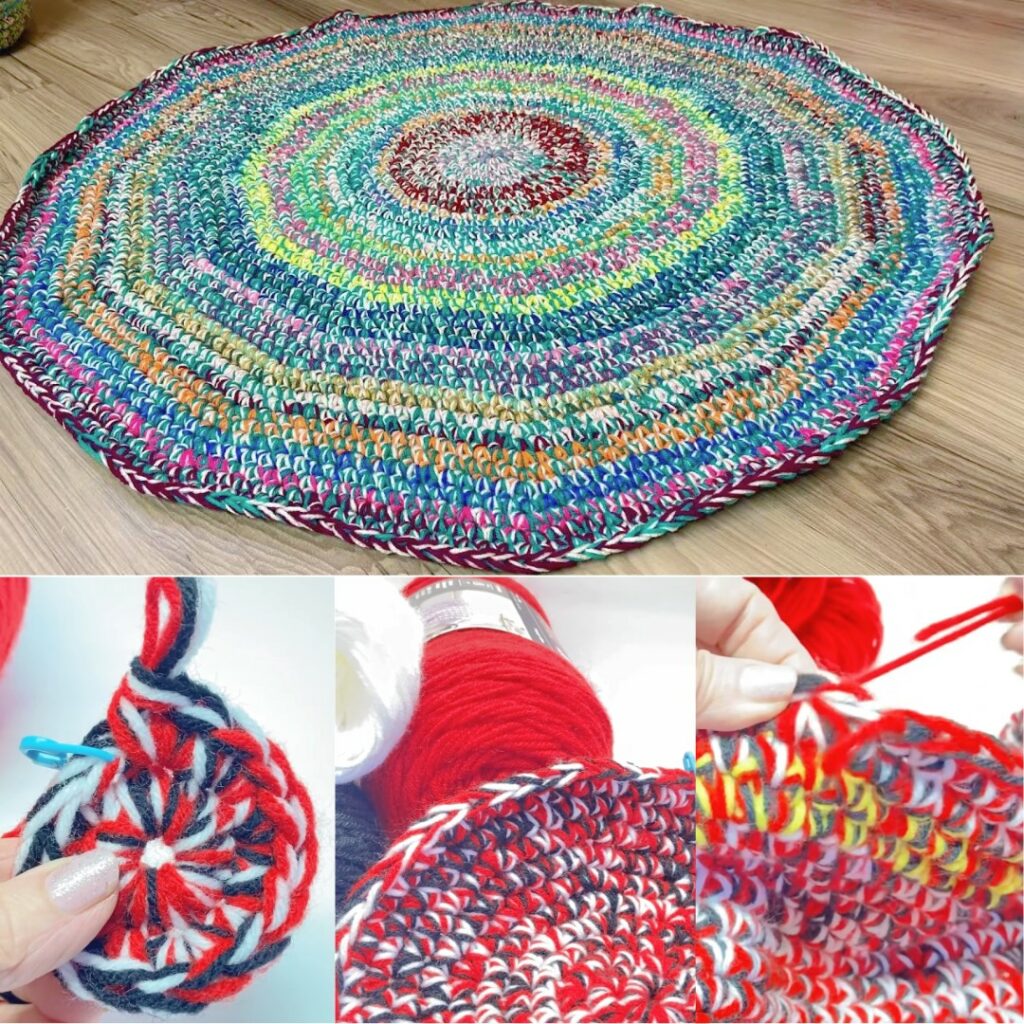
To keep the rug flat, use the standard “add 6 sts per round” rule when working in single crochet (when starting from 6 sts). That means typical increase scheme:
- R1 = 6 sc (magic ring)
- R2 = 2 sc in each st → 12 sc
- R3 = sc, inc repeat → 18 sc
- R4 = sc x2, inc → 24 sc
…and so on. Stop increasing when the circle reaches desired diameter (or slightly smaller if you plan a wide border). If you use taller stitches (hdc or dc), you’ll add the equivalent increases for those stitch heights—same math applies to keep it flat.
Step-by-step pattern (practical recipe)
Notes: I give two common stitch options. Use whichever feels nicest with your scrap material. Counts shown assume you use single crochet (sc) and start with 6-st center. Gauge/round counts will vary by material and hook — measure as you go.
A — Start the center
- Make a magic ring (or ch-4 and sl st to make a ring).
- Round 1: ch 1, work 6 sc into ring. Tighten ring. (Total = 6 sc).
Alternative: If you prefer a looser center, make 8 sc to avoid a tight hole.
Citation: standard start for rag/round rugs and Pamela’s video center start.
B — Increase rounds (keep the circle flat)
- Round 2: 2 sc in each stitch around. (Total 12 sc).
- Round 3: sc in next stitch, inc (2 sc in next) — repeat around. (Total 18 sc).
- Round 4: sc in next 2 sts, inc — repeat. (Total 24 sc).
- Continue this pattern: each round add one more single crochet between increases (Round n total ≈ 6 × n). Keep checking flatness: lay rug flat — if it’s cupping add increases sooner; if it’s ruffling, stop increasing for a round.
C — Changing stitches or speed
- If you want the rug to grow faster use hdc (half-double) or dc — then follow the same increase spacing but be mindful that taller stitches make the circle expand faster vertically (you may need fewer increases). Many rag-rug tutorials suggest sc for sturdiness but hdc is a popular compromise.
D — Introducing new colors / strips
- When a color/strip ends, join the next strip by overlapping and sewing, or use a slip-knot join and begin crocheting with the new strip — then immediately crochet over the tail for a few stitches to secure. Keep joins on the underside where possible.
E — Continue rounds to desired diameter
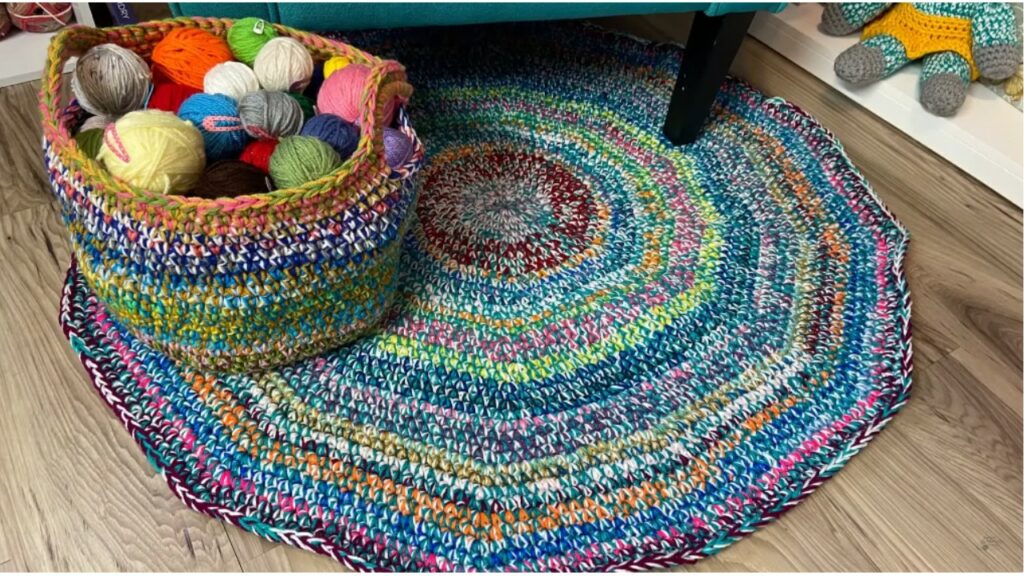
- Keep repeating steady rounds (with increases only where needed) until your rug reaches the diameter you want. Measure often. For example: after ~10–12 rounds (sc increases every round) you’ll have a modest mat; more rounds produce a larger rug. Many scrap rugs reach 60–100 cm requiring many rounds.
F — Edge & finish
- Work 1–2 rounds of even sc (no increases) to create a neat border.
- Optional decorative edge: shells, picots, or reverse single crochet (crab stitch) for extra finish.
- Fasten off, weave in ends thoroughly — bulky rugs need strong weaving so ends don’t pop out.
G — Backing (optional, recommended for floor rugs)
- For rugs that will be on slippery floors or heavy foot traffic, sew on a non-slip rug pad or glue a pre-cut rug gripper to the back. Alternately stitch a cotton canvas backing for long-term durability.
Sample stitch-count table (single-crochet start — approximate)
| Round | Pattern example | Total sts (approx) |
|---|---|---|
| 1 | 6 sc in magic ring | 6 |
| 2 | inc in each st (2 in each) | 12 |
| 3 | sc, inc repeat | 18 |
| 4 | sc x2, inc repeat | 24 |
| 5 | sc x3, inc repeat | 30 |
| 6 | sc x4, inc repeat | 36 |
| … | continue pattern | 6 × round number |
(If you use hdc or dc, treat increases the same way but counts will feel “bigger” — measure and adjust.)
Troubleshooting — common issues & fixes
- Rug cups up (bowl shape): you didn’t add enough increases. Add an extra increase round evenly spaced.
- Rug ruffles (wavy edge): too many increases — skip an increase round or work a round without increases.
- Uneven joins / visible seams: weave in joins on the wrong side, or stagger joins so they don’t line up in the same place.
Tips from Pamela’s style + rag-rug practice
- Work tight enough tension that the rug is sturdy but not so tight your hands hurt — scrap rugs use thicker material so a comfortably firm tension is ideal.
- Use a stitch marker every 2–3 rounds to keep track of the start of round (especially if working in joined rounds).
- Try a color plan: concentric rings, random scraps, or repeating stripes produce very different looks — plan ahead if you want a balanced color layout.
Video Tutorial: https://www.youtube.com/watch?v=DGQzR7Nr_XY
Have a nice day!