 by
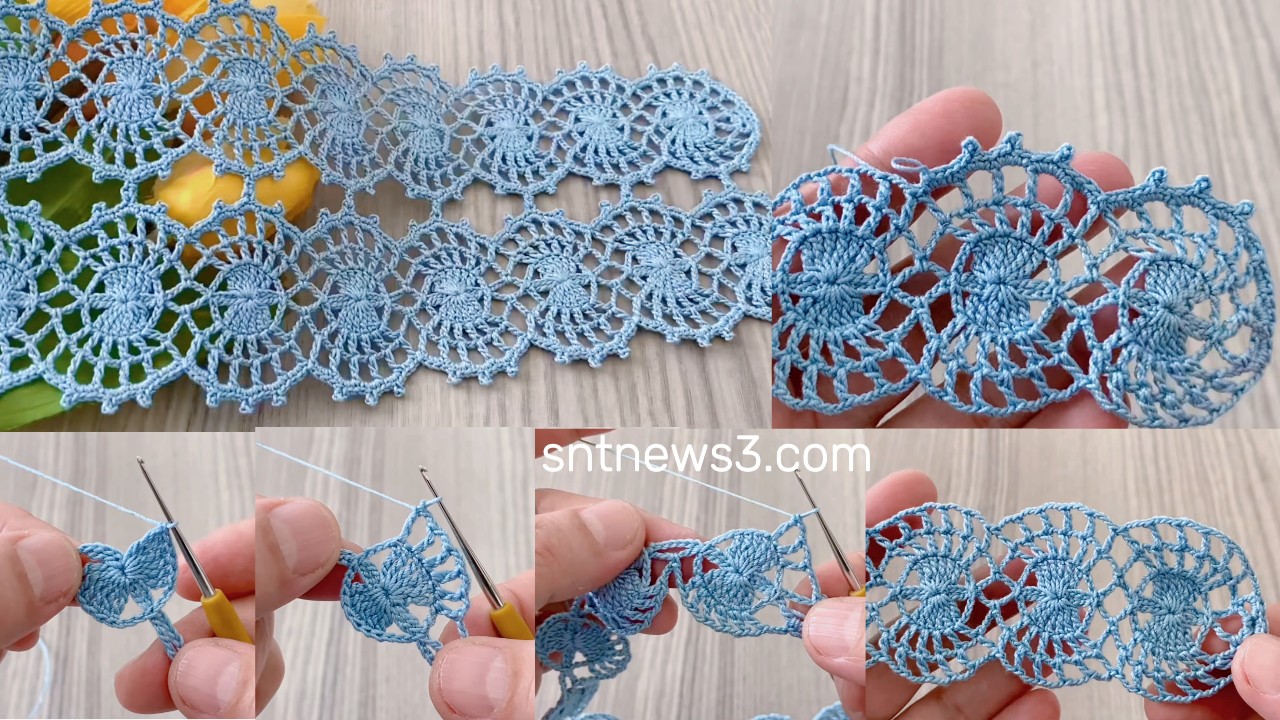
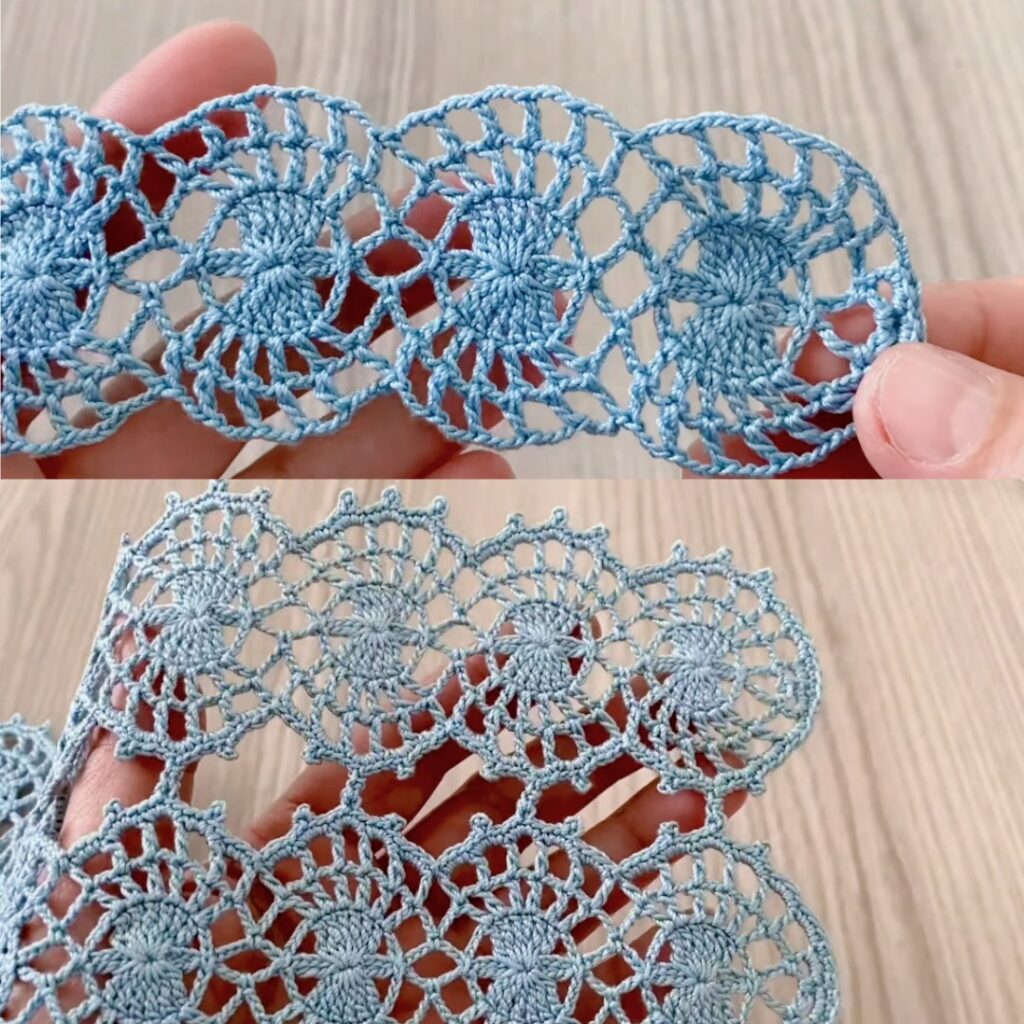
by 🌟 Pattern Overview — Multi-Purpose Lacy Motif
- Design: Round lacy motif with chain arches and picot scallop, joined into panels.
- Use: Join motifs into a rectangular panel for a runner, back+front panels for a blouse, or triangular/rectangular join for a shawl.
- Finished motif size: ~10–13 cm (4–5 in) with DK yarn + 4.0 mm hook (adjust hook for desired size).
Materials & Tools
- Yarn: DK/light worsted (or mercerized cotton for crisp lace).
- Hook: 3.5–4.5 mm (choose for gauge/drape).
- Notions: tapestry needle, blocking pins, scissors, stitch markers, measuring tape.
- Gauge: Make a motif to confirm size before committing.

Abbreviations
- ch — chain
- sl st — slip stitch
- sc — single crochet (US)
- hdc — half double crochet (US)
- dc — double crochet (US)
- tr — treble crochet (US)
- pic — picot (ch 3, sl st into base)
- st(s) — stitch(es)
- … — repeat
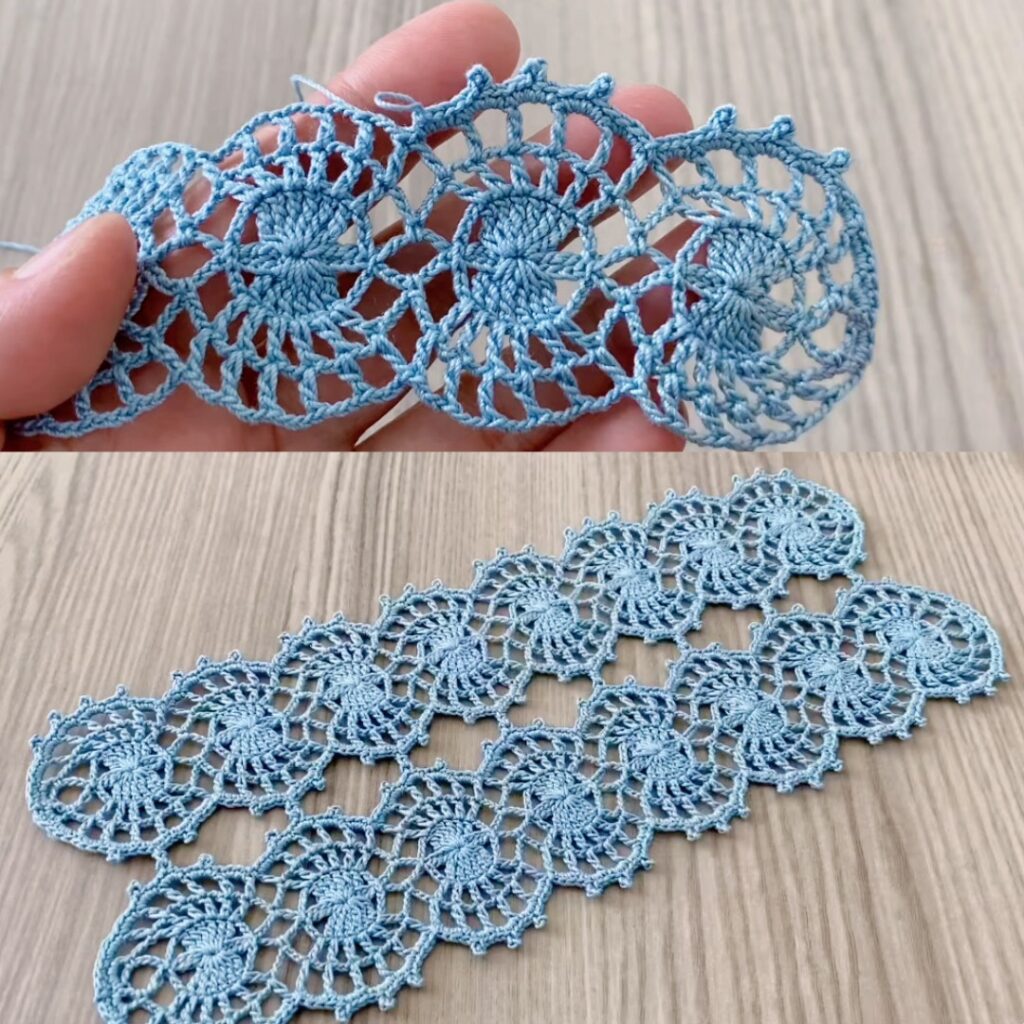
Motif Pattern — “Lacy Medallion” (8-petal)
Work in rounds. US terms used.
Round 0 — magic ring
Make a magic ring (or ch 4, join).
ch 3 (counts as dc), work 15 dc into ring. (ch-3 + 15 dc = 16 dc). Pull tight and join with sl st to top of ch-3. (16 dc)
Round 1 — chain spaces (petal foundation)
ch 4, skip next dc, sc in next dc — repeat around creating 8 ch-4 spaces. Join with sl st to first sc.
Round 2 — petals
Into each ch-4 space work: (sc, hdc, 7 dc, hdc, sc) — all in same space. Sl st to join. (8 petals)
Round 3 — tidy base round
Rejoin between any petals. Work sc evenly around bases to even the shape — distribute ~10 sc across each petal area so the motif lies flat. Join with sl st.
Round 4 — large arches (lacy frame)
sl st to outer petal tip → ch 7 → anchor into the sc round between next petals with (tr, ch 2, tr, ch 2, tr) → sl st to petal tip — repeat for all 8 petals to get 8 large arches. (Use ch 6–8 depending on yarn/hook.)
Round 5 — inner ribs (arch filling)
In each ch-arch: sl st into arch base → ch 3 → (dc, ch1, dc, ch1, dc) worked across the arch or into the tall post tops → ch 3 → sl st to next anchor. This gives 3 vertical ribs inside each arch. Join.
Round 6 — square/side loops (optional for easy joining)
Mark four quarter points (every 2 petals). Starting at a quarter point form corner loops: ch 6 (corner), sc into next side position; along side work (sc, ch 4, sc) repeated to next corner. Repeat for all 4 sides to create a block that joins in a grid. Join and fasten off.
Round 7 — outer scallop & picots
Rejoin and work a decorative edge: sc 3 across a curve, (pic: ch 3, sl st in same st), sc 4 — distribute sc so edge sits flat. Add picots at regular intervals (on each scallop) for the dotted look. Join, weave in ends, block.

Blocking
Pin motifs into shape (pull corners for square look if you made Round 6). Lightly spray or steam and let dry. Blocking is essential for lace clarity and even joining.
Joining Methods
Two user-friendly methods:
1) Join-As-You-Go (JAYG) — recommended
- Make first motif fully. For each new motif, when you work the outer edge (Round 7), attach to adjacent finished motif by replacing the sl st or final stitch at joining points with sl st into the corresponding stitch of the finished motif. Attach at side loops and at corner loops. This yields flat, nearly invisible joins and is fast.
2) Sew-after
- Make all motifs, block them, layout, and seam using mattress stitch or whipstitch through outer sc rounds/side loops. This gives adjustability.
Project Constructions
A) Table Runner (straight rectangular)
- Decide runner width W and length L in motifs. Example: 6 motifs long × 1 motif wide (narrow runner) or 6×2 for wider runner.
- Make (W×L) motifs. Block them.
- Join motifs in rows using JAYG or sew-after. Keep joins consistent (join at side loops for long seams).
- When joined, add a final border: 2 rounds of sc, then a shell/picot round for a finished look. Optional fringe.
B) Blouse (simple pullover)
This is a modular, motif-panel blouse.
- Measure chest circumference (C) and motif width (M). Motifs across = round(C / M / 2) per panel (front and back). Example: For 100 cm chest and 12 cm motif → ~4 motifs across per panel = 4 × 12 = 48 cm per panel → 48 + 48 = 96 cm total (allow ease).
- Make two panels (front & back) of motifs: width = motifs across, length = motifs down for desired torso length (e.g., 3–4 motif rows).
- Leave neckline gap by not joining the top-center 1–2 motifs (or remove joins when joining shoulders) to shape neck. Join shoulders leaving neck opening.
- Join sides partially from hem up to underarm (leave armhole height = ~20–25 cm or 1–2 motif heights). For sleeves: create sleeve panels of motifs and attach, or leave as shell (no sleeves).
- Finish edges: pick up stitches around neckline and armholes and work 2 rounds sc + decorative picot or eyelet row. Add weight with a dc round at hem if preferred.
C) Shawl (triangular or rectangular)
Rectangular shawl: Join motifs into a rectangle (e.g., 6 × 10 motifs). Add a lacy scallop border.
Triangular shawl (center-out):
- Option 1: Make rows with increasing number of motifs: 1,2,3,… joining rows below to form triangle. Use half-motif trimming at edges or leave staggered edges for a boho look.
- Option 2: Make a long skinny triangle by joining motifs in offset rows and block to triangular shape.
Border suggestion: 2 rounds sc, then a shell scallop (5 dc shell) or a delicate picot edge.
Measurements & Motif Count Guide (quick)
- Measure one blocked motif width (M).
- For blouse: motifs across per panel = desired half-chest (cm) ÷ M. Rows = desired torso length ÷ M.
- For runner: total motifs = width × length (in motifs).
- For shawl: adjust rows to reach desired depth/length.
Tips & Troubleshooting
- Motif cups up: loosen your tension or use a slightly larger hook.
- Motif ripples: reduce chain length in arches (ch-7 → ch-6) or remove a couple sc in base round.
- Joins gap: add extra sl st at join points or block more firmly.
- Want more drape? Use a softer yarn or one hook size larger.
- Want crisper lace? Use cotton and smaller hook.
Quick Variations
- Two-color motif: change color after Round 3 (petals) to highlight petals vs. frame.
- Bigger motif: use thicker yarn and larger hook, or increase central dc cluster (7 dc → 9 dc).
- Simpler motif for absolute beginners: replace Round 4/5 archwork with a simple ch-5 loop and 3 dc inside to reduce tall posts.
Example Patterns (starter counts)
- Small runner (narrow): 1 motif × 6 long → 6 motifs total.
- Medium runner: 2 × 8 → 16 motifs.
- Basic blouse (S): Front 3 × 3 + Back 3 × 3 + 1–2 motifs for sleeves.
- Shawl: Triangle build to 10 rows (1+2+3+…+10 = 55 motifs) — adjust for desired depth.
VIDEO: