 by
by Below is a complete, beginner-friendly pattern that reproduces the unique lacy blouse / shawl look: floral medallions that join into panels, bold arches for lace, and a picot scallop edge. I give exact round counts, checks after each round, JAYG joining instructions for a true one-piece blouse, and size guidance so you can make a blouse or a shawl from the same motif set.
Materials & finished size
- Yarn: DK / light worsted or sport (cotton for crisp lace; cotton-blend or acrylic for softer drape).
- Hook: 3.5–4.5 mm (adjust to reach the finished motif size you prefer).
- Notions: tapestry needle, blocking pins/mat, scissors, measuring tape, stitch markers.
- Finished motif (blocked): ~10–13 cm / 4–5 in (with DK + 4.0 mm). Make a test motif to confirm.
Abbreviations (US terms)
- ch = chain
- sl st = slip stitch
- sc = single crochet
- hdc = half double crochet
- dc = double crochet
- tr = treble crochet
- pic = picot (ch 3, sl st into base)
- st(s) = stitch(es)
- rep = repeat
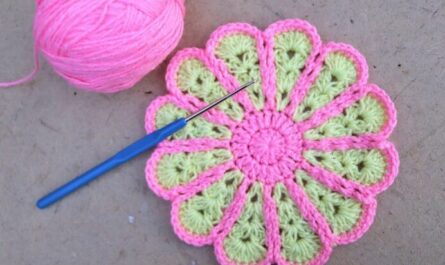
Motif: “Unique Lacy Medallion” — worked in rounds
Goal: 8 petals, lacy arches, outer side-loops for easy joining. Count after each bold check.
Round 1 — center
- Make a magic ring.
- ch 3 (counts as dc), work 15 dc into ring. (ch-3 + 15 dc = 16 dc total.)
- Pull ring closed. sl st to top of ch-3 to join.
Check: 16 dc.
Round 2 — loop foundation (petal bases)
- ch 4, skip next dc, sc in next dc — repeat around.
Result: 8 ch-4 loops and 8 sc. Join with sl st.
Check: 8 loops.
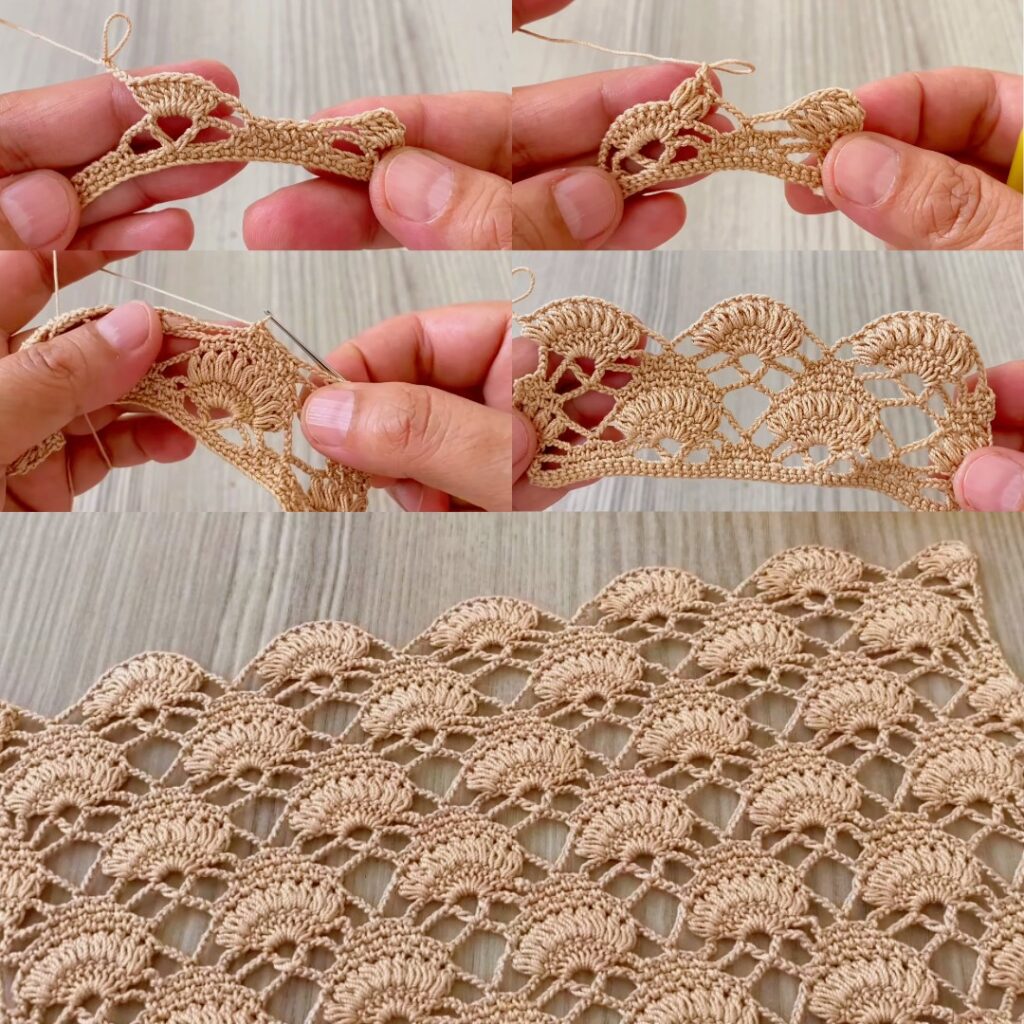
Round 3 — puffy petals
- In each ch-4 loop, work: (sc, hdc, 7 dc, hdc, sc) — all into the same ch-4 space.
- After each petal, sl st into next ch-4 space and repeat for all 8 petals. Join.
Check: 8 rounded petals.
Round 4 — tidy sc round
- Rejoin between any two petals. Work sc evenly around the petal bases to make a smooth circular boundary — aim for about 10 sc per petal area distributed so the round lies flat.
- Join with sl st.
Check: circle is smooth, not cupped or ruffled.
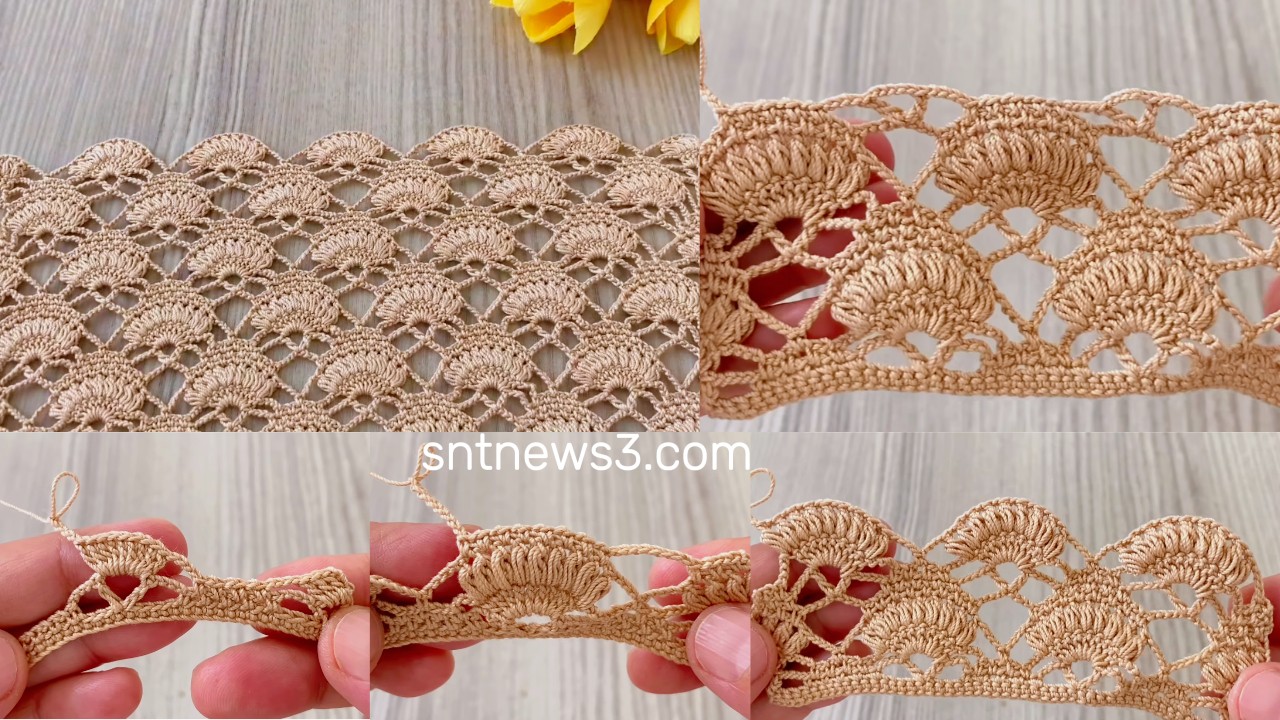
Round 5 — large arches (lacy frame)
- From a petal tip: sl st to outer tip → ch 7 → anchor into the sc round between the next petals with
(tr, ch 2, tr, ch 2, tr)worked into that sc or small space → sl st to petal tip. - Repeat for all petals — you’ll create 8 large arches. Adjust ch length (ch-6/7/8) to match your yarn/hook so arches sit nicely. Join.
Check: 8 evenly spaced arches.
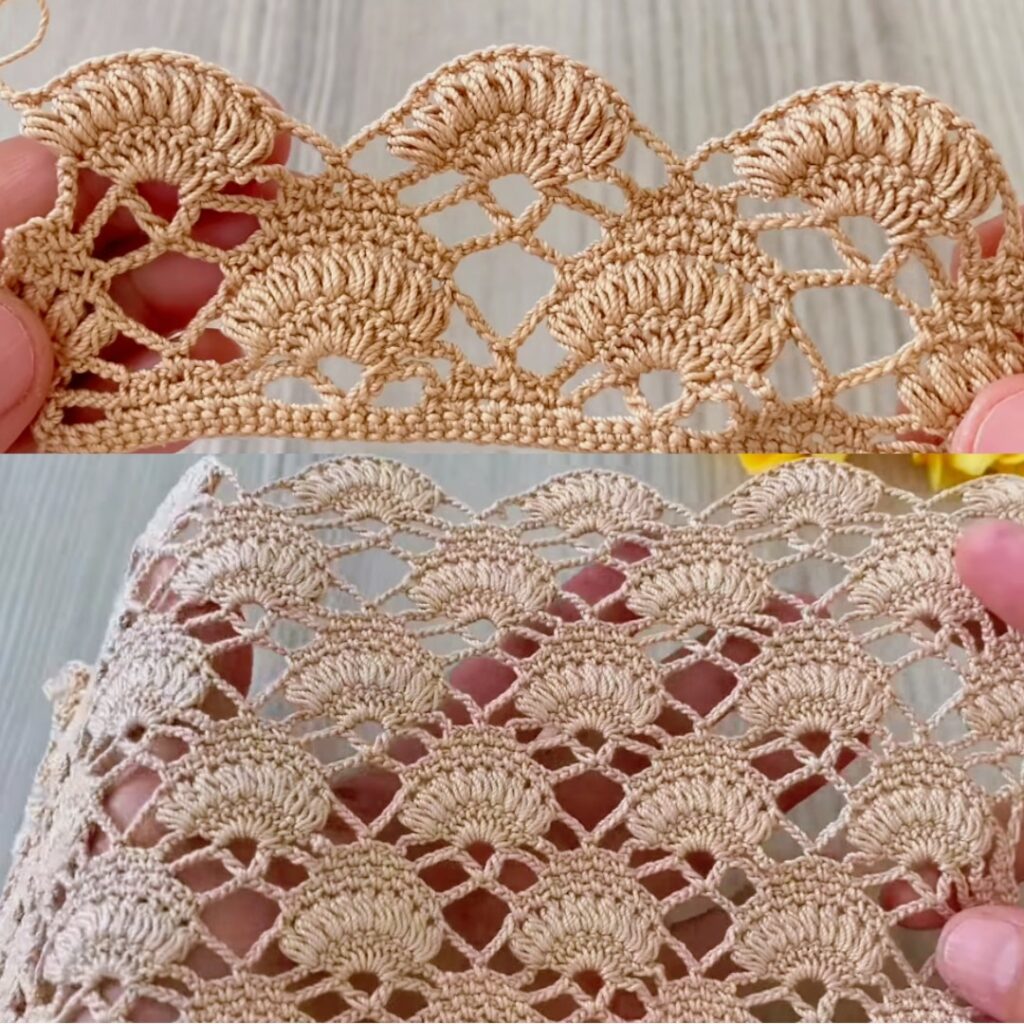
Round 6 — ribs / decoration inside arches
- Into each big arch: sl st into arch base → ch 3 → dc into top of first tr → ch 1 → dc into top of middle tr → ch 1 → dc into top of last tr → ch 3 → sl st into arch base.
- Repeat around for all 8 arches and join. (Simpler alternative: 3 dc separated by ch-1 inside each arch.)
Check: each arch has 3 internal ribs.
Round 7 — side loops & corner shaping (make motif joinable)
- Mark four quarter points (every 2 petals). Rejoin at a quarter marker.
- Along each side between corners work (sc, ch 4, sc) repeats; at each corner make ch 6 (corner loop). Distribute sc so opposite sides match exactly (e.g., 12 sc + 3 ch-4 loops per side — make counts consistent).
- Join and fasten off.
Check: four corner loops and evenly spaced side loops — motifs will align when joined.
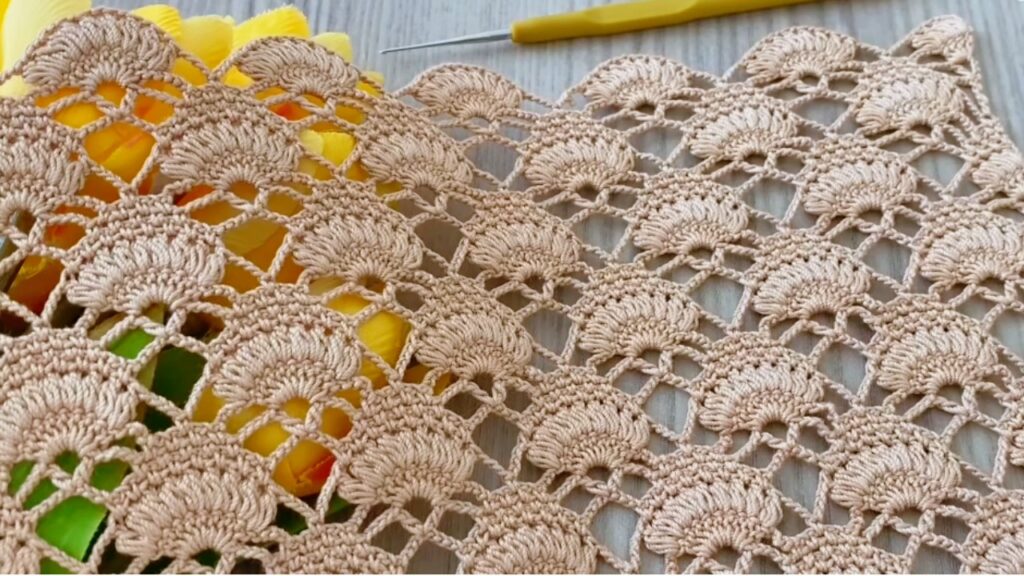
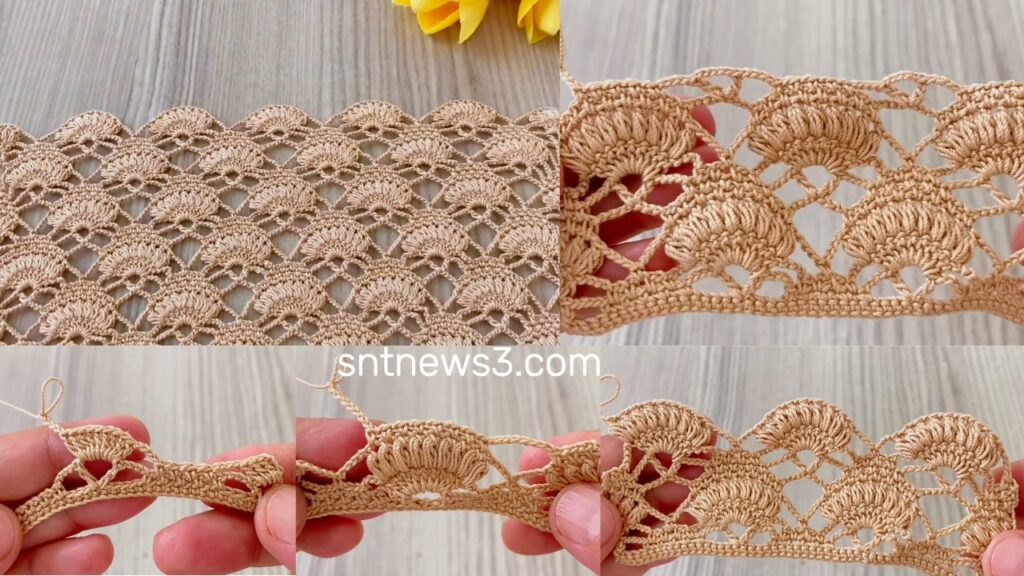
Round 8 — outer scallop & picot finish
- Rejoin and work a scalloped edge across the outer side-loops: sc 3 across curve, (pic: ch 3, sl st into same st), sc 4 — adjust sc counts per small curve so the edge lies flat. Place picots at each scallop peak.
- Join, fasten off, weave in ends, and block.
Check: even scallops, crisp picots, motif lies flat after blocking.

Blocking
- Pin motif to blocking board into the desired square/diamond shape, pull corner loops outward to make precise corners, and pin picots for crisp points. Spray with water (or use steam) and let dry completely. Blocking is essential to get even joins and correct motif geometry.
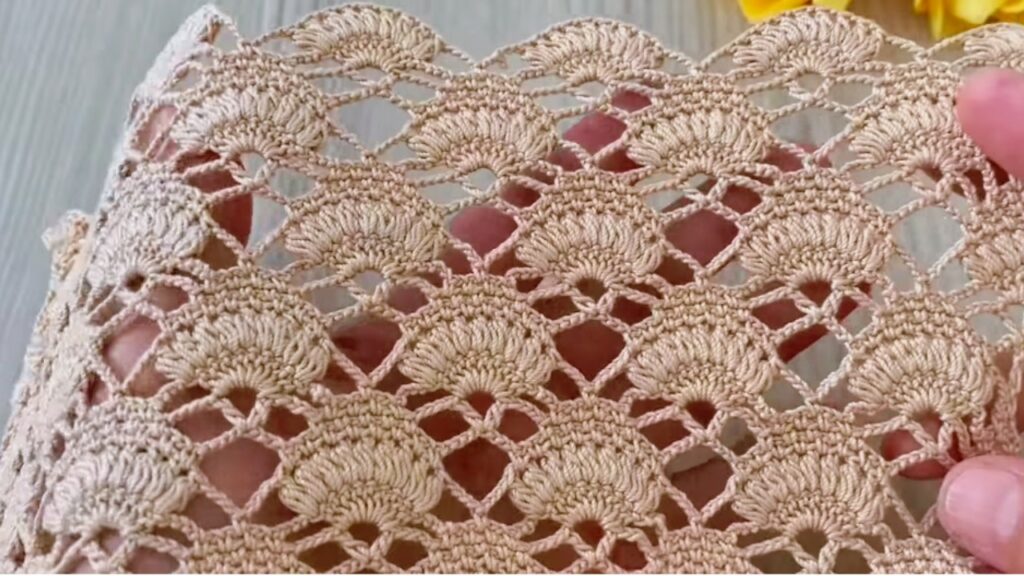
How to Join Motifs
1) Join-As-You-Go (JAYG) — recommended for one-piece blouse
- Make the first motif completely. For the next motif, work Rounds 1–7. On Round 8 (outer scallop), when you reach a stitch that should meet a finished neighbor, replace that sl st/picot with a sl st into the corresponding outer stitch of the neighbor. Attach at side ch-4 loops and corner ch-6 loops. Continue joining each new motif to any adjacent finished motifs as you add them — this produces flat, nearly invisible joins and allows one-piece construction.
2) Sew-after (traditional)
- Make all motifs and block them. Lay out the design, pin motifs together, and sew using mattress stitch or whipstitch through the Round 4/5 area or side loops. This gives adjustment flexibility but requires finishing work.
Projects & Construction
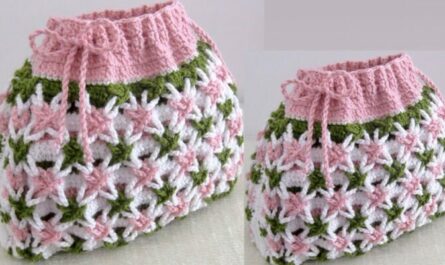
A) One-Piece Blouse (JAYG)
Top-down method (recommended):
- Decide half-chest width (H) and motif width (M). Number motifs across top row = round(H ÷ M).
- Crochet the top row of motifs (neckline row). For a round/boat neckline, leave center joins open to form the neck (skip joining center 1–2 motifs).
- Continue adding rows downward, joining each new motif to the row above as you go. Shape shoulders by decreasing motifs or leaving middle motifs unjoined for neckline.
- For armholes, stop joining along side seams for the height of the armhole (1–2 motif heights for cap sleeve; 2–3 for deeper armhole). Continue body below armhole.
- Optionally add sleeves: make strips of motifs for sleeves and JAYG attach into armhole opening. Alternatively, leave as sleeveless shell.
Example (approx): motif = 11 cm blocked. For chest 92 cm total: half-chest 46 cm → 46 ÷ 11 ≈ 4. Make 4 motifs across in top row (front), repeat for back, or work continuous sheet: 4 across, multiple rows down to desired length.
Neck finishing: pick up stitches around neck, work 2 rounds sc, then 1 round picot or eyelet for decoration.
B) Shawl (two options)
Rectangular shawl: join motifs into a rectangle (e.g., 6 × 10 motifs). Add a final scallop border (2 rounds sc + shell/picot round).
Triangular shawl: start with 1 motif at top, join a row of 2 motifs below, then 3, etc., building outward to desired depth. For smooth edges, use partial or trimmed motifs at sides or accept a scalloped outline.
Edging & Border Ideas
- Simple neat border: 1 round sc, 1 round hdc for weight, finish with picot scallop.
- Decorative shell: after sc round, skip 2 sts, shell (5 dc) in next st repeating for wide scallop.
- Add tassel/fringe to shawl ends if desired (attach to side loops).
Troubleshooting & Quick Tips
- Motif cups upward: use a slightly larger hook or loosen tension (especially in petal rounds) or block more strongly.
- Motif ripples/waves: shorten arch chains (ch-7 → ch-6) or reduce sc in Round 4.
- Joins gape: add one extra sl st at each join point or block motifs more firmly before joining. JAYG works best when motifs are blocked prior to attachment.
- Edge too stiff: use softer yarn or upsize hook 0.5 mm for drapier blouse.
- Counts not matching: ensure each motif has 8 petals and 8 arches; check side-loop counts per side before joining so joins align.
Variations & Customization
- Smaller motif: use finer yarn and a smaller hook; reduce petal dc (7 → 5) and arch chain (ch-7 → ch-6).
- Bigger motif: thicker yarn / larger hook or increase petal dc (7 → 9) and arch chains (ch-8/9).
- Two-color motif: change color after Round 3 to contrast petals & frame.
- Heavier hem for blouse: add a round of dc or hdc at hem for weight to help garment hang.
VIDEO: