 by
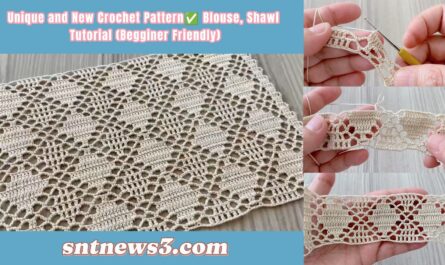
by Below is a clear, beginner-friendly, round-by-round text tutorial so you can crochet the square motif right away. It’s a floral medallion that converts to a tidy joinable square — perfect for runners, shawls, blouses or cushions. Uses US terms.
Materials & finished size
- Yarn: sport / DK (cotton for crisp lace; cotton-blend or acrylic for softer drape)
- Hook: 3.5–4.5 mm (adjust to get desired motif size)
- Notions: tapestry needle, blocking pins/mat, scissors, stitch marker (optional)
- Finished motif (blocked): ≈ 9–13 cm / 3.5–5 in (depends on yarn & hook). Make one test motif and block to confirm.
Abbreviations (US)
- ch = chain
- sl st = slip stitch
- sc = single crochet
- hdc = half double crochet
- dc = double crochet
- tr = treble crochet
- pic = picot (ch 3, sl st into base)
- rep = repeat
- sp = space
- st(s) = stitch(es)
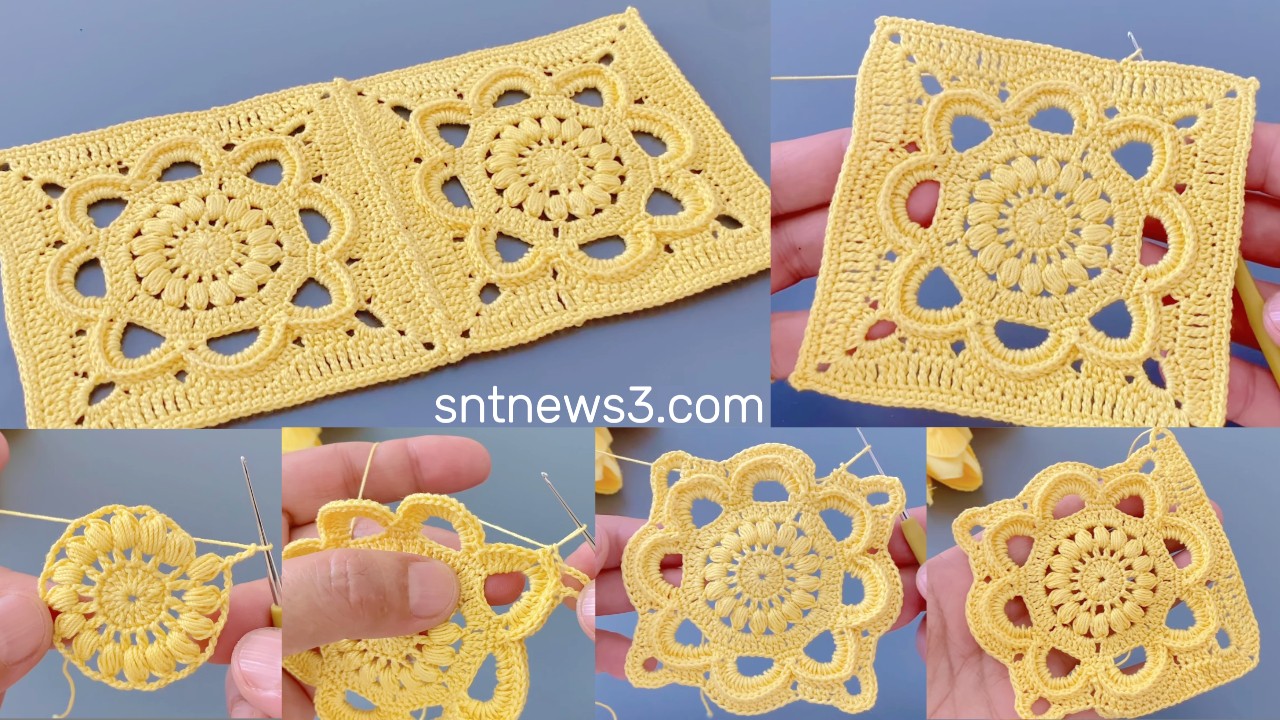
Pattern overview (what it does)
Worked from the centre out:
- small center ring
- chain-loop scaffold for petals
- puffy petal clusters
- tidy sc round to flatten
- tall chain arches (frame)
- decorative ribs inside arches
- optional side & corner loops to convert circle → square (for neat grid joins)
- scalloped picot outer edge (used for Join-As-You-Go)
Each round includes a short check so you can confirm counts before moving on.
Round-by-round (work rounds joined with sl st)
Round 1 — Centre (magic ring)
- Make a magic ring. ch 3 (counts as dc), work 15 dc into ring. (ch-3 + 15 dc = 16 dc.)
- Pull ring closed; sl st to top of ch-3 to join.
Check: 16 dc.
Round 2 — Loop foundation (petal scaffold)
- ch 4, skip next dc, sc in next dc — repeat around.
→ You’ll have 8 ch-4 loops separated by sc. Join with sl st.
Check: 8 ch-4 spaces.
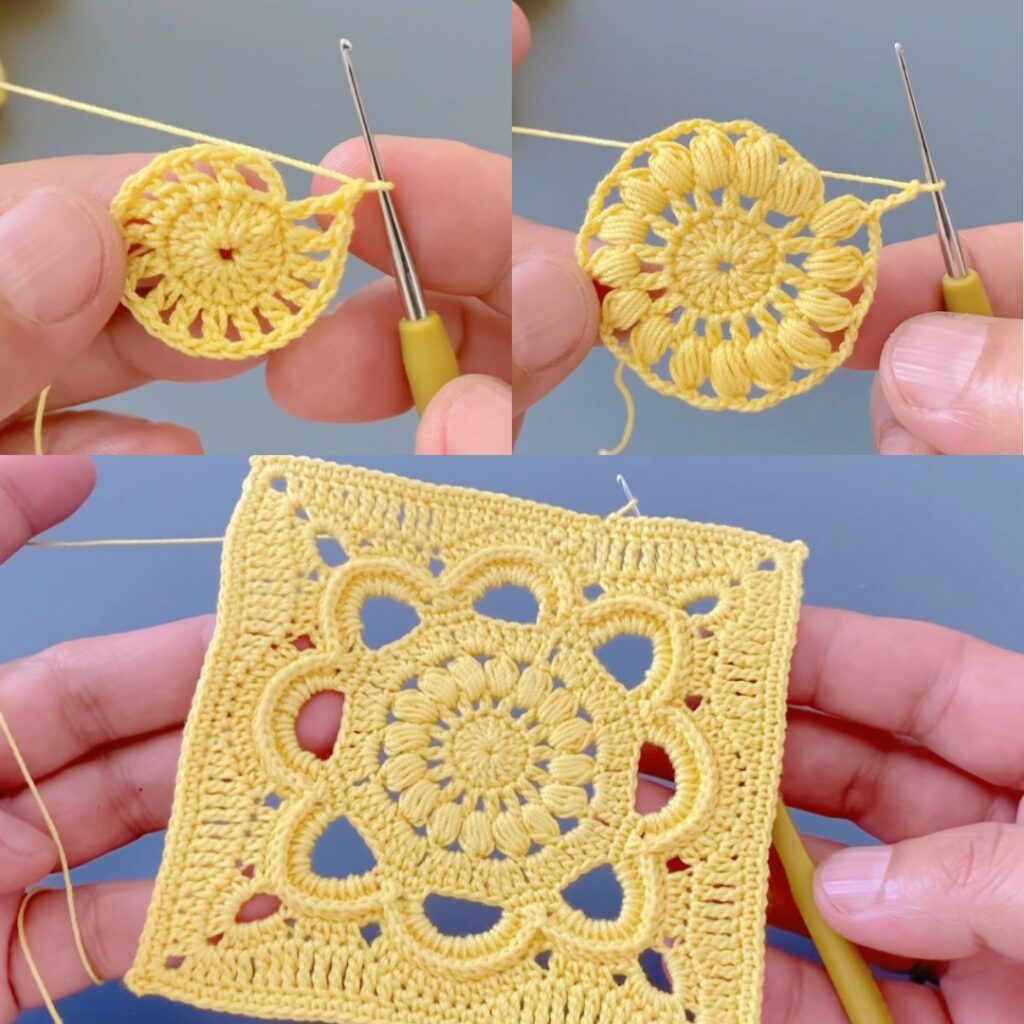
Round 3 — Puffy petals (8 petals)
- In each ch-4 loop work (sc, hdc, 7 dc, hdc, sc) — all into the same loop (one cluster = one petal).
- Sl st to next loop and repeat for all 8. Join.
Check: 8 full petals visible.
Variation: use 5 dc instead of 7 dc for smaller petals.
Round 4 — Tidy sc round (flatten & even)
- Rejoin between petals. Work sc evenly around petal bases to flatten the motif — distribute roughly 9–12 sc per petal area (adjust so motif lies flat).
- Join with sl st.
Check: outer boundary is even (not cupped or ruffled).
Round 5 — Tall lacy arches (frame)
- From each petal tip: sl st to outer tip → ch 7 → anchor into the sc round between the next petals with (tr, ch 2, tr, ch 2, tr) worked into that sc/space → sl st back to petal tip.
- Repeat around to form 8 tall arches. (If ch-7 sits wrong with your yarn/hook, use ch-6 or ch-8.) Join.
Check: 8 arches.
Round 6 — Decorative ribs inside arches
- Into each ch-arch work: sl st into arch base → ch 3 → dc into top of first tr → ch 1 → dc into top of middle tr → ch 1 → dc into top of last tr → ch 3 → sl st into arch base.
- Repeat for all 8 arches and join. (Simpler alt: 3 dc separated by ch-1.)
Check: each arch has 3 inner ribs.
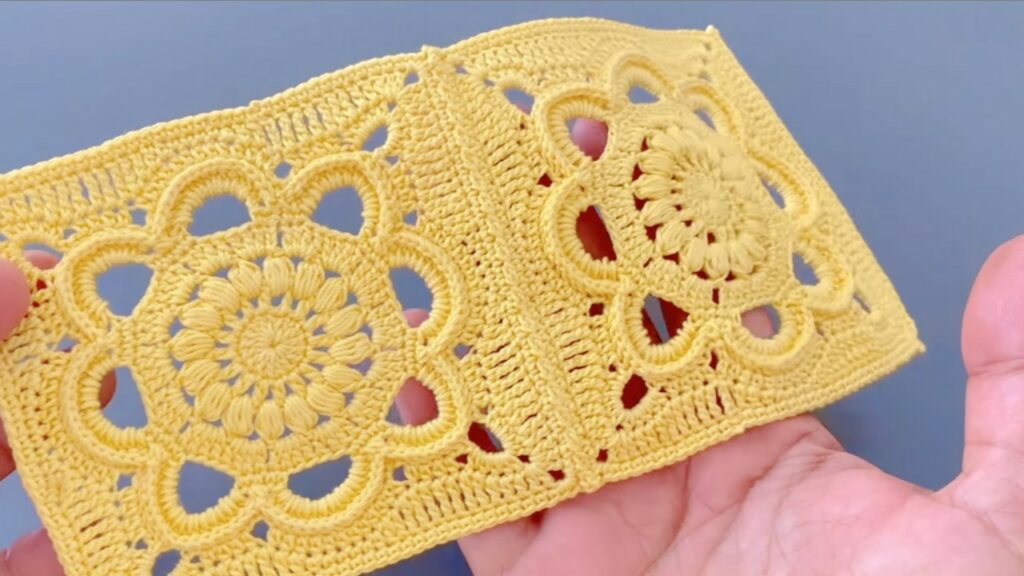
Round 7 — Convert circle → square (side loops & corner loops) — recommended
(Do this if you want tidy tiles for runners/blouses.)
- Mark four quarter points (every 2 petals = ~90° apart). Rejoin at a quarter marker.
- Work along each side between corners with a consistent distribution so all four sides match. Example starter counts (adjust to motif size):
sc 10, (sc, ch 4, sc) × 3 (side loops), sc 10 → ch 6 (corner loop).- Important: use the same sc and side-loop counts on all four sides so adjacent motifs align.
- Repeat for the remaining sides. Join and fasten off (or continue).
Check: motif has 4 ch-6 corner loops and identical side loops on each side — it blocks into a square.
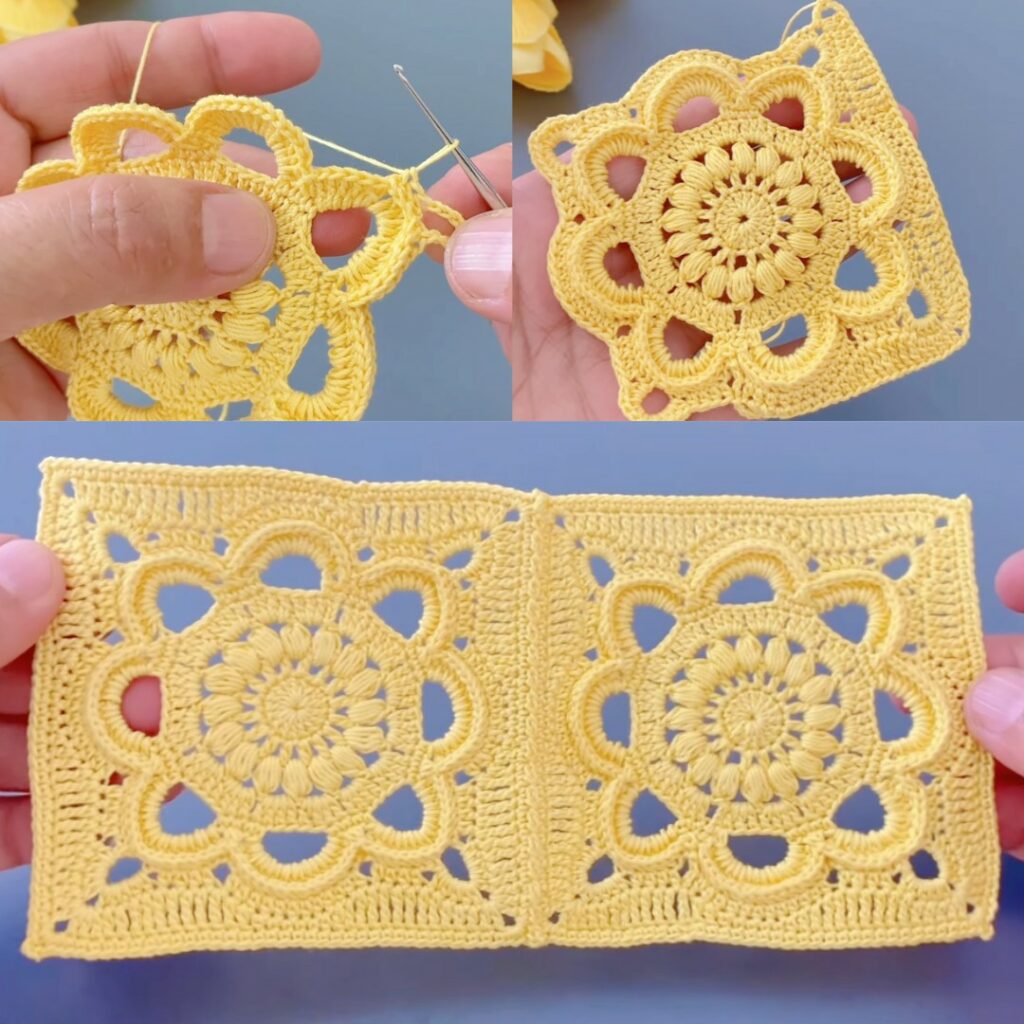
Round 8 — Outer scallop & picot finish (finish & JAYG round)
- Rejoin and work the final scalloped edge across the side loops: for example sc 3, (pic: ch 3, sl st into same st), sc 4 — adjust sc counts so scallops lie flat across the side elements.
- Place picots at regular intervals for the dotted look. This round is the one used for Join-As-You-Go: when a new motif meets a finished neighbour, replace that picot/sl st with sl st into the corresponding stitch/picot of the finished motif to join.
- Join, fasten off and weave in ends.
Check: scallops/picots even; motif lies flat after blocking.
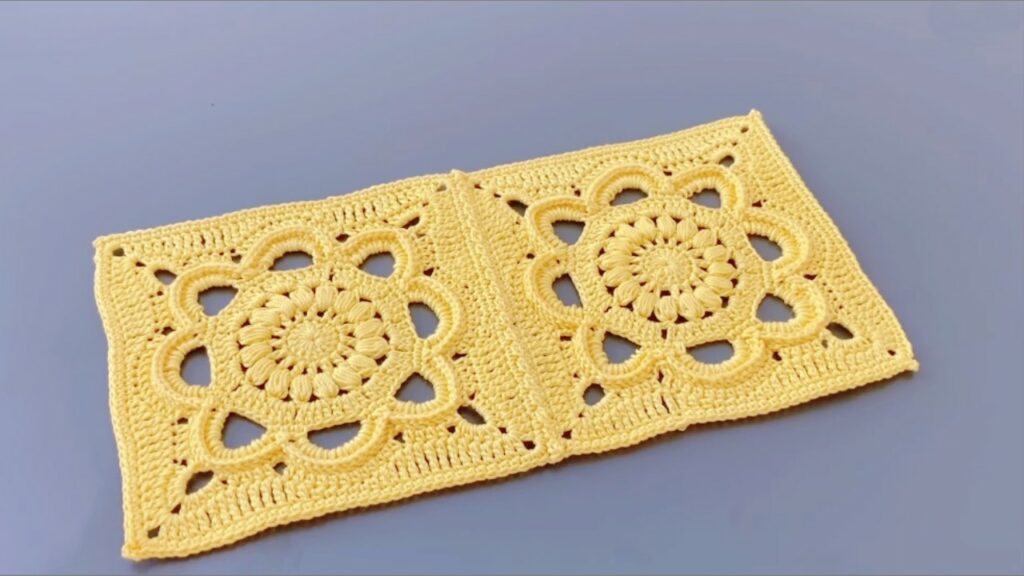
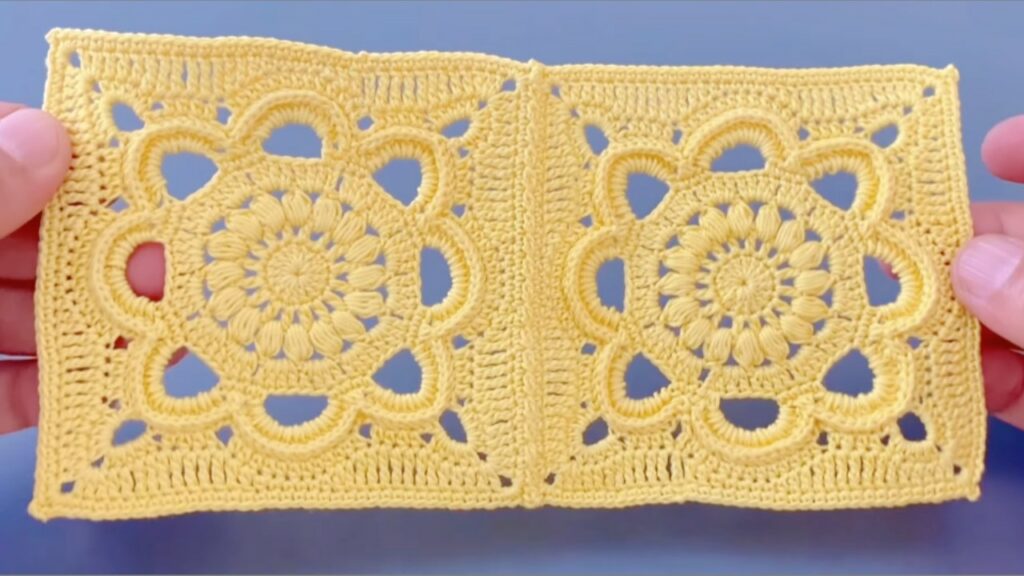
Blocking & finishing
- Block every motif pinned to a square (if Round 7 used). Pull corner ch-6 loops outward, pin scallop peaks and picots for sharpness. Mist with water or steam lightly and let dry completely. Blocking opens the lace and makes joins neat — don’t skip it.
- For a crisp runner/table piece, apply light spray starch after blocking if desired.
Joining motifs
Join-As-You-Go (JAYG) — recommended
- Crochet the first motif fully. For each new motif work through Round 7. On Round 8 (outer scallop) when you reach a place that meets a finished neighbour, sl st into the corresponding stitch/picot of the finished motif instead of creating the standalone picot — continue around joining at each meeting point (side loops and corner loops). This yields flat, nearly invisible seams and speeds assembly.
Sew-after (block then sew)
- Make & block all motifs. Lay out the design and join using a tapestry needle & matching yarn (mattress stitch or whipstitch) through the outer sc round or side loops. This lets you reposition motifs before final joining.
Project ideas & quick counts
Measure your blocked motif width M, then compute counts.
Examples (M ≈ 11–12 cm):
- Narrow runner: 1 × 8 motifs → ~88–96 cm long.
- Wider runner: 2 × 8 motifs → ~24 × 96 cm.
- Shawl/throw: 6 × 10 motifs → ~66–120 cm (depending on M).
- Blouse front panel (S): ~3 × 3 motifs (adjust for fit) — assemble with JAYG for a one-piece look.
If you give me your blocked motif width and desired finished dimensions I will compute exact motif counts (I can do that now if you want).
Troubleshooting & tips
- Motif cups (edges pull up): loosen tension on petal/arch rounds or go up 0.5 mm hook; block firmly.
- Motif ripples/waves: shorten arch chains (ch-7 → ch-6) or reduce sc count in Round 4.
- Joins gap: make join sl sts a touch firmer or add an extra sl st at join points; JAYG looks best when motifs are blocked before joining.
- Sides don’t match when joining: ensure Round 7 side sc/loop counts are identical on every motif — this is the most common alignment issue.
Variations & stylings
- Two-color motif: change color after Round 3 (petals) so petals contrast with frame.
- Smaller motif: use finer yarn + smaller hook or reduce petal dcs (7 → 5).
- Larger / bolder motif: heavier yarn or increase petal dcs (7 → 9) and arch chain lengths (ch-8/9). Adjust Round 7 side counts proportionally.
- Simpler beginner option: replace Round 5–6 archwork with ch-5 loops and 3 dc across each loop for an easier lacy result.
- Beaded edge: slide seed beads on yarn and work one into each picot for sparkle.
VIDEO: