by
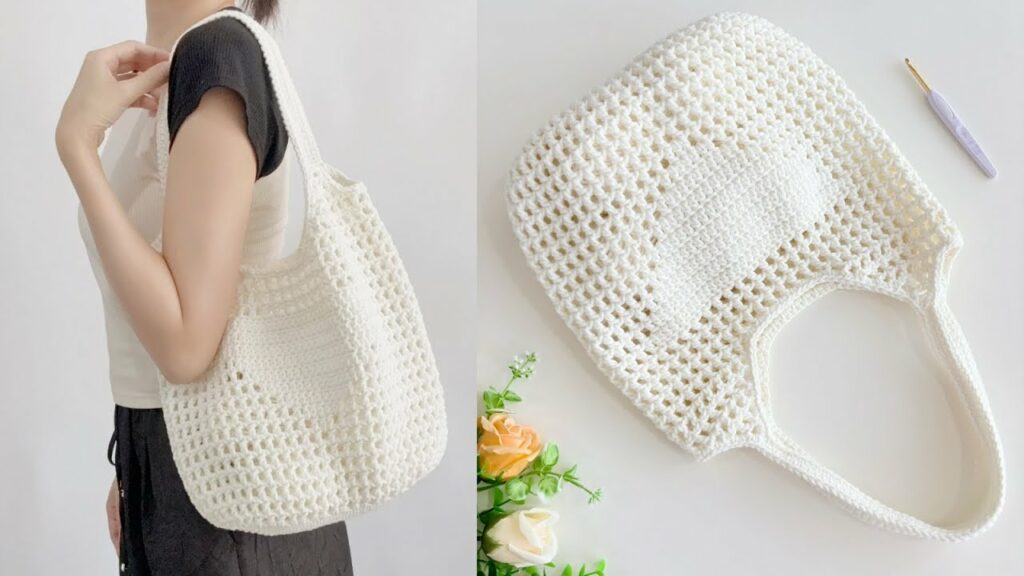
by As the temperature rises and the days grow longer, our wardrobe and accessories often shift towards lighter, more breathable options. The Crochet Tote Bag: Summer Hollow Shoulder Bag perfectly embodies this seasonal transition. This project combines the practicality of a spacious tote with the airy, decorative appeal of “hollow” or openwork crochet stitches, creating a bag that’s both functional for carrying your essentials and stylish enough to complement your summer ensembles.
This detailed guide will walk you through the steps of creating a beautiful and durable summer tote bag featuring a captivating hollow stitch pattern. Whether you’re heading to the beach, the market, or a casual outing, this handmade bag will be your chic and eco-friendly companion.
Why Crochet a Summer Hollow Shoulder Tote Bag?
- Lightweight & Breathable: The openwork design allows for air circulation, making it ideal for warm weather.
- Stylish & Unique: Stand out with a handmade accessory that showcases your crochet skills and personal style.
- Spacious & Practical: Perfect for carrying beach essentials, groceries, market finds, or everyday items.
- Customizable: Easily adjust the size, strap length, yarn color, and hollow stitch pattern to your preferences.
- Eco-Friendly: A reusable alternative to plastic bags.
- Satisfying Project: A larger project that offers a rewarding sense of accomplishment upon completion.
- Skill Enhancer: Provides practice in working with larger pieces, maintaining consistent tension, and potentially learning new stitch patterns.
Key Considerations Before You Start:
- Size & Dimensions:
- Consider what you intend to carry in your tote. Do you need a large beach bag or a smaller market tote?
- This tutorial will provide instructions for a medium-sized tote (approximately 14 inches wide, 12 inches tall, excluding straps). You can easily adjust these dimensions by altering your starting chain and the number of rounds/rows.
- Yarn Choice (Crucial for Durability and Drape):
- Fiber: Choose a strong, durable fiber that can withstand some weight and repeated use.
- Cotton or Cotton Blends: Highly recommended for their strength, breathability, and ability to hold shape. They also wash well. Options like mercerized cotton offer a nice sheen.
- Hemp or Jute: Provide a very sturdy, natural, and rustic look, though they might be a bit rougher on the hands while crocheting.
- Linen or Linen Blends: Offer a beautiful drape and a slightly rustic texture, perfect for summer.
- Strong Acrylic or Blends: If budget is a concern, choose a good quality, non-stretchy acrylic or a blend with cotton or other natural fibers.
- Weight: Worsted (Category 4) or DK (Light Worsted/Category 3) are good starting points. Worsted will create a sturdier bag more quickly, while DK will result in a finer, more delicate tote.
- Color: Think summery hues! Bright colors, pastels, nautical stripes, or natural tones all work beautifully.
- Fiber: Choose a strong, durable fiber that can withstand some weight and repeated use.
- Hook Size:
- Match your hook to your yarn weight, but consider going down half a size to create a denser fabric that can support weight and prevent excessive stretching of the hollow stitches.
- For Worsted yarn: H/8 (5.0 mm) or I/9 (5.5 mm).
- For DK yarn: G/6 (4.0 mm) or H/8 (5.0 mm).
- “Hollow Stitching” Pattern:
- Choose a relatively simple openwork pattern that creates a visually appealing texture without being too intricate or flimsy.
- Net Stitch (Filet Crochet Basics): Using double crochets and chains to create a grid.
- V-Stitch (V-scallop): (dc, ch 1, dc) in the same stitch, with spaces in between.
- Mesh Patterns: Combinations of single crochet and chains.
- This tutorial will use a variation of the V-stitch for a lovely openwork texture.
- Strap Construction:
- Consider how you want to carry your tote. Shoulder straps need to be long enough to comfortably hang from your shoulder.
- You can create crocheted straps (worked separately and sewn on, or integrated into the bag) or use purchased handles.
- Lining (Optional but Recommended for Durability):
- If you plan to carry small items or want extra structure, consider adding a fabric lining to your finished crocheted bag.
Materials You’ll Need:
- Yarn: Approximately 400-500 yards of Worsted (Category 4) weight cotton or durable summer yarn in your chosen color.
- Crochet Hook: Size I/9 (5.5 mm) or H/8 (5.0 mm) (adjust based on your yarn and tension).
- Yarn Needle (Tapestry Needle): For weaving in ends.
- Scissors: For cutting yarn.
- Stitch Markers (optional): Helpful for marking the beginning of rounds or specific stitches.
- Fabric for Lining (optional): Approximately 1/2 yard of coordinating cotton fabric.
- Sewing Machine and Thread (if adding lining).
- Measuring Tape: To check your dimensions.
Essential Crochet Abbreviations:
- ch: chain
- sl st: slip stitch
- sc: single crochet
- hdc: half double crochet
- dc: double crochet
- tr: treble crochet
- sp: space
- ch-sp: chain space
- (): indicates instructions to be worked into the same stitch/space
- ***…***: repeat instructions within asterisks
- []: indicates stitch counts at the end of a round/row
Crochet Summer Hollow Shoulder Tote Bag Pattern
This pattern works in rounds from the bottom up, creating a seamless bag body.
Part 1: The Base of the Tote
We’ll start with a flat circle that will form the base.

- Magic Ring (MR): Create a magic ring.
- Round 1: Ch 2 (does NOT count as a st). Work 10 hdc into the MR. Pull the tail tight to close the ring. Sl st to the first hdc to join.
- (10 hdc)
- Round 2: Ch 2. Hdc inc in each st around. Sl st to the first hdc to join.
- (20 hdc)
- Round 3: Ch 2. Hdc in the next st, hdc inc in the next st. Repeat from * around. Sl st to the first hdc to join.
- (30 hdc)
- Round 4: Ch 2. Hdc in the next 2 sts, hdc inc in the next st. Repeat from * around. Sl st to the first hdc to join.
- (40 hdc)
- Continue Increasing: Continue working in this manner, increasing by 1 hdc between increases in each round, until your base measures approximately 10-12 inches in diameter (adjust to your desired base size). For our example, we’ll aim for a final round with (80 hdc).
- Example Round 8: Ch 2. Hdc in the next 6 sts, hdc inc in the next st. Repeat around. (70 hdc)
- Example Round 9: Ch 2. Hdc in the next 7 sts, hdc inc in the next st. Repeat around. (80 hdc)
Part 2: The Body – Hollow V-Stitch Pattern
Now we’ll transition to the openwork section, working in continuous rounds (optional – you can join each round if you prefer a more defined seam).
- Round 1 (Transition): Ch 3 (counts as first dc). Dc in the same st. Ch 1. Skip 1 st. (Dc in the next st, ch 1, dc in the same st). Ch 1. Skip 1 st. Repeat from * around. Sl st to the top of the beginning ch 3 to join (if not working continuously).
- (40 V-sts, 40 ch-1 spaces)
- Round 2 (Hollow Pattern): Sl st into the ch-1 space of the first V-stitch. Ch 3 (counts as first dc). Dc in the same ch-1 space. Ch 1. (Dc in the ch-1 space of the next V-stitch, ch 1, dc in the same ch-1 space). Ch 1. Repeat from * around. Join with a sl st to the top of the beginning ch 3 (or continue working in the ch-1 space if not joining).
- (40 V-sts, 40 ch-1 spaces)
- Repeat Round 2: Continue repeating Round 2 until your bag reaches your desired height (approximately 12 inches or adjust as needed). For a taller bag, work more rounds. For a shorter bag, work fewer.
Part 3: The Top Edge
We’ll create a more solid edge for stability and attaching straps.
- Round 1 (Solid Edge): Ch 1 (does NOT count as a st). Sc in each dc and each ch-1 space around. Join with a sl st to the first sc.
- (Approximately 80 sc) – Your exact count might vary slightly.
- Round 2 (Reinforcement): Ch 1. Sc in each st around. Join with a sl st to the first sc.
- (Same sc count as previous round)
- Fasten off, leaving a long tail for weaving in.
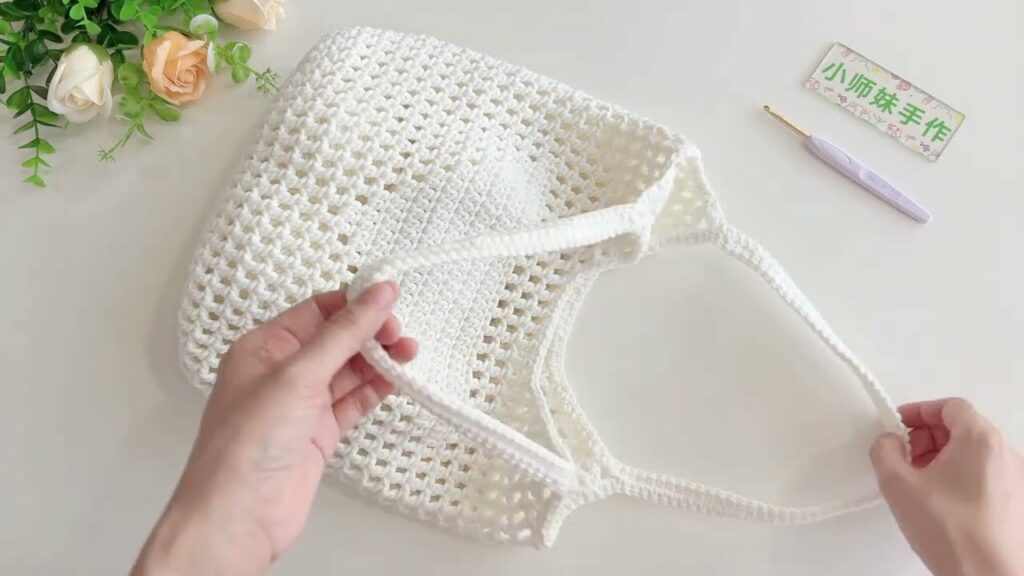
Part 4: The Shoulder Straps (Make 2)
You can create simple, sturdy straps.
- Starting Chain: Ch 5.
- Row 1: Sc in the 2nd ch from hook and in each ch across.
- (4 sc)
- Ch 1, turn.
- Repeat Row 1: Sc in each st across. Continue repeating this row until your strap reaches your desired length for a shoulder bag (approximately 24-28 inches or adjust to your preference).
- Fasten off, leaving a long tail for sewing.
- Make a second strap.
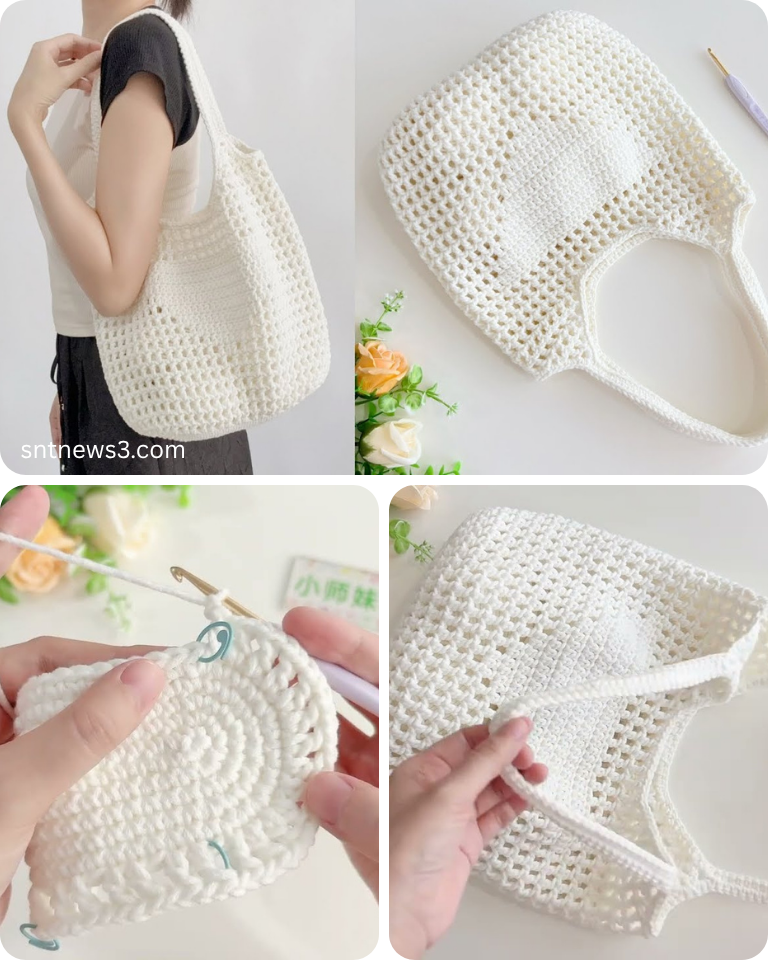
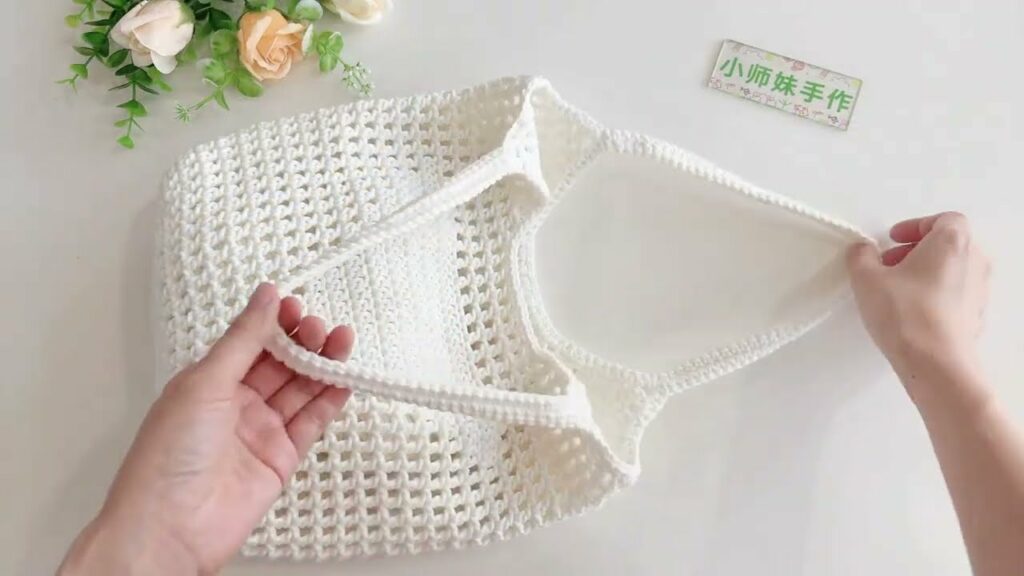
Part 5: Attaching the Straps
- Positioning: Lay your tote flat. Decide where you want to attach your straps. Typically, they are placed evenly spaced on either side of the top edge. For our approximately 14-inch wide bag, you might place the inner edge of each strap about 3-4 inches in from the sides.
- Sewing: Using your yarn needle and the long tails from your straps, securely sew the straps to the reinforced top edge of your tote bag. Make sure they are firmly attached to handle the weight. Sew several times back and forth for strength.
Part 6: Optional Lining
- Measure Your Bag: Measure the inside dimensions of your finished crochet bag.
- Cut Fabric: Cut two pieces of your chosen fabric according to your measurements, adding about 1 inch to the top edge for folding over and hemming.
- Sew the Lining: With right sides together, sew the two pieces of fabric along the bottom and side edges, creating a bag shape. Leave the top open.
- Hem the Top: Fold the top edge of your fabric lining down by 1/2 inch and press, then fold down another 1/2 inch and press again. Stitch the hem in place.
- Insert Lining: Place the fabric lining inside your crochet bag. Fold the top edge of the lining over the top edge of the crochet bag. Hand-stitch the lining to the inside of the crochet bag along the top edge, making sure it’s secure and neat.
Part 7: Finishing Touches
- Weave in All Ends: Ensure all yarn tails are securely woven in using your yarn needle.
- Blocking (Optional): If your bag seems a little uneven, you can lightly block it by stuffing it with towels or fabric scraps to shape it and gently misting it with water (if using a natural fiber like cotton). Allow it to air dry completely.
Your Crochet Summer Hollow Shoulder Tote Bag is Complete!
Now you have a stylish, lightweight, and practical tote bag perfect for all your summer adventures. The openwork design adds a touch of breezy elegance, while the sturdy construction ensures it can carry your essentials with ease. Enjoy your handmade creation!
Tips for Customization:
- Stitch Pattern Variations: Experiment with different openwork crochet stitch patterns for the body of the bag.
- Stripes or Color Blocking: Incorporate stripes or sections of different colors for a bolder look.
- Handle Alternatives: Use purchased leather or rope handles instead of crocheted straps for a different aesthetic.
- Add Pockets: You can crochet and sew in small pockets to the inside of the bag for organizing smaller items.
- Button or Tie Closure: Add a loop and button closure or create tie straps at the top for added security.
- Embellishments: Consider adding tassels, charms, or other decorative elements to personalize your bag.
Happy crocheting and enjoy your stylish summer tote!
Video tutorial: