 by
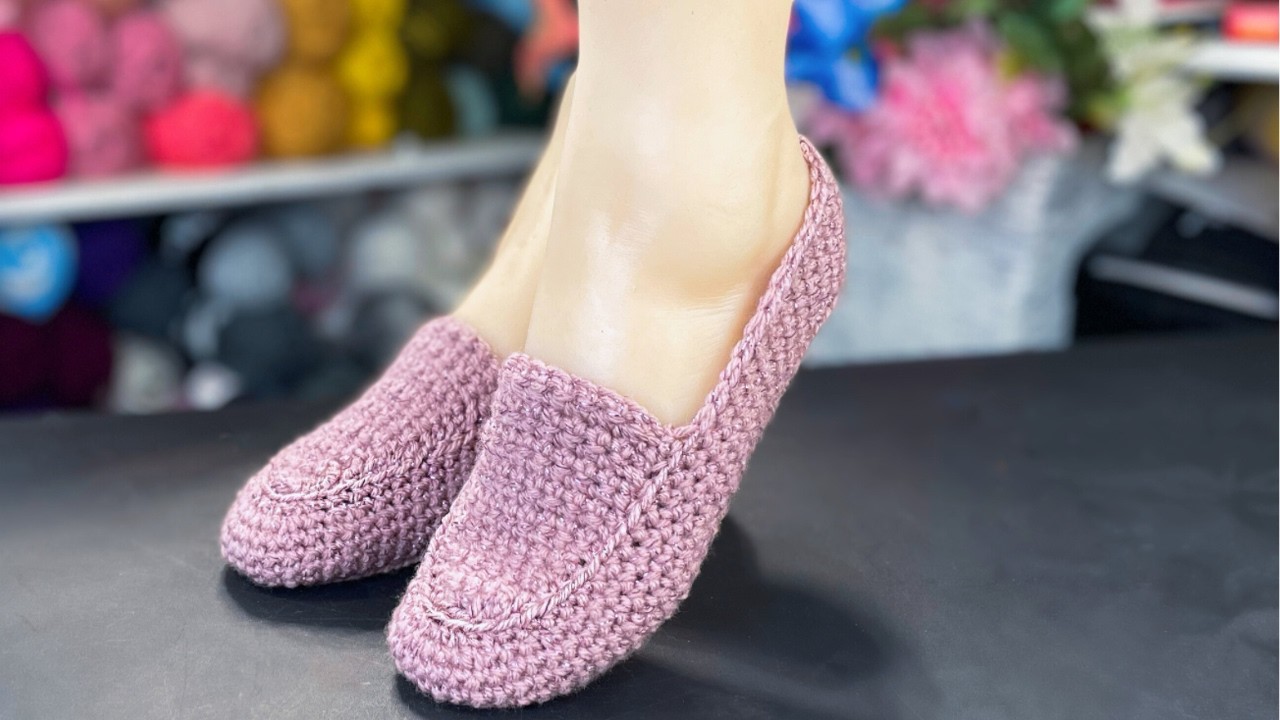
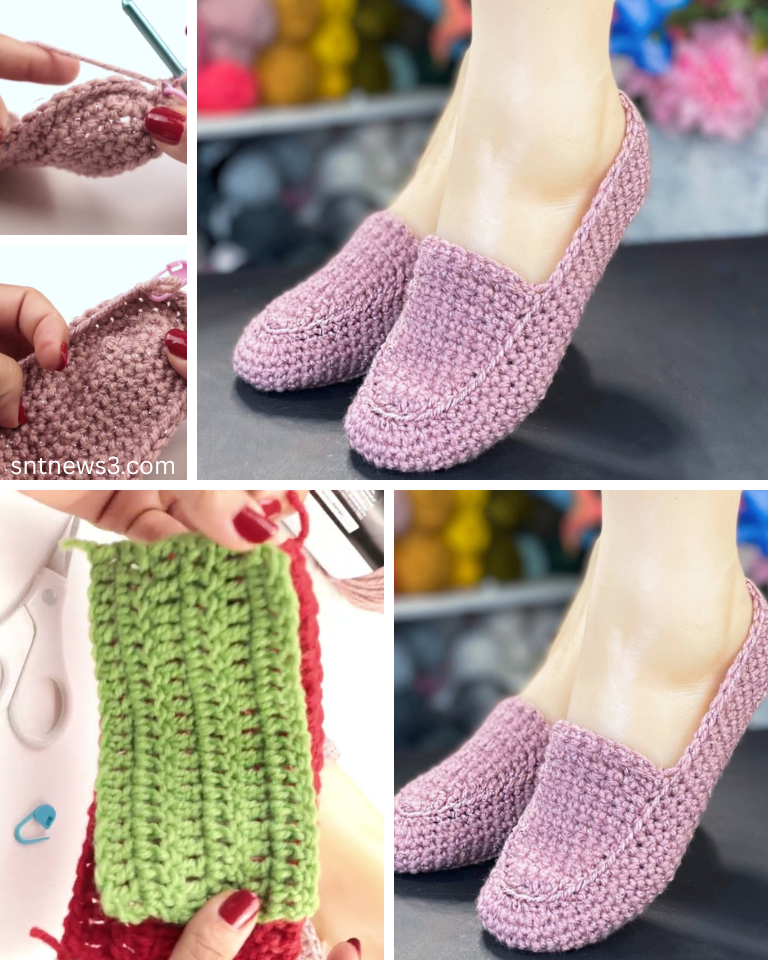
by There’s nothing quite like slipping into a pair of handmade, cozy slippers after a long day. And if you’ve ever thought crocheting footwear was too complicated, think again! The super easy crochet slipper is a fantastic project for beginners and seasoned crocheters alike, offering quick satisfaction and a practical, comfortable result. Specifically, a simple crochet loafer pattern creates a sleek, minimalist slipper that’s both stylish and wonderfully warm.
This detailed guide will walk you through creating a pair of these perfect crochet loafers, focusing on straightforward stitches and simple construction. Get ready to treat your feet to some handmade comfort!

Why Crochet Super Easy Loafer Slippers?
- Ultimate Comfort: Handmade slippers are often softer, warmer, and more comfortable than store-bought options, perfectly conforming to your feet.
- Quick Project: Using basic stitches and minimal shaping, you can often whip up a pair in just a few hours or over a weekend.
- Beginner-Friendly: This pattern relies on fundamental stitches like chains, slip stitches, single crochet, and half double crochet, making it accessible for new crocheters.
- Stash Buster: Perfect for using up those single skeins of chunky or worsted weight yarn you have lying around.
- Customizable: Easily adapt colors, add simple embellishments, or adjust the fit to your preference.
- Thoughtful Gift: A pair of handmade slippers makes a wonderfully personal and cozy gift for friends and family.
Key Considerations for Your Perfect Crochet Loafer Slippers
To ensure your slippers are comfy, durable, and look great, keep these points in mind:
- Yarn Choice (Comfort & Durability!):
- Fiber: For slippers, softness and warmth are key. Acrylic is a great, affordable option – choose a soft, non-pilling variety. Wool (especially superwash merino) is excellent for warmth and breathability, though it can be pricier. Cotton blends can also work, offering durability, but might be less warm. Avoid delicate or easily snagged yarns.
- Weight: Worsted weight (Category 4) is a versatile choice. For extra quickness and squishiness, bulky (Category 5) or even super bulky (Category 6) yarns are fantastic and result in very cozy slippers.
- Washability: Consider how often they’ll be worn. Machine washable yarn is a bonus!
- Color: Neutrals, pastels, or vibrant hues – it’s your choice! Solids highlight stitch texture, while variegated yarns add effortless color changes.
- Hook Size: To create a dense fabric that will hold its shape and keep feet warm, you generally want to use a hook size one or two sizes smaller than what your yarn label recommends for garments. This ensures there are no large gaps for toes to poke through.
- For worsted weight: 4.0mm (US G/6) or 4.5mm (US 7).
- For bulky weight: 6.0mm (US J/10) or 7.0mm (US K/10.5).
- Gauge (For Sizing!): While not as critical as for garments, gauge affects sizing. Make a small swatch (e.g., 4×4 inches) to check your stitch density. If your slippers are too loose, go down a hook size. If too tight, go up. The most important measurement is the length of your starting chain, as this will determine the length of the sole.
- Sole Durability (Optional but Recommended):
- For extra durability and slip-resistance, you can add non-slip gripper fabric to the bottom of your finished slippers, or apply liquid latex/gripper dots (available at craft stores).
- You can also crochet a double sole for extra padding and durability by making two identical soles and stitching them together before building the upper.
Essential Crochet Abbreviations
- ch: chain
- sl st: slip stitch
- sc: single crochet
- hdc: half double crochet
- dc: double crochet
- sc2tog: single crochet 2 together (single crochet decrease)
- st(s): stitch(es)
- sp: space
- FO: Fasten off
- (): indicates instructions to be worked into the same stitch
- …: repeat instructions within asterisks
Super Easy Crochet Loafer Slipper Pattern (Adult Sizes S, M, L)
This pattern creates a simple slipper by starting with an oval base (the sole) and then building the upper directly from it.
Sizing (Approximate Foot Length):
- Small (S): US Women’s 5-6 (8.75-9.25 inches / 22-23.5 cm)
- Medium (M): US Women’s 7-8 (9.5-10 inches / 24-25.5 cm)
- Large (L): US Women’s 9-10 (10.25-10.75 inches / 26-27 cm)
Yarn: Worsted Weight (Category 4) – approx. 150-200 yards per pair. Hook: 4.5mm (US 7) or 5.0mm (US H/8) – choose based on preferred fabric density. (A 5.0mm hook will create a slightly larger/looser slipper than a 4.5mm).
Part 1: The Slipper Sole (Make 2)
This is the foundation of your slipper.
- Starting Chain:
- S: Ch 27
- M: Ch 30
- L: Ch 33
- (Chain counts as your foot length. For larger/smaller, adjust this chain length by multiples of 3. Remember to make an odd number of chains so your first Hdc is in the 3rd ch from hook.)
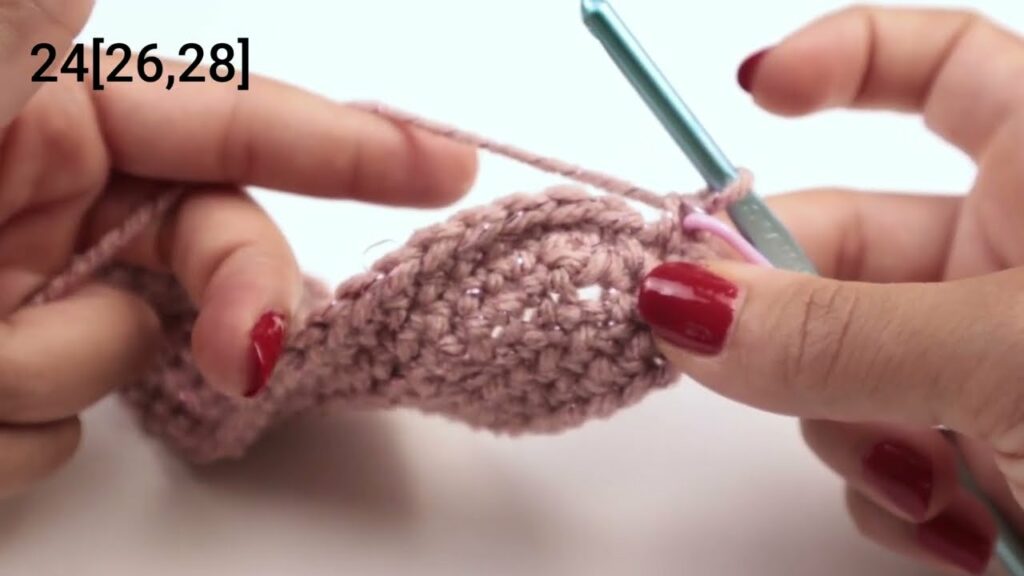
- Round 1:
- Hdc in 3rd ch from hook. Hdc in each ch across until you reach the very last ch.
- Work (5 hdc) in the very last ch (this forms the toe end).
- Working down the opposite side of the starting chain: Hdc in each ch across until you reach the last ch (where you made your first hdc).
- Work (4 hdc) in the very first ch (this forms the heel end). Join with a sl st to the top of the first hdc.
- (You should have a long oval shape.)
- Round 2: Ch 1. Sc in each st around the entire oval.
- When you reach the toe end (the 5 hdc from previous round), work 2 sc in the first, 1 sc in the next 3, 2 sc in the last of those 5.
- When you reach the heel end (the 4 hdc from previous round), work 2 sc in the first, 1 sc in the next 2, 2 sc in the last of those 4.
- Join with a sl st to the first sc.
- (This round helps flatten and define the sole. The increases ensure it stays oval-shaped.)
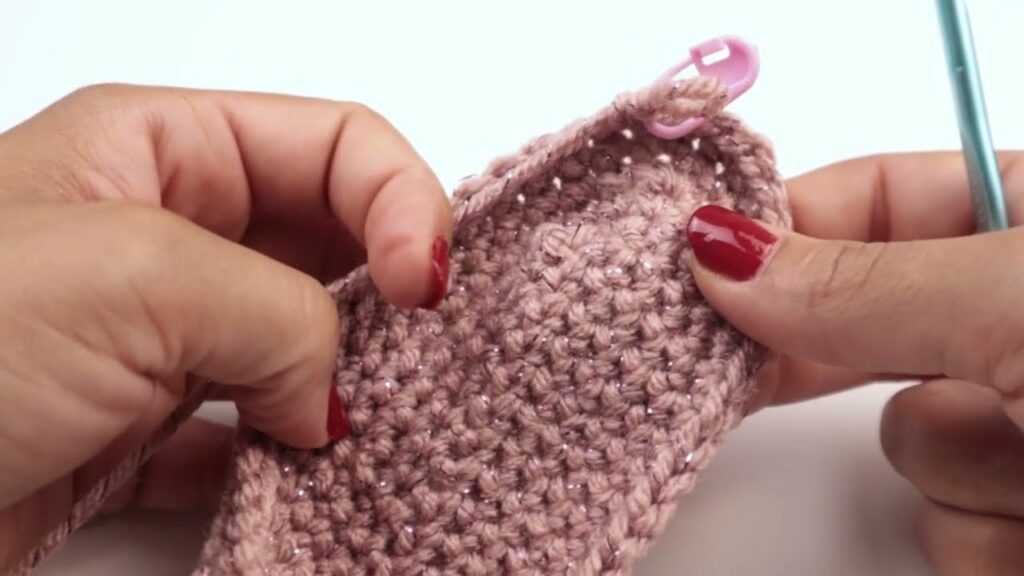
- Round 3: Ch 1. Sc in the back loop only (BLO) of each sc around. Join with a sl st to the first sc.
- FO, leaving a long tail for weaving in.
- (Working this round in BLO creates a distinct ridge, making a clean separation between the sole and the upper, helping the slipper hold its shape and stand up straight.)
Part 2: The Slipper Upper (Working from the Sole)
Now we’ll build the top part of the slipper directly onto the sole.
- Re-attach Yarn: With the sole’s RS facing up (the ridge created by BLO should be visible and facing you), re-attach yarn with a sl st at the very back center of the heel (this is typically where your starting chain was).
- Round 4 (Building Up): Ch 1. Sc in each sc around, working into the unworked front loops from Round 3 (or just into the stitch if it’s easier). Do not join. Continue working in a continuous spiral.
- (This round starts to pull the sides of the slipper up.)
- Round 5: Sc in each sc around, continuing in a spiral.
- (You’ll be able to tell where the rounds begin if you use a stitch marker in the first stitch of each round, moving it up.)
- Round 6 (Shaping the Toe):
- Sc in first few stitches until you reach the beginning of the toe curve (usually about 1/3 of the way around from the heel).
- Now, you’ll start decreasing for the toe:
- *(Sc2tog, sc in next st)* repeat from * 3-5 times (adjust based on size and how pointy/rounded you want the toe).
- Sc in remaining stitches until you reach the back of the heel again.
- (Don’t join. Keep working in a continuous spiral.)
- Round 7 (More Toe Shaping):
- Sc in first few stitches until you reach the decreases from the previous round.
- *(Sc2tog)* repeat from * 3-5 times (or until the toe opening is about 1-1.5 inches / 2.5-4 cm wide).
- Sc in remaining stitches until you reach the back of the heel again.
- Round 8 (Closing the Toe):
- Sl st into the next stitch.
- Ch 1. Sc in each of the remaining stitches around the opening of the slipper.
- Sl st into the last sc. FO, leaving a long tail.
- Sew Toe Closed: Using your yarn needle, carefully gather the stitches at the very tip of the toe opening and sew them closed securely. Weave in any remaining yarn tail.
Part 3: Finishing Touches
- Weave in All Ends: Meticulously weave in every single yarn tail using your yarn needle. For slippers, secure ends are important as they get a lot of wear.
- Optional: Add Sole Grippers:
- Liquid Latex/Gripper Dots: Apply dots or a thin layer to the sole of the slipper. Let dry completely according to product instructions.
- Non-Slip Fabric: Cut out a piece of non-slip fabric the shape of your sole. Hand-sew or machine-sew it securely to the bottom of the slipper.
- Optional: Add Embellishments:
- Crochet a simple bow or flower and sew it to the top of the slipper.
- Add a single button for a decorative touch.
- Embroider a simple initial or design.
Tips for Making Your Slippers Perfect:
- Try On As You Go: Especially during the toe-shaping rounds (Rounds 6-8), try the slipper on (or hold it against the intended foot) to check the fit and adjust decreases as needed.
- Consistent Tension: This is key for creating a sturdy, evenly shaped slipper.
- Work in Continuous Rounds: Not joining at the end of each round (after Round 3) creates a seamless upper, which is perfect for comfort.
- Make a Pair at Once: To ensure both slippers match as closely as possible, consider working a few rounds on one, then a few on the other, alternating as you go.
- Practice Decreases: Sc2tog (single crochet 2 together) is a simple decrease that’s perfect for shaping. Make sure your decreases are evenly spaced for a symmetrical toe.
- Add a Double Sole: For extra cushioning and durability, crochet two identical soles and stitch them together before starting Part 2 (The Slipper Upper).
With this super easy pattern, you’ll be able to create perfectly cozy and stylish crochet loafer slippers in no time. Happy hooking!
Video tutorial: