 by
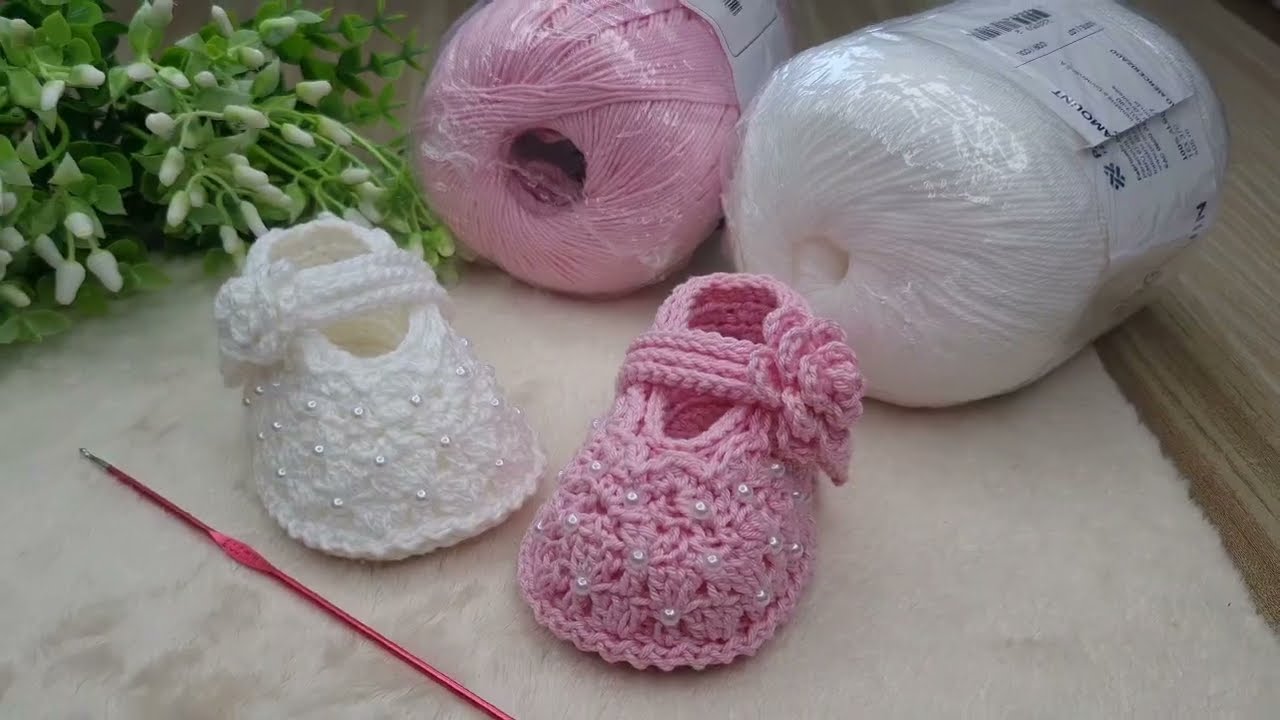
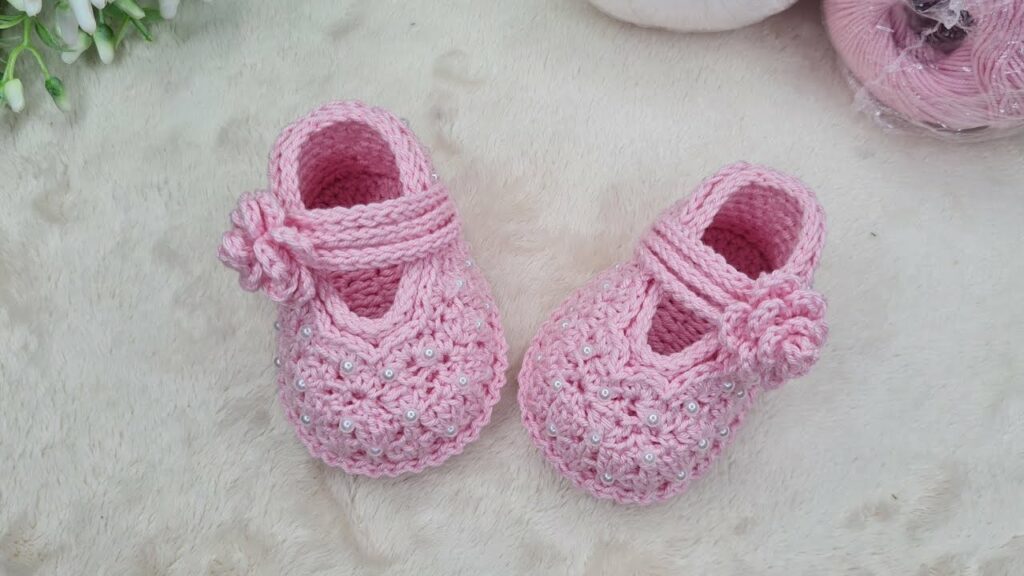
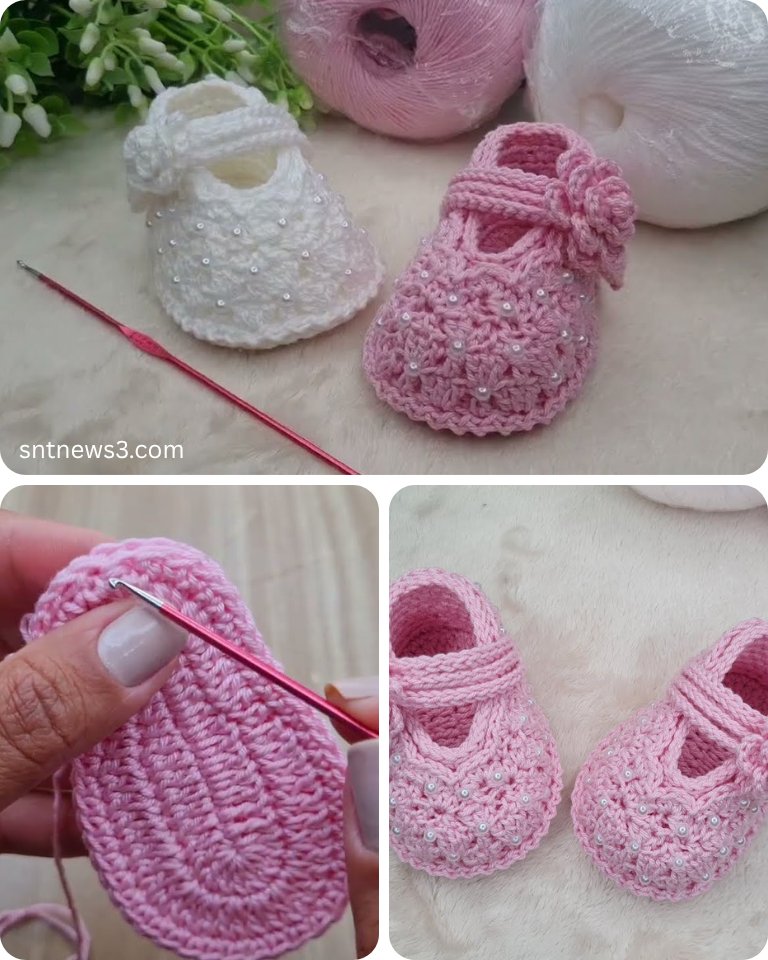
by There’s an unparalleled joy in crafting for newborns, and few items are as cherished as a pair of delicate, handmade booties. Imagine tiny toes nestled in soft, intricate lace – a truly enchanting sight. A crocheted lace bootie, specifically designed for newborns (often referred to as “RN size” or “0-1 month size”), is a perfect project for a baby’s first photoshoot, a christening, a memorable coming-home outfit, or as a timeless keepsake.
This detailed article will guide you step-by-step through crocheting an elegant pair of lace booties, emphasizing the techniques that create their delicate beauty. We’ll focus on a simple yet effective lace pattern that even confident beginners can master, ensuring a stunning and precious result. Get ready to wrap tiny feet in pure, handcrafted loveliness!
Why Crochet Lace Booties for Newborns?
- Adorable & Delicate: The intricate lace pattern perfectly complements the sweet innocence of newborn feet, adding an ethereal touch to any outfit.
- Photography Prop: These booties are a beloved accessory for newborn photoshoots, adding texture and charm to professional or at-home pictures.
- Special Occasion Wear: Ideal for christenings, blessings, naming ceremonies, or simply as a special accessory for family gatherings.
- Precious Keepsake: Hand-crocheted booties often become treasured family heirlooms, holding sentimental value for years to come.
- Skill Building: Practices working in small rounds, introduces simple lace stitches, and refines your shaping and finishing techniques.
- Quick & Rewarding Project: Being small, a pair works up relatively quickly, offering immediate satisfaction.
Key Considerations Before You Start:
- Size (Newborn – 0-1 Month / RN Size):
- This tutorial targets a finished sole length of approximately 8-9 cm (3-3.5 inches), which is suitable for most newborns up to about one month old.
- “RN size” in the context of baby items usually implies suitability for very small infants, often used for hospital gifts or preemie/early newborn sizing.
- Yarn Choice (Crucial for Delicacy & Softness!):
- Fiber: Prioritize extreme softness, breathability, and non-irritating qualities, as this will be directly against baby’s sensitive skin.
- Baby Merino Wool or Baby Alpaca: Luxuriously soft, excellent drape, and naturally temperature-regulating. Look for superwash varieties for easier care.
- Soft Cotton or Bamboo Blends: Breathable, natural, and gentle. Choose a very soft variety.
- High-Quality Baby Acrylic: Many modern baby acrylics are incredibly soft, durable, and machine washable, making them a practical choice.
- Weight: Fine yarns are best for delicate lace.
- Fingering (Category 1) or Sport (Category 2) will yield the most delicate results.
- DK (Category 3) can also be used if you prefer a slightly less airy, but still soft, lace.
- Colors: Classic white, ivory, or very soft pastels (baby pink, mint green, sky blue, pale yellow) enhance the delicate lace aesthetic.
- Fiber: Prioritize extreme softness, breathability, and non-irritating qualities, as this will be directly against baby’s sensitive skin.
- Hook Size:
- Match your hook to your yarn weight, but consider going up half a size or even a full size from the yarn label’s recommendation. This is key to creating an open, airy lace fabric with beautiful drape, preventing the booties from being stiff.
- For Fingering yarn, try 2.5 mm (US C/2) or 3.0 mm (US D/3).
- For Sport yarn, try 3.0 mm (US D/3) or 3.5 mm (US E/4).
- Gauge (Important for Fit!):
- Making a small swatch for the sole (Part 1) and measuring its length is crucial to ensure the bootie fits the intended size. Adjust your hook size if your sole length is significantly different.
- Stitch Pattern (Lace):
- We’ll use a simple (dc, ch 1, dc) shell variation combined with chain spaces to create an elegant lace effect. This is easy to learn and looks beautiful.
- Construction Method: The bootie is constructed by first crocheting an oval sole, then building up the sides, shaping the instep/toe, and finally adding the lace pattern for the ankle cuff and a ribbon tie.

Materials You’ll Need:
- Yarn: Approx. 30-50 yards of very soft Fingering (Category 1) or Sport (Category 2) weight yarn in your chosen color.
- Crochet Hook: Size C/2 (2.5 mm) to E/4 (3.5 mm) (adjust for desired lace openness).
- Yarn Needle (Tapestry Needle): For weaving in ends.
- Scissors: For cutting yarn.
- Stitch Marker (optional but helpful): To mark the beginning of rounds.
- Ribbon: Approx. 20-24 inches (50-60 cm) of thin (1/8 – 1/4 inch / 3-6mm wide) satin or sheer ribbon for ties.
Essential Crochet Abbreviations:
- ch: chain
- sl st: slip stitch
- sc: single crochet
- hdc: half double crochet
- dc: double crochet
- sc inc: single crochet increase (2 sc in same st)
- hdc inc: half double crochet increase (2 hdc in same st)
- dc inc: double crochet increase (2 dc in same st)
- sc2tog: single crochet 2 together (decrease)
- hdc2tog: half double crochet 2 together (decrease)
- st(s): stitch(es)
- ch-sp: chain space
- BLO: back loop only
- FO: fasten off
- (): indicates instructions to be worked into the same stitch/space
- ***…***: repeat instructions within asterisks
- []: indicates stitch counts at the end of a round
Crochet Lace Booties (Newborn RN Size – 0-1 Month) Step-by-Step Tutorial
We’ll use a mix of sc, hdc, and a simple lace shell pattern.
Gauge Swatch (Sole Check): Work Part 1: The Sole. Measure the length. It should be approximately 8-9 cm (3-3.5 inches). Adjust hook size if significantly different.
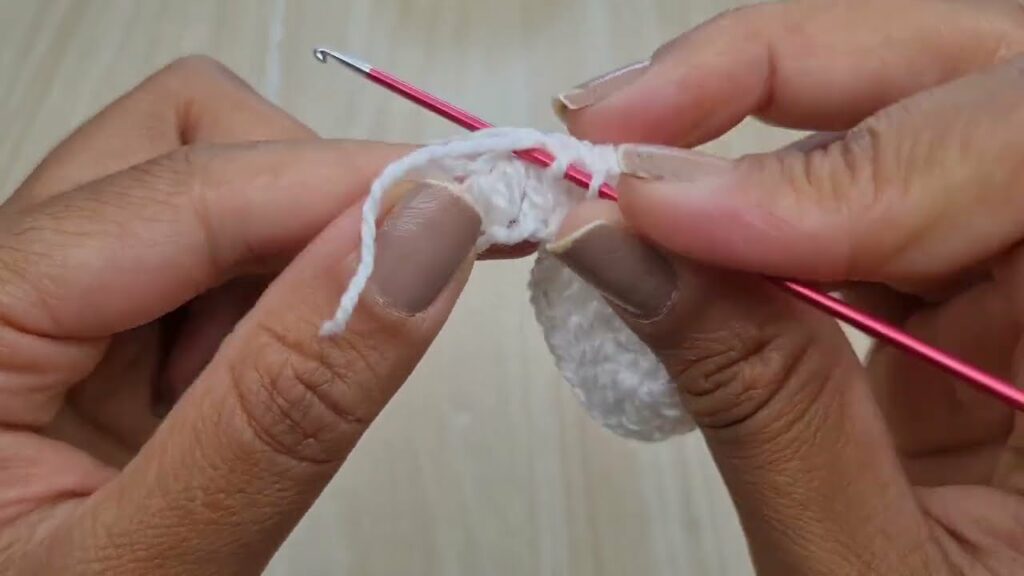
Part 1: The Sole (Foundation)
We begin with a flat oval that forms the bottom of the bootie.
- Start with your chosen yarn.
- Round 1: Ch 10.
- Hdc in 3rd ch from hook (counts as 1st hdc). Hdc in next 6 ch.
- (5 hdc) in last ch.
- Working along the opposite side of the starting chain: Hdc in next 7 ch.
- (4 hdc) in the very first ch where you made your first hdc.
- Join with a sl st to the top of the beginning Ch 2.
- [24 hdc]
- Round 2: Ch 2 (does NOT count as a st). Hdc in first st. Hdc in next 6 sts.
- (Hdc inc) in next 5 sts.
- Hdc in next 7 sts.
- (Hdc inc) in next 4 sts.
- Join with a sl st to the top of the first hdc.
- [33 hdc]
- Your sole should measure approx. 8-9 cm (3-3.5 inches) in length now. If not, adjust hook size and re-do.
Part 2: Building the Bootie Body (Establishing the Wall)
This round creates the defined vertical edge of the bootie.
- Round 3 (Establishing Wall):
- Ch 1 (does NOT count as a st).
- Sc in the back loop only (BLO) of each st around.
- Join with a sl st to the first sc.
- [33 sc]
- Round 4 (Body Height):
- Ch 1. Sc in each sc around.
- Join with a sl st to the first sc.
- [33 sc]
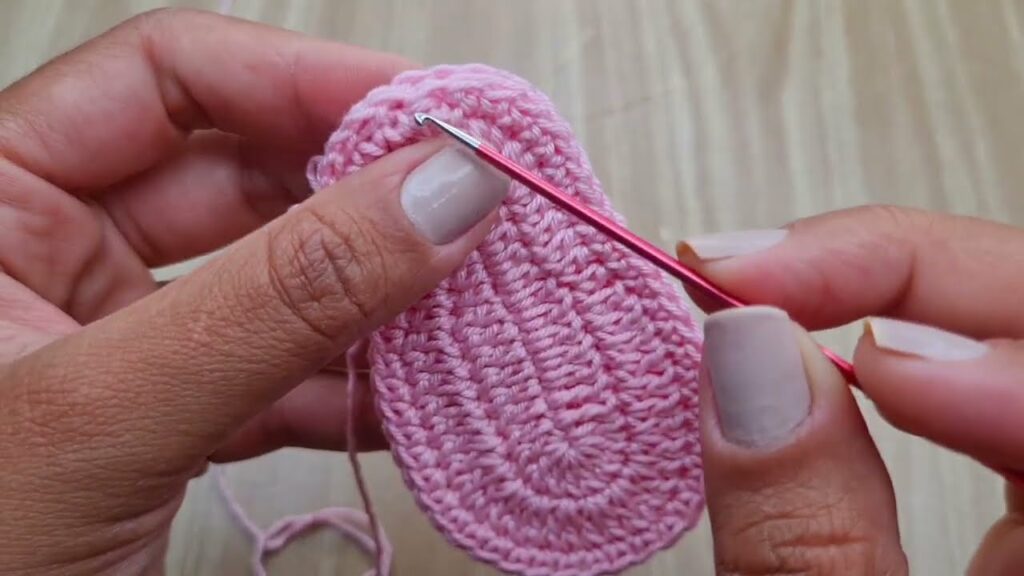
Part 3: Shaping the Instep/Toe
Now we’ll work upwards and decrease stitches at the front to form the toe.
- Round 5 (Initial Toe Decrease):
- Ch 1. Sc in first 8 sts.
- (Sc2tog) 8 times.
- Sc in remaining 9 sts.
- Join with a sl st to the first sc.
- [25 sc]
- Round 6 (Further Toe Decrease):
- Ch 1. Sc in first 6 sts.
- (Sc2tog) 4 times.
- Sc in remaining 11 sts.
- Join with a sl st to the first sc.
- [21 sc]
- You should now see the bootie beginning to curve upwards and form the toe shape.
Part 4: The Ankle/Cuff (Lace Detail)
This creates the delicate lace cuff.
- Round 7 (Lace Pattern – Foundation):
- Ch 1. Sc in first st.
- Ch 2, skip 2 sts.
- (Sc in next st, ch 2, skip 2 sts). Repeat from * 6 times.
- Join with a sl st to the first sc.
- [7 sc, 7 ch-2 sps]
- This round creates the spaces for the ribbon to be threaded through later.
- Round 8 (Lace Pattern – Shells):
- Sl st into the first ch-2 sp.
- Ch 3 (counts as 1st dc). Work (dc, ch 1, 2 dc) in the same ch-2 sp (this forms your first lace shell).
- Skip next sc. Work (2 dc, ch 1, 2 dc) in next ch-2 sp. Repeat from * around.
- Join with a sl st to the top of the beginning Ch 3.
- [7 shells of (2 dc, ch 1, 2 dc)]
- Round 9 (Picot Edging):
- Ch 1. Sc in first dc. Sc in next dc.
- (Ch 3, sl st into the first of those 3 chs – this makes a picot).
- Sc in ch-1 sp.
- (Ch 3, sl st into the first of those 3 chs – picot).
- Sc in next 2 dc.
- Repeat from * around the entire cuff, placing picots over the middle of each shell and in the ch-1 sps.
- Join with a sl st to the first sc.
- FO, leaving a short tail to weave in.
Part 5: Finishing Touches
- Weave in All Ends: Use your yarn needle to carefully weave in all starting and ending tails. For lace, meticulous weaving is essential as loose ends will be visible through the open stitches.
- Make a Second Bootie! Repeat all steps to create a matching pair.
- Add Ribbon Ties: Cut your thin ribbon into two equal lengths (approx. 10-12 inches / 25-30 cm per piece). Thread one piece of ribbon through the ch-2 spaces of Round 7 on each bootie. Start from the front center, weave in and out, and finish with equal lengths on each side for tying a bow.
- Blocking (Optional but Recommended):
- Gently wet your finished booties (you can mist them with water or gently submerge them, then squeeze out excess water).
- Place them over a small baby bootie blocker, or gently stuff them with tissue paper or plastic bags to help them hold their shape.
- Allow them to air dry completely. Blocking helps open up the lace pattern and sets the shape beautifully.
Your Crocheted Lace Booties are Complete!
You’ve created a truly delicate, elegant, and precious pair of booties, perfect for a newborn’s earliest days.
Tips for Success & Enhancing Delicacy:
- Yarn Quality & Hook Size: The type of yarn and the hook size you choose are the most important factors for achieving a delicate, airy lace. Don’t be afraid to swatch and adjust.
- Consistent Tension: Maintain even tension throughout the entire project, especially for the lace rounds. This ensures your stitches are uniform and the lace pattern looks neat.
- Blocking is the Magic: For lace items, blocking is a game-changer. It transforms a potentially crumpled piece into a beautifully defined and elegant creation.
- Ribbon Choice: A thin satin or sheer organza ribbon will complement the delicate lace. Avoid thick or heavy ribbons that might overwhelm the bootie.
- Care: Always refer to your yarn label for specific care instructions. Most baby yarns and delicate lace items are best hand-washed in cool water with a mild detergent, then gently squeezed and laid flat to dry.
Enjoy the sheer beauty and satisfaction of your handcrafted creation!
Video tutorial: