 by
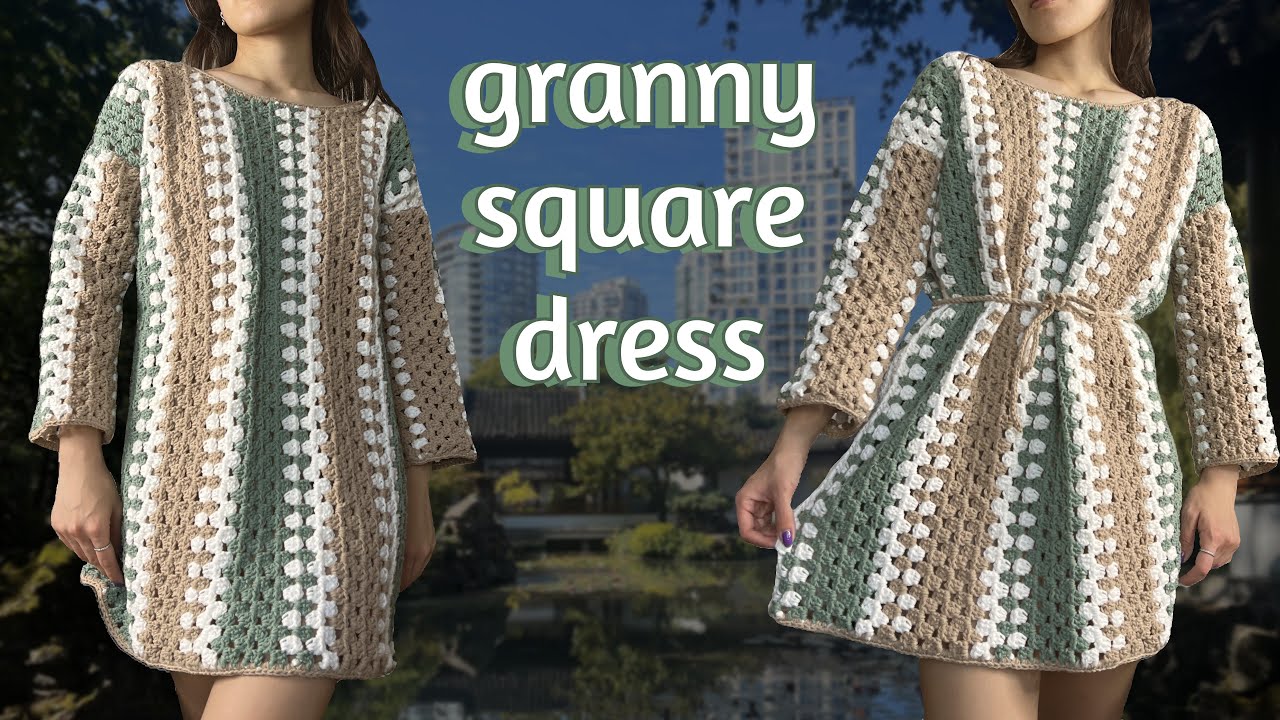
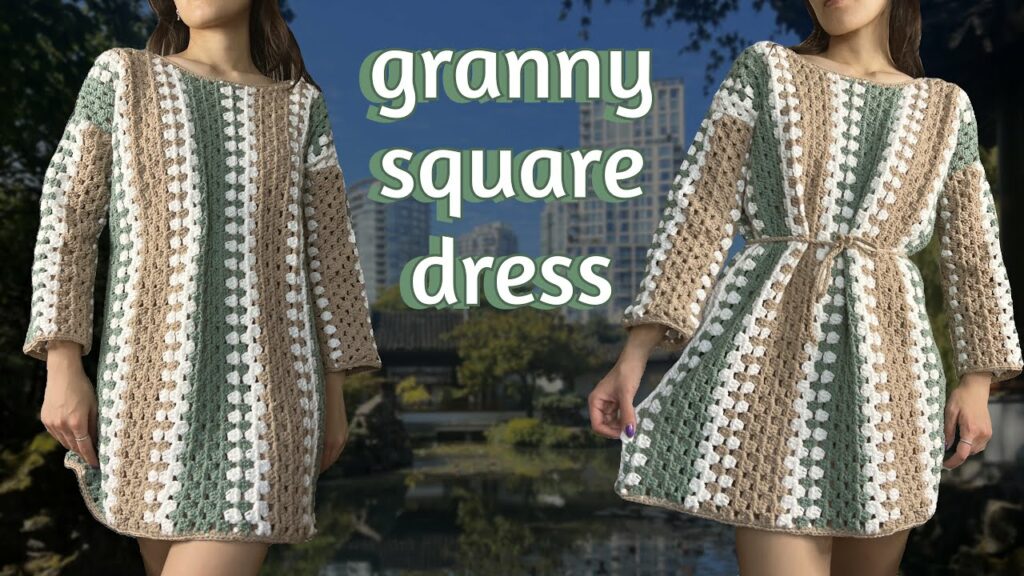
by The granny square has transcended its humble beginnings to become a true fashion icon. And nowhere is its resurgence more vibrant than in the form of a crochet granny square dress. This isn’t just a garment; it’s a wearable piece of art, a celebration of color, and a testament to handmade style. Perfect for festival wear, beach days, or adding a unique, bohemian touch to your wardrobe, a granny square dress is a project that’s as rewarding to make as it is to wear.
While it might seem like a daunting undertaking, this detailed tutorial will break down the process, guiding you through creating a beautiful and customizable granny square dress. We’ll focus on a beginner-to-intermediate approach, assuming you’re comfortable with basic stitches and joining techniques.
Why Crochet a Granny Square Dress?
- Uniquely Yours: Each granny square dress is one-of-a-kind. Your choice of colors, square size, and arrangement ensures a truly personalized garment.
- Creative Expression: It’s an incredible canvas for playing with color palettes, from vibrant rainbows to sophisticated monochromatic designs.
- Skill Mastery: Making a dress requires consistent tension, accurate joining, and often, some basic shaping, solidifying your crochet skills.
- Fashion Forward: Granny square garments are highly trending right now, making a stylish statement.
- Rewarding Project: The feeling of wearing something you’ve painstakingly created, stitch by stitch, is incredibly fulfilling.
- Stash Buster: A dress requires many squares, making it an excellent way to use up those smaller yarn scraps and remnants.
Key Considerations Before You Begin
A successful granny square dress starts with thoughtful planning.
- Design & Fit:
- Silhouette: Most granny square dresses are designed with a relaxed, straight, or slightly A-line fit to accommodate the modular nature of the squares. Tight-fitting designs are more challenging.
- Length: Decide on your desired length: mini, knee-length, midi, or maxi. This will determine the number of squares needed.
- Sleeve Style: Sleeveless (easiest), short sleeves, or long sleeves?
- Neckline: Simple round neck, square neck, or V-neck?
- Open vs. Solid: Some designs leave intentional gaps between squares for a lacier look, while others fill in all gaps with smaller stitches or join method. For a wearable dress, filling the gaps is often preferred unless layering is intended.
- Yarn Choice (Crucial for Drape & Wearability!):
- Fiber: For garments, cotton or cotton blends are highly recommended. They are breathable, drape beautifully, and are comfortable against the skin. Acrylic can also work, offering affordability and a vast color range, but ensure it’s a soft, draping acrylic, not stiff. Avoid wool unless you want a very warm, bulky dress, as it can be heavy.
- Weight: DK (Light Worsted / Category 3) or Worsted Weight (Category 4) are ideal. DK creates a lighter, drapier fabric, while worsted will result in a slightly heavier, quicker-to-make dress. Consistency in yarn weight across all squares is paramount.
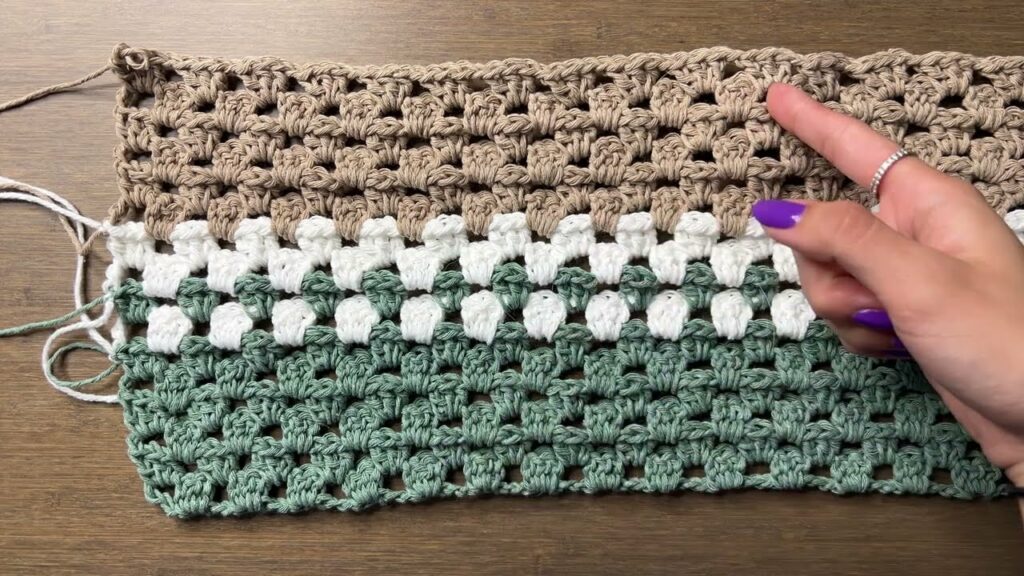
- Colors: Plan your color scheme. You can create a random, “scrapghan” look, a carefully curated gradient, repeating color patterns for each square, or even a sophisticated solid color.
- Hook Size: Use the hook size recommended for your chosen yarn weight, but lean towards a size that creates a fabric with good drape rather than excessive stiffness. For DK, a 4.0mm (G/6) or 4.5mm (7) is common. For worsted, a 4.5mm (7) or 5.0mm (H/8) is typical. Swatch to confirm your fabric is not too stiff.
- Gauge & Square Size:
- It’s critical that all your granny squares are the same size. If they vary, your dress will be distorted.
- Work a swatch square (e.g., 3-4 rounds) and measure it. Note its dimensions.
- Calculate how many squares you’ll need for your desired width (bust/hips) and length, considering how they will be joined.
- Joining Method:
- Slip Stitch Join: Creates a flat, often invisible seam. Great for a sleek look.
- Single Crochet Join: Creates a slightly raised, decorative seam. Adds a bit of texture.
- Whip Stitch (with yarn needle): A common and easy method, but can create a bulkier seam.
- Join-As-You-Go (JAYG): An advanced technique where squares are joined while the last round is being crocheted, eliminating separate seaming. This is the most seamless method for experienced makers. For this tutorial, we’ll assume a basic sewing/slip stitch join.

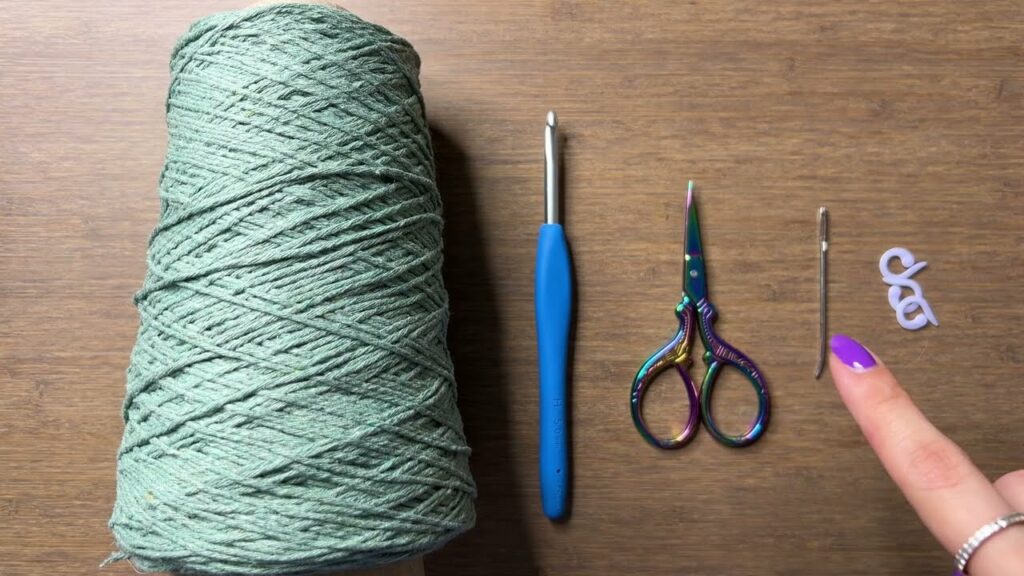
Materials You’ll Need
- Yarn: Sufficient quantity of your chosen DK or Worsted weight yarn (e.g., 1500-3000+ yards depending on size and length). Have all your chosen colors ready.
- Crochet Hook: Size appropriate for your yarn (e.g., 4.0mm – 5.0mm).
- Yarn Needle (Tapestry Needle): Essential for weaving in ends and seaming.
- Scissors:
- Stitch Markers (optional): Helpful for marking corners or beginning of rounds.
- Measuring Tape: Crucial for sizing and planning.
- Blocking Mats & Pins (Highly Recommended!): For blocking individual squares and the finished garment.
Essential Crochet Abbreviations
- ch: chain
- sl st: slip stitch
- sc: single crochet
- dc: double crochet
- st(s): stitch(es)
- sp: space
- ch-sp: chain space
- FO: Fasten off
- yo: yarn over
- (): instructions worked into the same stitch/space
- …: repeat instructions within asterisks
Granny Square Dress Tutorial: A Step-by-Step Approach (Basic Design)
This tutorial provides a framework for a simple, straight-fitting granny square dress. The exact number of squares will vary significantly based on your size and desired length.
Phase 1: Crocheting Your Granny Squares
You’ll need to make many identical granny squares. The number will be determined in the planning stage.
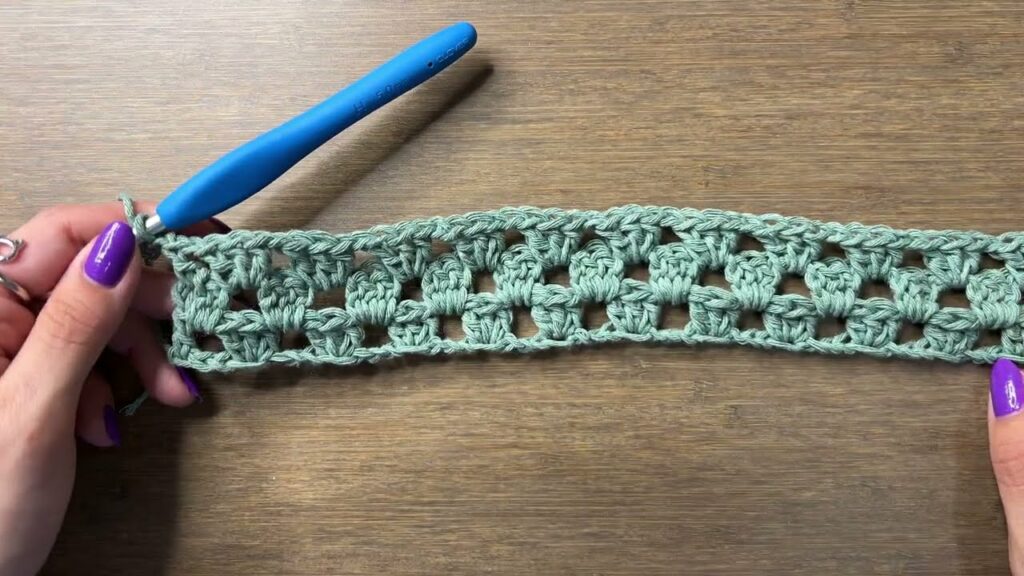
- Classic Granny Square Pattern (3-4 Rounds):
- Round 1 (Center): Make a Magic Ring. Ch 2 (does NOT count as a st). Work (3 dc) into the ring. Ch 2. (3 dc) into the ring. Ch 2. Repeat from * 2 more times. Join with a sl st to the top of the first dc. Pull Magic Ring tail tight to close. [4 groups of 3 dc, 4 ch-2 sps]
- FO and weave in ends if changing colors.
- Round 2: Attach new yarn (if desired) with a sl st into any ch-2 corner sp. Ch 2. Work (2 dc, ch 2, 3 dc) into the same ch-2 sp. *Ch 1. Work (3 dc, ch 2, 3 dc) into the next ch-2 sp.* Repeat from * 2 more times. Ch 1. Join with a sl st to the top of the beginning dc. [8 groups of 3 dc, 4 ch-2 sps, 4 ch-1 sps]
- FO and weave in ends if changing colors.
- Round 3 (and subsequent rounds): Attach new yarn (if desired) with a sl st into any ch-2 corner sp. Ch 2. Work (2 dc, ch 2, 3 dc) into the same ch-2 sp. *Ch 1. Work (3 dc) into the next ch-1 sp. (Repeat
Ch 1. Work (3 dc) into next ch-1 sp.for each side space). Ch 1. Work (3 dc, ch 2, 3 dc) into the next ch-2 sp.* Repeat from * 2 more times. Ch 1. Work (3 dc) into the last ch-1 sp(s). Ch 1. Join with a sl st to the top of the beginning dc.- Continue adding rounds until your squares reach your planned size. Most dress designs use squares with 3-5 rounds.
- Round 1 (Center): Make a Magic Ring. Ch 2 (does NOT count as a st). Work (3 dc) into the ring. Ch 2. (3 dc) into the ring. Ch 2. Repeat from * 2 more times. Join with a sl st to the top of the first dc. Pull Magic Ring tail tight to close. [4 groups of 3 dc, 4 ch-2 sps]
- Weave in ALL Ends: This is paramount. Weave in every single yarn tail on every single square as you finish it. Do not skip this step!
- Block Your Squares (Highly Recommended!): Once all squares are made and ends are woven, gently mist each square with water (or wet block if using cotton). Pin them out onto blocking mats to their exact, consistent dimensions. Let them dry completely. This step ensures all squares are the same size, making assembly much, much easier and giving your dress a professional finish.
Phase 2: Planning & Assembly
This is where your vision comes to life.
- Mock-Up Your Dress: Lay out your blocked squares on a flat surface (floor or large table) according to your desired dress dimensions.
- Determine Width: For a straight dress, you’ll need enough squares across to fit comfortably around your bust/hips (whichever is largest), with a little positive ease (room to move). For example, if your hip measurement is 40 inches and your squares are 5 inches wide, you might need 8 squares across for a comfortable fit (4 for front, 4 for back).
- Determine Length: Stack squares vertically to achieve your desired length.
- Armholes/Neckline: Plan where squares will be left out or partially added to form the armholes and neckline. For a simple design, you might have fewer squares in the top rows for the armhole opening.
- Sketch your layout on paper, noting how many squares wide and tall each panel will be.
- Join Your Squares (Panel by Panel):
- Work in sections. First, join all the squares for your front panel (e.g., 4 squares wide x 6 squares tall).
- Next, join all the squares for your back panel.
- Then, join any side or sleeve panels if your design includes them.
- Joining Method: Hold two squares (right sides together if using sl st/sc join) and join along the edges using your chosen method (sl st through both loops, sc through both loops, or whip stitch with a yarn needle). Always join two adjacent edges at a time.
- Take your time. Neat joins are crucial for the overall look.
- Join the Panels:
- Lay your front panel and back panel (right sides together, if applicable).
- Join the side seams from the bottom hem up to your desired armhole opening.
- Join the shoulder seams.
- If you’re adding sleeves, join them to the armhole openings.
Phase 3: Finishing Touches & Details
These steps make your dress wearable and polished.
- Bottom Hem:
- Attach yarn with a sl st to any stitch on the bottom edge of the dress.
- Ch 1. Sc evenly around the entire bottom hem. Join with a sl st to the first sc.
- Repeat this sc round 1-3 more times for a sturdy, neat hem. You can also use half double crochet (hdc) or single crochet in the back loop only (BLO) for a ribbed effect.
- Neckline & Armholes:
- Attach yarn with a sl st to any stitch on the neckline.
- Ch 1. Sc evenly around the entire neckline opening. Join with a sl st.
- Repeat this sc round 1-2 more times for a neat finish.
- Repeat the same process for the armholes.
- Final Weaving: Double-check that all remaining yarn tails are woven in securely.
- Final Blocking (Highly Recommended!): Once the entire dress is assembled, wet block it. Gently mist it, or immerse it in cool water, then gently squeeze out excess water (don’t wring). Lay it flat on blocking mats, carefully shaping it to your desired dimensions. Pin it securely, ensuring all seams are flat and edges are straight. Allow it to air dry completely. This step transforms your dress, making it drape beautifully and look professionally finished.

Tips for a Stunning Granny Square Dress:
- Patience is Key: This is a larger project. Break it down into manageable steps (e.g., “make 10 squares today,” “join one panel tomorrow”).
- Swatch, Swatch, Swatch: It cannot be stressed enough how important it is to get your square size consistent through swatching and blocking.
- Seam Neatly: Your joining method will greatly affect the final look. Practice your chosen seam on spare squares.
- Consider a Slip: Depending on the yarn and design, you might want to wear a simple fabric slip dress underneath for modesty and to help with drape.
- Embrace Imperfection: Handmade items have character. Don’t stress over every tiny imperfection; it’s part of the charm!
Creating a granny square dress is a significant undertaking, but the journey of watching it come together, square by colorful square, is incredibly rewarding. Get ready to turn heads with your unique, handmade statement piece!
Video tutorial: