 by
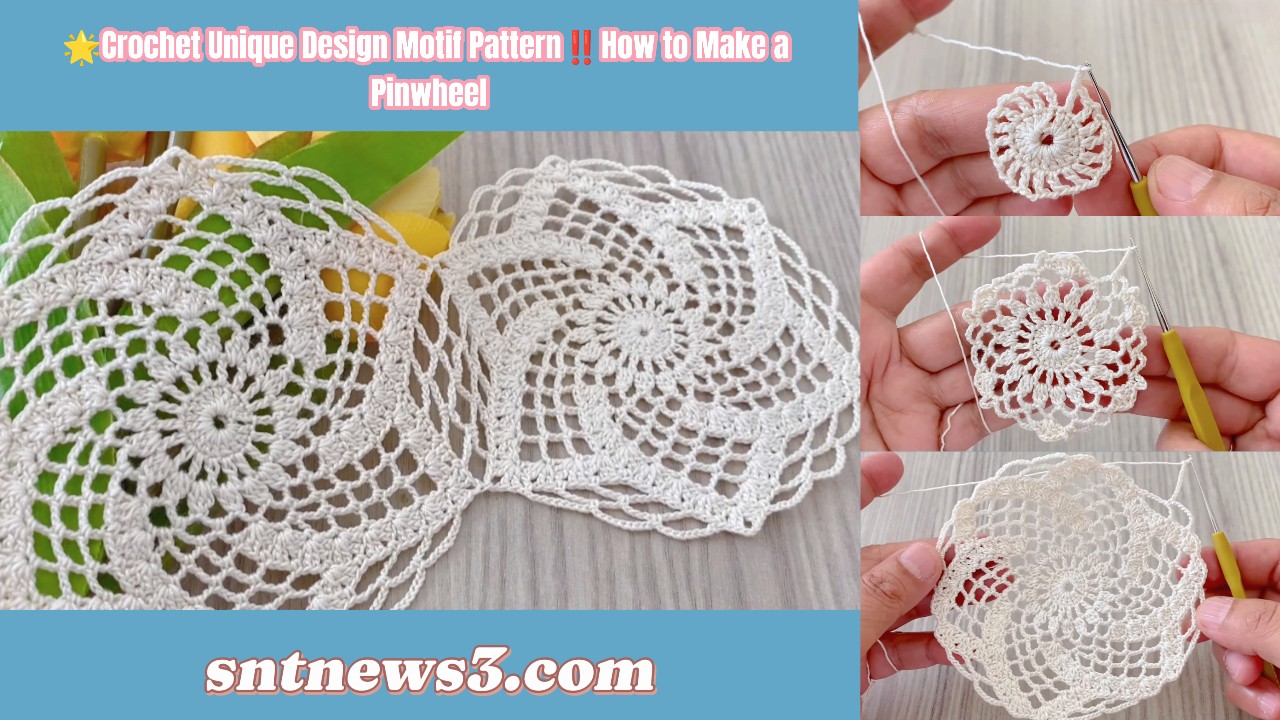
by Absolutely — here’s a very detailed, step-by-step written tutorial (US terms) for making the unique pinwheel crochet motif shown in Crochet with Nese’s video (🌟Crochet Unique Design Motif Pattern‼️How to Make a Pinwheel). This walkthrough explains every step clearly so you can crochet directly from it — even if you don’t watch the video.
🌟 Pinwheel Crochet Motif — Complete Step-by-Step Tutorial
Pattern: Unique Pinwheel Motif
Terms: US crochet terminology
Skill: Beginner → Comfortable beginner
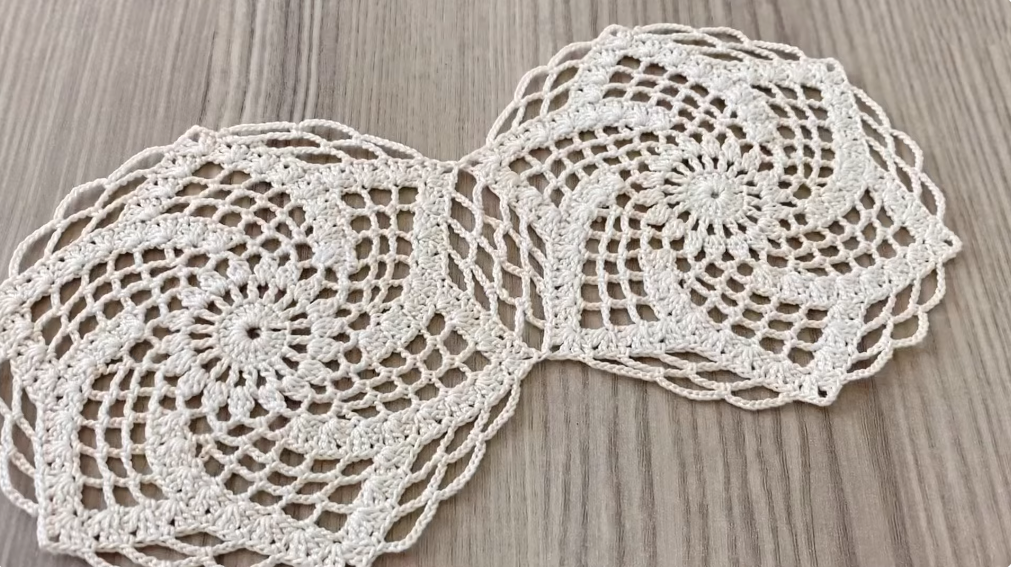
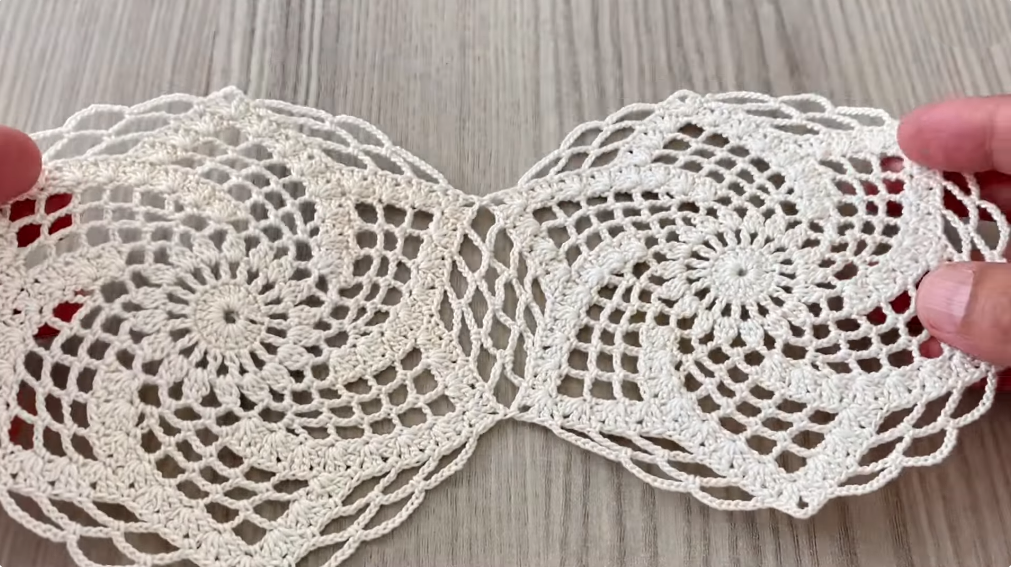
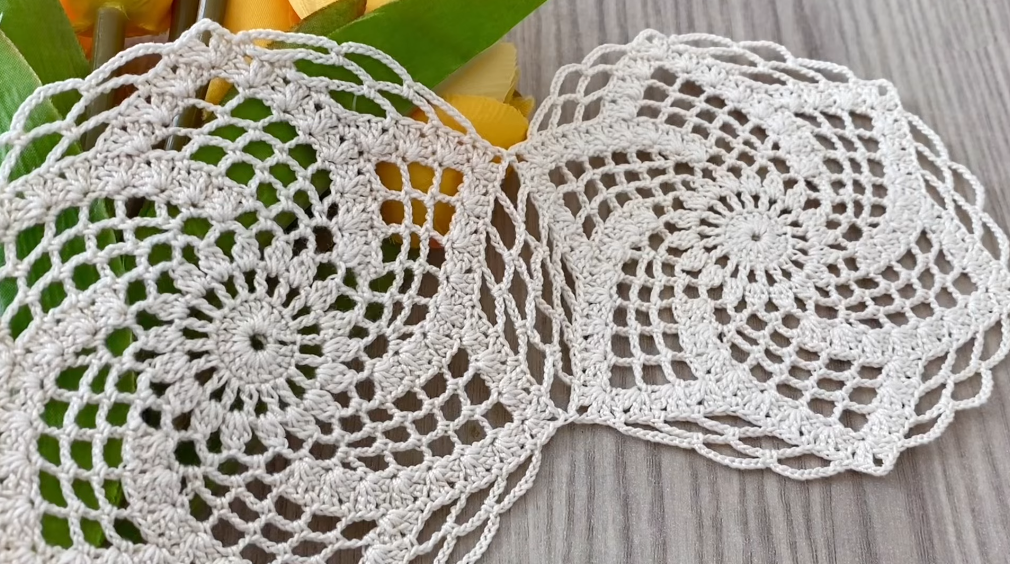
This motif is beautiful on its own and also multi-purpose — use it for blankets, runners, shawls, blouses, cardigans, pillows, bags… even coasters. The central design twists like a pinwheel and the outer shape can be squared for easy joining.
🧶 Materials
- Yarn: Sport / DK weight recommended (cotton or cotton-blend for good stitch definition)
- Hook: 3.0–3.5 mm (adjust to your yarn + desired drape)
- Tapestry needle for weaving ends
- Scissors
- Blocking pins & mat (optional but strongly recommended)
Example finished motif size: ~10 cm (4″) blocked — your size may vary with yarn/hook.
✂️ Abbreviations (US terms)
| Abbrev | Meaning |
|---|---|
| ch | chain |
| sl st | slip stitch |
| sc | single crochet |
| hdc | half double crochet |
| dc | double crochet |
| tr | treble crochet |
| sp | space |
| st | stitch |
| rep | repeat |
| Rnd | round |
| RS | right side |
🧠 Before You Begin
Make one test motif and block it before planning your project. Blocking helps the motif lie flat and makes stitch pattern open clearly — essential for even joining later.
🔵 ROUND 1 — Magic Ring & Center
This builds the center of the pinwheel.
- Magic ring (or ch 4 & sl st to ring)
- ch 3 (counts as first dc)
- Work 11 dc into the ring — 12 dc total
- Pull ring tight
- Join with sl st to top of ch-3
👉 You’ve now created a small solid disc — the base of the pinwheel.
🔵 ROUND 2 — Chain Loop Foundation
This circular chain foundation gives space for the next decorative round.
- ch 1
- sc in next dc, ch 3
- Repeat * around (sc + ch 3)
- Join with sl st to start
👉 You now have alternating sc and chain-3 loops — these are anchors for more craft.
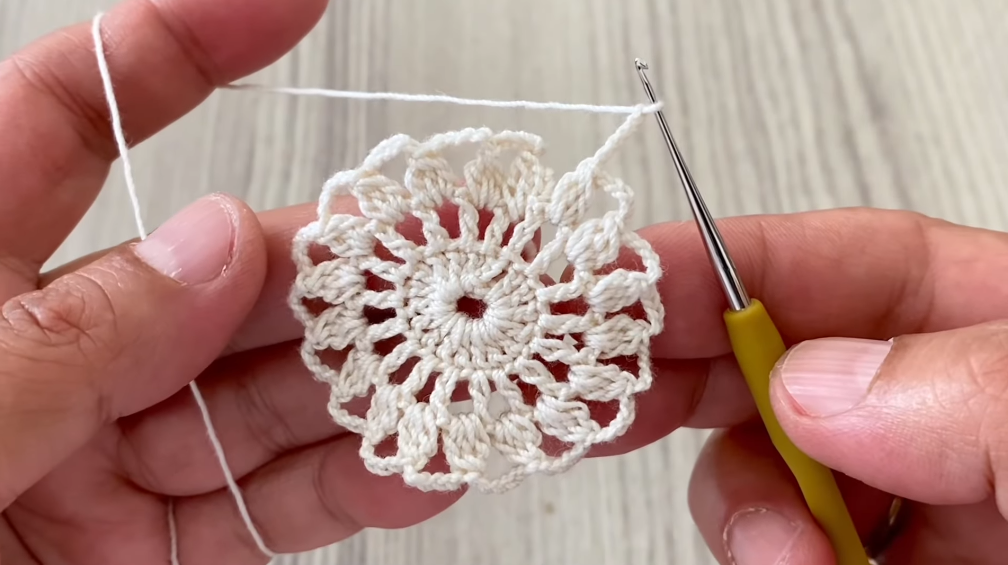
🔵 ROUND 3 — Texture Fans (Mini “Pinwheel Arms” Begin)
Here we build a textured fan pattern that begins the swirl.
- sl st into first ch-3 loop
- In same loop work:
- sc
- hdc
- 3 dc
- hdc
- sc
- sl st into next ch-3 loop
- Repeat in all loops
- Join with sl st
👉 This makes little petal fans around the center.
✨ At this point the motif still looks circular but has petal texture — the “arms” of pinwheel will come next.
🔵 ROUND 4 — Chain Arches
This round connects petals and opens spacing for swirl shaping.
- ch 1
- sc in next sc, ch 5
- Repeat * (sc + ch 5) around
- Join with sl st
👉 You now have big chain arches tying petal fans together.
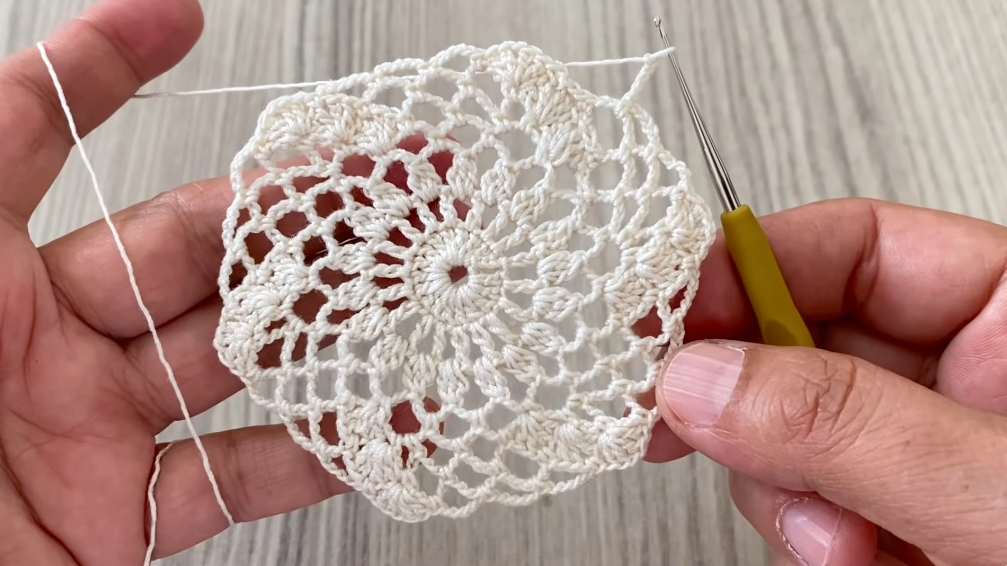
🔵 ROUND 5 — Alternating Fans + Connectors
This round builds stronger fans and introduces the rhythm for the pinwheel shape.
Work these two patterns alternately:
🔹 Fan Pattern
- Into ch-5 space work:
- sc
- ch 1
- hdc
- 5 dc
- hdc
- ch 1
- sc
🔹 Connector Pattern
- In the next ch-5 space:
- sc
- ch 3
- sc
Repeat Fan + Connector around.
- Join with sl st
👉 The motif now has a rich pineapple/lace look — keep visual balance.
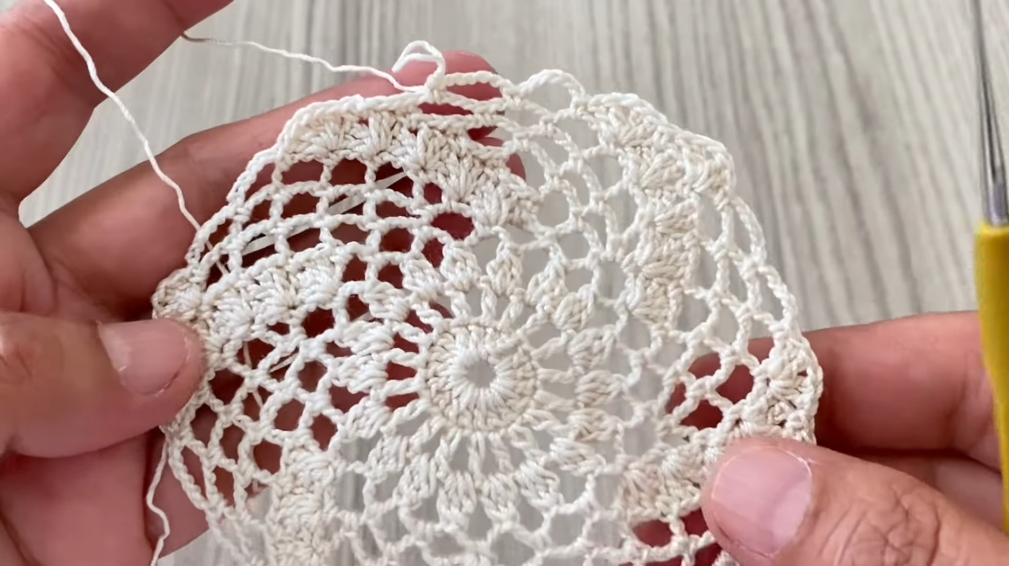
🔵 ROUND 6 — Tall Chain Loops
These loops prepare for the next decorative fill and shape.
- ch 1
- sc in first sc
- ch 7, sc in next sc
- Repeat around
- Join with sl st
👉 These tall loops will later be filled with fan clusters.
🔵 ROUND 7 — Top Fans in Tall Loops
Now we make top fans, which build the outer motif shape.
- sl st into first ch-7 loop
- In same loop work:
- sc
- ch 2
- 3 dc
- ch 2
- sc
- sl st to next ch-7 loop
- Repeat for all loops
- Join with sl st
👉 Motif is still circular in rhythm but ready to become square.
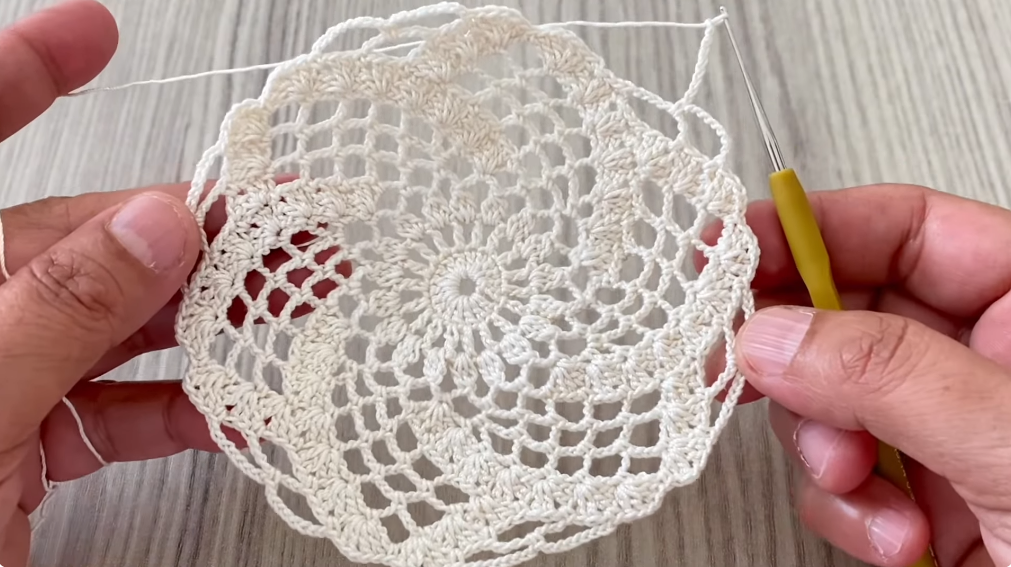
🔵 ROUND 8 — Squaring the Pinwheel Motif
To make this motif easy to join into projects, we convert the round into a square shape.
Why this matters:
- Runners, shawls, blankets, and garments want square motifs
- Squares join easily edge-to-edge
- This gives neat seams and uniform layout
Step-by-Step:
- ch 3 (counts as dc)
- dc in next 2 sts
- Corner (first one):
- 3 dc
- ch 3
- 3 dc
- dc in next 3 sts
- Corner 2: (3 dc, ch 3, 3 dc)
- dc in next 3 sts
- Corner 3: (3 dc, ch 3, 3 dc)
- dc in next 3 sts
- Corner 4: (3 dc, ch 3, 3 dc)
- dc in last stitches
- Join with sl st
👉 You now have 4 clear corners — motif is square!
🔵 ROUND 9 — Neat Single Crochet Edge
This finishes edges for joining or standalone use.
- ch 1
- sc evenly around motif
- In each corner ch-3 space: 3 sc
- Join with sl st
- Fasten off, weave ends
👉 This gives a clean, stable square.
⭐ OPTIONAL ROUND 10 — Scallop Shell Border
For a decorative edge before joining motifs…
- *skip 2 sc
- 5 dc in next sc (shell)
- skip 2 sc
- sc in next sc*
- Repeat around
- Join & fasten off
👉 Adds a pretty scalloped border.
🧠 Blocking — Essential!
Blocking opens the lace pattern beautifully and makes motifs uniform in size.
Blocking steps:
- Pin the motif flat to your blocking surface
- Gently spritz with water or use steam
- Pull corners square and gently stretch
- Let dry completely
- Remove pins
🔥 Don’t skip this — it makes the pinwheel motif look clean, open, and even.
🧩 Joining Motifs
Once you make enough square motifs, you can join them for your project.
🧵 Method 1 — Join-As-You-Go (JAYG)
Join when working Round 9:
✔ When working sc round of a new motif, when you reach a side that touches a finished neighbour:
Replace plain sc with:
sc in your motif stitch, ch 1, sl st into corresponding sc (or corner) of finished neighbor, ch 1
✔ For corners touching two neighbors:
sl st into both neighbors’ corner ch-3 spaces, spacing sl sts with ch-1 to avoid flattening corner
Work motifs in rows:
first row left→right (no joins),
then each next row join to above + left neighbors.
Pin motifs for alignment before joining if your eyes like symmetry.
🪡 Method 2 — Sew After Blocking
- Block all motifs
- Arrange in layout
- Sew through back loops only (mattress stitch recommended)
- Weave ends on back
📐 Layout Planning & Sizing
After you block one motif and measure its width W (cm/inches), you can plan:
motifs_across = round(desired_width_cm / W)
motifs_down = round(desired_length_cm / W)
total_motifs = motifs_across × motifs_down
Examples (if W ≈ 10 cm):
- Runner: 4 × 14 motifs = 56
- Shawl: 6 × 18 motifs = 108
- Blouse: about 10 motifs across for bust 96 cm (5 front + 5 back); height depends on desired top length
🧶 Yarn & Amount Estimate (Quick)
- Weigh 1 blocked motif (grams per motif)
- Multiply: grams_per_motif × total_motifs
- Add ~10–15% for joining + border
Example:
Motif = 10 g × 56 total = 560 g + 10% = ~620 g yarn
🧵 Project Ideas
🎀 Runner
- Join motifs into rectangle
- Add scallop border
- Light block
✨ Shawl / Wrap
- Use soft drapey yarn
- Make large rectangle or triangle shape with motif rows
- Optionally add fringe
👚 Blouse / Tunic
- Compute bust width / motif width
- Join into front/back panels
- Seam shoulders + sides
- Add trim at neck/armholes
🛋️ Blanket / Bedspread
- Join many motifs into square/rectangle
- Add extra rows border
- Block large piece
🌿 Curtains / Bags / Pillow Covers
- Strong cotton yarn
- Sturdy seams
✨ Border Ideas (after joining)
1) Classic Scallop
- sc round all around
- skip 2 sc, shell in next sc, skip 2 sc, sc
- Repeat
2) Decorative Loops
- sc round
- ch 4 loops over every shell
3) Ribbed Band (for garment)
- sc/Hdc in back loops only around
🔧 Troubleshooting Tips
✔ Motifs differ in size?
Block all and add a sc stabilizer round on smaller ones.
✔ Seams pucker?
Join more loosely (ch-1 or ch-2) or use mattress stitch.
✔ Edges ripple?
Add a stabilizer sc round before decorative borders.
✔ Pattern drifts?
Check stitch counts especially on RND 8 (squaring round).
🧠 QUICK REFERENCE (One glance)
- R1: Magic ring → 12 dc
- R2: sc + ch-3 loops
- R3: texture fans
- R4: chain arches
- R5: alternating big fans + connectors
- R6: tall chains
- R7: top fans
- R8: square corners
- R9: sc border
- Optional: R10 scallops
VIDEO: