 by
by Diamonds Squared — step-by-step tutorial
(How to recreate the Diamonds Squared quilt from Jordan Fabrics’ video MATT’S “DIAMONDS SQUARED” QUILT ADVENTURE!)
Nice choice — this is Donna Jordan’s Diamonds Squared style (the video shows Matt making a scrappy/fat-quarter version). Below is a clear, workshop-style, step-by-step text tutorial you can follow at the machine. I cite the video and Jordan Fabrics’ pattern pages where the pattern details and layout options are shown.
Quick overview / design notes
- Construction style: strip-piecing + sub-cut diamonds (fast, accurate, great for fat quarters or scraps).
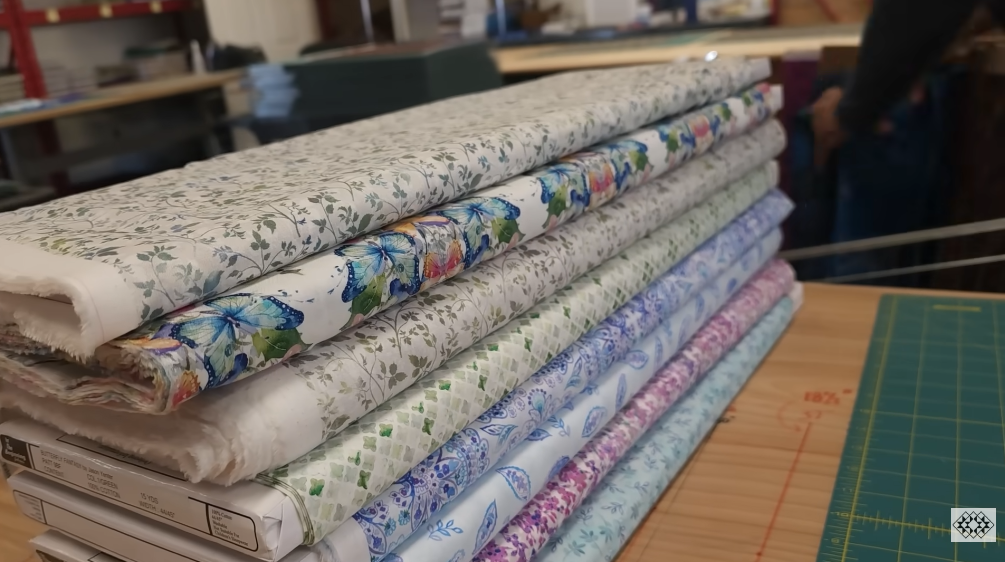
- Typical fabric plan used in the video: a set of colorful fat quarters/fat eights for the diamonds and a neutral background for frames/setting pieces. The pattern works well scrappy or with coordinated colorways.

Materials (make one throw / adjust for other sizes)
- Color fabrics: about 18–24 fat quarters (or equivalent yardage / fat eighths) — these make the diamond pieces.
- Background / neutral: 3–4 yards (for frames, setting triangles, borders — adjust to final size).
- Border fabric: 1–2 yards (depending on border width).
- Backing: ~6–8 yards (or piece backing to fit the finished top + 4–6″ ease).
- Batting: slightly larger than finished top.
- Notions: rotary cutter, long ruler (24″+), square ruler, pencil/fabric marker, ¼” presser foot, sewing machine, pins/clips, iron/pressing board.
- Optional: diamond/Lone-star ruler or a 45° triangle ruler for trimming diamonds (many makers use a simple square/diagonal trimming method instead).
Before you begin (planning)
- Watch the video once to see the rhythm Matt uses for strip sets, trimming, and assembly — it shows the order of operations and pressing hints.
- Decide how large you want the finished quilt (wall/throw/bed). The pattern page lists sizes and cut counts; this tutorial describes the construction workflow so you can follow along or scale to your desired size.
Overview of the workflow (big picture)
- Cut long strips from your colored fabrics and background fabric.
- Sew colored strips into strip sets (bands that will become diamonds).
- Sub-cut strip sets into diamond blanks (or square units you cut on the diagonal).
- Trim each diamond to the pattern’s diamond dimension.
- Sew diamonds together to form square blocks (the “squared” look), add small background corner/setting pieces.
- Join blocks into rows, add setting triangles / borders, quilt and bind. The video demonstrates these exact steps.
Step-by-step instructions
Step 1 — Cut strips
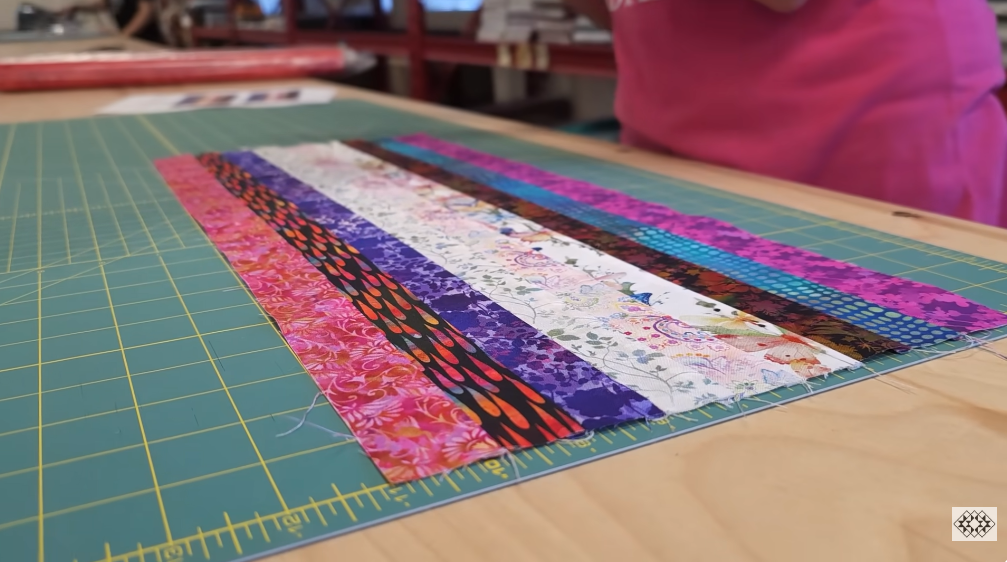
- From each chosen color fat quarter (or yardage), cut long strips. Common working widths are 2½”, 3″, or 5″, depending on how wide you want the diamond bands. A practical approach for a fat-quarter scrappy Diamonds Squared is to cut 2½” or 3″ strips so you get multiple bands out of each fat quarter. The video and pattern show using narrow bands for the diamond effect.
Step 2 — Make strip sets
- Lay strips in the order you want them to read in the finished diamond (for example: dark → medium → light → medium → dark).
- Sew strips together along the long edge using a consistent ¼” seam allowance. Press seams as you go (press to one side or open — be consistent). Chain-piecing is fast here. Make multiple strip sets until you have enough length for the required number of diamonds.
Step 3 — Sub-cut blanks for diamonds
There are two common ways to make diamond blanks — pick the one you prefer:
A. Square-and-cut-on-diagonal method (reliable, shown in many strip quilts)
- Sub-cut the strip set into squares whose side = the finished diamond’s long diagonal plus seam allowance (the pattern gives exact diamond dimensions; use that).
- Cut each square on the diagonal to produce two triangles; sew triangles into diamonds or use diagonal cuts to create diamond shapes that are trimmed to final size.
B. Diamond ruler or direct diamond cutting
- Use a diamond ruler to mark and cut diamonds directly from the strip set (fast if you have the ruler and comfortable with it).
- Whichever method you use, aim to produce uniform diamond blanks (all the same oversize so you can trim to the pattern size cleanly).
Step 4 — Trim each diamond to size
- Using either a specialty ruler or a square ruler and a 45° line, trim each diamond to the exact diamond measurement shown in the pattern. Accurate trimming here is crucial — Diamonds Squared depends on consistent diamond sizes so blocks join perfectly. The video emphasizes trimming each piece before final assembly.
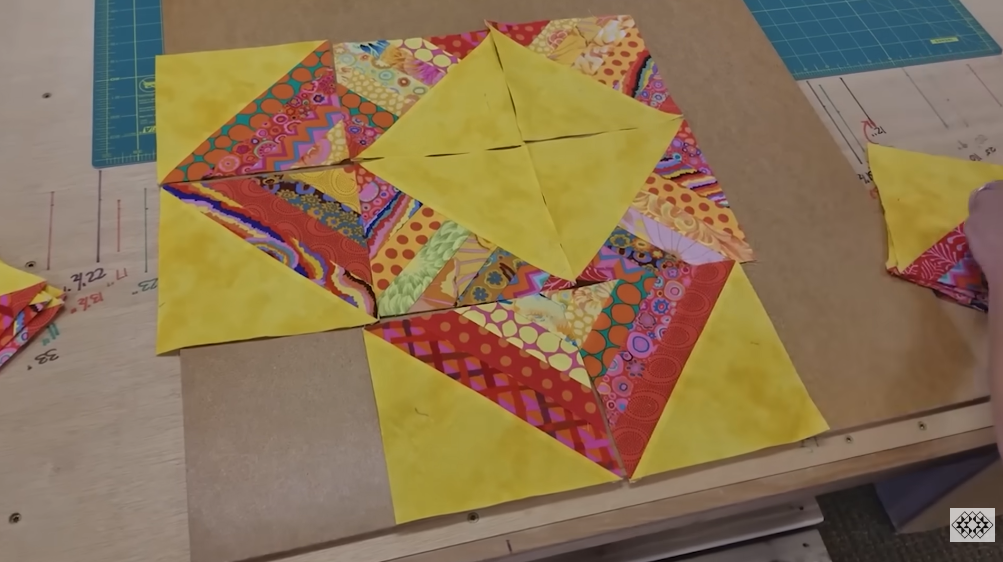
Step 5 — Make diamond blocks (assemble squared units)

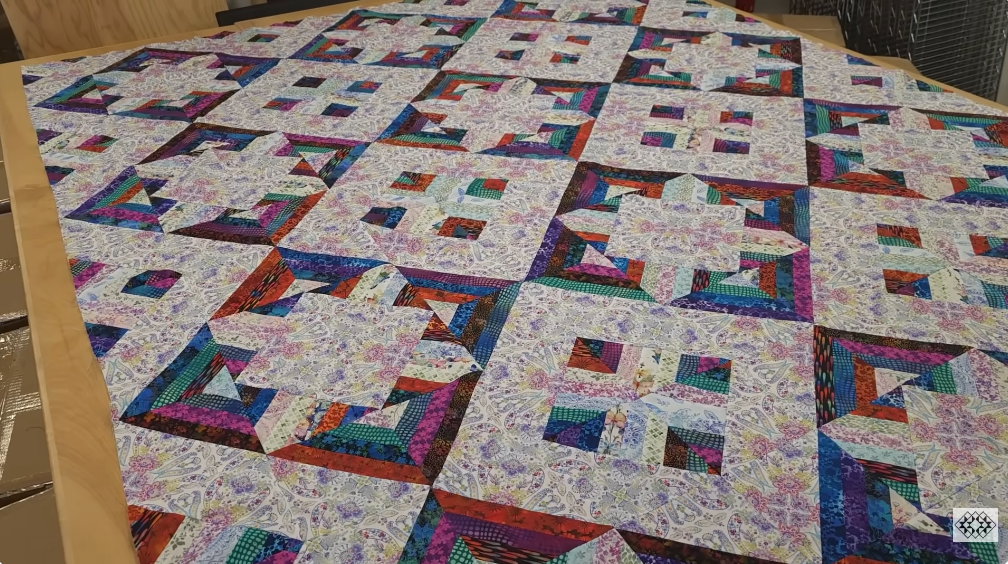
- Layout diamonds into the block configuration the pattern uses (in many Diamonds Squared layouts, four diamonds make a square block that looks like a rotated diamond within a square).
- If the block requires small background corner triangles or spacer strips, cut and add them now (pattern diagrams show where background pieces are used to “square” the diamonds). Sew the diamond pieces and background pieces into blocks. Use ¼” seams and press carefully.
Step 6 — Square up blocks
- Trim each finished block to the block dimension given in the pattern. Consistent, accurate blocks make the on-point/straight-set layout assemble cleanly. The pattern & video both recommend trimming as you go so rows match.
Step 7 — Layout & decide setting
- Lay out all trimmed blocks on a design wall or floor. Choose a layout — the pattern shows several layout/border options; the video shows Matt’s chosen layout with frames and a neutral background. Move blocks around until color balance looks right.
Step 8 — Add setting pieces / triangles (if needed)
- If you are setting blocks on point or using background triangles between blocks, cut the background squares and cut on the diagonals to produce setting triangles. Add them to edge blocks as the pattern indicates. The Diamonds Squared design sometimes uses small background corner triangles to make the diamond blocks fit into a square grid.
Step 9 — Sew block rows and join top
- Sew blocks into rows, pressing seams to alternate directions where possible to help seams nest. Join rows to complete the quilt top. Constantly check overall measurements so borders will fit.
Step 10 — Add borders
- Add inner/narrow frames first (if the design calls for them), then outer borders. Measure the quilt top and cut border strips to length with seam allowance for accurate joining. Matt often adds a simple neutral frame to let the diamonds “pop.”

Step 11 — Baste, quilt, bind
- Baste the quilt sandwich (top + batting + backing). Choose quilting that complements the geometric diamonds:
- Radiating echoes from each diamond or block to emphasize shape.
- Simple all-over meander for a scrappy, textured finish.
- Trim and bind (machine or hand finish). The video shows gentle quilting that preserves the diamond definition.
Tips & tricks from the video and makers
- Consistent ¼” seam — this is the most important accuracy rule. Small seam variations will show when many diamonds meet.
- Chain piece and press as you go — it’s faster and keeps sets consistent.
- Trim before final assembly — trimming each diamond/block to the exact size prevents cumulative error and keeps the top flat.
- Scrappy vs coordinated — fat-quarter scrappy gives a lively, modern look; using a planned gradient gives a more controlled medallion effect. Both options are shown in community makes of this pattern.
Where this tutorial came from
This step-by-step follows the construction demonstrated in Jordan Fabrics’ video and the Diamonds Squared pattern/instructions posted by Jordan Fabrics and community sewists. If you want exact diamond measurements and official block counts for specific finished sizes, check the Diamonds Squared pattern’s cut list (it lists the diamond size, block size, and fabric yardages).
VIDEO:


