by
by Side Steps — step-by-step tutorial
(How to recreate the “SIDE STEPS” quilt shown in the Jordan Fabrics video)
Nice choice — Side Steps is a clean, modern, strip-friendly quilt that uses simple strip-piecing and careful trimming to create a stepped diagonal effect. Below is a practical, machine-ready, numbered tutorial you can follow at your cutting table and sewing machine. I give a sample throw-sized plan (adjustable) plus clear batch-work steps so you can sew efficiently like in the video.
Quick overview (what this is)
- Style: strip-pieced blocks set to create a stepped/diagonal “side steps” movement.
- Construction approach: chain-piece long strip sets → sub-cut into blanks → assemble block sub-units → trim → lay out in an on-point/offset or straight-set layout → add borders → quilt & bind.
- Good for: jelly-rolls / 2½” strips, fat quarters cut into strips, or leftover scraps in widths you can standardize.
Materials (sample — makes a throw ≈ 60″ × 72″; scale up/down)
- Main printed/colored strips: about 40 × 2½” × WOF (one jelly roll) or equivalent cut from stash.
- Background / neutral fabric: ~3 yards (for sashing/frames, setting pieces and borders).
- Border fabric (if separate): ~1 yard.
- Backing: ~4–5 yards (or piece to size).
- Batting: slightly larger than finished top (e.g., 64″ × 76″).
- Binding: ½–¾ yard (or leftover strips).
- Tools: rotary cutter & mat, long ruler 24″, square ruler (6½” or 9″), sewing machine with ¼” foot, iron/pressing surface, pins/clips, safety pins or spray baste.
Prep & planning
- Decide scale: Side Steps reads nicely with 2½” strips (jelly-roll friendly). If you want larger “steps,” use 3″–5″ strips and adjust blank lengths proportionally.
- Sort strips by value (light → dark) if you want intentional gradation; keep mixed/scrappy if you want a lively, random field.
- Pick a working unfinished blank size — in this example we’ll use blanks that will trim to 7½” unfinished (so finished blocks will be 7″ after sewing). You can choose any consistent blank size; the workflow is the same.
Cutting (sample throw plan)
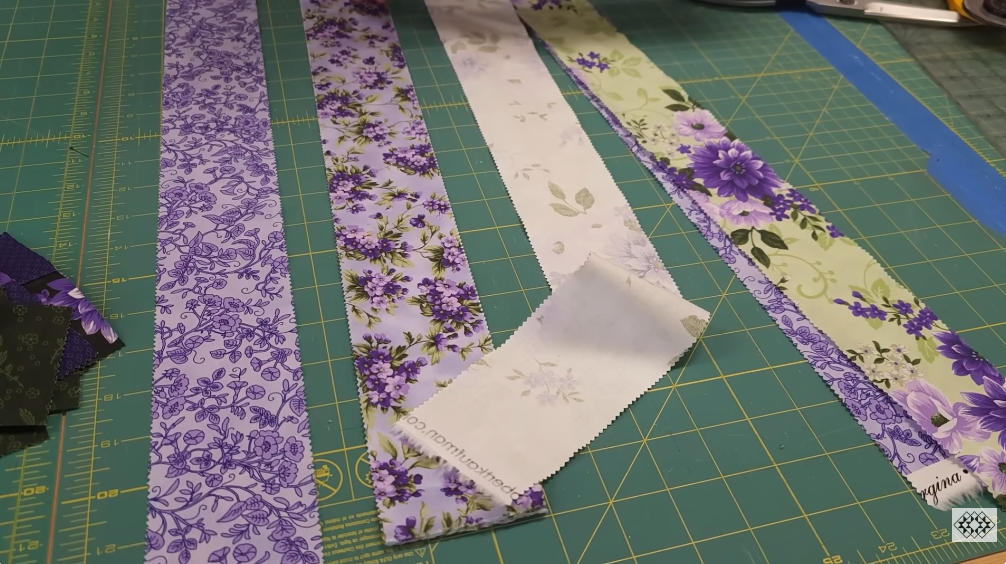
- From your colored prints (or jelly roll): prepare 40 strips at 2½” × WOF.
- From background: cut enough 2½” × WOF strips for spacers and sashing (about 20–24 strips), plus border strips (cut to lengths after top is measured).
- Note: you’ll use colored strips combined with background strips to make strip-sets that will be sub-cut into the “step” pieces. Cut extras for trimming ease.

Construction — step-by-step
1 — Make strip sets (batch)
- Decide the strip-pairing formula. A common, effective formula for Side Steps:
- BG (2½”) + Color (2½”) + BG (2½”) → sew these three strips together longwise to make a 7½”-wide strip set.
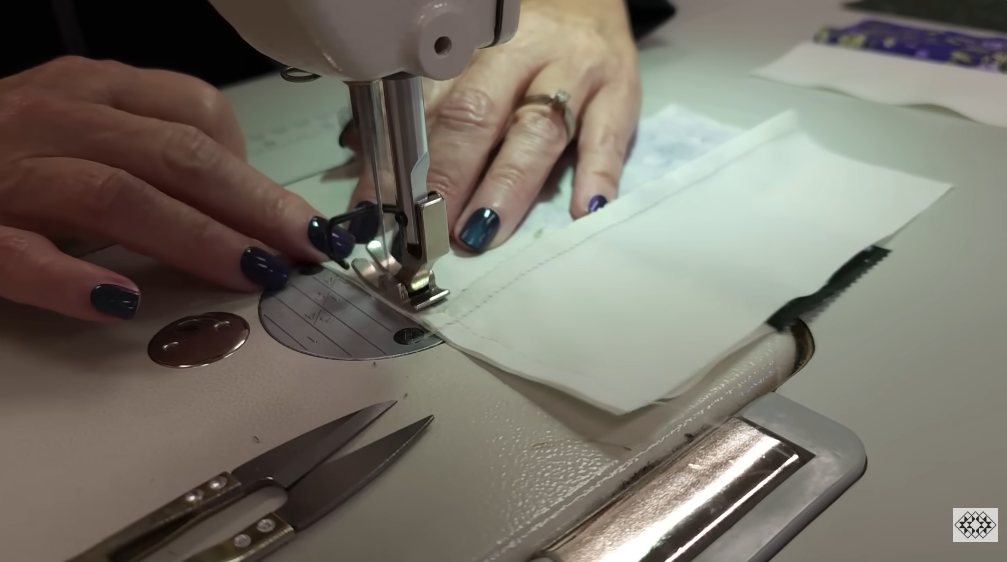
- Chain-piece many of these strip sets without snipping threads between pieces — this is fast and keeps stitching consistent. Press seams toward the background or open (consistent pressing helps nesting later).
2 — Sub-cut stacked blanks
- From each completed 7½”-wide strip set, sub-cut lengthwise into 7½” squares/rectangles (so every blank is 7½” × 7½” in the stack). Stack several sets and cut together to ensure uniformity. These blanks are the basic “step unit.”
3 — Make the step sub-units
- The Side Steps block is formed by combining these blanks into small assemblies that create the stepped diagonal. Typical sub-unit assembly:
- Take two blanks: one oriented with the color at the top, one with color at the bottom (you can flip to vary the direction).
- Sew them together along one short edge so you have a 7½” × 15″ rectangle (two blanks joined). Press seam flat.
- From that rectangle, you can sub-cut or combine with other rectangles to form the multi-step block per the layout you want (the video uses small groups of these joined blanks to make the step shape). Work in batches — make many two-blank rectangles at once.
4 — Assemble full blocks
- Combine the two-blank rectangles, single blanks, and sometimes a narrow background spacer to create the full block configuration (for our sample, two-blank rectangles paired with a single blank can make an L-shaped step block). Follow a repeating unit so blocks are all the same size when trimmed.
- After sewing sub-units into blocks, trim each block to 7½” × 7½” unfinished (or whatever block size you chose). Trimming ensures consistent block size for assembly.
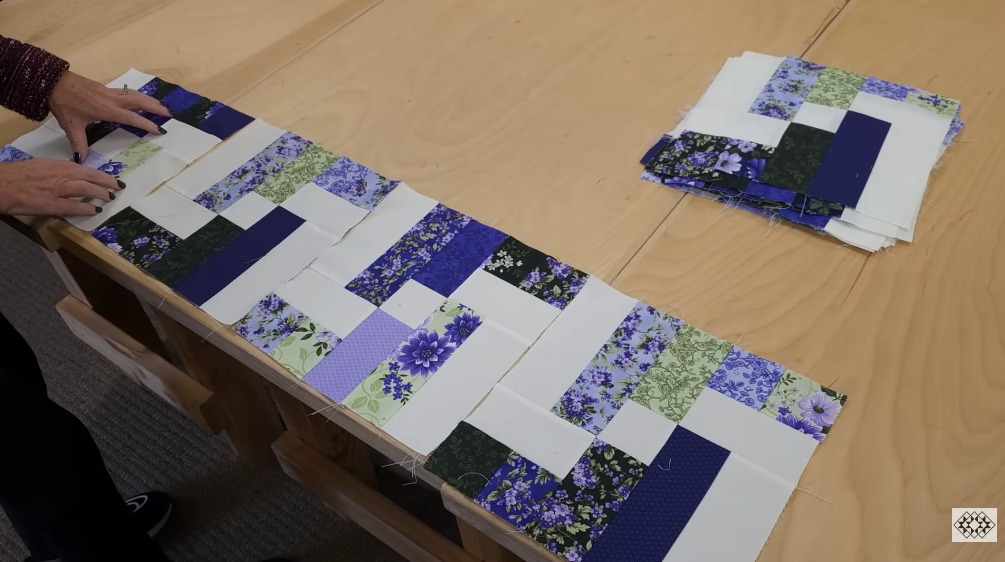
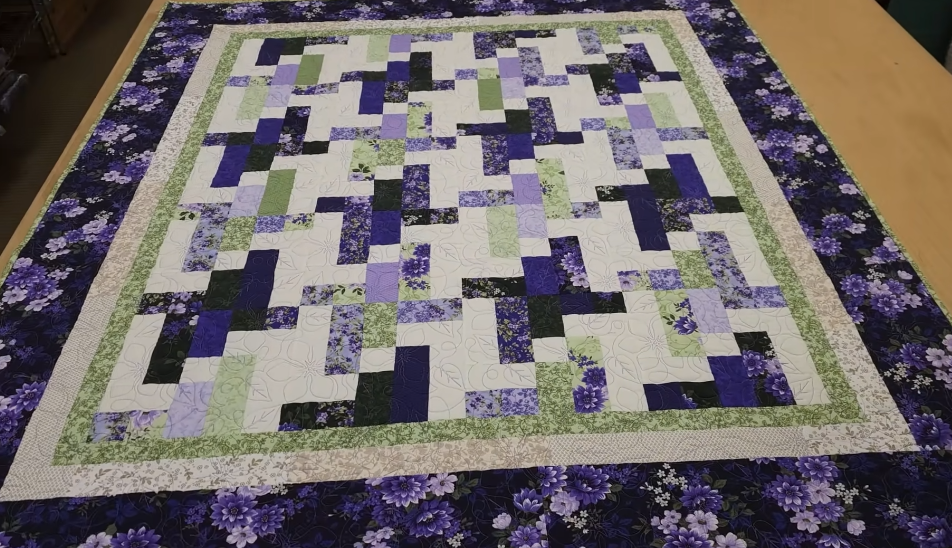
5 — Layout (create the Side Steps effect)
- Lay trimmed blocks on the design wall or floor in rows. The stepped effect comes from rotating or offsetting the blocks so colored strips “step” diagonally across the field.
- Two common placements:
- Straight-set with alternating rotations — place blocks in a grid, but rotate every other block 90° to create local diagonal steps.
- Offset rows — offset alternate rows by half a block so steps run diagonally across multiple rows for a continuous staircase effect (this looks more “flowing”).
- Move blocks until color balance and overall movement look pleasing.
6 — Sew rows & join top
- Sew blocks into rows with ¼” seams, pressing seams alternately to nest seams. If you used offset rows, match seams carefully and pin intersections. Join rows to create the quilt top; measure and square the top.
7 — Add sashing / setting strips (optional)
- If you want more breathing room between the step fields, add narrow background sashing strips between rows (e.g., 1½”–2½” finished). Sew sashing to rows before joining rows, or add after rows are joined. This changes the reading of the steps — narrower sashes read more continuous, wider sashes read more framed.
8 — Add borders
- After the top is assembled and squared, add borders to finish the dimensions. A narrow inner frame in background plus a wider outer border looks great to frame the stepped field. Cut border strips to measured lengths and sew on (sides then top/bottom or vice versa).
9 — Baste the sandwich
- Layer backing + batting + quilt top and baste using spray or safety pins. Keep the quilt flat and stagger pins to avoid puckers.
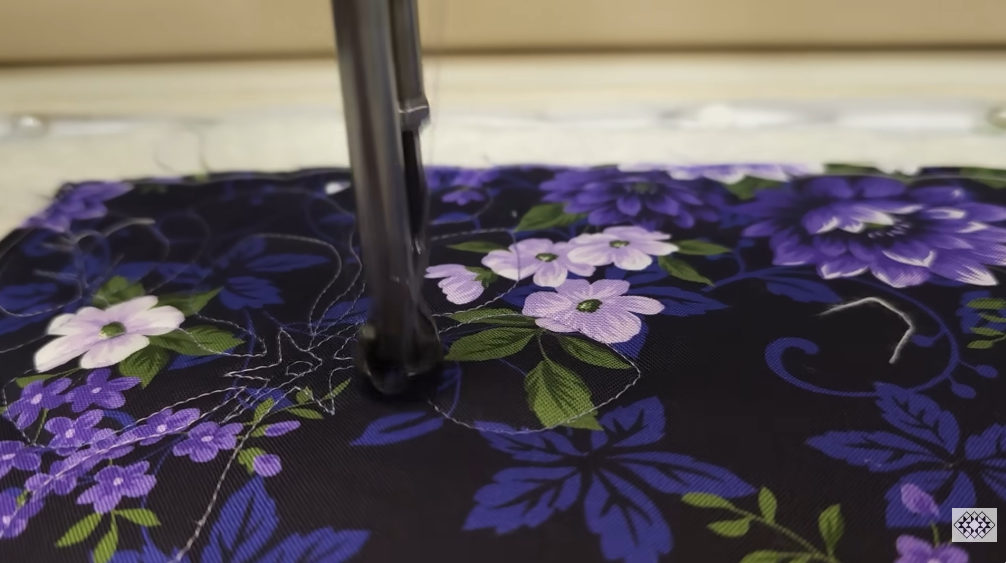
10 — Quilting suggestions
- Quilting should complement the stepped linear design:
- Straight-line quilting following the strip direction or running parallel to the steps emphasizes the geometry.
- Echo quilting around each step cluster brings out the stair shape.
- Diagonal cross-hatch can add texture without competing with the strips.
- For fast finishing, an all-over meander works nicely and keeps the steps primary.
- Choose thread color to emphasize or mute the strip seams depending on the look you want.
11 — Trim, bind & finish
- Trim oversize backing and batting even with the quilt top, prepare binding strips (2½” strips are standard), sew binding to the front, fold to the back and stitch down by hand or machine. Add a label, press, and enjoy.
Tips & troubleshooting (from the video-style approach)
- Keep a reliable ¼” seam allowance — use a ¼” foot and test on scraps. Inconsistent seam allowance is the #1 reason blocks won’t join neatly.
- Batch everything: chain-piece strip sets, stack-cut blanks, trim stacked units, then assemble blocks. This is faster and more consistent.
- If steps look uneven: square up blocks carefully — small trimming errors add up. Trim after sub-assembly, not at the very end.
- For clarity of the step motif, use moderate contrast between background and colored strips; very low contrast will blur the steps.
- When you want a continuous diagonal across the whole quilt, plan the rotation/offset BEFORE sewing rows so you cut any required sashing lengths correctly.
VIDEO: