 by
by Project overview
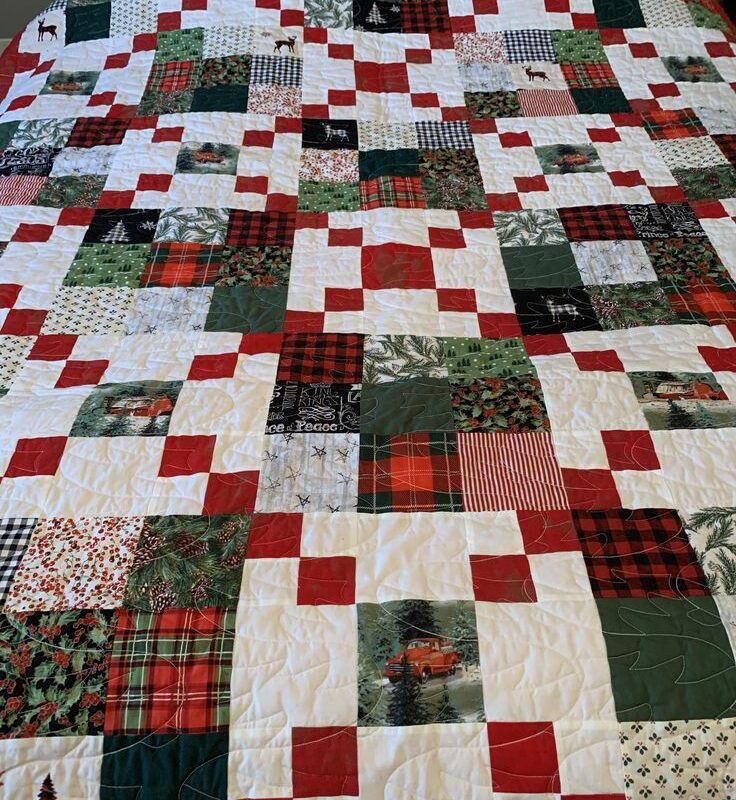
- Finished size: 84″ × 96″ (width × height) — a generous bed quilt.
- Block finished size: 12″ × 12″ (each block is a 3×3 grid of 4″ finished mini-squares).
- Grid:7 blocks across × 8 blocks down = 56 total blocks.
- 28 Nine-Patch (scrappy festive) blocks (colorful 3×3 of prints)
- 28 Cornerstone White blocks (white field with 4 red cornerstones)
- Small square finished size: 4″ × 4″ (so each 12″ block is 3 × 4″ squares)
Yardage & supplies (approximate)
(If you are using scraps / FQs you may not need full yardage. Fat quarters work beautifully for the scrappy nine-patches.)
- Assorted scrappy festive prints (reds/greens/plaid/novelty prints): 6–8 yards total (or ~30–40 fat quarters). These supply the colorful nine-patch blocks.
- Solid/print red for cornerstones and some nine-patch squares: 1¼ yards (or a few fat quarters if scrappy).
- Background / white or cream for the white squares: 5¼–6 yards (this supplies the white squares for the cornerstone blocks and plenty for sashing/borders if used).
- Navy/dark or optional inner border (if you want a small frame): ½–¾ yard (optional).
- Outer binding accent (red or matching print): 1 yard.
- Backing: 8–9 yards (or wide backing 108″ × 100″ equivalent — buy 8 yd of 44–45″ wide OR 4.5 yd of 108″ wide).
- Batting: at least 96″ × 104″ (queen/bed sized).
- Sewing thread, pins, ¼” foot, rotary cutter, rulers, iron, walking foot (for quilting).
Cutting (all cuts are unfinished sizes unless specified)
We build each small square at 4″ finished → cut at 4½” × 4½” to allow ¼” seam allowances.
Total small squares needed
- Total blocks = 56. Each block = 9 small squares → 56 × 9 = 504 small squares.
- Of those, half of the blocks are colorful nine-patches and half are white/cornerstone blocks (the counts below will ensure you have enough).
Cut list (suggested — you can cut lot from fat quarters):
From white/cream background (for white blocks & filler):
- Cut ~300 squares 4½” × 4½”. (This covers the white fields and some extra for mistakes.)
From assorted scrappy prints (reds/greens/plaid/novelty):
- Cut ~160 squares 4½” × 4½”. Spread across many prints; make sure to include many different tones so the nine-patches read scrappy.
From solid/strong red (cornerstones and accents):
- Cut ~44 squares 4½” × 4½”. (28 cornerstone blocks × 4 cornerstones = 112 red cornerstones — wait: that’s 112; if you want every cornerstone red you actually need 28 × 4 = 112 red squares. But many designs mix cornerstones, so if you want all cornerstones red, cut 120 red squares. To keep it simple below I’ll instruct making cornerstones red in each white block and allow scrappy substitutions. Let’s give final clear numbers:)
Revised counts for clarity:
- White/cream: ~300 squares.
- Red solid (cornerstones): ~120 squares (if all cornerstones are red).
- Scrappy assorted prints (for nine-patch centers and 8 other squares per block): ~84 nine-patch blocks × average 9 squares?? Wait—easiest: assume 28 nine-patch blocks × 9 = 252 scrappy squares. So cut ~260 assorted squares from prints (plaids, greens, holiday motifs) for the nine-patch units.
(You can mix red into the scrappy nine-patches if you prefer fewer solid reds—adjust accordingly.)
Practical approach if using fat quarters: cut each fat quarter into 6–8 squares 4½” — assemble until you have the counts you need.
Piecing plan (simple, reliable method)
Both block types are 3×3 grids of 4″ finished squares, so the sewing is consistent:
- Make the scrappy Nine-Patch block by sewing three horizontal rows of three 4½” squares (chain-piecing), press, then join rows into a 12½” unfinished square and trim to 12″ finished.
- Make the Cornerstone White block by arranging:
RED WHITE RED WHITE WHITE WHITE RED WHITE RED(all small squares 4½”). Sew rows and join in same way for 12″ finished block.
Because both blocks finish at the same dimension, they join in a checkerboard layout seamlessly.
Step-by-step assembly
1) Prepare small squares
- Press all fabrics. Organize squares in labeled stacks or trays (RED, WHITE, PRINT1, PRINT2, etc.).
- Lay out a single nine-patch block first as a sample to verify color balance: make each nine-patch with a strong center print and contrasting surrounding prints to create depth.
2) Sew nine-patch blocks (28 units)
(Repeat for 28 blocks)
- For each nine-patch, arrange nine 4½” squares in a 3×3 on your work surface.
- Sew each horizontal row: place pair 1 and 2 right sides together, sew a ¼” seam, then add square 3 to finish the row. Chain-piece rows for speed. Press seams for each row (press two rows one direction, middle row opposite so seams can nest).
- Join the three rows: match seam intersections carefully, pin if needed, sew the rows together. Press.
- Trim the finished block to 12½” × 12½” (unfinished), square it up and then it will measure 12″ finished when sewn in.
3) Sew cornerstone white blocks (28 units)
(Repeat for 28 blocks)
- Layout: Row 1 = RED / WHITE / RED; Row 2 = WHITE / WHITE / WHITE; Row 3 = RED / WHITE / RED (all 4½” squares).
- Sew rows as above, then sew rows together, press, trim to 12½” × 12½”.
Tip: Chain-piece many at once — sew Row 1 for multiple blocks in one chain, then Row 2 for multiple, then Row 3, then join.
4) Block quality check
- Make one row of 7 blocks on your design wall/floor first (Row 1). Press seams on alternate rows in opposite directions so when you join Row 1 to Row 2 the seams will nest (press Row 1 seams to the left, Row 2 seams to the right, etc.). This makes matching intersection “crosses” sharp.
5) Layout the quilt
- Lay out your 7 × 8 block grid following a checkerboard arrangement: start top-left with a nine-patch block and alternate across and down. (That yields 28 of each block type over 8 rows and 7 columns.)
- Rearrange scrappy nine-patches until the color balance is pleasing — distribute reds/greens/plaid so they don’t cluster.
6) Sew blocks into rows
- Sew the 7 blocks in Row 1 left→right with ¼” seam allowance. Press seam allowances for the entire row in a single direction.
- Repeat for all 8 rows.
7) Join rows into the quilt top
- Alternate pressing direction on adjacent rows (Row 1 seams pressed left, Row 2 right, Row 3 left, etc.) so seams will nest when joining.
- Pin at every block intersection matching seam points. Sew rows together one at a time, then press.
- After all rows are joined you will have a quilt center of 84″ × 96″ (12″ × 7 = 84; 12″ × 8 = 96). If there is small variation due to seam allowance, trim edges straight with a long ruler before adding borders.
8) Optional inner/outer borders
- The pictured quilt has a narrow red border and wider outer red binding. If you want the framed effect:
- Add a 1″ finished (2½” cut) red inner border all around: cut 4 strips 2½” × 84½” (sides) and 2 strips 2½” × 90½” (top & bottom). Sew sides first, press, then top & bottom.
- Add a wider outer border (optional) or go straight to binding. If you prefer cabining, add a 3–4″ outer border in a coordinating print.
9) Baste, quilt & bind
- Prepare backing (join lengths if needed) and batting slightly larger than your quilt top.
- Baste (spray or pins) on a flat surface, smoothing to eliminate wrinkles.
- Quilt: suggested options that fit this style:
- All-over stipple or meander (gives a soft, cozy finish).
- Wide diagonal lines echoing the checkerboard (1½–2″ spacing) for a modern look.
- Channel quilting between block seams to emphasize the grid.
Use neutral thread for subtle quilting or red/green in selective areas for accent. A walking foot is helpful for straight-line quilting.
- Trim quilt edges square and attach binding: cut 2½” strips, join into one continuous length, machine sew to front, fold and hand stitch to back for a classic finish.
Helpful tips & troubleshooting
- Make a test block first and measure it. If the test block is off, fix seam allowance before making the rest. Each small square must finish 4″ — so cut 4½” and sew with precise ¼” seams.
- Chain-piecing speeds up production and keeps sizes consistent.
- Pressing direction: press alternating rows oppositely to nest seams — intersections will match nicely.
- If cornerstones don’t align: use pinning at intersections (pin through the vertical seam, then through the horizontal seam) and sew slowly.
- If you want fewer seams: you can make the nine-patch units from larger strip sets (3 strips sewn and subcut) — but the 4½” square method is easiest and most accurate.
- Fabric selection: to recreate the pictured cozy Christmas look, use a mix of plaids, holly/berry prints, novelty truck prints, pine branches, and a solid warm red for the cornerstones. Vary values (light/dark) so the nine-patch blocks read textured rather than flat.