by
by Quick overview
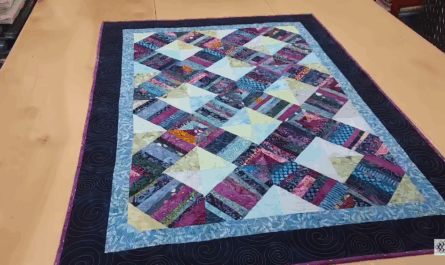
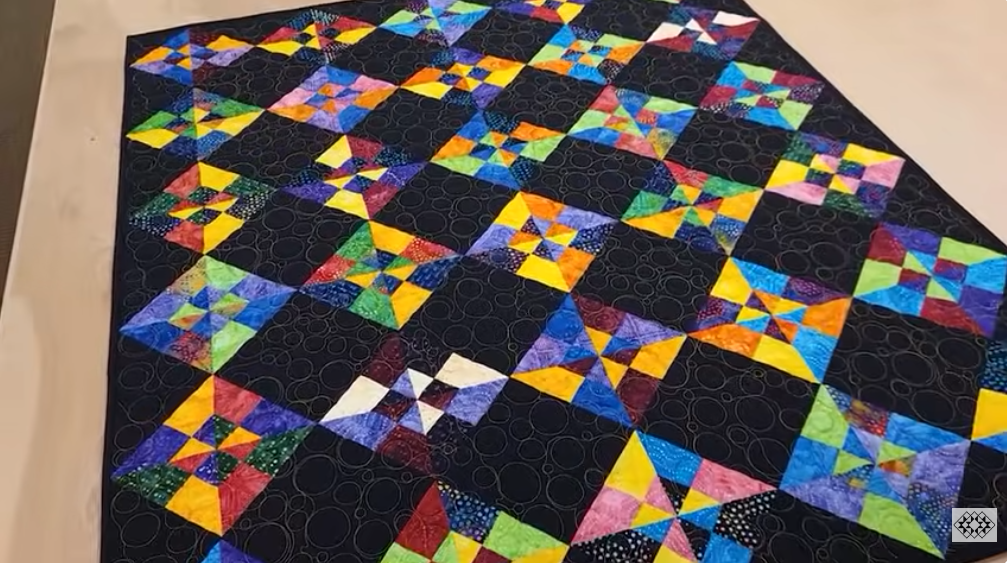
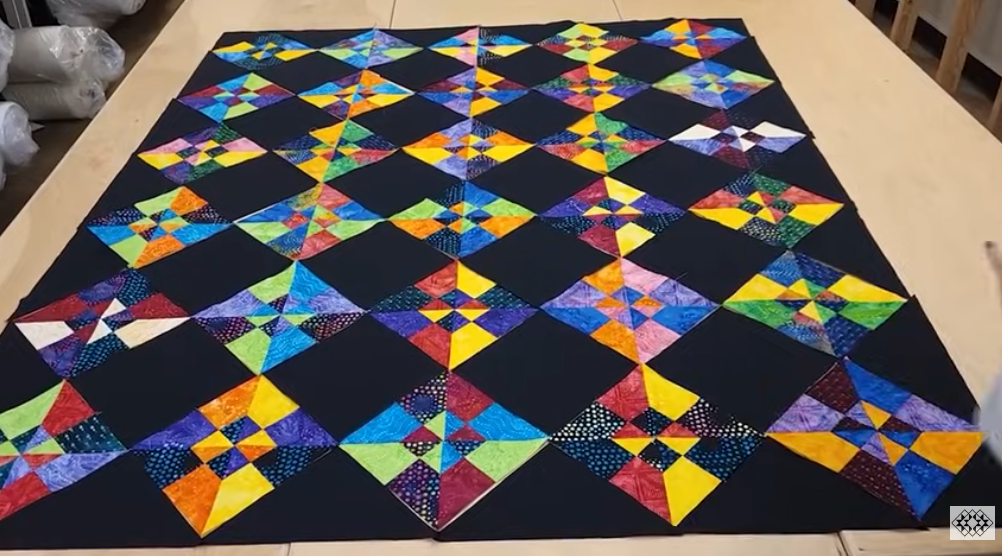
- Pattern name: Mix & Match (Donna Jordan / Jordan Fabrics).
- Finished quilt (as published): ≈ 49″ × 59″ (lap/throw size).
- Main idea: use 5″ charm squares (precuts) to create small patchwork units, “mix” the pieces, then “match” them together into blocks and set those blocks on a darker background so the secondary pattern pops.
Materials (what to buy / gather)
- Charm squares (5″ pre-cut) — assorted prints. Estimate: 3–5 charm packs (≈42 squares per pack) depending on how scrappy/dense you want the design. (If you want an exact count for the Jordan Fabrics version, download their free pattern — link below.)
- Background / setting fabric (solid or darker neutral) — ~2½ – 3 yards (this is for the background that surrounds blocks and may include sashing; adjust if you use more or wider borders).
- Border fabric (if different from background) — ~1 yard.
- Backing fabric — 3.5 – 4 yards (or 2½ yards pieced).
- Binding fabric — ½ yard (or 1/3 yard for 2½” strips).
- Thread, rotary cutter, ruler, cutting mat, sewing machine with a ¼” seam foot, pins/clips, iron / pressing surface, safety pins or basting spray for quilting.
- Optional: batting approx 50″ × 60″.
Tip: Jordan Fabrics’ site groups this pattern under their 5″ charm-friendly free patterns — they usually provide a downloadable PDF with exact cutting counts and block count.
Before you start
- Download the official free pattern from Jordan Fabrics for exact number of charm squares and cutting diagrams. (Search the Jordan Fabrics free patterns list for “Mix & Match” / Donna Jordan.)
- Read the pattern front-to-back so you understand block counts and the order of assembly. The guidance below follows the same construction flow used in the Jordan Fabrics video and pattern: cut charms, create mixed patch units, make blocks, assemble rows, add borders, quilt & bind.
Step-by-step tutorial (practical, followable)
1) Prepare & organize fabric
- Press all charm squares lightly. Lay them out on a design wall or floor in the rough value/colour arrangement you like. The “mix & match” effect is achieved by randomizing pairings so similar prints sit next to different values.
- Decide whether you’ll use single charms for whole small units or cut them for more variety (patterns like this often cut charms and recombine pieces).
2) Cutting (general method used for charm-based mix & match)
(Important — the exact cut sizes and counts for Jordan Fabrics’ version are in their free PDF — use the PDF if you want exact numbers. The method below is the approach the video demonstrates.)
- If you’re following Jordan Fabrics’ charm-friendly approach, you’ll mostly work with full 5″ charm squares and sometimes split them to make more varied units. A common, fast approach:
- Leave a number of charms whole (5″ squares).
- Cut a portion of charms in half (cut 5″ charm into two 2½” × 5″ rectangles, either vertically or horizontally). This gives you more combination options without intensive piecing.
- Cut a few charms into 2½”×2½” squares (i.e., quartering if you want 4-patch units).
- Keep background rectangles/strips cut to the dimensions the pattern calls for (if using the PDF, follow those exact background strip sizes). If you don’t have the PDF, cut background strips in widths 1½”–2½” depending on how much negative space you want — you can trim later.

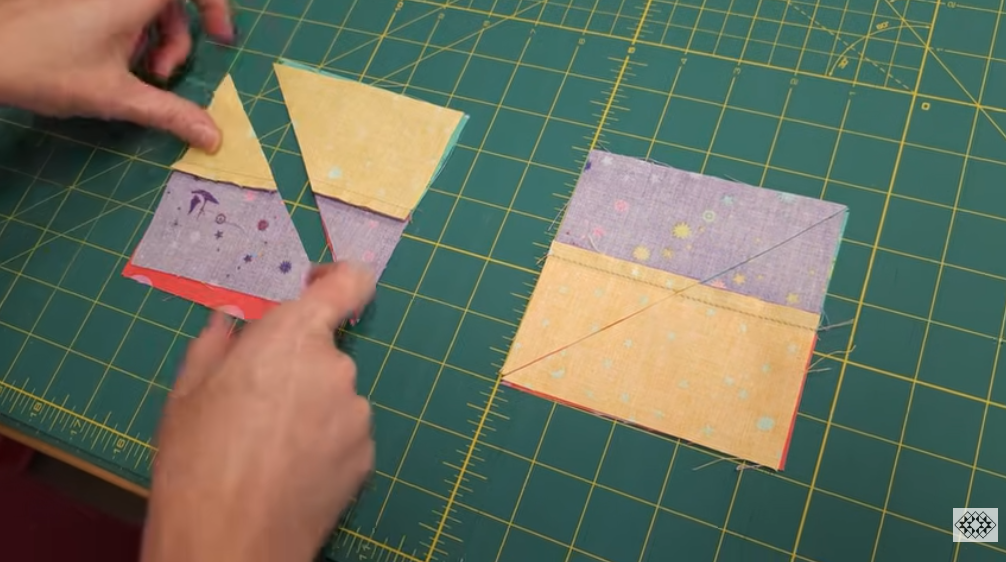
3) Make the mixed units (the “mix” step)
- Pair charm pieces in different combinations. Example working unit (one fast method used in charm quilts):
- Take two 5″ charms or two 2½”×5″ rectangles of contrasting prints.
- Sew them together along the 5″ side (if using halves) to create a strip set or sew 5″ squares into two-square units. Press seams to one side.
- If the pattern calls for 4-patch blocks, sew two pairs together to make a 4-patch, or sew a strip set to a background strip to form a block center.
- The idea is to create many small patch units where the prints change half way so when units are placed, they form secondary shapes and star/diamond effects.
4) Trim and square up
- After piecing each small unit, trim to size per the pattern. Trimming keeps blocks consistent and makes assembly easier. Use a square ruler and trim to the block measurement the pattern specifies (if you don’t have the PDF, trim so your sewn units are consistent — for example, aim for blocks that finish at ~6–7″ depending on how many you want across the width).
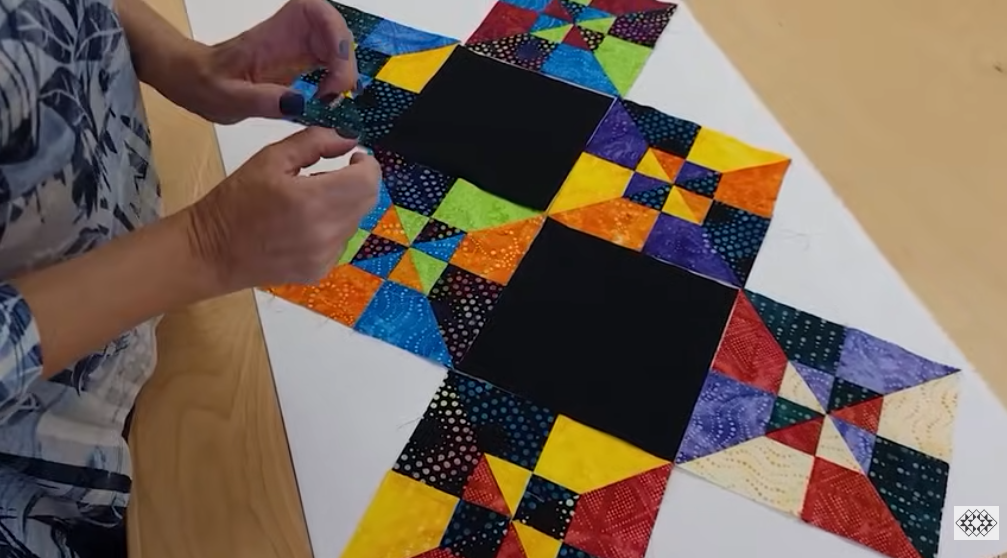
5) Assemble blocks
- Arrange your trimmed units into the block configuration shown in the Jordan Fabrics tutorial. For many charm mix patterns that result in the 49″ × 59″ finished top, you’ll create a grid of multiple blocks (the Jordan Fabrics sample is a lap throw with several rows of blocks).
- Sew units into rows, nesting seams as you go. Press seams after each row.
6) Join rows to make the quilt top
- Lay out finished rows, adjust for color balance, then sew rows together with a ¼” seam allowance. Press seams (many quilters press alternating row seams opposite directions so seams “nest” where rows meet).
7) Add borders (if the pattern shows them)
- The Jordan Fabrics sample uses a darker setting/background which frames the small patchwork and makes the small prints pop. Add inner or outer borders per the pattern:
- A common layout: a narrow inner border (1¼”–1½” finished) of background fabric, then a wider outer border (3″–4″ finished) of a coordinating fabric.
- Measure the quilt top after assembly, cut border strips to match (add ¼” seam allowance), and sew borders on in the usual order (sides first, then top/bottom, or vice versa).
8) Prepare backing, batting, and baste
- Trim the backing and batting about 4″ larger than your finished top on all sides (so you have ease for quilting). Baste the three layers using your preferred method: spray basting, safety pins (every 4–6″), or long-arm basting.
9) Quilting
- Choose quilting that complements the busy small-scale patchwork:
- Simple all-over meander or echo motifs keep the focus on the piecing.
- Echo the block shapes with straight line quilting or diagonal crosshatching to enhance the secondary patterns.
- If you want the crinkly scrappy look, use heavier thread or close line quilting. For a flatter, modern finish, use finer thread and looser spacing.
10) Trim and bind
- Square up the quilt after quilting, trimming excess batting/backing even with the quilt top.
- Make binding strips (2½” wide strips sewn together on the diagonal or straight grain). Join to the quilt, fold to the back, and hand-stitch or machine-stitch the binding down.
Finishing tips & styling choices
- Contrast matters. The Jordan Fabrics version uses a relatively dark background to make the charm colours pop; if you prefer a light, airy quilt, use a light background instead and you’ll get a different visual effect.
- Scrappy vs matched: If you want a more controlled look, use limited colorways; for the true “mix & match” scrappy look, use many different charm prints and cut some into halves to increase combinations.
- Block trimming: Accurate trimming (after creating strip sets/small blocks) is the biggest factor in a tidy finish.
- Backing: For a bold backing, use a large panel or wide print that contrasts nicely with the front — Jordan Fabrics often shows large prints on the back in their video examples.
VIDEO: