 by
by Overview & assumptions
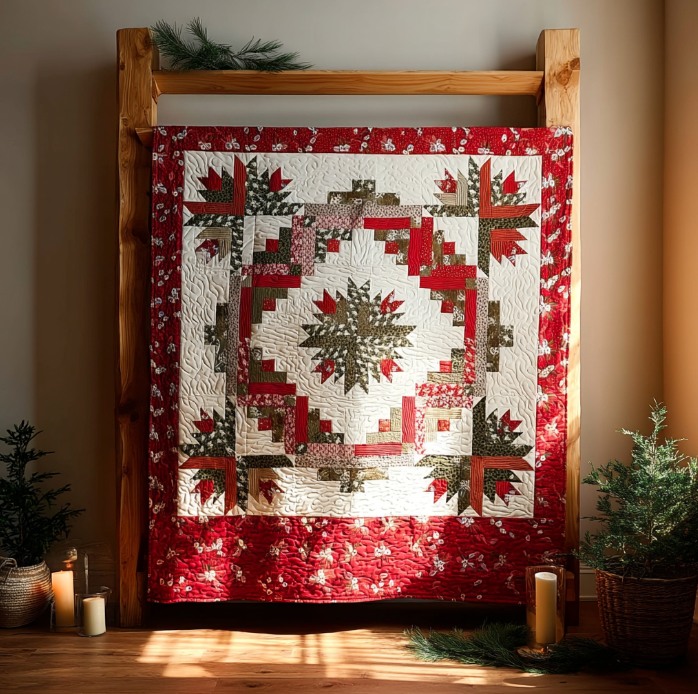
- Finished quilt size: 60″ × 60″ (square) — a good lap/throw size that matches the proportions of the photo.
- Block modular system: quilt = 5 × 5 grid of 12″ finished blocks (5 × 12 = 60″). Center block is a medallion star, the four corners are leaf/star corner blocks, and the remaining 20 are log-cabin / pieced frame blocks that create the octagon/ring look.
- Seam allowance: ¼” throughout. When I give cut sizes for squares or strips, those are the sizes you cut (i.e., include seam allowance in the numbers provided).
If you want a different finished size, I include notes at the end for scaling.
Materials (for 60″ × 60″)
Note: I describe fabric roles the way the quilt in the photo looks — lots of cream/ivory background, mixed reds & greens for prints, and a bold red floral border.
- Background / neutral (cream/ivory) — 2½ yards
- Scrappy prints (reds, greens, browns) — assorted — 3 yards total (a fat-quarter bundle of 12–20 prints would be ideal)
- Outer border fabric (red floral used in your photo) — 1½ yards
- Backing fabric — 3½ yards (enough to make a 62″ × 62″ backing, or join two widths)
- Binding — ¾ yard (or scrap strips 2½” × width-of-fabric)
- Batting — at least 62″ × 62″
- Thread, pins, rotary cutter, rulers, pencil, iron
Quick math check (how I arrived at yardage)
(Showing step-by-step math so it’s clear.)
- Finished area = 60 in × 60 in = 3600 square inches.
- 60 × 60 = 3600.
- Standard fabric usable area per yard (approx) = 36 in (width across) × 42 in (usable length) = 1512 sq in.
- 36 × 42 = 1512.
- Background estimated coverage ≈ 55% of quilt → 0.55 × 3600 = 1980 sq in.
- 0.55 × 3600 = 1980.
- 1980 ÷ 1512 ≈ 1.31 yards → round up to 1.5–2.5 yards to allow piecing and scraps; I recommend 2½ yards to be safe (lots of background in sashing and block centers).
(So the final yardages above are conservative and include allowances for piecing, borders, and matching.)
Cutting plan (based on 12″ finished blocks)
Block grid: 5 × 5 = 25 blocks (center medallion + 4 corners + 20 pieced blocks)
Cutting basics & units
- All block finished size: 12″ finished → cut main unit pieces mostly to 12½” when squares are used (12″ + ¼” left seam + ¼” right seam = 12½”).
- When cutting strips for log-cabin-style blocks, I’ll list the strip widths to cut.
Cutting list (concrete pieces)
Background / neutral (cream / ivory)
- 25 squares 12½” × 12½” for block backgrounds and centers (this is a simplification — some blocks use multiple background pieces). Cutting 25 such squares gives you options. (You can subcut strips from these.)
- Additional for sashing/pieces: cut 6 strips 2½” × WOF (width of fabric) to use for faint sashing pieces / partial background — the photos show mostly block-to-block so you may not need wide sashing.
- Binding inner if required: use scraps.
Scrappy prints (reds/greens/browns)
- For log-cabin-style blocks, cut strips:
- Strip widths (cut): 1½”, 2″, 2½”, 3″, 3½” — approximate assortment. Cut multiple strips at each width from different prints.
- Aim for at least (a) 40 strips in the 1½”-2″ range and (b) 30 strips in the 2½”-3½” range across your scrappy stash. This gives strong scrappy variety.
- For border and accent pieces, set aside the red floral: cut border pieces below.
Borders
- Inner narrow border (optional): if you want a narrow cream or green inner border, cut 4 strips 1½” × WOF.
- Outer red floral border (as in photo): final border width in photo looks approx 6″ finished. For a 6″ finished border, you cut 7″ strips (6″ finished + ½” seam both sides = 7″).
- Need two horizontal border strips length = 60″ + 2 × (7″ seam allowances for mitering) ≈ cut 2 strips 7″ × 64″ (we’ll piece to length; in practice cut 7″ × WOF pieces and join).
- Need two vertical border strips likewise. From 1½ yards you will get enough width-wise (1½ yds = 54″ — join pieces). So 1½ yards is workable.
Binding
- For 2¼” finished binding, cut 7 strips 2½” × WOF (typical rule for 60″ quilt).
- Why 7? Standard: perimeter ≈ 4 × 60 = 240″ → binding strip length per WOF ≈ 40″ (usable) so 6 strips gives ~240″, but 7 gives comfortable extra.
Block constructions (step-by-step)
I’ll describe three block types (12″ finished each):
A. Center Star Medallion (12″ finished)
B. Corner Maple/Leaf Block (12″ finished) — stylized leaf/star corner like the photo
C. Log-cabin–style Frame Block (12″ finished) — scrappy strips forming L-shaped frames
Use chain piecing where possible.
A — Center Star Medallion (12″ finished)
This is a small star with many small half-square triangles. I’ll create a 8-pointed star that finishes at 12″.
Pieces & cutting:
- Cut one cream center square: 3½” × 3½” (finished 3″ center after seams).
- Cut 8 HST pairs to make the star points: cut 4 squares each of two contrasting colors (red/green) at 3¼” × 3¼” to make 8 HST after trimming to 2½” finished? To keep numbers clean, use this approach:
Step-by-step:
- For each star point, pair a 3¼” red square with a 3¼” cream square. Draw diagonal on lighter square, sew ¼” each side, cut on diagonal → two HSTs about 2¾” raw; trim to 2½” finished. Repeat to make 8 trimmed HSTs.
- Arithmetic: 3¼” = 3.25″; no heavy math needed beyond measuring squares.
- Arrange the HSTs around the center so the star points radiate. Add small background corner squares as necessary to bring the block to 12½” raw. Use a layout: center 3½” + two HST rows (each 2½” finished) + seam allowances = 12″.
Assembly:
- Make four units of HST pairs into flying geese-like clusters, join around center square. Press seams open or to the side for a flat top. Square block to 12½” raw (12″ finished).
(If you want a printable template, I can draw one next.)
B — Corner Leaf / Maple-Style Block (12″ finished)
This block mimics the leafy corner motifs in the photo (looks like a maple-ish leaf with multiple small triangles).
Simpler construction:
- Make a 4-patch pieced leaf built from HSTs and small squares.
Cutting:
- Background squares: four 4½” × 4½” (these yield two HSTs each when paired)
- Leaf print squares: four 4½” × 4½”
- Smaller accent triangles: cut 2″ squares for small HSTs if needed
- Assemble two HST units (pair leaf + background 4½” squares, sew diagonally, cut, press) → trim to 4″ finished subunits. Use these to assemble the leaf shape (arranged as two 4″ units plus corner 4″ squares), giving a 12″ block.
Assembly:
- Make HSTs from the 4½” pairs; trim to 4″ finished.
- Arrange HSTs so points form a leaf shape. Add background 4″ squares to corners. Join subunits into rows, then join rows into the 12″ block.
- Square to 12½” raw.
C — Log-cabin–style Frame Block (12″ finished)
This is the main repeated block that forms the octagon/ring. The block is an improvisational log cabin where the “light” is cream and the “logs” are scrappy reds/greens.
Construction (clean, repeatable method):
- Start with a center 2½” square (cream or small print).
- Sew 2½” strips around the center in this order: right, top, left, bottom; increase strip widths as you like (typically keep them 2½” for a fairly geometric look). After four rounds you’ll have a roughly 12″ block.
- Press after each addition.
- Trim to 12½” raw square.
Cutting for many blocks:
- Cut many strips 2½” wide by varying lengths (use long strips and subcut needed lengths per block).
Tip: For the blocks that look like corner L-shapes in the photo, start the log cabin center off-center (not centered) so each block has a pronounced corner.
Assembling the quilt top
- Arrange blocks in a 5 × 5 layout: center medallion in the middle, leaf blocks in four corners, log-cabin blocks filling the rest. Lay out on the floor or a design wall until you like the balance of reds/greens/scrappy prints.
- Sew blocks into rows: sew 5 blocks together for each row (use chain piecing). Press seams consistently (alternate pressing direction each row so seams nest).
- Join the 5 rows to make the 60½” raw top (60″ finished). If you added an inner narrow border, attach it now.
- Attach the outer red floral border: measure the quilt center (should be ~60½” raw). Cut border strips 7″ wide (as noted) and piece to length as needed. Mitered corners optional — for mitering, cut border strips a bit longer, attach to opposite sides first, press, then add the remaining two sides and miter at corners.
Quilting design
The photo shows an all-over meandering or pebble quilting. Options:
- Echoed meander / stipple in the background and inside the cream areas to emphasize the medallion.
- Feathered or echo quilting around the center star to make it pop.
- Quilting density: 10–12 spi (stitches per inch) on background is fine for batting thickness.
If you quilt by machine at home:
- Baste the sandwich (batting, backing right side down, top right side up) using safety pins every 4–6″.
- Start quilting from the center outward to avoid puckers.
- Use a walking foot for an all-over meander or a free-motion foot for stippling.
Binding & finishing
- Square the quilt, trim excess batting/backing so all layers are even.
- Prepare binding strips: strip full width 2½” × WOF, join into one continuous strip.
- Attach binding to front with ¼” seam, fold to back, hand-stitch or machine stitch on back.
- Label your quilt and enjoy!
Tips & troubleshooting
- Scrappy planning: spread reds/greens evenly so one color doesn’t dominate a whole side.
- Chain piecing saves time with many small HSTs or log-cabin strips.
- Pressing: press seams toward dark fabrics where possible to reduce shadow through light fabrics.
- If your center block looks small/large: you can make the center star block larger (e.g., 16″ finished) and adjust surrounding blocks, but then you’ll need to recalculate borders.