 by
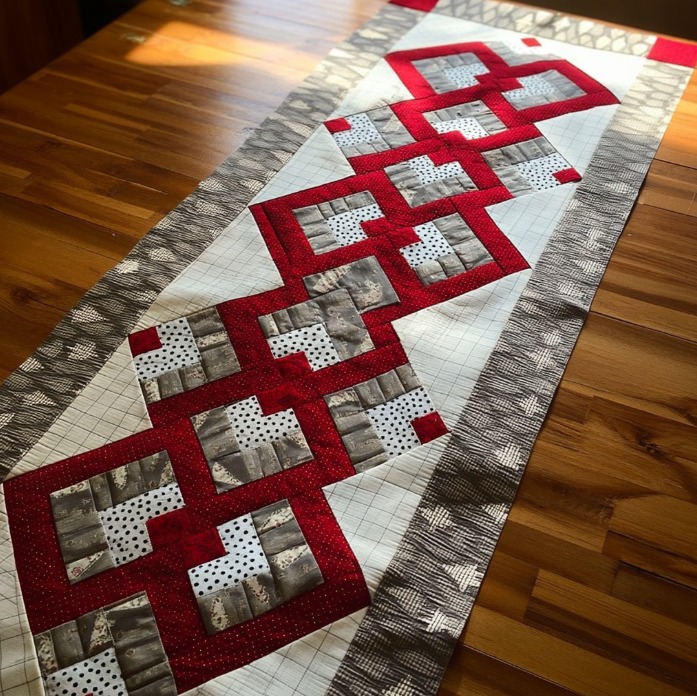
by Great — lovely runner! I’ll give you a clear, stitch-by-stitch, start-to-finish tutorial so you can recreate that exact linked-on-point look.
Finished size
Approx. 16″ × 60″ (16″ wide × 60″ long, finished) — long table runner that fits a narrow table or runs down the center of a dining table.
Materials
- Main “link” fabric (red, for the outer frame) — ⅝ yard
- Inner log/strip fabrics (greys / prints) — ½ yard total of assorted scraps or 6–8 fat quarters
- Center fill fabric (white/cream with dots) — ¼ yard (for block centers)
- Background / setting fabric (light gridded fabric in photo) — 1 yard (for triangles, setting squares, and background)
- Outer narrow border fabric (grey textured) — ½ yard
- Binding (same as outer border or red) — ¼ yard (or 2–3 strips 2½” × WOF)
- Backing fabric — 1½ yards (enough for a piece 18″ × 62″)
- Batting — about 18″ × 62″ piece
- Thread, rotary cutter, ruler, pins, iron, sewing machine, walking/free-motion foot for quilting
Seam allowance: ¼” throughout.
Design & construction plan (how the runner is built)
- The runner is built from on-point “link” blocks (square blocks turned 45°) placed corner-to-corner to make a diagonal chain.
- Each “link” block is a 10″ finished square made from: a 4″ finished center square, a 1″ finished inner log ring (scrappy greys), and a 2″ finished outer red frame. That yields 4 + 2×1 + 2×2 = 10″ finished side.
- We will make 6 full link blocks (6 × 10″ = 60″ length when arranged corner-to-corner) — that yields a ~60″ runner. If you want it longer/shorter make more/fewer blocks.
Cutting
(Measurements shown are cut sizes unless marked “finished.” Add a ¼” seam when joining — instructions below already account for seam allowance by giving raw cut sizes.)
For each 10″ finished link block (make 6)
- Center square (finished 4″): cut 4½” × 4½” (one from center/contrast fabric — white dotted in photo).
- Inner scrappy log strips (1″ finished): cut several strips 1¼” wide (these will be sub-cut as needed for side lengths). You’ll need strips long enough to surround the center: for one block approximate total strip length needed = 4 sides × (4″ + two seam allowances) ≈ cut 4 strips about 4½” long from assorted greys; but easier: cut a few long 1¼” × WOF strips (WOF = width-of-fabric) and subcut as you go.
- Outer red frame strips (2″ finished): cut strips 2½” wide. For each block you need four frame strips to surround the inner unit, cut lengths of about 10½” raw (we’ll trim to final). Again easiest: cut 2½” × WOF and subcut.
- If you prefer precut: for six blocks, cut:
- Red 2½” strips: about 8–10 strips 2½” × 42″ (you will use relatively little).
- Scrappy grey 1¼” strips: a bunch of 1¼” × WOF strips (reuse across blocks).
Background / Setting
- Background squares (to place between block corners when setting on point): cut 2½” × 2½” squares (these become 2″ finished setting squares). You’ll need about 10–12 of these (we’ll use 5 between 6 blocks plus a few for ends).
- Large background triangles / corner filler: To set a 10″ square on point inside a 16″ width runner, we’ll add triangles above & below the row. Cut background squares 16½” × 16½” and cut into quarters to make corner triangles when needed (instructions below). Alternatively cut triangles directly — I prefer the square-into-quarters method for accuracy.
Borders
- Inner narrow border (optional, grey textured in photo): cut 2¾” × WOF strips (for a 2″ finished border we cut 2¾” raw). You’ll need two strips for long edges (join if needed) and two for short edges.
- Binding: cut 2¼” finished binding → strip width 2½” × WOF, 3–4 strips joined for full length.
Make one link block — step-by-step (repeat 6×)
This block construction is a simple “center square → inner log ring → outer frame” approach.
- Center: Start with your center square cut 4½” × 4½” (this yields a 4″ finished after seams). Press.
- Add inner logs (1″ finished, cut 1¼” wide):
- Subcut four grey strips to lengths approximately: two 4½” (for left & right) and two 6½” (for top & bottom — because they wrap around seam allowances). Exact lengths aren’t critical because we’ll square up later; if using long strips simply sew them in sequence.
- Sew one 1¼” grey strip to the right edge of the center square (align raw edges, ¼” seam). Press seam toward strip.
- Sew a second 1¼” grey strip to the left edge. Press.
- Sew one strip to the top and one to the bottom, all four forming a single “frame” of grey around the center. When adding top and bottom, sew them to the whole unit (not to center alone), nesting seams as you go so seams lie flat. Press outwards.
- The inner unit should now be roughly 6½” square raw (lock + seam allowances); square it if needed but leave some extra for outer frame.
- Add outer red frame (2″ finished, cut 2½” wide):
- Subcut four red strips from the 2½” × WOF strips: two about 10½” for top/bottom and two about 10½” for left/right (you can start with longer and trim).
- Sew one red strip to the right side of the inner grey-framed unit. Press. Sew the left red strip. Then sew the top and bottom red strips. Press.
- Trim/square the block to 10½” × 10½” raw (this will be 10″ finished). Use a square ruler and align center seams so the block is centered.
- That’s one 10″ finished link block. Repeat until you have six blocks (or your desired number).
Setting blocks on point (create the chain)
We are going to set the 10″ squares on point (so the square tips face top/bottom) and join them corner-to-corner with small setting squares. This produces the linked chain look.
- Decide block order — lay your 6 blocks on a design wall/bed/table in a diagonal line so the block centers line up and the red frames interlock visually (alternate which way the inner grey logs face if you want variety).
- Make setting squares: Make about 5–6 small background squares 2½” × 2½” for placement between the touching corners of two on-point blocks. These small squares act as the little white dots/connection points in the photo.
- Layout the on-point row: Place Block 1 on point; to its lower-right corner place a small 2½” background square, then place Block 2 on point rotated so its upper-left corner meets that setting square. Repeat to link Block 3, 4, 5, 6. The raw sizes will be 10″ block diagonals, and the small 2½” squares will sit between corners.
- Sew blocks into a strip:
- For each adjacent pair: sew the small 2½” square to the corner of one block first (use a small ¼” seam and press). You can also use the “square-in-a-square” stitch and trim technique for better accuracy: align the 2½” square on top of the corner of the block (right sides together), stitch ¼” from the corner, trim the extra, press open — this yields a tiny corner square attached.
- Join the assembled pairs into a continuous strip: sew Block1+setting to Block2+setting, etc. Use a walking foot/slow sewing to match corners. Press seam allowances so units nest (alternate direction).
- Trim the completed strip: After joining all blocks, square the entire strip so the long edges are straight and even. The finished length should be ~60″ finished (6 × 10″), plus the small influence of the setting squares; trim so the runner is even.
Add background triangles / top & bottom filler
Because blocks are set on point, the runner will have triangular background spaces at the top and bottom and maybe small triangular gaps on the sides. We’ll add background triangles to square it to a rectangle for borders.
- Make two background corner triangles: Cut two 16½” × 16½” background squares, cut each into quarters (diagonally) to make large triangles. Attach a triangle to the top and bottom of the chain so they fill to a final runner width of 16″ (you’ll actually trim to 16″ final width).
- Align the long straight edge of the triangle to the top edge of the runner strip, stitch along the straight edge, press. Repeat for bottom.
- Trim & square: With triangles attached, trim the overall runner to 16½” × final length (raw) and then square to 16″ × 60″ finished (trim ¼” seam allowance into final size). The 16½” raw width gives 16″ finished after final seam allowance if you prefer.
Add borders
- Add the outer grey textured border by sewing 2¾” raw (2″ finished) strips to the long sides first, then short sides, miter corners if you wish. Press seams outward.
- Trim whole runner so final size is 16″ × 60″ finished (including binding allowance).
Basting & Quilting
- Baste your sandwich (backing wrong side up, batting, top right side up) with safety pins about 4–6″ apart or use spray baste. Smooth from center outward to avoid wrinkles.
- Quilt design: the photo looks like a grid / echo quilting with diagonal echoes and a straight-line grid on the background.
- Option A (machine straight-line): echo the red frames by stitching ¼” inside the red frames, then quilt straight-line crosshatch/diagonal on the background (use a walking foot).
- Option B (free-motion): stipple the background and echo around the links.
- Recommended density: about 3–4″ between lines in background and closer around the links for contrast.
- Start quilting from the center and work outwards (if free-motion start in center), or start at one end and roll the quilt as you quilt if using long-arm.
Binding & Finishing
- Trim the edges square. Prepare binding (2½” × WOF strips joined into one long strip).
- Attach binding to front with ¼” seam, miter corners, fold to back, hand-stitch for invisible finish or machine stitch.
- Give a final press. Add a label if you like (date, name, pattern).
Tips & troubleshooting
- Accuracy matters when making the inner log ring and outer frame — keep seams consistent ¼”. A scant ¼” on one side will help when sewing nested seams later.
- If your blocks aren’t exactly 10″ finished after framing, don’t worry: square them carefully before setting on point, and trim to a consistent raw size (10½”) for easiest joining.
- Use starch on the outer red strips to keep bias edges stable (red frames are fairly wide and can stretch).
- Chain-piece identical steps across all blocks to speed the process (sew inner logs for all blocks, then sew outer frames for all blocks).
How to adapt / scale the runner
- To shorten/lengthen: add/remove full 10″ link blocks. Each block adds 10″ to finished length.
- To widen: increase block size proportionally (e.g., make 12″ finished blocks; recalc cut sizes: center 4.8″ finished → cut 5.25″, etc.), or add wider side borders.