 by
by Overview (what you’ll make)
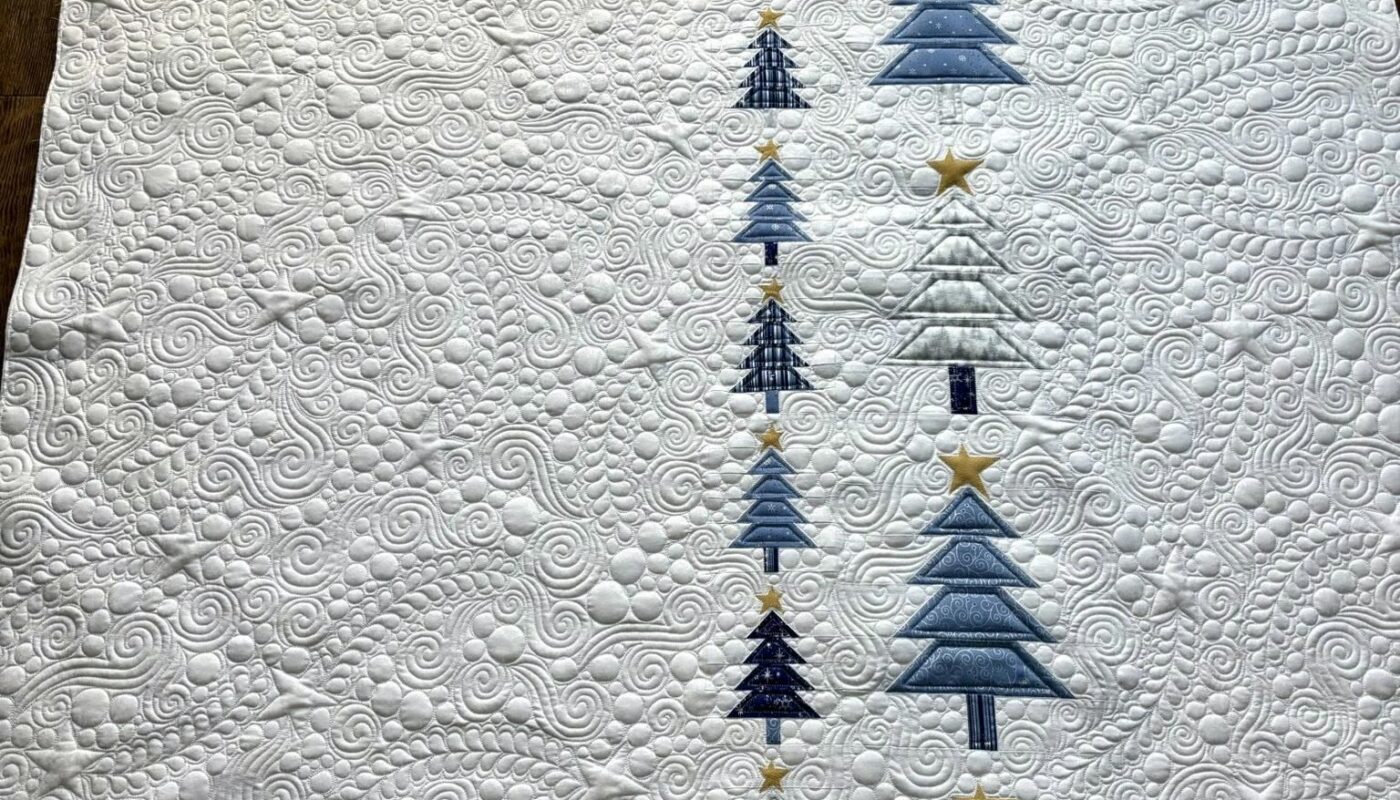
- Finished size: 88″ × 96″ (queen / large throw; the layout and measurements below match the photo proportions).
- Design: two vertical columns of stacked, stylized applique trees (small → large), stars above each tree, set on a wide white background heavily quilted with swirls and pebbles.
If you want a different size, this pattern scales easily — the tree templates and spacing are proportional; tell me later if you want a smaller lap or crib version and I’ll recalc.
Materials & tools
- Background/setting fabric (solid white/very pale) — 7 yards (enough for top + bias for binding if preferred).
- Assorted tree fabrics (blues/indigos/plaids/greys) — 2–2½ yards total (mix of light, medium, and dark prints; fat quarters work great).
- Star fabric (gold/yellow) — ½ yard.
- Backing fabric — 9 yards (or one piece 108″ wide × 8 yards/adjust depending on backing width) — aim for at least 94″ × 102″ backing to allow shrink and quilting margin.
- Batting — single piece ~92″ × 100″ (or seam two pieces to size). Use 80/20 cotton/poly or 100% cotton, your preference.
- Fusible web (HeatnBond Lite or Steam-a-Seam 2) for applique (or needle-turn applique supplies if you prefer).
- Thread — matching and neutral (for top and quilting). Use quilting thread (50/60 wt).
- Rotary cutter, rulers (24″ and 6″ × 24″), mat, pencil, fabric scissors.
- Sewing machine with a small zigzag or blanket stitch foot (if doing machine applique) and a walking foot for quilting.
- Pins, spray starch (optional), seam ripper, safety pins for basting.
Design grid & placement (how the layout fits the quilt)
- The quilt top is mostly background. Two vertical columns of trees are placed about 16″ in from the left and right edges (this leaves lots of background quilting room). Each column has 8 trees of varying sizes spaced evenly from top to bottom.
- The trees are arranged in alternating small/medium/large groups so the eye moves down the column. Each tree is made from stacked trapezoid/triangle layers (4–5 layers each) plus a rectangular trunk and a small star above.
I’ll give precise templates for 3 tree sizes: Small, Medium, Large. Make a mix in each column matching the photo.
Cutting & templates
You’ll make appliqué pieces (no complicated piecing). The measurements below are raw/cut sizes, and account for ¼” seam turning if you needle-turn, or for fusible seam allowances if you are fusing and turning under.
Tree layer templates (make from cardstock once and reuse)
Each tree is built from horizontal layers (wider at base). For clarity I give cut widths and layer heights.
Small tree (finishes ~ 6″ tall overall)
- Layer A (top small triangle): cut triangle/pennant approx 2½” wide × 1¾” high (cut a small isosceles triangle or a trapezoid whose top is narrow).
- Layer B: 3½” wide × 1¾” high
- Layer C (base layer): 4¾” wide × 1¾” high
- Trunk: ¾” wide × 1½” high (cut from dark fabric)
- Star: 1″ finished star (cut from gold)
Medium tree (finishes ~ 10″ tall)
- Layer A: 3″ wide × 1¾” high
- Layer B: 4¾” wide × 1¾” high
- Layer C: 6″ wide × 1¾” high
- Layer D (base): 7½” wide × 1¾” high
- Trunk: 1″ × 2″
- Star: 1½” finished
Large tree (finishes ~ 15″ tall)
- Layer A: 3½” × 1¾”
- Layer B: 5½” × 1¾”
- Layer C: 7½” × 1¾”
- Layer D: 9½” × 1¾”
- Layer E (largest base): 11½” × 1¾”
- Trunk: 1¼” × 3″
- Star: 2″ finished
Notes:
- Each layer height is small (1¾”) so stacks form the triangular tree silhouette; you can change heights slightly if you want a taller or squatter look. If you intend to press under raw edge you can cut them 1/8″–¼” larger to allow turning. If you use fusible web, cut exactly to these sizes, fuse, and turn-under or raw-edge stitch as you prefer.
- For the triangular/top piece you may cut a small wedge (triangle) or a narrow trapezoid—either looks fine. If you prefer an exact triangular top, cut a square and subcut on the diagonal.
How many pieces to cut
(For 2 columns × 8 trees = 16 trees total; varied sizes. Suggested mix: 6 small, 6 medium, 4 large.)
- From your 2–2½ yards of tree fabrics, cut strips and subcut to these widths. Make sure you have light/medium/dark values so the stacked look reads.
Background & borders cut
- Background full top: cut background fabric to 91″ × 99″ (raw) to allow 1–2″ extra per side for quilting & trimming. You will trim to final 88″ × 96″ after quilting. If your fabric isn’t wide enough, join selvedges to get enough width.
- Binding strips: If you want 2¼” finished binding, cut 6 strips 2½” × WOF. (You can also use background for binding.)
Step 1 — Prepare appliqué shapes
I recommend fusible web appliqué for clean, fast results; raw-edge machine blanket/zigzag is modern and looks great with dense quilting.
- Trace templates: make cardboard templates for each layer width and star. Trace onto fusible web paper (paper side up).
- Fuse: iron fusible web to wrong side of each tree fabric piece following manufacturer directions. Let cool and peel paper.
- Cut each layer carefully on the drawn outline. If you prefer a turned-edge look, add 1⁄8″–1⁄4″ around the template when cutting and turn the edge under. (Fusible web technique generally doesn’t need turned edges.)
- Prepare stars: trace star templates (1″, 1½”, 2″ finished sizes) on the fusible, cut and set aside.
Step 2 — Design wall layout & marking the background
- Press your large background piece flat. Lay it out on a large table or design wall.
- Measure column positions: measure 16″ in from the left edge — this is the centerline of the left column of trees. Measure 16″ in from the right edge for the right column centerline. (These numbers produce the look in the photo; if your top is slightly narrower/wider, adjust so columns are visually balanced.) Mark those vertical centerlines lightly with a washable fabric pencil or chalk.
- Mark tree center points: divide the vertical center area into 9 equal vertical spaces and place the tree centers there. Practically: mark positions so the stack of 8 trees extends from about 6″ from the top to 6″ from the bottom with even spacing. You can measure by dividing the height of the top (96″) minus top & bottom margins by the number of gaps. Example: if you leave 6″ margin top & bottom, usable height = 84″; spacing between centers = ~10.5″ (84″/8). Mark centers along the column lines at those intervals.
Step 3 — Applique the trees
Work column by column.
- Fusing: starting with the smallest tree at the top, place the bottom (largest) layer first and build upward OR place the layers stacked as you want them and fuse from bottom layer to top — either order works. I recommend overlapping layers slightly (about ⅛”–¼”) so edges tuck and look like a single tree silhouette. Important: place trunks centered under the stacked layers; trunks should be centered on the column centerline.
- Alignment: align each tree’s center with the marked center point on the quilt background. Keep consistent spacing for a tidy look.
- Press to fuse each layer to the background following fusible web instructions; press firmly and let cool.
- Stitching the applique (recommended): for durability and visual definition use a small zigzag or blanket stitch around each applique piece:
- Use thread in a coordinating color (medium blue/indigo) or neutral white for subtlety.
- Stitch close to the edge (test on scraps to get the tension/width right).
- Stitch around the star last.
If you prefer raw-edge fused look, you can skip stitching, but for a quilt that will be laundered often, at least a straight-stitch or small zigzag is recommended.
Step 4 — Add stars above each tree
- Place gold stars about ¼” above each tree top (centered on the tree). Fuse and then stitch around with a small zigzag or satin stitch for stability. Stars are small focal points — use a slightly contrasting thread for a delicate outline if you like.
Step 5 — Add small background details (optional)
The photo shows a few little tiny appliqué dots/stars interspersed. If you want, add small applique dots (⅝”–1″ circles) around the tree columns to echo the “snow” — fuse and tack-stitch.
Step 6 — Baste the quilt sandwich
- Layer backing (wrong side up), batting, and quilt top (right side up), smoothing as you go.
- Baste with safety pins every 4–5″ or spray-baste on a clean surface. Start basting in the center and move outward to avoid ripples.
Step 7 — Quilting (the look that makes this quilt sing)
This quilt’s magic is the densely quilted white background: feathers, swirls, and pebbles. If you have a longarm or domestic machine with free-motion skills, do the following. If not, you can hire a longarm quilter or do an alternate straight-line design with a walking foot.
Recommended quilting plan:
- Trees and stars: quilt around each applique with a narrow echo (¼”–⅜”) to make them pop. You can echo several times outward. Use a slightly darker thread for the first echo and then switch to neutral for background if you want depth.
- Background: densely quilt swirling paisleys and pebbles. Pattern sequence:
- Large, flowing paisley/feather motifs filling the major negative space — these are the elongated feather curls you see. Work one large feather at a time, fill the inner areas with smaller feathers.
- Fill smaller spaces with pebbles (clusters of small round pebble quilting — ¾”–1½” diameter) and tiny circular stipples to read as snow.
- Create subtle directional flow that swirls around the tree columns — echo the tree columns with faint columns/echo lines to keep attention on the center.
Stitch density: overall fairly dense — aim ~6–8 spi in detailed pebble areas; 3–4 spi in open large swirls. Use neutral thread (white/ivory) for continuity; you can use slightly darker thread for echoes near the applique to help them read.
Tips for quilting:
- If free-motion, work from the center outward. Use a darning foot and lower feed dogs.
- If using a walking foot and marking, you can create a flowing wavy grid and then add pebbles inside.
- Practice feather & pebble motifs on a scrap sandwich to decide sizes and spacing.
Step 8 — Trimming, binding, finishing
- Trim the quilt to 88″ × 96″ finished after quilting (square edges).
- Prepare binding: 2½” × WOF strips joined end-to-end to make one continuous binding strip. For a 2¼” finished binding, use 2½” raw strips. You’ll need about 8 strips (depends on width of fabric); if using background fabric for binding you already have lots of white; using a dark contrast can frame the quilt nicely.
- Attach binding: sew to front with ¼” seam, fold to back, and hand-stitch for a clean finish (or machine stitch the back with a narrow stitch).
- Add a label and gently wash on a delicate cycle (if desired) to fluff the texture and accentuate pebble quilting.
Tips & troubleshooting
- Value contrast is key. Use a mix of lights, mediums, and dark blues so each tree layer reads separately — the layered look depends on contrast more than exact pattern match.
- Spacing: make sure you mark the column centerlines and tree centerpoints accurately so both columns remain parallel and balanced.
- Applique durability: if the quilt will be washed often, stitch the applique with a small satin/zigzag to secure the edges; fusible alone won’t hold forever.
- Quilting complexity: if dense free-motion swirls are intimidating, hire a longarm quilter and request “dense feather & pebble fill.” Give them this picture or this quilting plan — it’s a classic longarm motif.
- Pressing: press applique layers lightly from the back (use press cloth for delicate prints) so they sit smoothly without flattening texture.
Yardage summary (again)
- Background: 7 yards (top + binding allowance)
- Tree fabrics (assorted blues): 2–2½ yards
- Star (gold): ½ yard
- Backing: 9 yards (or adjust if you have wide-back)
- Batting: one piece 92″ × 100″
Quick construction checklist
- Cut background to 91″ × 99″ raw; press.
- Make cardstock templates for layers and stars.
- Cut & fuse appliqué pieces from assorted blues & gold.
- Mark column centerlines and tree centers on background.
- Fuse & stitch applique trees and stars in place.
- Baste sandwich.
- Quilt with dense feathers, swirls, and pebbles (echo applique).
- Trim to 88″ × 96″.
- Bind, label, and finish.