 by
by Overview (what you’ll make)
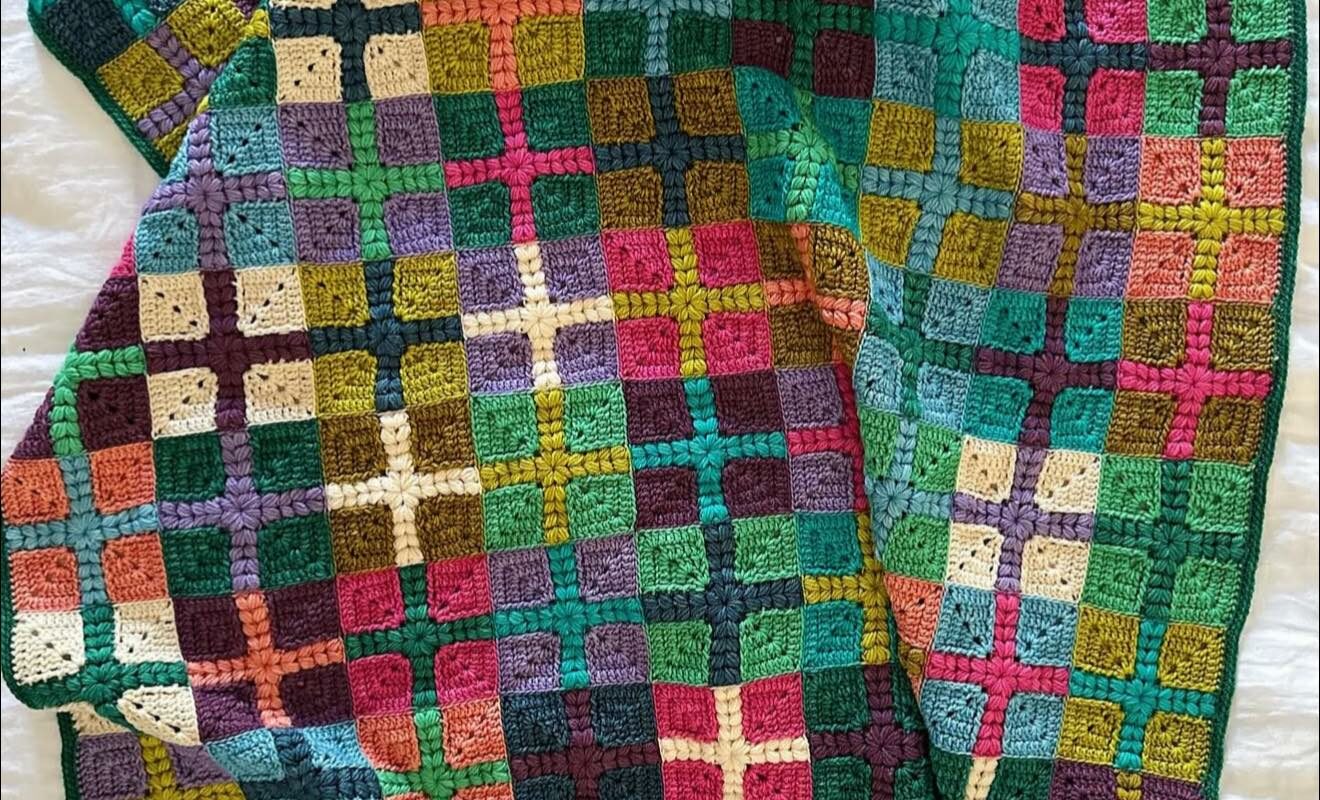
A blanket made of mini granny squares joined into a grid. The joining technique uses a contrasting yarn worked across the seams so that where four squares meet a bold raised “plus/cross” appears — exactly like the photo. The pattern is modular, so you can make any size by adding or removing squares.
Materials
- Worsted/Aran weight yarn (category 4) — several colors (main palette) + one contrasting “join” color for the plus/cross lines and a final border color (the photo uses a dark green for edges).
- Suggested fiber: acrylic, wool, cotton or blends — consistent weight across colors.
- Crochet hook: 4.5 mm (G/7) or 5.0 mm (H/8) depending on your tension — choose the hook that gives you the stated gauge or your preferred drape.
- Tapestry needle for weaving ends.
- Scissors.
- Blocking pins / mat (optional but recommended).
- Stitch marker (optional).
Abbreviations
- ch = chain
- sl st = slip stitch
- sc = single crochet
- dc = double crochet (US)
- tr = treble crochet (US) — only if I mention it
- cluster (cl) = make a 3-dc cluster: yarn over, insert, yarn over pull through, yarn over pull through 2 (repeat to create 3 partial dc’s then yarn over and pull through all loops) — I’ll give cluster details when used.
- RS = right side
- WS = wrong side
Finished sample sizes (made with the motif below)
Pick one or scale it:
- Baby ~ 30″ x 36″ — 6 × 8 squares (48 mini-squares)
- Lapghan / stroller throw ~ 36″ x 48″ — 8 × 10 squares (80 mini-squares)
- Throw ~ 50″ x 60″ — 10 × 12 squares (120 mini-squares)
These sizes assume each finished mini-square is ~5″ square. If your gauge differs, adjust counts.
Gauge (important for size planning)
- 3 rounds mini-square = ~5 cm / 2 in square using 4.5–5.0 mm hook (this will vary by yarn and hook).
To make sizes match the examples, measure one finished mini-square and multiply.
Pattern concept (short)
- Make mini granny squares: small 3-round squares.
- Arrange squares in a rectangular grid.
- Join squares using a visible join color and technique that creates a raised bar across every seam. At intersections where bars cross, they form a raised plus.
- Add a simple border in a coordinating color.
The mini granny square (the building block)
Make each mini-square in 3 rounds. Each round uses clusters so the fabric has a textured look.
Mini Granny — finished square = approx 5 cm / 2 in (adjust hook if needed)
- With Color A (main color), make a magic ring (or ch 4 and join to form ring).
- Round 1: ch 3 (counts as first dc), work 2 dc, ch 2, 3 dc into ring (first corner). Ch 1, (3 dc, ch 2, 3 dc) into ring — repeat * across to make 4 corners total. Join with sl st to top of starting ch-3. (You have 4 corner spaces with 3-dc groups separated by ch1 spaces.)
- Round 2: sl st into first ch-1 space (the side space). Ch 3 (counts dc), work 2 dc in same ch-1 space, ch 1, then in next ch-2 corner space work (3 dc, ch 2, 3 dc), ch 1; continue * along each side: in each side space (the ch-1) work 3 dc, ch 1; in each corner (ch-2) work (3 dc, ch2, 3 dc). Join with sl st to top of ch-3.
- Round 3: Repeat Round 2. (This gives a slightly larger square; if you want your squares slightly taller, you can do a fourth round repeating the pattern.) Fasten off and weave ends.
Notes:
- If you prefer a more solid square, replace side “3 dc, ch1” with (2 dc, ch1, 2 dc) to tighten; but the 3-dc gives the textured look in the photo.
- Make squares in many colors — pick randomly, or plan a palette.
Layout
- Decide width × height in squares (for example, 10 × 12 for a throw).
- Lay squares right-side-up on a flat surface in the color arrangement you like. The photo uses a semi-random scrappy layout with repeats of teal/greens, pinks, neutrals and purple accents.
Join method that creates the raised “plus” (the Cross-Join)
This is the key trick. We will join squares with a contrasting join yarn worked as a line of raised slip stitches or single crochet across seam lines so that each seam becomes a visible bar. Where two seam lines cross (at the spot where four squares meet) the bars cross and visually create the plus sign. Use the same contrasting join color across the whole blanket for the grid effect.
Two good options:
- Option A — Raised Single Crochet Join (recommended for a clear raised bar)
- Option B — Surface Crochet Cross Join (creates very raised crosses)
I’ll describe Option A (Raised Single Crochet Join) in detail — it’s sturdy and very similar to the photo.
Option A — Raised single crochet seam (row-by-row join)
We will join squares into strips, then join strips.
Step 1 — Join squares into horizontal strips
- Place two squares RS facing you, with their right sides up (we’ll join seam edge-to-edge). Align them so their edges meet. With the join color and your hook inserted from the back through the corner of first square, pull up a loop and sl st into the corner to anchor (or start with a ch 1 and sc in the corner).
- Work raised sc (front post or surface sc) along the edge: insert hook through the loop between stitches on the edge of the first square and into the corresponding loop on the second square, pull yarn up and work a sc through both loops — effectively making a sc that connects both squares and sits on top of the seam. Work evenly across; when you reach the corner, work into the corner ch-2 space of both squares with a sc to secure. Fasten off.
Notes on technique: You want the seam to have a visible rib or bar. To make it raised, work sc from the front into the spaces so the stitches sit prominently. If you prefer a rounded bar, work a row of sc along one square first, then join to the second square with slip stitches into the sc row of the first — but the direct sc joining is simpler and gives the linear bar.
- Continue joining squares across the row until you have a horizontal strip of your desired length.
Step 2 — Join strips vertically
- Stack two completed horizontal strips so the RS of both face up and align them. Using the same contrasting join color, join them using the same raised sc method along the vertical seam between strips. Work down the entire length of the strip. The vertical bar will cross the horizontal bars at each intersection. Because the join yarn sits on top, the cross appears raised — a plus where four squares meet.
- Repeat until all strips are joined into the full blanket.
Tips:
- Keep tension even when joining — too tight makes the blanket pucker.
- If your squares vary in size slightly, insert fewer/more join stitches across that edge and adjust so the seam lies flat.
Alternative: Join-as-you-go (JAYG) for a continuous plus
If you prefer fewer ends to weave, you can use a join-as-you-go method where you join each new square to its left neighbor (and the strip below) with the join color so the bars form naturally as you work. This is more advanced but reduces finishing.
Basic JAYG idea:
- Make a square, leave long tail of join color, but instead of fastening off your last round, slip-stitch along the edge to meet the previous square and work the raised sc join into the finished neighbor. Repeat to add squares and get crosses where four meet.
Making the plus look like the photo (slightly puffed/clustery)
In the photo, the bars look slightly tactile (puff-like). To mimic that:
- Use a cluster stitch instead of sc for the join line:
- Work a line of 3-dc clusters through the seam spaces (insert through both squares’ side loop/spaces), pull up clusters so they sit a little taller than the square faces.
- At each corner/intersection, switch to a single shorter stitch (sc) to keep corners neat.
- Or after joining, use surface crochet to make a line of triple chains or slip stitches along the seam to create a raised effect.
Either approach makes the plus more pronounced.
Border (to finish and match the photo)
- Once the blanket is fully joined and squares are pressed/blocked, pick the border color (photo uses a deep green).
- Round 1 (evening out): With RS facing, join yarn at any corner. Work 1 round of sc evenly around the whole blanket, placing (3 sc) in each corner to keep corners flat. Keep stitches even so edge is square. Fasten off.
- Round 2 (decorative): Work a round of dc or shell stitches: e.g., (sc in next 2 st, 5 dc in next st, sc in next 2 st) around—this gives a scalloped edge; or keep it simple with another round of sc then a final round of slip stitches in contrasting color for a neat finish. The photo shows a single narrow border in a contrasting color; two rounds (sc then sl st) will replicate that clean look.
Weaving in ends and finishing
- Weave each yarn tail into the wrong side with a tapestry needle, following the stitches so ends are secure.
- Block the blanket flat: pin to shape and spray or mist with steam (check yarn care) to relax joins and make the grid even. Blocking makes the crosses sit nicer and flattens puckers.
Yarn quantities (approximate)
These are estimates — actual needs depend on yarn weight, hook, and blanket size:
- Baby (6×8 squares ≈ 48 mini-squares): 6–10 skeins total of worsted weight if each skein is 100 g (depends how many colors). Join color: about 1 skein. Border: about 1 skein.
- Lapghan (8×10 ≈ 80 squares): ~12–16 skeins total; join color 1–2 skeins; border 1 skein.
- Throw (10×12 ≈ 120 squares): ~18–25 skeins; join color 2 skeins; border 1–2 skeins.
If you plan many colors, estimate 20–60 g per color for scrappy style. Buy extra of the join and border color — you’ll need that consistently across the whole blanket.
Step-by-step summary (quick reference)
- Choose yarn, hook and final size (squares across × down).
- Make mini granny squares in chosen colors — 3 rounds each (or 4 for bigger squares). Make the required number for your layout.
- Block squares lightly if desired for even joining.
- Join squares into horizontal strips using the raised single crochet join in the contrasting join color — this forms horizontal bars.
- Join strips to strips using the same join color; vertical bars will cross horizontal bars forming the pluses at intersections.
- Weave in ends as you go or at the end.
- Add border rounds in border color: 1 round sc, then a finishing round (sl st, sc, or decorative shell).
- Final block/press and trim any remaining loose ends.
Tips & troubleshooting
- If seams pucker: use a bigger hook when working the join or reduce density of join stitches.
- If joints aren’t showing well: switch to a slightly thicker join yarn or use cluster stitches for a taller bar.
- Want fewer ends? Try join-as-you-go (JAYG) or join squares into strips first, then weave long tails into joins as you attach strips.
- Want the crosses sparser like the photo (some pluses stronger than others)? Vary the join color intensity or make every 3rd seam in the join color and others in a subtler tone. The pictured blanket looks scrappy but consistent — using the same join color across the whole blanket gives the strongest grid effect.
Variations and design ideas
- Use a neutral join color for a subtle grid, or a bold contrasting color (like the photo’s green) for a graphic effect.
- Try making some squares with a lighter center color (as in the picture) to mimic the highlighted crosses.
- Make larger “blocks” by combining 4 mini-squares into one larger motif before joining for fewer joins and a bolder look.