 by
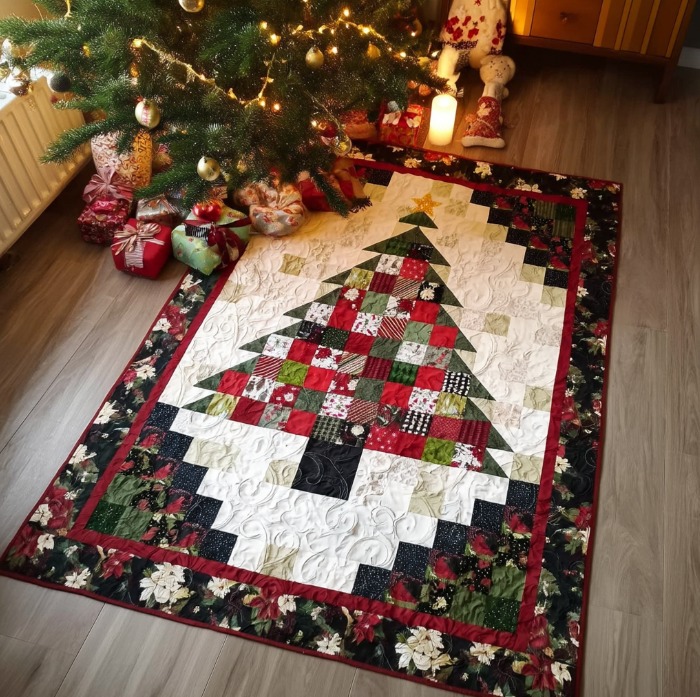
by Finished sample (this write-up)
- Grid: 13 columns × 17 rows of small squares
- Each square finishes at 2½” (that is, after sewing) → CUT size = 3″ × 3″ (2½” finished + ¼” seam each side)
- Finished quilt top before outer binding and quilting ≈ 32½” × 42½” (13 × 2½” by 17 × 2½”)
- With borders (1″ inner + 3″ outer finished) final quilt ≈ 38½” × 48½” (approx lap/throw)
If you want a bigger or smaller quilt, I include scaling notes near the end.
Materials
- Assorted cotton quilting fabrics (scrappy greens, reds, plaids, florals) for the tree: approx 1–1½ yards total scrappy (see fabric estimate below).
- Background fabric (solid cream/ivory/white) for negative space: ~2¼ yards.
- Trunk fabric (dark brown/black): ¼–½ yard.
- Inner narrow border (deep red): ⅓ yard.
- Outer floral border (feature fabric): 1–1¼ yards.
- Backing fabric: 3½–4 yards (to match finished quilt size + 8–10″ extra for quilting).
- Batting: one piece approx 42″ × 50″ (or a 45″ × 60″ batting you can trim).
- Rotary cutter, mat, 6″×24″ ruler (or similar), scissors.
- Sewing machine, ¼” presser foot (recommended), thread, pins/clips.
- Iron and ironing board.
- Quilting pins or basting spray, safety pins, or longarm/basting method of choice.
- Binding fabric: ¾–1 yard (or use leftover border fabric).
- Optional: walking foot if quilting on a domestic machine.
Cutting (exact)
All cuts assume squares are cut 3″ × 3″ (this yields 2½” finished after ¼” seam allowance on each side).
- Total squares: 13 × 17 = 221 squares.
I give a full layout map below that shows which position is tree, trunk, star, or background. From that you’ll cut exactly the counts you want. For a quick scrappy build, cut:
- Background (cream/white): 115 squares (approx estimate below)
- Tree (greens / red ornaments / prints): ~92 squares (includes the star and any ornament/red squares)
- Trunk (dark): 6 squares (3 wide × 2 high)
(These add to 221 — see exact row map next.)
Border cuts (finished sizes):
- Inner narrow red border — finished width ½”–¾”: cut 2 strips width-of-quilt + 4″:
- If finished width ½” (very narrow), cut strips 1″ wide. If you prefer a ¾” finished inner border cut 1¼” strips. I used 1″ cut strips for a slim red accent in the sample.
- Outer floral border — finished 3″: cut strips 3½” wide (3″ finished + ½” total seam) — cut lengths to match vertical/horizontal needs: you will need 2 strips the full width + 2 strips the full height after adding the inner border. See assembly below.
Yardage estimates (approx):
- Background: ~2¼ yards
- Scrappy tree fabrics (greens, reds patterns): 1–1½ yards total (scrappy fat quarters would work well)
- Trunk: ¼–½ yard
- Inner red accent: ⅓ yard
- Outer floral border: 1–1¼ yard
- Backing: 3½–4 yards
Adjust if you want larger margins or wider borders.
Layout map (13 × 17 grid)
Numbering columns 1..13 left→right, rows 1..17 top→bottom.
I mark:
- B = Background (cream/white)
- T = Tree (greens / red ornament squares / mixed scrappy)
- S = Star (top center)
- U = Trunk (dark)
Row by row (each row has 13 positions). I’ll show each row as 13 letters:
- B B B B B B S B B B B B B
- B B B B B T T T B B B B B (tree @ cols 6-8)
- B B B B T T T T T B B B B (cols 5-9)
- B B B T T T T T T T B B B (cols 4-10)
- B B T T T T T T T T T B B (cols 3-11)
- B B T T T T T T T T T B B (cols 3-11)
- B T T T T T T T T T T T B (cols 2-12)
- T T T T T T T T T T T T T (cols 1-13)
- B T T T T T T T T T T T B (cols 2-12)
- B B T T T T T T T T T B B (cols 3-11)
- B B T T T T T T T T T B B (cols 3-11)
- B B B T T T T T T T B B B (cols 4-10)
- B B B B T T T T T B B B B (cols 5-9)
- B B B B B T T T B B B B B (cols 6-8)
- B B B B B U U U B B B B B (trunk: cols 6-8)
- B B B B B U U U B B B B B (trunk: cols 6-8)
- B B B B B B B B B B B B B (ground row — all background)
This map matches a centered, symmetric tree with a small star at row 1 col 7 and a 3×2 trunk near the bottom. Use this map to place fabrics: pick a mix of greens/pine plaids for T squares, sprinkle in a handful of red/print squares for “ornaments,” and place 1–2 golden/yellow squares at the top for the star (S) — you can also use a small metallic print.
Counts from this map
- Tree (T): 92 squares
- Star (S): 1 square
- Trunk (U): 6 squares
- Background (B): 122 squares
- Total: 221 squares
(If you want exact counts by color e.g., how many dark greens vs light greens, split the 92 tree squares however you like — scrappy looks great.)
Step-by-step construction
1) Cut all squares
- From background fabric, cut 122 squares 3″×3″.
- From various tree fabrics, cut ~92 squares 3″×3″ (mix greens, plaids, reds for ornaments).
- From trunk fabric, cut 6 squares 3″×3″.
- Cut inner red border strips (see above) and outer floral border strips now or later.
Tip: chain-piece your cutting — stack several layers and cut multiple layers at once if your tools and fabric allow.
2) Arrange the squares
- On a design wall or flat floor, lay out the full 13×17 grid following the layout map. This step is crucial so you can audition placement of scrappy greens and ornament/red squares.
- Pay attention to balancing dark and light greens for depth. Place reds sparingly so “ornaments” pop.
3) Sew in rows (piecing)
We’ll piece the top row by row (13 squares per row). Use ¼” seam allowance.
- To speed up, chain piece each row: place two adjacent squares RS together and sew along one edge, continue adding squares in the row sewing each new square to the previous, trimming threads between chain segments if desired.
- Press seams open or to one side — many prefer pressing to one side for less bulk; if you press to the side, press alternating rows opposite directions when you join rows (to help seams nest). I recommend pressing seams open for this dense small-square quilt (reduces bulk at intersections).
Row order: work top-to-bottom (rows 1 → 17) or any order you like, but keep neat.
4) Join rows into the full panel
- After all 17 rows are finished (each 13 squares sewn), join rows together, matching seam intersections carefully to preserve the pixel tree motif. Use pins at intersections to make seams align well.
- Sew rows together with ¼” seam allowance. Press seam allowances open (or press alternating directions so seams can nest). Open pressing will reduce bulk where four seams cross.
Tip: With small squares, accurate ¼” seam and consistent stitching are essential so grid lines stay straight.
5) Add inner narrow red border
- After the center panel is assembled and pressed, add the inner narrow red border: with RS facing, sew red strip along the two long sides and two short ends. (If your red strips were cut 1″ wide, they will finish about ½” width after sewing.) Press toward the border.
6) Add outer floral border
- Measure the quilt top after inner border is added. Cut floral border strips 3½” wide to the correct lengths (two widths and two heights accounting for seam allowances).
- Sew the long side borders first, press, then sew on the top/bottom strips. Press.
7) Square up the quilt top
- Trim any uneven edges so the outer border is straight and the quilt is square.
Basting & Quilting
Basting
- Layer backing (right side down), batting, then quilt top (right side up). Smooth and baste using safety pins, basting spray, or your preferred method. Make sure layers are flat and smooth.
Quilting ideas (to match the cozy feel)
- Meandering/free-motion stipple: a classic choice that keeps the patchwork readable and gives a quilted texture.
- Echo quilting around tree silhouette: trace the outline of the tree with an echo (2–3 lines spaced) and fill the background with loose meandering. This will make the tree “pop.”
- Feather or swirl motifs in the outer floral border that echo the floral print.
- Looping motifs inside the tree for a whimsical look, or a simple straight-line grid quilting (horizontal/vertical lines quilted every 1″–1½”) for a modern pixel look.
Use a thread color that complements — cream thread will blend into the background; a green thread will emphasize tree quilting lines.
Binding
- Trim quilt and square up. Prepare binding strips (typically 2½” wide binding strips for a ¼” seam and ¼” folded binding; but you can use 2¼” if you prefer). Cut on the bias only if throwing on curved edges (not necessary here). Join strips into one continuous strip, press in half lengthwise.
- Machine sew to the front using ¼” seam, fold to back and hand-stitch or machine stitch for a neat finish.
Finishing touches
- Label the quilt with date/name.
- Give it a gentle pressing on the front/back.
- Wash according to fabric/batting care before gifting or use (pre-washing fabrics and batting recommendations vary).
Tips & Variations
- Scale change: To double the finished size, make each square finish 5″ (cut 5½”). Or change the grid to a larger/smaller column/row count and keep squares the same 2½” finished — the same design logic applies.
- Star & ornaments: For a sparkly star, use a golden metallic quilting cotton or a yellow print. For ornaments, choose a few vibrant reds/metallics and distribute them across the tree.
- Scrappy variation: Use many small scraps and fat quarters — this quilt is ideal for stash-busting.
- Softer look: Use tone-on-tone prints for tree squares for less contrast.
- Quilting emphasis: Quilting lines can follow the grid (quilt every 1½” vertically and horizontally) to create a stitched pixel effect.
Troubleshooting & Hints
- If seams don’t line up exactly at intersections: don’t worry — small offset is typical with so many small squares. Try pressing seams open next time or pin carefully; chain piecing and consistent ¼” seam help reduce mismatch.
- Maintain accurate ¼” seam allowance: use a quarter-inch foot or mark the plate of your machine.
- Keep consistent cutting: small errors in cutting multiples of squares will compound; stack-cut when possible.
Quick materials recap (for shopping)
- Background: 2¼ yd
- Assorted tree scrappy fabrics: 1–1½ yd total (or 10–15 fat quarters)
- Trunk: ¼ yd
- Inner accent red: ⅓ yd
- Outer floral border: 1–1¼ yd
- Backing: 3½–4 yd
- Batting: 42″×50″ (or similar)