 by
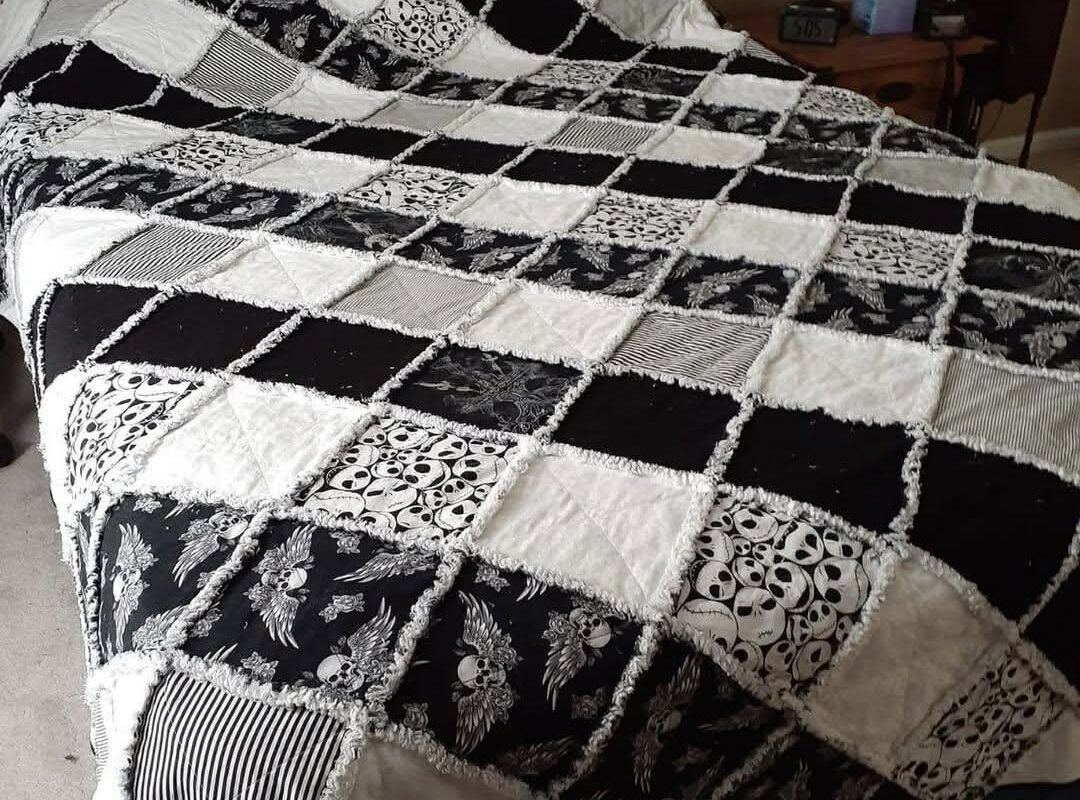
by Short, punchy, and exactly what this quilt is: black (“Midnight”) and white/cream (“Chalk”) squares with the soft ragged seams that give it texture and attitude.
Below is a complete, step-by-step tutorial that shows you how to recreate the exact look — the black & white scrappy squares, the exposed rag seams, and the diamond/diagonal quilting look. I give a clear cutting plan, sewing order, clipping guide, washing/fraying method, finishing and helpful troubleshooting tips. I also include a sample layout for a bed-sized quilt (queen/large bed) and notes to scale up or down.
Quick overview (what you’ll make)
A monochrome rag quilt made from 7″ cut squares (finished 6″ blocks after ½” seams), arranged in a rectangular grid (sample: 14 × 16 grid = 224 blocks) sewn together with ½” seam allowance, all seam allowances left exposed and clipped; after laundering the clipped seams fray into the classic ragged look. The quilt is quilted in diagonal lines to emphasize the diamond effect and has a rag border.
Materials
- Assorted quilting cottons in black + black prints + white/cream prints (mix of solids, stripes, skulls, florals as in photo). Aim for strong contrast.
- Lightweight batting sheets (Fusible or regular 100% cotton or cotton/poly batting). For rag quilts you use thin batting so seams fray easily — approx 80–100gsm.
- Backing fabric (a single fabric or scrappy back) — you’ll cut backing squares the same size as top squares or use wide backing if sewing from yardage.
- Thread: good quality 50wt cotton/poly, neutral or matching.
- Rotary cutter, mat, 6″×24″ ruler (or similar).
- Sewing machine with ½” seam guide (you can mark plate). A walking foot helps.
- Pins / clips, seam ripper, scissors.
- Washing machine & dryer (for fraying).
- Iron & pressing surface.
Yardage estimate (sample queen-size 14×16)
- Squares cut 7″ × 7″ — total squares = 224
- Scrappy black prints: ~110 squares
- White/cream solids & prints: ~110 squares
- (Balance depends on your design; above is roughly half/half.)
- Batting: about 4 yards (or a 90″×110″ piece to be trimmed) — but for square-by-square layering you can use small batting squares cut to match.
- Backing: 4–5 yards if using yardage; less if you piece the back from squares.
- Binding (if you prefer) or extra border fabric: ¾–1 yard.
If you want a smaller throw: use a 10×12 grid or fewer squares — see “scaling” section below.
Tools & techniques glossary (short)
- Rag quilt: a quilt where seam allowances are left on the exterior and clipped so they fray after washing, creating a soft fuzzy ridge where pieces join.
- ½” seam: rag quilts usually use a ½” seam allowance (not ¼”) so you have enough fabric to clip and fray. In this tutorial we use ½”.
- Clipping: cutting short slits into the seam allowance near the seam so the raw edges will fray. Clip to about 3/8″–½” from the stitching line.
Cutting (exact for sample 14×16 quilt)
Decide finished block size. In this tutorial:
- Finished block = 6″ square (the visible square in the quilt after sewing).
- Seam allowance = ½” on each side.
- Cut size = finished + 2×seam = 6″ + 1″ = 7″ square.
Sample quilt (queen/large bed):
- Grid: 14 columns × 16 rows = 224 squares.
- Cut 224 top squares (mix of black prints and white/cream fabrics — choose how many of each based on the photo or your preference).
- Cut 224 backing squares (either the same fabric as top for each block, or use one continuous backing yardage and cut larger backing strips — see options below).
- Cut 224 batting squares, each 6½” × 6½” (slightly smaller than the fabric square so the batting doesn’t get clipped). I recommend cutting batting about ¼” smaller than the fabric so batting is entirely inside the seam and won’t be clipped (e.g., if fabric squares are 7″, cut batting 6½”).
If you’re making the throw smaller: choose a smaller grid — for example 10×12 = 120 blocks; keep the same 7″ cut size and change counts accordingly.
Design / layout
- Lay out the 224 top squares in a checker/scrappy pattern on a design wall or floor. The photo shows a high-contrast distributed scrappy layout: alternate clusters of black/print and white/cream to create diagonal emphasis.
- Aim for balance: scatter the large/strong prints rather than clustering them too tightly unless you want that effect.
Tip: take a phone picture of your layout — it helps when moving pieces.
Construction — the step-by-step method
There are two common rag quilt methods. I describe the sandwich-and-sew grid method (most forgiving and very similar to the photo). This method makes a quilt that is warm and has a nicely ragged seam line.
STEP 1 — Make block sandwiches
For each position make a three-layer sandwich:
- Place Top fabric square right side up.
- Center a batting square on top (approx 6½”). (The batting is slightly smaller so it won’t be clipped.)
- Place Backing fabric square right side down on top of the batting (so right sides of top and backing face out when the sandwich is turned).
- Pin the three layers together lightly at the center.
You will have 224 sandwiches. (If you prefer: you can use a continuous backing and cut fewer backing squares — see variations below.)
STEP 2 — Sew squares into rows
We will sew the sandwiches together, right sides facing, using ½” seams and leave seam allowances exposed.
- Arrange blocks in the first row (14 sandwiches in order).
- Take the first two sandwiches, place them right sides together matching edges, and align centers. Sew a ½” seam along the edge (full length). Press seam open (or press towards one side — open is common to reduce bulk).
- Continue adding the third sandwich: place the sewn pair and the next sandwich right sides together, sew ½” seam, and so on across the row until the row has 14 blocks joined. Chain-piecing speeds this.
- Repeat for all rows (16 rows total).
Important: Keep your seam allowance accurate — use the ½” guide on your machine or a ½” presser foot. Consistent seams make the grid even and the rag lines neat.
STEP 3 — Sew rows together to form the quilt top
- Once rows are finished, place two rows with RS together and match the seam intersections as best you can. Pin at intersections (especially where four corners meet) so the squares align.
- Sew the rows together using ½” seam. Press seam allowances open. The quilt top is now formed — you’ll see the seam allowances on the outside (they will be the “rags”).
STEP 4 — Add an outer border (optional)
If you want a rag border like the photo has a framed edge, add extra border strips or make the outermost squares wider. Two options:
- Option A — rag border with strips: sew 7″ wide fabric strips (or two strips) around the perimeter as you would rows, continuing the rag seams and using the same ½” seam + clipping treatment.
- Option B — square border: add an extra row/column of 7″ squares around the panel so the edges are already ragged like the interior. (The photo shows a full framed edge where the last squares give a ragged outer perimeter; choose whichever you like.)
STEP 5 — Clip the seam allowances
Clipping is what makes rag quilts fray prettily.
- Using sharp scissors, clip the seam allowance every ¼”–⅜” along every seam, cutting through the seam allowance to about ⅜”–½” from the stitching line (closer is fine but don’t cut the stitches).
- Clip all seam allowances on the top of the quilt (the exposed seams). If you used a continuous backing, you may need to clip both sides. The goal is short slits in every seam allowance to encourage fraying.
- Don’t clip the batting — remember why we cut the batting slightly smaller: so clipping won’t cut through the batting.
Pro tip: Clip slightly deeper on heavy woven cottons — the deeper the clip (within safety) the more pronounced the fray. But be cautious — never cut the stitches.
STEP 6 — Launder to fray
- Place the whole quilt in the washer (cold to warm) with a handful of towels to help agitate and start fraying. Use a gentle or normal cycle depending on fabric.
- Dry the quilt in the dryer until fully dry — the agitation and tumbling cause the clipped seam allowances to fuzz and fray into the rag look. Repeat washing/drying once more if you want a fuller fringe.
- After drying, use your fingers to tease any stubborn threads if you want a more uniform look.
Warning: The first few washes may shed lint — wash with towels and be prepared to clean the lint trap. If you don’t want lint in the machine, do the fraying outside (hands-on clipping/teasing), but machine washing gives the softest rag edges.
Quilting the layers (diamond/diagonal quilting like photo)
The photo shows subtle diagonal quilting giving a diamond texture. You can quilt in several ways; here are two options that suit this style:
Option 1 — Stitch-in-the-ditch/diagonal grid
- Using a walking foot, stitch straight lines diagonally across the quilt every 4–5 inches to create diamonds. The lines will emphasize the square grid and give the visual diamond effect. Choose neutral thread (white or light grey) or contrast for emphasis.
Option 2 — Free-motion meander
- Free-motion quilt a loose meander pattern across the whole quilt to add texture while letting the rag seams dominate visually.
When to quilt?
- You can quilt before clipping (quilt the whole quilt top/backing/batting sandwich while seams are still unfrayed — safer), or after a gentle pre-wash. Quilting before clipping keeps the layers stable as you launder the top to fray.
I recommend: assemble → baste → quilt → clip → launder. This preserves quilting integrity.
Binding or edge finish
Rag quilts typically have exposed seam edges rather than traditional folded binding. If you added outer rows/strips and clipped, that is your edge. If you prefer a tidy finish, add a narrow folded binding after washing — but be aware the rag aesthetic is best with raw clipped edges.
If you want a framed look with a clean binding: sew a 1½” binding, attach in traditional manner after washing and trimming.
Finishing & care
- After the first laundering/drying, trim any excessively long loose threads for a tidy look.
- The quilt will continue to soften and fray slightly over time and washes — that’s the charm.
- Machine wash cold, tumble dry low. Avoid bleach. Expect some lint in the dryer the first few cycles.
Troubleshooting & tips
- Seams puffing or bulky intersections: use lightweight batting and press seams open. Sewing with consistent ½” seam reduces bulk.
- Seams not fraying enough: clip slightly deeper and launder again. Use agitation (towels) to increase fray.
- Too much fraying (holes develop): reduce how deep you clip or use slightly larger batting squares so the seam allowance has more fabric.
- Squares shifting while sewing rows: pin at intersections, chain piece thoughtfully, and keep seam allowance constant. A walking foot helps with layers.
- Lint in machine: clean lint trap often during the first launderings.
Variations & styling ideas
- Use flannel for an extra cozy rag quilt — flannel frays beautifully.
- Make the grid smaller (5″ finished squares) for a more “pixelated” look. Cut accordingly (finished + 1″ = cut size 6″ for ½” seams).
- Add a few accent metallic or embroidered squares for focal points.
- Make a completely scrappy back with leftover squares — it looks great and is efficient.
Recap — quick Make Plan (sample queen rag quilt)
- Cut 224 top squares 7″ × 7″ (mix black & white fabrics), 224 backing squares 7″ × 7″, and 224 batting squares 6½” × 6½”.
- Make 224 sandwiches (top right-side up, batting, backing right-side down).
- Sew sandwiches into 16 rows of 14 blocks each using ½” seams. Press seams open.
- Sew rows together to form the full top. Press seams open.
- Baste and quilt the full sandwich (stitch diagonal lines or meander).
- Clip seam allowances every ¼”–⅜”, taking care not to cut stitching or batting.
- Launder in the washing machine and dry to fray seams. Repeat wash/dry for fuller rags.
- Trim loose threads and finish edges (rag edge or binding).