 by
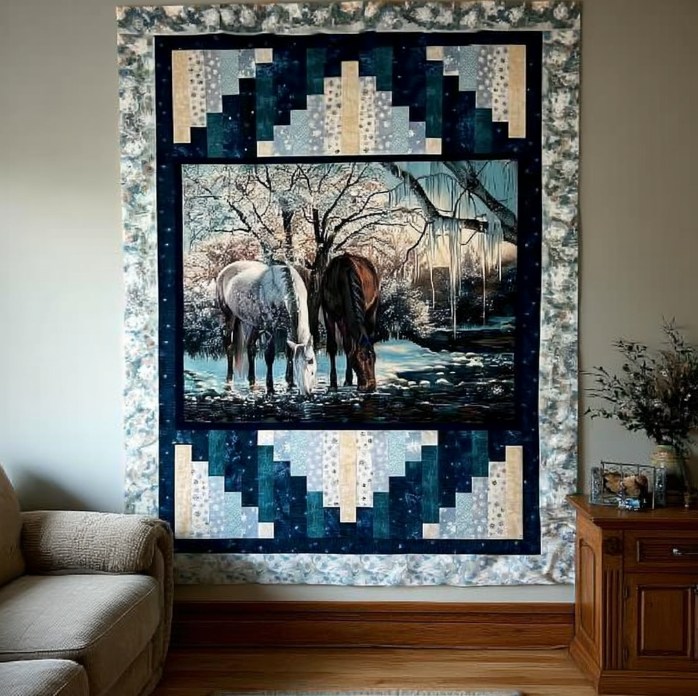
by Lovely quilt — warm, wintry panel with crisp log-cabin companions and a soft floral outer frame. Below is a full, step-by-step text tutorial that will let you recreate this exact look. I chose convenient, common block sizes so the math is simple and the sewing flows well. Read through once, then follow each step as you work.
Project summary (what you will make)
- Finished quilt size: 48″ wide × 84″ high (portrait wall quilt or lap blanket)
- Center panel: 36″ × 48″ (focal horse panel)
- Inner navy frame (surrounding panel): 2″ finished (top, bottom, left, right)
- Top & bottom pieced sections: Log-cabin style “stair-step” bands, each 12″ finished height, built from 6″ finished log-cabin blocks laid 6 blocks across (6 × 6″ = 36″ width to match panel) and two rows high (12″ total).
- Outer floral border: 4″ finished around all sides
- Overall construction strategy: Center scenic panel → add narrow navy frame → attach the top & bottom log-cabin bands to frame the panel → add outer floral border → quilt → bind.
Materials & tools
Fabric
- Scenic panel (horse panel) — 36″ × 48″ printed panel (or trim a larger panel to this size).
- Navy / deep blue for inner frame and log-cabin accents — 1 yard.
- Assorted blues/teals/ice creams for log-cabin strips (range of 4–7 coordinating fabrics; lights, mid, darks): 2½ yards total.
- Cream / warm neutral (to contrast blues): 1 yard.
- Floral print for outer border: 1½ yards (if 42–44″ wide fabric).
- Backing: 4.5–5 yards (estimate; depends on backing width).
- Batting: at least 56″ × 92″ (a little larger than the top).
- Binding: ¾ yard (or cut 2½” binding strips totaling approx 240″).
Notions & Tools
- Rotary cutter, cutting mat, quilting rulers (24″ and 6″ cubes helpful)
- Sewing machine with a reliable ¼” seam allowance (¼” foot recommended)
- Iron & pressing surface
- Pins / clips
- Walking foot (recommended for quilting)
- Safety pins or basting spray for sandwiching
- Optional: acrylic template for trimming log-cabin blocks to exact size
Cutting (make all cuts with right sides together where appropriate; widths given are finished unless otherwise stated)
Center panel
- If your purchased panel is larger than 36″ × 48″, trim it down to 36″ × 48″ (press first, square it, then trim).
Navy inner frame (finished widths)
- Cut (4) navy strips 2½” × 36½” for left & right inner borders (these include seam allowance; final sewn width = 2″).
- Cut (2) navy strips 2½” × 40½” for top & bottom inner borders (these include seam allowance).
Note: Measuring includes ¼” seam allowance on each side. If you prefer to cut finished widths differently, memorize that these strips will finish at 2″.
Log-cabin blocks (we will make 6″ finished blocks)
You will build 6″ finished log-cabin blocks assembled from narrow strips (a quick strip-pieced log-cabin method). You need 6 blocks across × 2 rows × 2 bands (top & bottom) = 24 blocks total.
To produce stable units quickly, cut strips for two widths:
- From assorted blues/teals/darks (mix of lights & darks): cut multiple strips 2½” wide (WOF — width of fabric) — you need enough length to subcut many 2½” × 6½” pieces; plan on cutting a total of (24 blocks × approx 8 strips per block) = a lot, so buy a variety. Practically:
- 3–4 prints at ⅓–½ yard each cut into 2½” strips
- 2 prints at ¼–⅓ yard each for medium values
- From cream/neutral fabrics: cut several 2½” strips (approx ½–1 yard total).
You will use 2½” strips to construct the rounds of the log cabin (see block construction). The finished block before trimming will be about 6½”, then squared to 6″ finished.
Outer floral border
- Cut (4) floral strips 4½” × 46½” (two for top & bottom) and 4½” × 52½” (two for sides). We’ll explain exact lengths in assembly — cut longer if you prefer to measure after the center is put together.
Keep extra strips handy — it’s easier to cut a little extra than run short while piecing.
How the log-cabin blocks are constructed (quick, repeatable method)
We’ll use a strip-assembly technique (fast and accurate, great for many blocks).
Goal block size: 6″ finished (6½” unfinished before squaring).
Quick pattern idea (visual)
Each log-cabin block is built around a small center square and wrapped with successive 2½” strips that are subcut and added to the four sides in a standard log-cabin order to create the stepped look. For a 6″ finished block we’ll make two rounds around the center.
1) Prepare strip pieces
From your 2½” strips:
- Subcut center squares: (24 blocks) → cut 24 center squares at 1½” × 1½” (these will be the very center; choose a dark or medium tone).
- Subcut many strips 2½” × 3½”, 2½” × 5½”, and 2½” × 6½” — you’ll sew pieces to each block in sequence. (Rather than precise counts per block here, make several of each length so you can assemble quickly — for 24 blocks, plan to cut 24 pieces of each length or more from your strips.)
Practical shortcut: make strip sets of light + dark + medium sewn long, then subcut into sections to speed construction (see next).
2) Build blocks (repeat until you have 24)
- Start with a center square (1½”).
- Sew a 2½” × 3½” strip to the right side (short edge) of the center; press.
- Sew a 2½” × 5½” strip to the top; press.
- Sew a 2½” × 6½” strip to the left; press.
- Sew a 2½” × 6½” strip to the bottom. After these four strips, the unit will be approx 6½” square (unfinished) with stepped logs on all four sides forming the log-cabin look.
- Trim the block to 6½” square (unfinished) and square it up using a ruler. Repeat until you have 24 blocks.
Tips:
- Always press seams toward the darker strip to reduce visible seam shadow.
- Use consistent ¼” seam allowance.
- If you prefer very exact control, use a paper template and do the traditional log-cabin round-by-round addition — the strip method is faster and produces identical visual result.
Layout the top & bottom bands
Each band is 36″ wide (to match panel) and 12″ tall, made of 6 blocks across × 2 blocks high (6 × 6″ = 36″ width; 2 × 6″ = 12″ height).
- Lay out 12 of your 6″ finished log-cabin blocks for the top band (arrange lights/darks to create the stepped triangular motif as seen in the photo — darker blues in the outer logs, lighter creams toward the center stair). The photo shows a mirrored stepped motif at the center of the band; arrange blocks so the central vertical line has lighter tones forming a light peak.
- Sew blocks in rows of 6 (left→right), press seams, then join the two rows to make a 36″ × 12″ band. Square the band to exact 36″ × 12″ (trim if needed).
- Repeat the exact layout for the bottom band using the remaining 12 blocks. You can mirror the top band so top & bottom look balanced.
Design note: The photo’s look is achieved by arranging log-cabin blocks in mirrored groups to create a large stepped chevron/peak. If you want to replicate it exactly, lay the blocks out on a design wall and take a photo before sewing.
Assembly — join the center panel, frame, and bands
1) Add the inner navy frame to the panel
- Press the trimmed panel and measure to confirm it’s exactly 36″ × 48″.
- Sew the navy side inner borders (2½” × 36½”) to the left and right edges of the panel (right sides together). Press seams outward toward the navy.
- Sew the navy top & bottom inner borders (2½” × 40½”) to the panel top & bottom. Press.
After adding the inner navy frame, your framed panel will measure 40″ × 52″ (36 + 2 + 2 = 40 width; 48 + 2 + 2 = 52 height).
2) Attach the top log-cabin band
- Center the top 36″ × 12″ band above the framed panel. Because the framed panel is 40″ wide, but the band is 36″ wide, you’ll center the band horizontally and add small navy filler strips at each side to make widths match. To make filler strips:
- Cut (2) navy strips 2″ × 12½” (include seam allowance). Attach one to each side of the 36″ band to bring its width to 40″ (36 + 2 + 2 = 40); trim as needed.
- Sew the band (now 40″ wide) to the top of the framed panel (right sides together). Press seam upward into the band.
3) Attach the bottom log-cabin band
- Repeat the step above for the bottom band: add two navy side fillers to make the band 40″ wide if needed, then sew to the bottom of the framed panel.
After attaching top & bottom bands the quilt center now measures 40″ wide × (52 + 12 + 12) = 76″ high (panel + inner borders + two 12″ bands).
4) Add outer floral border
- Trim the quilt center if needed to be neat and square (final center should be 40″ × 76″).
- Prepare floral border strips:
- Cut two floral strips 4½” × 40½” for left & right sides.
- Cut two floral strips 4½” × 84½” for top & bottom (the longer length ensures you have enough; adjust after attaching sides).
- Sew left & right floral borders to the sides of the center (right sides together), press.
- Measure the new width (40 + 2*4 = 48″ finished). Now cut the top & bottom floral border strips to exact 4½” × 48½” and sew them on. Press.
Final quilt top size after outer border: 48″ × 84″ finished.
Basting & quilting
1) Prepare backing & batting
- Backing: press and join if necessary, make the backing at least 4″ larger all around (approx 56″ × 92″).
- Batting: same — slightly larger than the quilt top.
2) Baste
- Layer backing (face down), batting, quilt top (face up). Smooth on a large flat surface or use a long-arm/basting spray. Baste with safety pins every 4–6″ or use spray.
3) Quilt
- Recommended quilting design: The photo shows delicate motif quilting (organic loops) across the panel and subtle echoing on log-cabin blocks. Good options:
- All-over meander / stipple on the panel and borders for a gentle scrim effect.
- Straight line or diagonal echo quilting across the log-cabin bands to enhance the stair-step geometry (repeat lines 1/2″–1″ apart for definition).
- Use a walking foot on a home machine for straight lines; a free-motion foot if you prefer meander.
- Use thread color to match each zone: neutral/light for the panel area (to not compete with the scenic detail), and a subtle contrast in the logs to emphasize texture.
- Quilt to your preference — denser quilting will make the quilt heavier and more sculpted; wider spacing keeps it softer and more drapey.
Binding & finishing
- Trim the quilt edges square.
- Prepare binding: cut 2½” strips of navy or a coordinating floral (approx ¾ yard). Join strips on the bias or straight grain into one continuous length and fold in half lengthwise, wrong sides together, pressing.
- Machine-sew binding to the front, miter the corners, fold to the back, and either hand-stitch for an invisible finish or machine-stitch on the back.
- Label your quilt (include title, maker, date), and press lightly (do not iron directly over heavy batting seams — use steam carefully).
Yardage summary (approximate)
- Scenic panel (36″ × 48″): purchased panel or large print piece.
- Navy inner frame + fillers + binding: 1 yard.
- Assorted blues/teals/creams for log-cabin strips: 2½ yards (mix of scraps/fat quarters works very well).
- Cream/neutral: 1 yard.
- Outer floral border: 1½ yards.
- Backing: 4.5–5 yards (depending on fabric width).
- Batting: ~56″ × 92″ piece.
- Binding: ¾ yard.
Tips for a crisp result
- Square the panel precisely before you begin — every subsequent measurement depends on the panel being true 36″ × 48″.
- Make one sample log-cabin block first and measure it. Trim to the target unfinished 6½” and then square it to 6″ finished; use that block as your template for the rest so all blocks match.
- Alternate pressing direction on rows of blocks so seams nest when joining rows for the bands — this helps match intersections later.
- When sewing bands to the panel, pin frequently or use clips — the transition between panel fabric and pieced band can shift if not pinned.
- Use plenty of seam allowance accuracy; a consistent ¼” is key for block sizing.
Troubleshooting – common small issues
- If your log-cabin band comes out a bit short or long: trim carefully, or add thin navy side fillers to reach the framed panel width (I suggested these on purpose — they make fitting forgiving and visually tidy).
- If center panel looks off-center after adding top band: remove band and re-center, or add slightly wider side fillers to adjust. Always press and square after each addition.
- If your blocks don’t nest perfectly: press seams to alternate directions and use pins at intersections when joining rows.