 by
by Great — I made a clear, beginner-friendly, step-by-step text tutorial for a heart motif you can use as a single applique or join into panels for a blouse, tunic, shawl or runner. I split it into two parts so you can either (A) make the little heart applique and add it to any project, or (B) make the framed heart motif (heart + round background) that joins neatly with other motifs.
Everything below uses US crochet terms. I include exact stitch groupings, short checks after each round, blocking & finishing, join-as-you-go instructions, layout ideas and troubleshooting.
💖 Super Idea — Heart Motif (two options)
- Option A — Heart applique only (small hearts you can sew onto garments)
- Option B — Framed Heart Motif: heart applique worked into a round medallion background so the heart sits centered inside a lacy motif (joinable into panels)
Pick which you want to make — both patterns are given below so you can mix & match.
Materials & tools
- Yarn: fingering → DK (cotton mercerized for crisp lace, or soft blend for wearables).
- Hook: match yarn label (typical: 2.5–4.0 mm). Use smaller hook for a firm heart applique or larger for drapey motif.
- Notions: tapestry needle, blocking pins/mat, scissors.
- Gauge/size: Heart applique ≈ 3–5 cm (depends on yarn/hook). Framed motif ≈ 9–13 cm blocked (DK + 3.5–4.0 mm).

Abbreviations (US)
- ch = chain
- sc = single crochet
- hdc = half double crochet
- dc = double crochet
- tr = treble crochet
- sl st = slip stitch
- pic = picot (ch 3, sl st into base)
- st(s) = stitch(es)
- sp = space
- rep = repeat
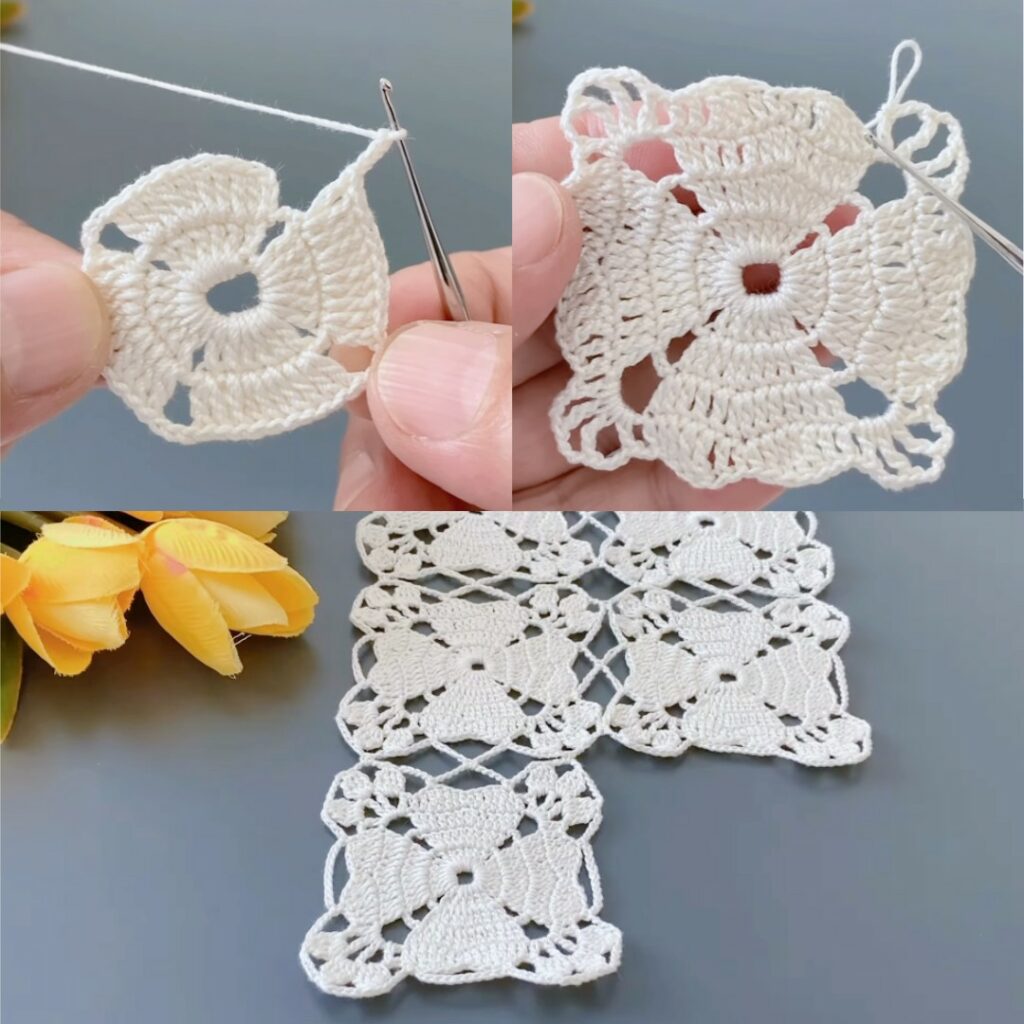
OPTION A — Small Heart Appliqué (fast & useful)
This little heart is worked flat in one short round/row and is ideal for sewing onto a motif, collar, hat or pocket.
Heart Appliqué — Instructions
- ch 4 (foundation chain).
- Work on the chain: in 2nd ch from hook: sc, hdc, 3 dc, hdc, sc. (Work these 7 stitches into that single chain.)
- You’ve worked on the “top” side of the chain so you have the left semicircle of the heart.
- Now continue across the other side of the same foundation chain (work into the opposite side of the chain): sc, hdc, 3 dc, hdc, sc.
- Finish by sl st into the first sc to close the heart. Fasten off and weave in ends.
Check: Heart should look symmetrical with two lobes (3 dc in each lobe) and a point below where the two sides meet.
Finishing & attachment
- Optional: press lightly or block by pinning the heart on a towel and misting.
- Sew onto fabric or a motif using matching yarn and a fine tapestry needle — tack the tip first, then each lobe. Hidden stitch through the back works best.
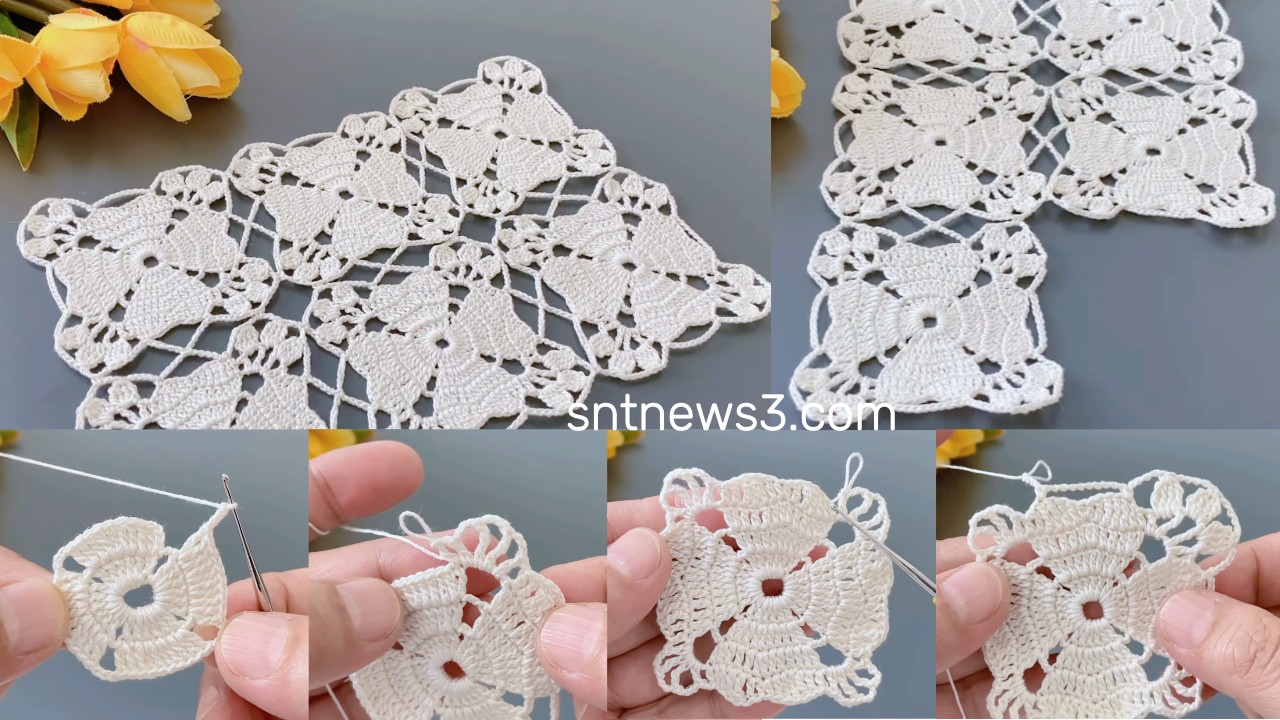
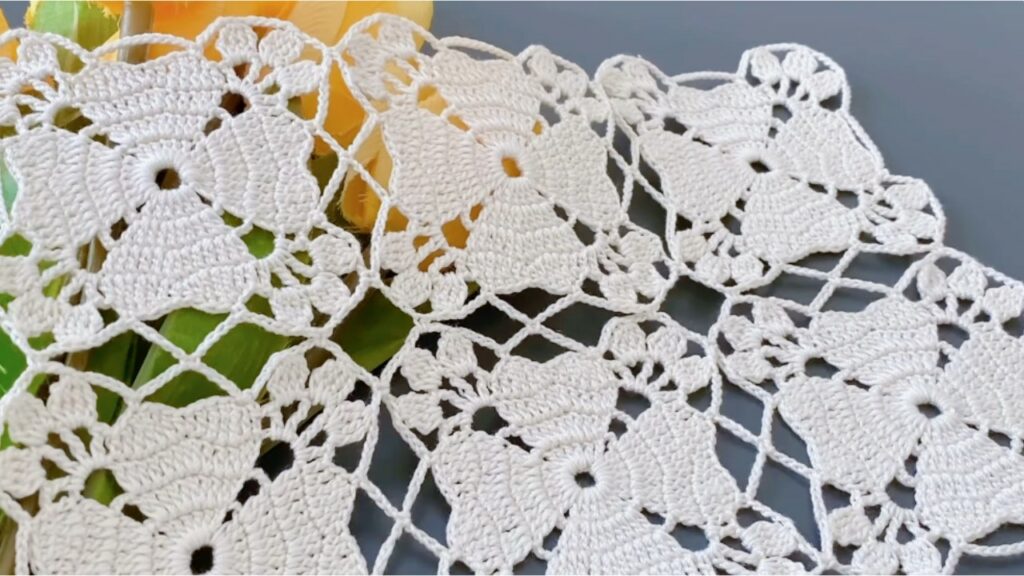
OPTION B — Framed Heart Motif (heart appliqué + round frame)
This is the framed motif that places the small heart inside a round lacy medallion you can join into panels. I keep the round counts straightforward so it’s beginner friendly and joins cleanly.
Overview
- Round 0: make the Heart Appliqué (Option A) and set aside (or leave it attached and continue — see note).
- Rounds 1–6: work a circular medallion that frames the heart. You can either:
- A1) Sew the heart onto the center after completing the medallion, or
- B1) Crochet the heart first, attach it by sl st into the motif center, and continue rounds around it (I show both methods — sewing gives precision; crocheting it in produces a seamless look).
Framed Heart Motif — Full Pattern (method: heart sewn on after medallion)
(If you prefer to crochet the heart into the center instead of sewing, there’s a short note after the rounds.)
Round 1 — small neat center (foundation ring)
- Make a magic ring.
- ch 3 (counts as dc), work 11 dc into the ring. (That is: ch-3 + 11 dc = 12 dc total.)
- Pull ring closed and sl st to top of ch-3 to join.
Check: 12 dc.
Why 12? It gives 6 loop spaces in the next round (nice spacing for a small heart center).
Round 2 — chain loop foundation (6 loop spaces)
- ch 4, skip next dc, sc in next dc — repeat around.
- Because there are 12 dc, skipping every other dc yields 6 ch-4 spaces (and 6 sc between). Join with sl st.
Check: 6 ch-4 loop spaces.
- Because there are 12 dc, skipping every other dc yields 6 ch-4 spaces (and 6 sc between). Join with sl st.
Round 3 — small petals (frame the center)
- Into each ch-4 space work: sc, hdc, 5 dc, hdc, sc — all into same ch-4 space. This makes 6 small rounded petals that form a nice base for the heart frame.
- After each petal, sl st (or sl st to the next ch-4) and continue. Join after 6 petals.
Check: 6 petals.
Round 4 — tidy sc round
- Rejoin between any two petals. Work sc evenly around the petal bases to even the motif — distribute roughly 8–10 sc per petal area so the round lays flat. Join with sl st.
Check: outer boundary is smooth.
Round 5 — lacy arches
- From petal tips: sl st to the outer tip → ch 7 → anchor into the sc round between the next petals with (tr, ch 2, tr) — or (tr, ch 2, tr, ch 2, tr) if you want taller clusters. I recommend (tr, ch 2, tr) for a lighter look.
- Repeat around to form 6 arches (one between each petal). Join.
Check: 6 arches (one per petal).
Round 6 — arch ribs & outer tidy round
- Into each ch-7 arch work a simple decorative fill: sl st to arch base → ch 3 → 3 dc separated by ch-1 across the arch → ch 3 → sl st into arch base.
- Simpler: 3 dc evenly spaced across arch.
- After decorating arches, work a final sc round to tidy the outer edge (sc evenly across the arch tops and small chains) — OR go straight to picot scallop if you prefer.
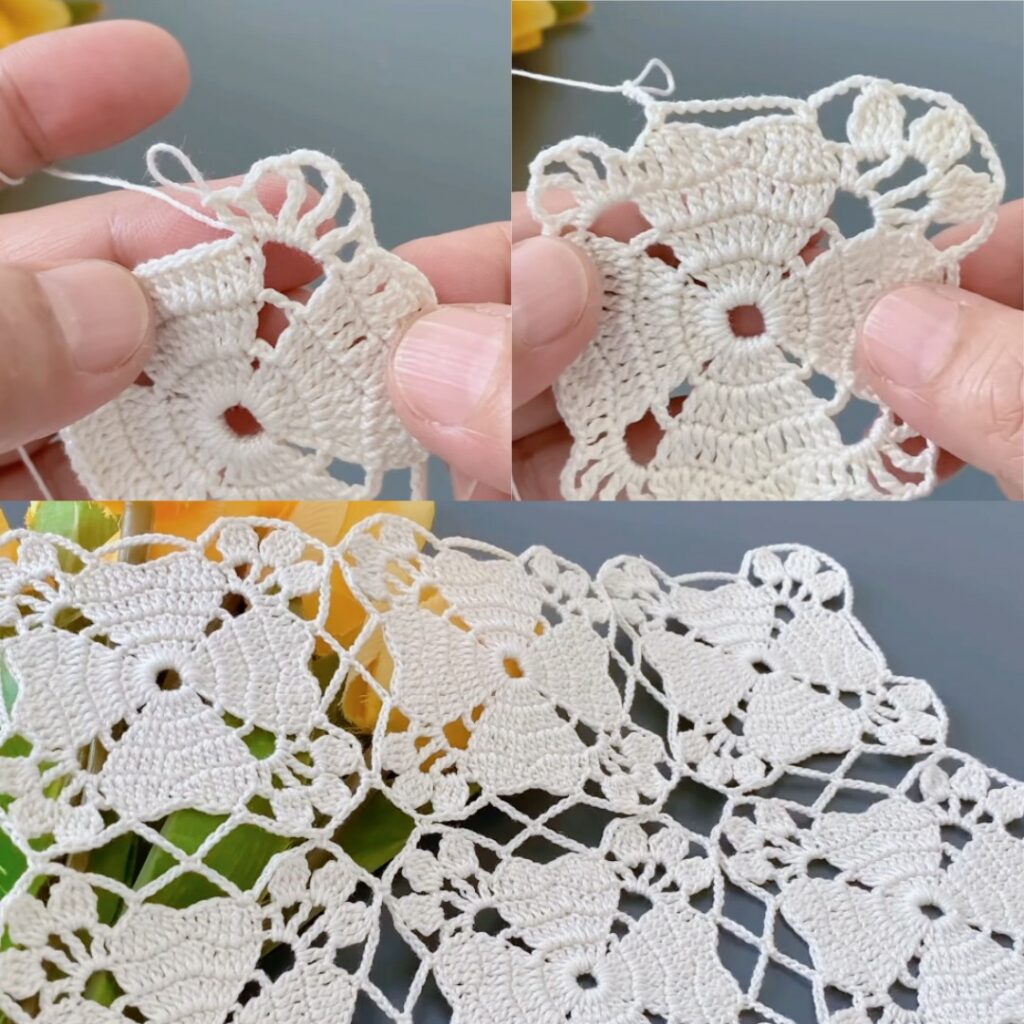
Finish & heart placement
- Sew method (recommended for placement precision): Block the medallion flat. Center the small heart applique on the motif and tack-sew with small hidden stitches near the top of each lobe and the point at the bottom. Weave ends on the back.
- Crochet-in method: After Round 1 or 2 (while the magic ring is still open), you can slip-stitch the heart foundation into the ring and continue. This method is more advanced to keep tension even.
Optional outer scallop & picot edge (neat finish / join round)
If you plan to join motifs as panels, make a neat outer round that’s used for Join-As-You-Go (JAYG) or for a joining seam:
- Round X (outer): sc 3, (pic: ch 3, sl st into same st) — picot — sc 4 repeated across the outer small curves so the scallop sits even.
- This outer scallop is also where JAYG attaches: when working a motif next to a finished one, replace the sl st or picot with sl st into the corresponding stitch/picot of the finished motif to join.
JOINING MOTIFS — options & tips
- Join-As-You-Go (JAYG): make your first framed heart motif completely. For each new motif, when working the outer scallop round, replace the sl st or picot step at hit points with a sl st into the corresponding stitch/picot of the neighbor. Join at 4–6 attachment points per side depending on your outer round spacing. This produces very neat, flat seams and avoids sewing.
- Sew-after: block all motifs, arrange layout, then whipstitch or mattress stitch through the outer sc round or side loops for an invisible seam.
BLOCKING & FINISHING
- Pin the motif to blocking surface, shape heart & lobes, and pin heart before sewing if using applique.
- Spray with water or use light steam; let dry completely.
- For a stiffer applique (ornaments) use diluted stiffener; for wearables keep it soft.
SIZING, ADJUSTMENTS & Tension tips
- Heart size depends mostly on hook & yarn. For a smaller crisp heart, use thinner yarn & a smaller hook. For bigger / bolder hearts, use thicker yarn or a bigger hook.
- If frame ripples: add (or remove) 1–2 sc in Round 4 to even the circumference.
- If arches are sagging: shorten chain length in Round 5 (e.g., ch-6 instead of ch-7) or tighten tension on chains.
- Want more space around heart? Increase petal dc from 5 → 7 in Round 3.
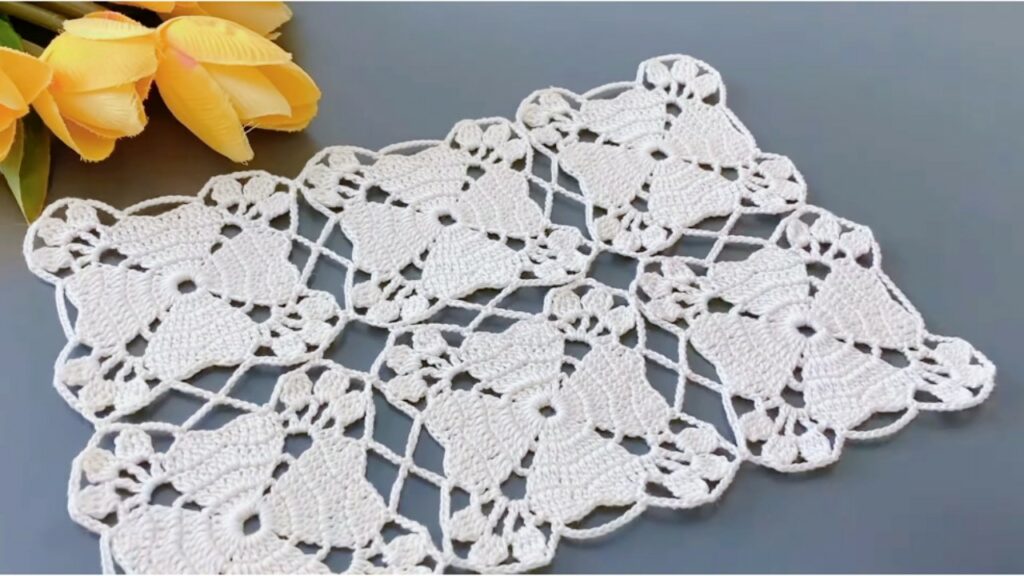
PROJECT IDEAS / LAYOUTS
- Make 1 framed heart as a focal medallion for a cushion front.
- Make many framed hearts and join in rows for a blouse (front/back panels), a runner (1×N or 2×N), or a delicate shawl (rectangle or triangle).
- Use the small heart appliqués to top the centers of plain motifs, collars, baby clothes, hats, or gift tags.
Troubleshooting quick guide
- Heart looks lopsided: re-stitch the heart, stitch firmly across the base chain, block before attaching.
- Motif cups up: loosen tension or increase sc in Round 4 to flatten.
- Motif ripples: shorten arch chains or reduce dc counts in petals.
- Joints gap: add extra sl st points when joining or block motifs before joining.
VIDEO: