 by
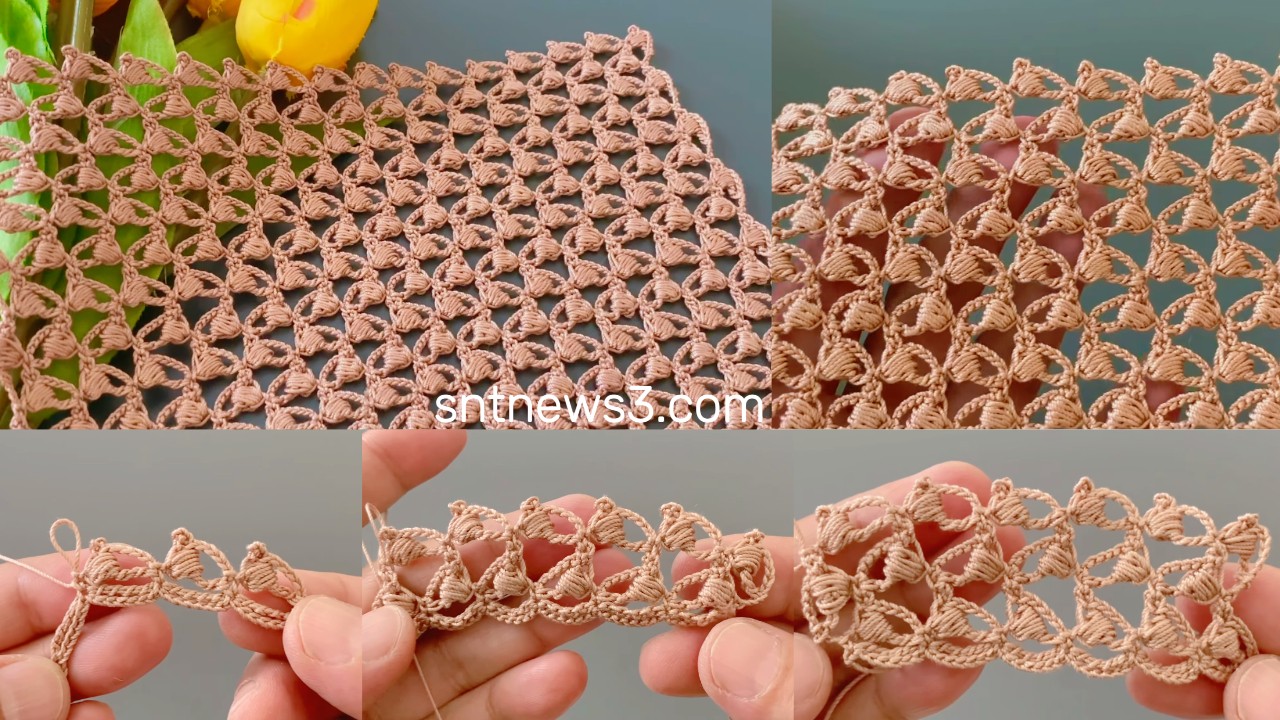
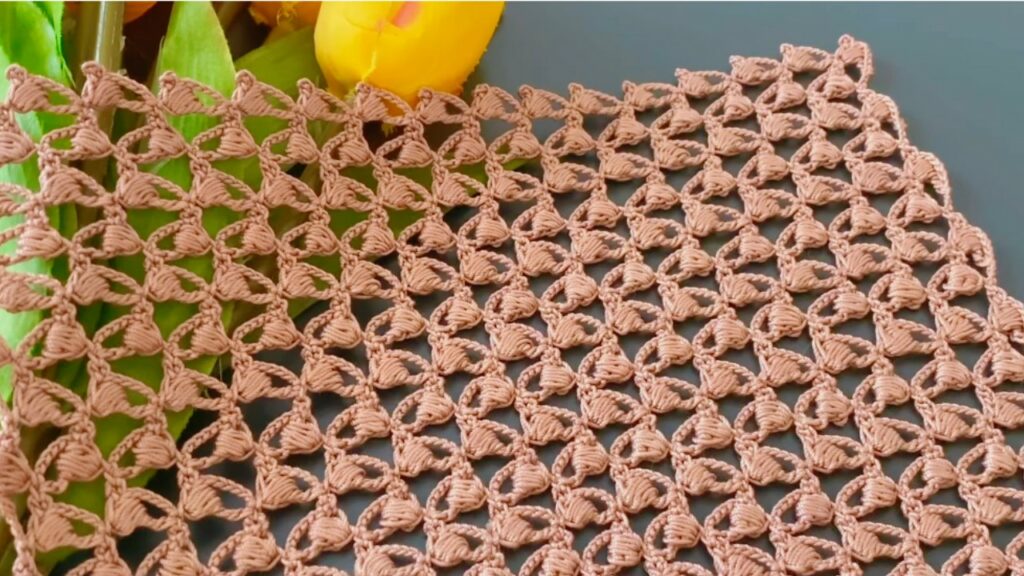
by This is a single-row repeat lace you work across a foundation (chain or edge) — perfect for quickly making a blouse panel, a light shawl, or a decorative band. It’s beginner friendly, very repeatable, and you can attach it to fabric or work it as a strip and join rows. US terms.
What it makes
A delicate scalloped row of little leaf/arch motifs with picot dots. Use it:
- as a continuous one-row band (repeat across width) for the body of a blouse (worked in horizontal strips)
- as the main body of a shawl worked in long rows (turn each row)
- as an edging worked along a finished fabric edge
Materials
- Yarn: fingering → DK (cotton for crisp, wool/blend for drape)
- Hook: 2.5–4.5 mm depending on yarn & desired openness
- Notions: tapestry needle, blocking pins/towel, scissors, stitch markers (optional)
Abbreviations (US)
- ch = chain
- st = stitch
- sc = single crochet
- hdc = half double crochet
- dc = double crochet
- tr = treble crochet
- sl st = slip stitch
- pic = picot (ch 3, sl st into base)
- sk = skip
- rep = repeat
Gauge & repeat
- Repeat multiple: 6 + 2 (6 stitches per motif + 2 for turning/edge).
- Make a 10-12 motif swatch and block to decide hook/yarn for desired look.
Foundation options
Choose one:
A — Work directly onto a fabric/previous row (recommended for blouse hems or necklines):
Work an even row of sc along the edge (one sc per fabric stitch or spaced to taste). Use those sc as anchors for the lace.
B — Make a free strip from chain:
Ch a multiple of 6 + 2 (example ch 38 = 6×6 + 2). Row 1: sc in 2nd ch from hook and across (creates base sc row to work lace into).
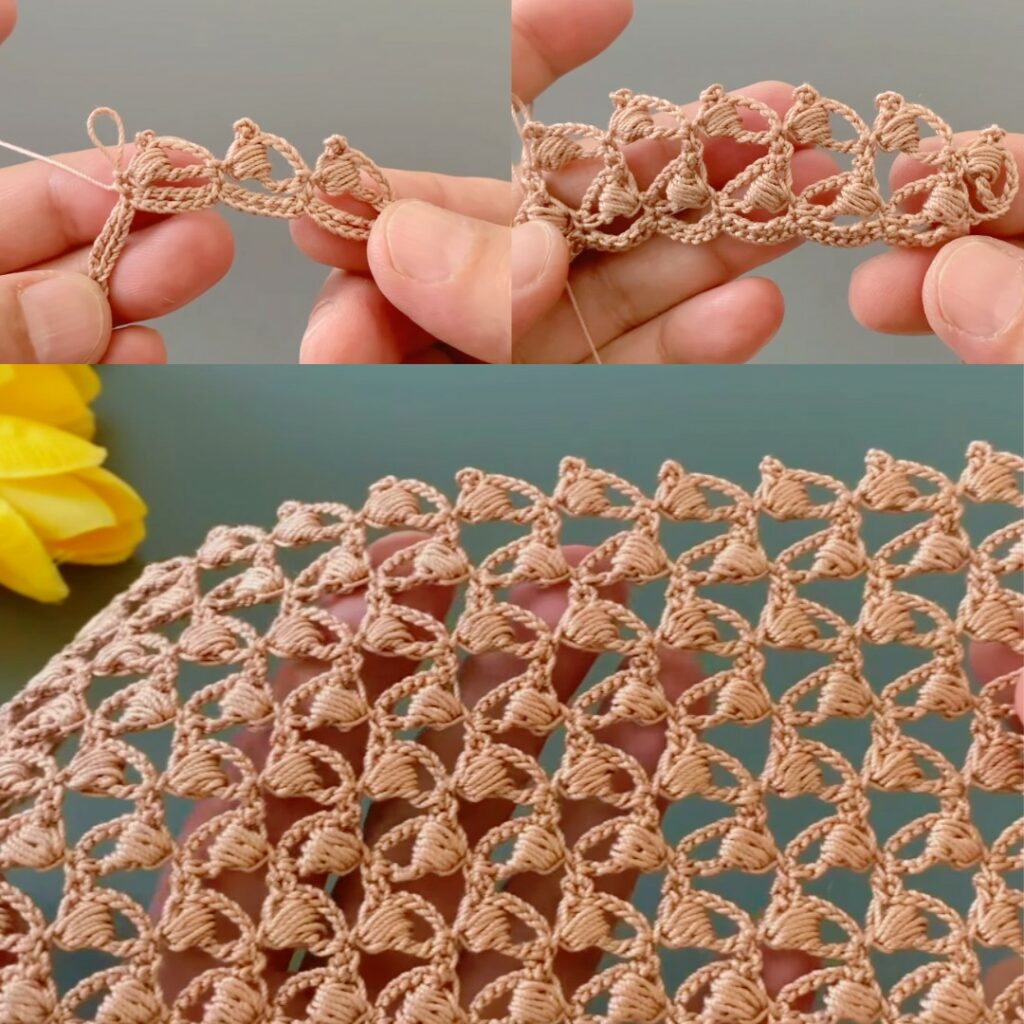
The one-row pattern (work across base sc row)
Row (Main Lace Row — repeat across):
Start with base sc row prepared (Option A or B). Work left to right:
- Sc in next 3 sc.
- (sc, hdc, 3 dc, tr, 3 dc, hdc, sc) — all into the next ch-3 loop or into the chosen anchor space (if working onto fabric, you can work these into a ch-3 space you made previously — see attachment method below).
- Sl st into the next base sc to anchor.
- Sc in next 2 sc, ch 3, sk 2 sc.
- Repeat from * across.
If you prefer to think of it as a repeating block:[sc, sc, sc, (sc, hdc, 3dc, tr, 3dc, hdc, sc), sl st, sc, sc, ch3, sk2] — then continue.
End of row: finish with sc in final 1–2 sts so the edge looks squared.
Short explanation of the stitches
- The
(sc, hdc, 3 dc, tr, 3 dc, hdc, sc)cluster makes the leaf / pointed scallop. ch 3between repeats is the small hinge that spaces the leaves.sl stinto base sc anchors each scallop so the row stays flat.
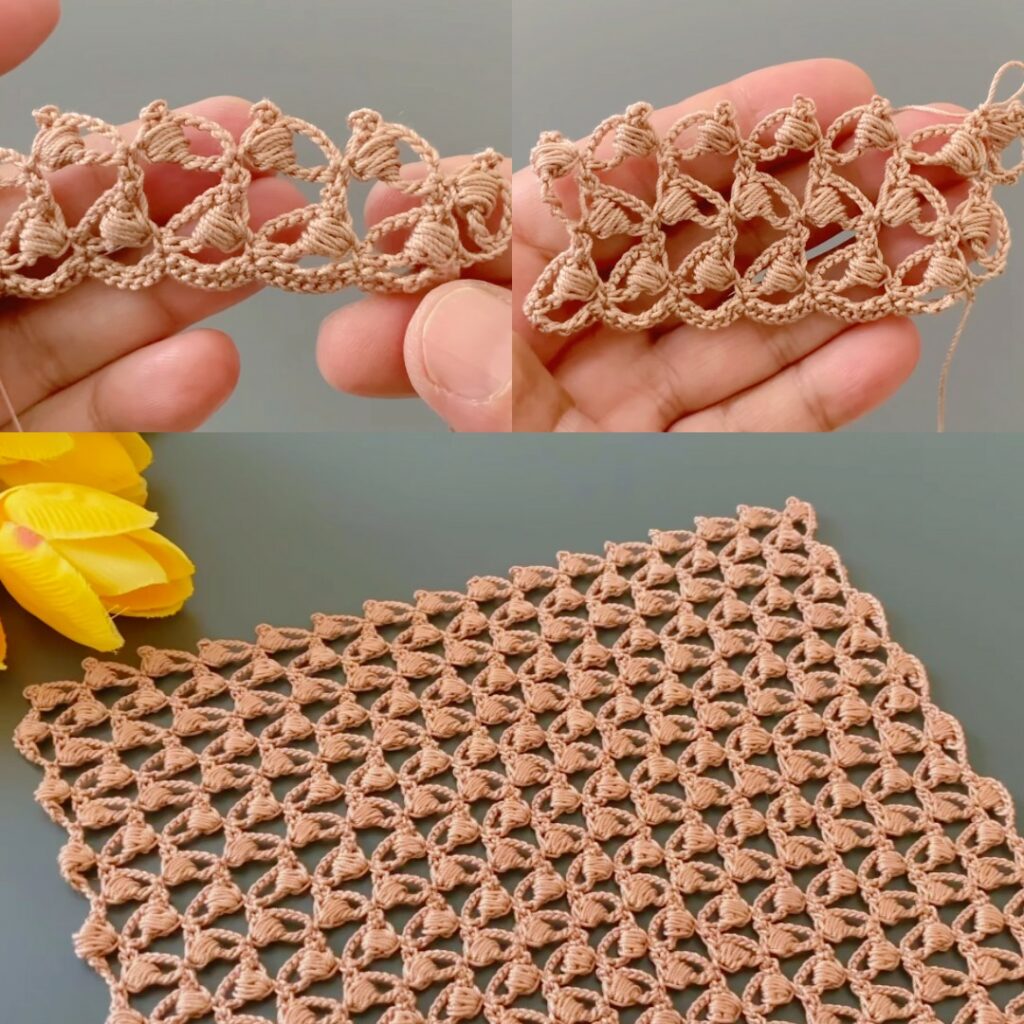
Turning & working multiple rows (for shawl or wide panels)
This pattern is designed as a one-row repeat, but for a shawl or wide blouse panel work as follows:
Option 1 — Mirror Rows (easiest):
- Row 1: Work the Main Lace Row. Turn.
- Row 2: Work a foundation sc row back across (sc into each st and into picots/peaks where needed) so you rebuild a base sc row to anchor the next lace row. Turn and repeat the Main Lace Row.
This makes a banded fabric: lace row, sc return, lace row, etc.
Option 2 — True lace rows (no sc return):
- Row 2: Work the same Main Lace Row but anchor each leaf to the leaf below using sl sts into the top of the tr from the previous row (creates a more connected lace fabric). This takes care to align repeats precisely (recommended only if you like an open mesh).
Attachment to fabric (if adding as edging)
If you made a strip (Option B) sew it on with whipstitch through base sc row, or crochet-on by working sc through both the fabric edge and the base sc simultaneously (neater).
If working directly onto a fabric edge (Option A) you can skip the base sc step: work sc stitches evenly along fabric edge first, then work the Main Lace Row into those sc anchors.
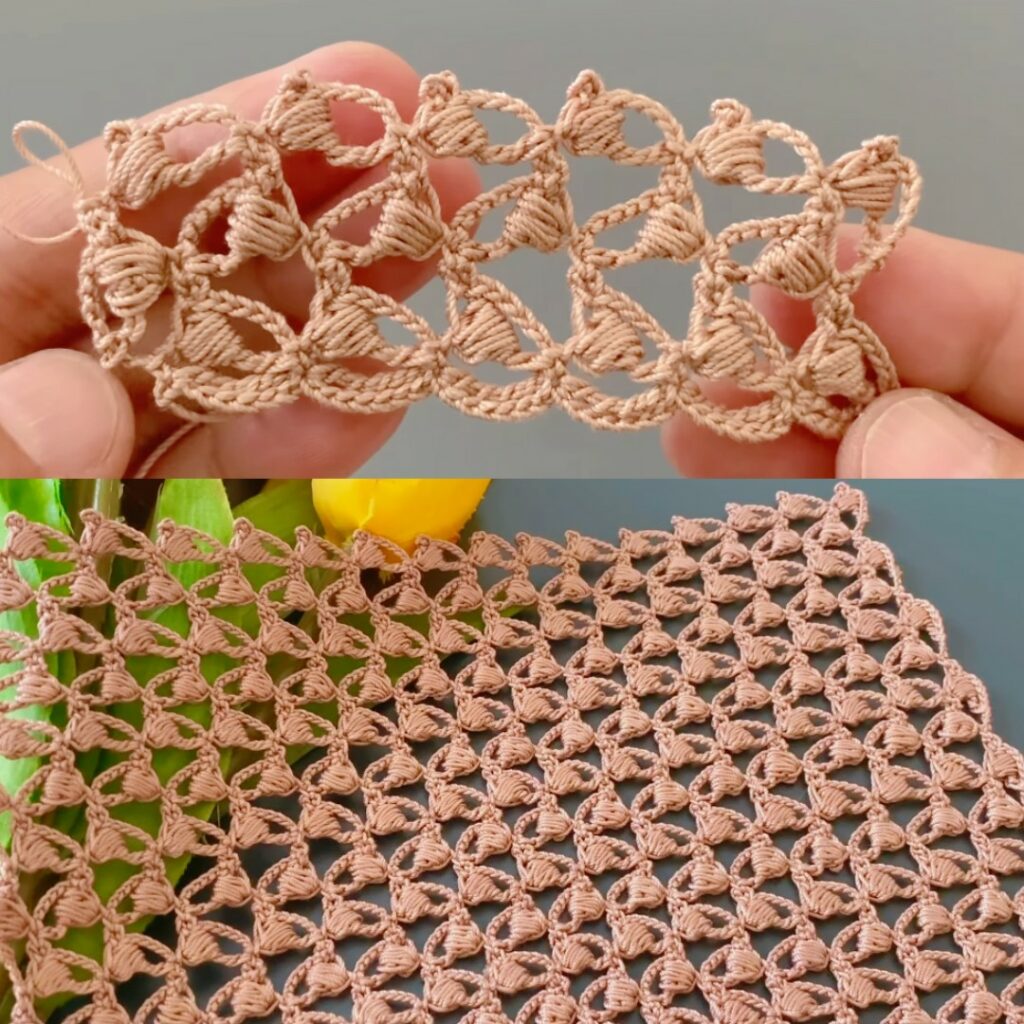
Corners (turning a rectangular piece)
At a corner, after the last full scallop, make ch 6 for the corner loop (or ch 4 for a tight corner). Work the next scallop into that corner loop so the pattern turns cleanly.
Finishing & blocking
- Pin the band/rows out, shape each scallop and picot, and block lightly with water steam or mist. For a crisper finish (table shawls/runners) lightly starch or use diluted PVA; for garments keep softer — just pin and air-dry.
Troubleshooting & adjustments
- Row waves / too many scallops: increase spacing — change
sc 3tosc 4between clusters, or change foundation multiple to increase distance. - Scallop tips curl up: shorten the center height (use
dcinstead oftr) or block strongly. - Scallops flatten / lack pointiness: make picots slightly smaller (ch2) or use a smaller hook for the final anchoring pass.
- Uneven repeats: count the first 3 repeats carefully to set rhythm before continuing.
Variations
- Petite version: reduce
3 dc→2 dcandtr→dc. Works well for collars/necklines. - Larger dramatic leaves: increase
3 dc→5 dcandch 3→ch 4for bigger openness. - Two-color: do base sc row in Color A, switch to Color B for the leaf cluster row.
- Beaded version: thread small seed beads onto yarn and work a bead onto the central tr of each leaf before you stitch it down.
Quick sample uses & layout
- Blouse: make multiple horizontal bands (lace row + sc return) to the desired length and join by side seams; or work lace strips and JAYG-join them into a sheet. Add 2 rounds sc around neck/armholes for stability.
- Shawl: work long rows (lace row + sc return) until desired length; finish ends with a scallop border; block heavily for open drape.
- Scarf / runner: repeat as a single long band and finish both short ends with a picot fringe.

Example compact repeat (for your notes)
Foundation: ch multiple of 6 + 2 → Row 1 (base sc row).
Main Lace Row (repeat):sc ×3 // (sc, hdc, 3dc, tr, 3dc, hdc, sc) into next anchor // sl st into next base sc // sc ×2, ch3, sk2 // rep
VIDEO: