 by
by As the leaves begin to turn and a crispness enters the air, there’s nothing quite like the cozy charm of autumn. And what better way to carry a piece of that warmth with you than with an adorable, handmade mini pumpkin keychain? Whether you’re a seasoned crocheter or just picking up a hook for the first time, this project is designed to be EASY, satisfying, and incredibly rewarding.

These little pumpkins are quick to whip up, making them perfect for last-minute gifts, craft fair stock, or simply adding a touch of fall festivity to your own keys, bags, or even as decorative accents. So grab your yarn and hook, and let’s get started on bringing these tiny autumnal treasures to life!
Why Crochet a Mini Pumpkin Keychain?
- Beginner-Friendly: The stitches involved are basic, making it ideal for those new to crochet.
- Quick Project: You can easily complete one in an hour or two, perfect for instant gratification.
- Portable & Practical: A charming accessory that’s also functional.
- Great for Gifting: Handmade gifts are always appreciated, and these are perfect for friends, family, or teachers.
- Uses Scrap Yarn: A fantastic way to use up those smaller bits of yarn you have lying around.
Materials You’ll Need:
Before you begin, gather your supplies. Having everything ready will make the process smooth and enjoyable.
- Yarn:
- Orange (or desired pumpkin color): Worsted weight (or DK weight for an even smaller pumpkin) acrylic or cotton yarn. A small amount is all you’ll need.
- Brown or Green (for stem): A small amount of worsted weight yarn.
- Crochet Hook:
- Size G/6 (4.0 mm) or H/8 (5.0 mm) for worsted weight yarn. (Adjust hook size if using a different yarn weight – you want a relatively tight fabric to prevent stuffing from showing through).
- Yarn Needle (or Tapestry Needle): For weaving in ends and shaping.
- Scissors: For cutting yarn.
- Stuffing: Polyester fiberfill (Poly-fil) or cotton stuffing.
- Keychain Ring: A standard metal keychain ring.
- Optional: Stitch marker (helpful for working in the round, but not strictly necessary for this small project).
Abbreviations:
Familiarize yourself with these common crochet abbreviations:
- ch: chain
- sc: single crochet
- sl st: slip stitch
- inc: increase (2 single crochet in one stitch)
- dec: decrease (single crochet 2 stitches together)
- st(s): stitch(es)
- ( ): indicates the number of stitches at the end of the round/row
Pattern Instructions: EASY Crochet Mini Pumpkin Keychain
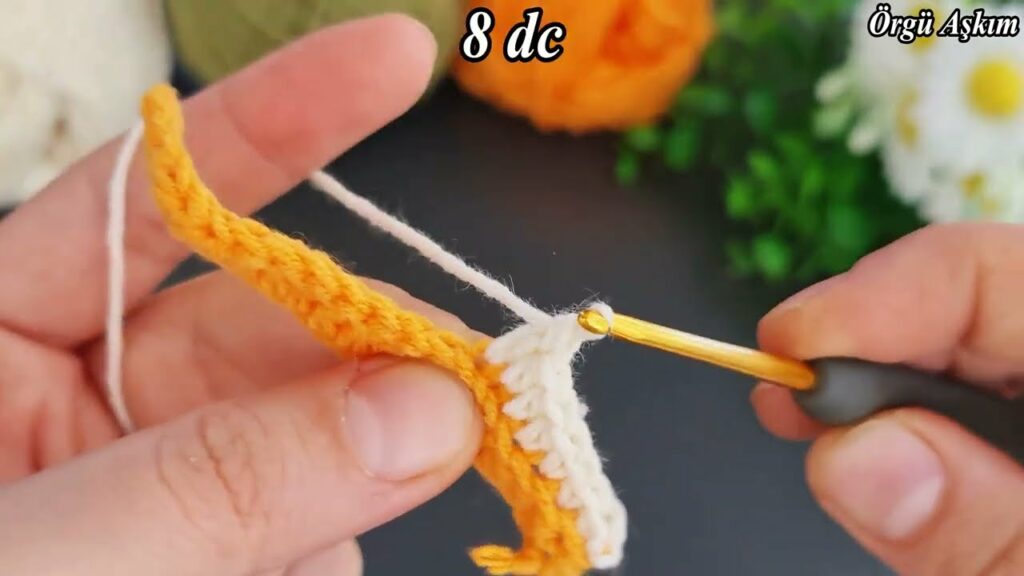
This pattern is worked in continuous rounds (unless otherwise stated), so you won’t be joining with a slip stitch at the end of each round. Use a stitch marker if you find it helpful to keep track of your first stitch.
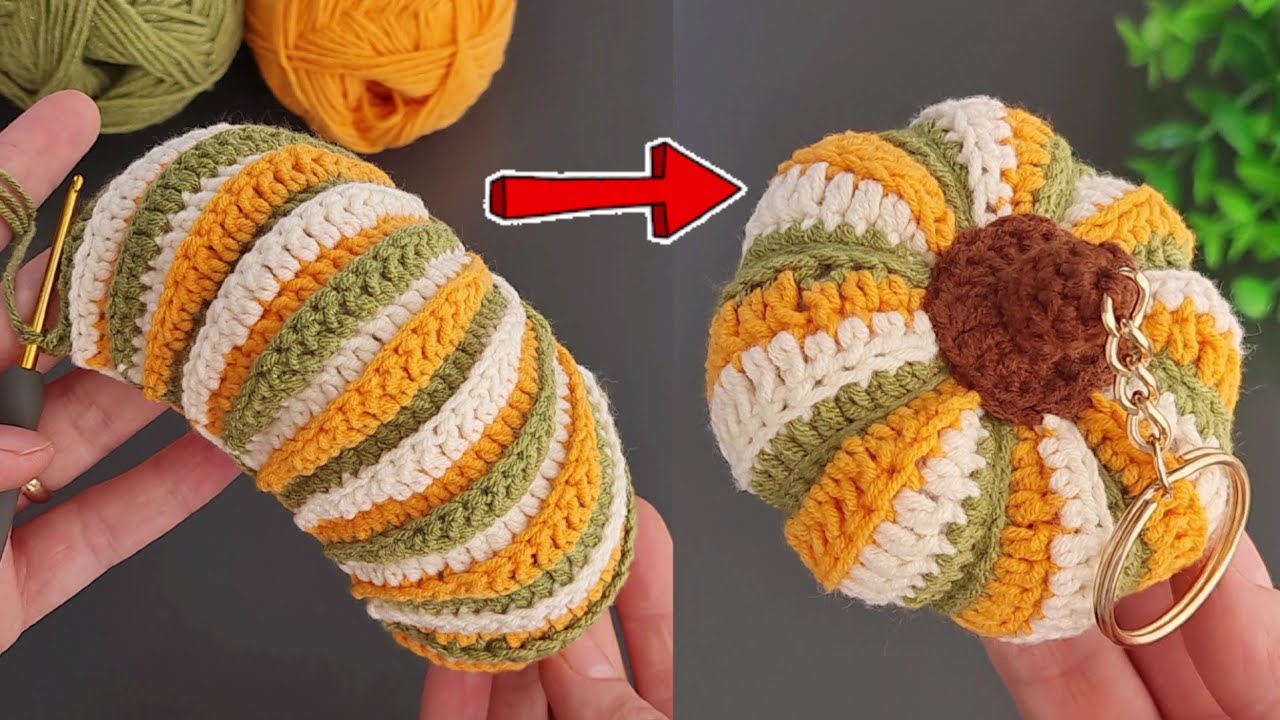
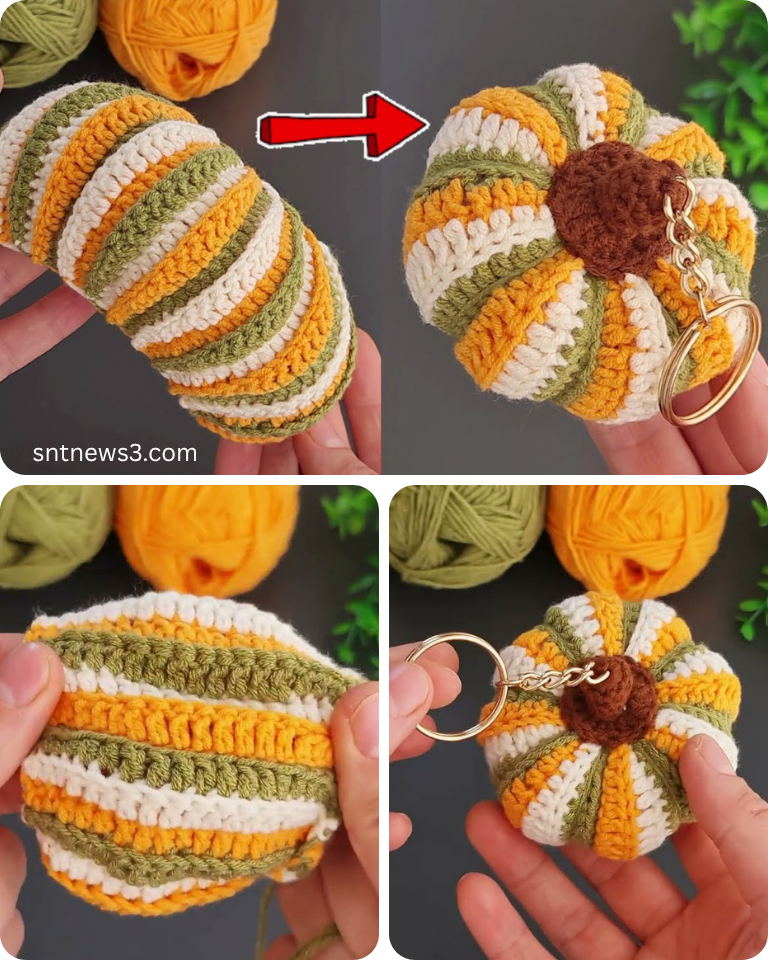
Pumpkin Body (in Orange Yarn):
- Magic Ring: Create a magic ring (or ch 2 and sc 6 into the first ch). This creates a tight center hole.
- (6 sts)
- Round 1: Sc 6 into the magic ring.
- (6 sts)
- Round 2:Sc in the first st, inc in the next st around.
- (9 sts)
- Round 3:Sc in the first 2 sts, inc in the next st around.
- (12 sts)
- Round 4:Sc in the first 3 sts, inc in the next st around.
- (15 sts)
- Round 5:Sc in the first 4 sts, inc in the next st around.
- (18 sts)
- If you want a slightly larger pumpkin, you can add another increase round here (Round 6: Sc in the first 5 sts, inc in the next st around (21 sts)).
- Rounds 6-9 (or 7-10 if you added another increase round): Sc in each st around. (4 rounds of straight single crochet).
- (18 sts)
- Round 10 (or 11):Sc in the first 4 sts, dec over the next 2 sts around.
- (15 sts)
- Start stuffing your pumpkin firmly as you go, ensuring it’s evenly filled.
- Round 11 (or 12):Sc in the first 3 sts, dec over the next 2 sts around.
- (12 sts)
- Round 12 (or 13):Sc in the first 2 sts, dec over the next 2 sts around.
- (9 sts)
- Continue stuffing, shaping your pumpkin as you go.
- Round 13 (or 14):Sc in the first st, dec over the next 2 sts around.
- (6 sts)
- Add any final stuffing needed.
- Fasten off, leaving a long tail (about 6-8 inches) for shaping and sewing.
Pumpkin Stem (in Brown or Green Yarn):
- Magic Ring: Create a magic ring.
- Round 1: Sc 4 into the magic ring.
- (4 sts)
- Rounds 2-3: Sc in each st around. (2 rounds)
- (4 sts)
- Fasten off, leaving a short tail for sewing (about 4 inches).
Assembly and Shaping:
This is where your mini pumpkin truly comes to life!
- Sew on the Stem:
- Thread the tail of your stem onto your yarn needle.
- Position the stem directly on top of the closed hole of your pumpkin.
- Whip stitch or mattress stitch the stem securely to the top of the pumpkin. Weave in any remaining ends.
- Shaping the Pumpkin Lobes:
- Thread the long tail from the pumpkin body onto your yarn needle.
- Crucial Step: Insert your needle through the center of the pumpkin (either through the magic ring at the top where the stem is, or through the bottom hole if you started with a chain).
- Bring the needle out through the bottom center of the pumpkin.
- Pull the yarn firmly, indenting the top and bottom slightly.
- Now, working from bottom to top, create the “lobes” of the pumpkin. Insert your needle back into the pumpkin near the bottom center, and bring it out through the top center, about 1/4 to 1/3 of the way around from where your yarn is currently exiting. Pull gently to create an indentation.
- Repeat this process 2-3 more times, evenly spacing your stitches around the pumpkin to create 3-4 distinct lobes. Pull firmly each time to really cinch in the shape.
- Once you’ve created all the lobes, make a knot at the top near the stem to secure the shaping. Weave in any remaining yarn tail into the pumpkin.
- Attach the Keychain Ring:
- Using your yarn needle, weave a piece of yarn (either from the tail of the stem or a new piece of brown/green yarn) through the top of the stem.
- Thread this yarn through the keychain ring.
- Tie a secure knot to attach the ring to the stem, then weave in the ends to hide them. Alternatively, you can use a small jump ring to attach the stem loop to the keychain if you prefer.
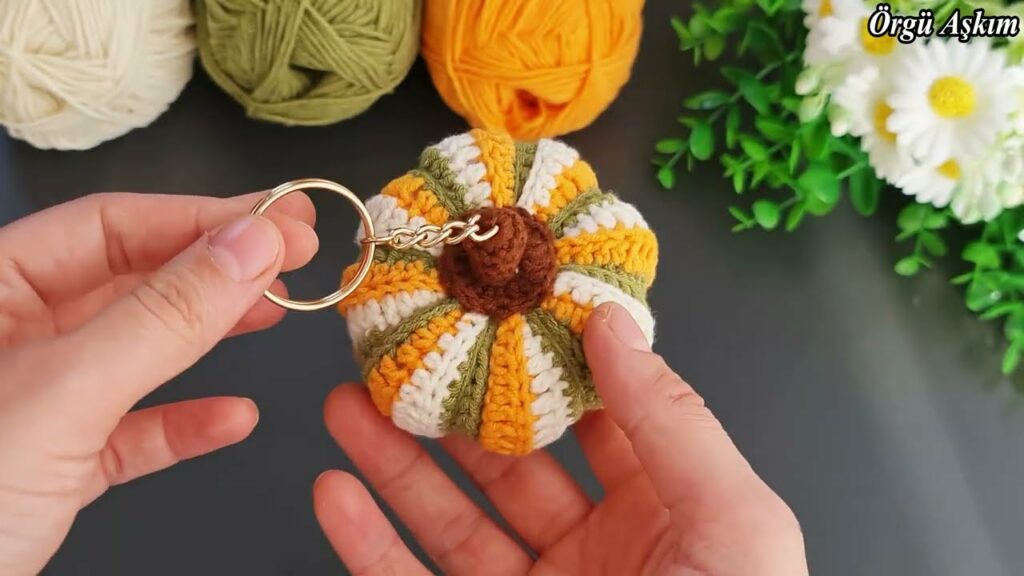
Your Mini Pumpkin Keychain is Complete!
Take a moment to admire your adorable creation! You’ve successfully crocheted a charming and festive accessory.
Tips for Success:
- Gauge isn’t crucial: Don’t stress too much about getting an exact gauge. The goal is a tightly crocheted fabric that doesn’t let stuffing show through.
- Stuff firmly: A firmly stuffed pumpkin will hold its shape better, especially when you shape the lobes.
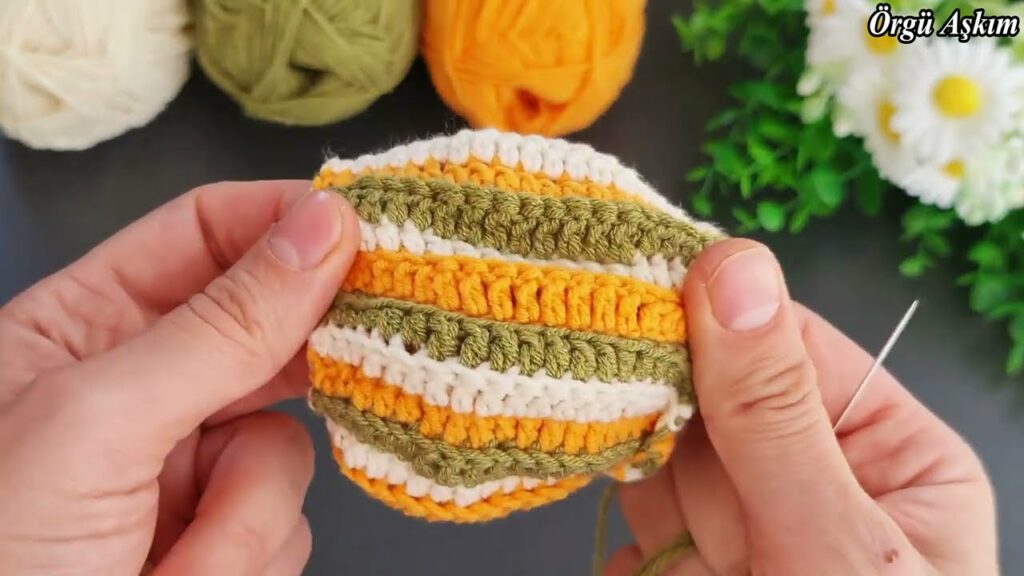
- Experiment with colors: While orange is classic, don’t be afraid to try white, green, or even striped pumpkins!
- Add details: For extra flair, you can embroider small black eyes and a mouth for a tiny jack-o’-lantern, or add a tiny green leaf or curly vine made with a chain stitch.
- Practice makes perfect: If your first pumpkin isn’t exactly how you envisioned, don’t worry! Each one you make will get easier and look better.
This easy crochet mini pumpkin keychain is a delightful project that brings a touch of handmade charm to your everyday. Happy crocheting, and enjoy your little piece of autumn!
Video tutorial: