by
by Crochet baskets are more than just practical storage solutions; they are beautiful works of art that can add warmth, texture, and a personal touch to any home decor. From organizing clutter with charming flair to serving as stunning centerpieces, the versatility of crocheted baskets knows no bounds. If you’re looking to elevate your home aesthetics with handmade charm, diving into the world of decorative crochet baskets is a rewarding endeavor.
Why Crochet Decorative Baskets?
- Customizable Style: Choose your yarn, colors, and stitch patterns to perfectly match your existing decor, from bohemian to minimalist, rustic to modern.
- Functional Beauty: They excel at taming clutter – magazines, remotes, toys, yarn stashes, or even potted plants – while looking undeniably pretty.
- Texture & Warmth: Crochet adds an unparalleled softness and tactile appeal, instantly making a space feel more inviting and cozy.
- Eco-Friendly: A sustainable choice for home organization, reducing reliance on plastic or mass-produced containers.
- Therapeutic Craft: The rhythmic motion of crocheting is incredibly relaxing and satisfying.
- Unique Gifting: A handmade crochet basket filled with goodies makes a thoughtful and cherished gift.

Key Elements of a Beautiful Crochet Basket
Creating a truly beautiful crochet basket involves a thoughtful combination of yarn choice, stitch pattern, shaping, and finishing.
1. Yarn Choice: The Foundation of Form and Feel
The yarn you select plays a pivotal role in the basket’s appearance and structural integrity.
- Sturdy Yarns for Structure:
- Cotton or Cotton Blends: Excellent for baskets. They hold their shape well, are durable, and come in a vast array of colors. Mercerized cotton offers a lovely sheen.
- T-shirt Yarn (Zpagetti): Made from recycled t-shirt fabric, this bulky yarn creates incredibly sturdy, chunky baskets that work up quickly. Perfect for a modern, rustic, or even industrial look.
- Rope or Cording: Crocheting around or with cotton rope (often used for macrame) can produce very stiff and robust baskets, ideal for heavy items.
- Jute or Hemp: For a rustic, natural, or bohemian vibe, these fibers are strong and biodegradable. They can be a bit rough on the hands, so take breaks!
- Super Bulky Acrylic/Wool Blends: While softer, heavier weights of these yarns can create surprisingly sturdy baskets, especially with tighter stitches.
- Soft Yarns for Texture (often combined with sturdy stitches):
- Chunky Chenille or Blanket Yarn: For super soft, squishy baskets, great for nurseries or storing cozy throws. May require a firmer stitch or lining to maintain shape.
- Wool/Acrylic Blends: Depending on the ply and weight, these can offer a softer feel while still providing some structure.
Tip: Consider doubling or tripling strands of thinner worsted weight yarn to achieve a thicker, more substantial fabric for your basket.

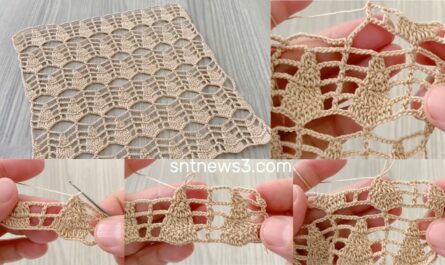
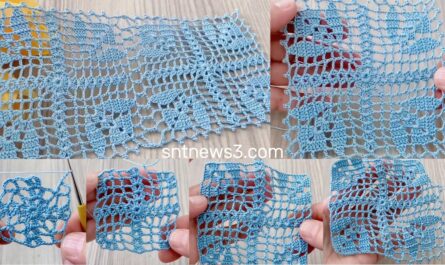
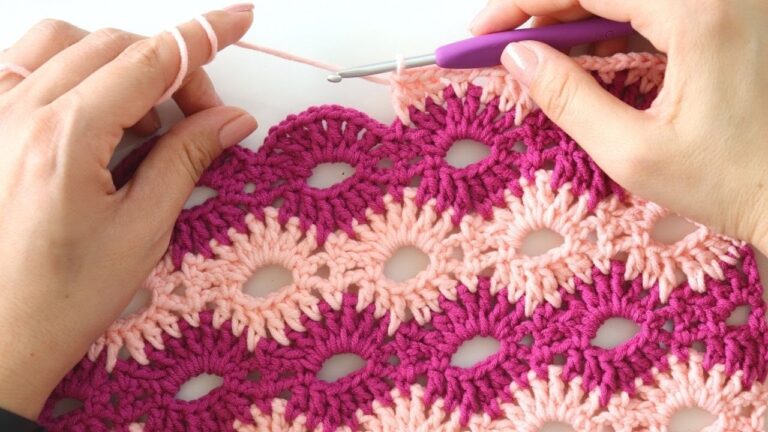
2. Stitch Patterns for Strength and Aesthetics
The stitch pattern dictates the basket’s density, texture, and how well it will hold its shape. Tighter stitches are generally preferred for basket construction.
- Single Crochet (sc): The workhorse of basket making. Its dense fabric creates a strong, stiff structure. Often worked in the back loop only (BLO) or front loop only (FLO) for added texture, or using the “waistcoat stitch” (or “knit stitch”) for a knit-like appearance.
- Half Double Crochet (hdc): Slightly taller than sc, it works up quicker while still providing a good, dense fabric.
- Puff Stitch / Bobble Stitch: Adds incredible texture and visual interest, making the basket soft and squishy. Often combined with sc or hdc for structure.
- Basketweave Stitch: A beautiful textured stitch that mimics woven fabric. It uses front post and back post double crochets to create a ribbed, basket-like effect. Provides good structure.
- Camel Stitch (hdc in the 3rd loop): Creates a knit-like ribbing that is dense and attractive.
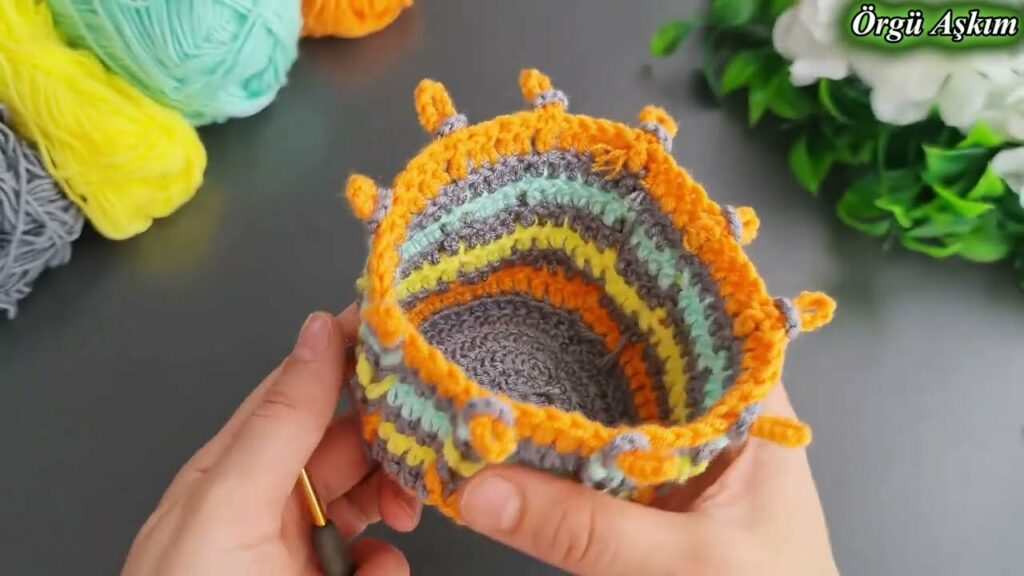
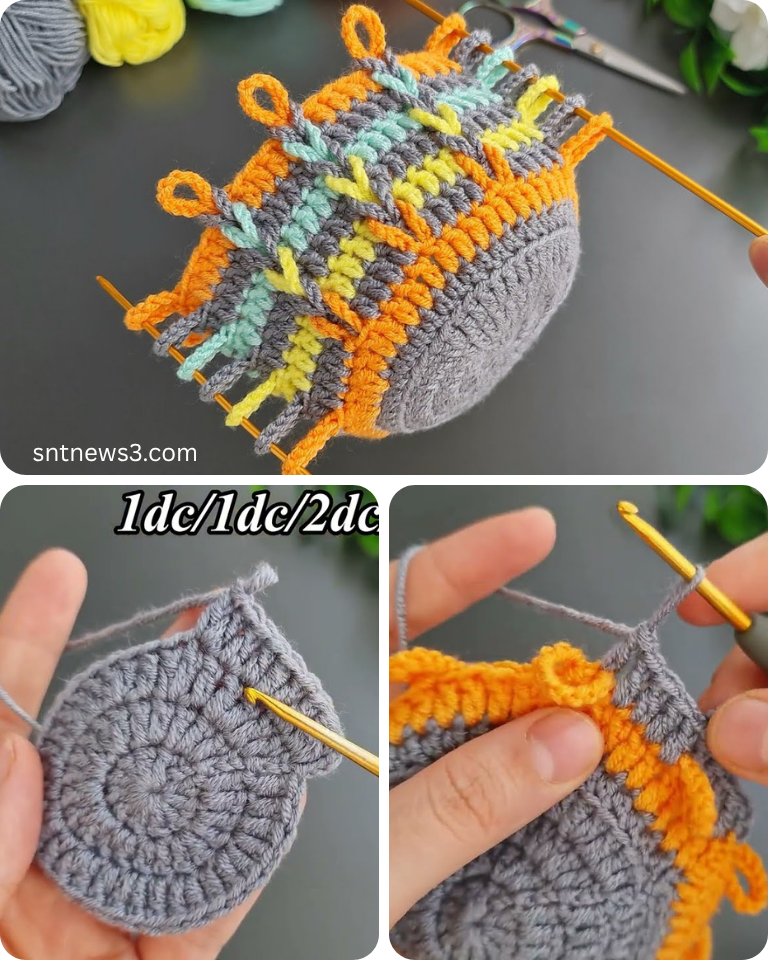
- Tapestry Crochet: Incorporate colorwork and patterns by carrying multiple strands of yarn, allowing for intricate designs on the basket’s exterior.
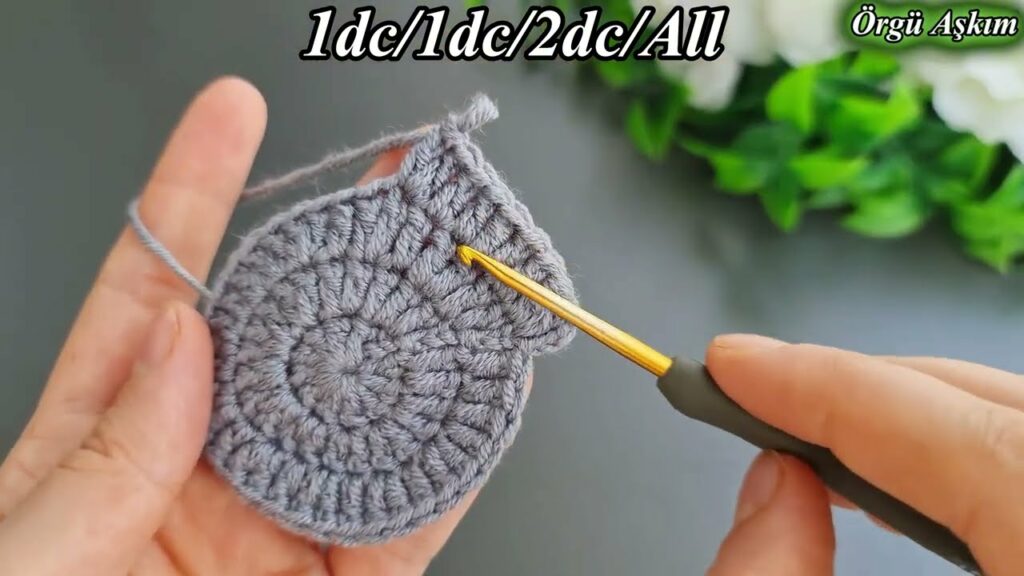
3. Shaping: Building the Basket
Most baskets are worked in the round, starting from a flat base and then building up the sides.
- The Base: Typically a flat circle (or oval/square) made with increasing stitches in each round until the desired diameter is reached. A firm, flat base is crucial for a stable basket.
- The Sides: Once the base is complete, you’ll stop increasing and often work a specific round (like slip stitching in the back loop only, or a round of single crochet in the back loop only) to create a defined “corner” before working straight up for the sides. This ensures the sides don’t curl inwards.
- Handles (Optional but Functional):
- Integrated Handles: Created by skipping stitches and chaining over them in a round.
- Separate Handles: Crocheted separately and then sewn securely to the basket.
- Wooden/Leather Handles: Can be attached for an elevated, professional look.
4. Finishing Touches: The Polish
- Weaving in Ends: Crucial for a neat and durable basket. Weave tails securely into the fabric.
- Stiffening (Optional): For very soft yarns or intricate shapes, you might consider:
- Fabric Stiffener: A spray-on or dip-and-dry solution for yarn.
- Sugar Stiffener: A traditional, natural method (sugar and water solution).
- Interfacing/Fabric Lining: Sewing a fabric liner into your basket can provide excellent structure and a clean interior finish, especially for baskets holding smaller items.
- Embellishments: Consider adding a leather tag, a wooden button, a tassel, or a contrasting stitch for a pop of color.
Popular Decorative Basket Ideas & Uses:
- Entryway Catch-All: Keys, mail, sunglasses.
- Bathroom Organization: Toiletries, hand towels, extra toilet paper rolls.
- Nursery Storage: Diapers, wipes, small toys.
- Craft Room Helper: Yarn balls, crochet hooks, sewing notions.
- Living Room Flair: Remote controls, magazines, small throws.
- Plant Pot Covers: A stylish way to hide plain plastic plant pots (use waterproof lining inside if watering plants directly).
- Gift Baskets: Fill with homemade goodies, spa items, or baby gifts.
- Kitchen Companion: Fruit basket, bread basket (with a cloth liner).
- Vanity Organizer: Makeup, brushes, jewelry.
Getting Started: Tips for Beginner Basket Crocheters
- Start Simple: Begin with a small, round basket using single crochet and a sturdy cotton or T-shirt yarn.
- Use a Large Hook: A larger hook (e.g., J/10 (6.0mm) or larger) makes working with thicker yarns easier and helps prevent hand fatigue.
- Tight Tension is Key: Aim for a tighter tension than you might for a blanket. This contributes significantly to the basket’s rigidity.
- Watch Tutorials: YouTube is an excellent resource for visual learners, especially for techniques like the magic ring or specific stitches.
- Don’t Be Afraid to Experiment: Once you understand the basics of base and side construction, play with different yarns and stitches!
Crochet decorative baskets are a delightful blend of artistry and utility. They allow you to infuse your living spaces with personalized charm, organize with style, and indulge in the satisfying process of creating something beautiful with your own hands. So pick up your hook, choose your favorite yarn, and start weaving some beauty into your home today!
How to Crochet a Beautiful Decorative Basket: A Beginner’s Step-by-Step Guide
Let’s make a sturdy and charming small-to-medium-sized crochet basket using simple stitches. This guide will walk you through the process, perfect for those new to basket making.
What We’re Making:
A round, single crochet basket with firm sides. This can be adapted for various sizes once you understand the basic construction.
Materials You’ll Need:
- Yarn:
- Option 1 (Recommended for beginners, very sturdy): T-shirt yarn (approximately 1-2 large skeins, depending on basket size)
- Option 2 (Sturdy, good for practice): Worsted weight (Category 4) cotton yarn. You will need to use 2-3 strands held together for a sturdy basket. (Approx. 200-400 yards total, depending on basket size).
- Option 3 (Rustic): Jute or hemp yarn (be aware this can be tough on hands).
- Crochet Hook:
- For T-shirt yarn: L/11 (8.0 mm) to N/P (10.0 mm) hook.
- For multiple strands of worsted weight cotton: K/10.5 (6.5 mm) to M/13 (9.0 mm) hook.
- Choose a hook size that creates a dense fabric with your chosen yarn(s).
- Yarn Needle (Tapestry Needle): For weaving in ends.
- Scissors: For cutting yarn.
- Stitch Marker (optional but helpful): To mark the beginning of each round.
Abbreviations:
- ch: chain
- sl st: slip stitch
- sc: single crochet
- inc: increase (2 single crochet in one stitch)
- st(s): stitch(es)
- (): indicates the number of stitches at the end of the round
Gauge (Important for Baskets!):
While not a strict number, your gauge should be tight and firm. You want the fabric to be dense, with very little space between the stitches, so your basket holds its shape. If your fabric is too loose, go down a hook size. If it’s too difficult to get your hook into the stitches, go up a hook size.
Pattern Instructions:
This basket is worked in continuous rounds for the base, then the sides are built up without further increases.
Part 1: The Base (Flat Circle)
We’ll start with a magic ring for a neat center. If you struggle with the magic ring, you can ch 2, and then work all sc stitches of Round 1 into the first chain.
Start with your chosen yarn(s) and hook.
- Magic Ring: Create a magic ring.
- Round 1: Ch 1 (does NOT count as a stitch). Sc 6 into the magic ring. Pull the tail tight to close the ring.
- (6 sts)
- Place your stitch marker in the first sc of this round if you’re using one.
- Round 2: Inc in each stitch around.
- (12 sts)
- Round 3:Sc in the first st, inc in the next st around.
- (18 sts)
- Round 4:Sc in the first 2 sts, inc in the next st around.
- (24 sts)
- Round 5:Sc in the first 3 sts, inc in the next st around.
- (30 sts)
- Round 6:Sc in the first 4 sts, inc in the next st around.
- (36 sts)
- Round 7:Sc in the first 5 sts, inc in the next st around.
- (42 sts)
- Check your base size: Lay the circle flat. This pattern will make a base approximately 5-6 inches (13-15 cm) in diameter, depending on your yarn and hook. If you want a larger base, continue the increase pattern (e.g., Round 8: Sc in next 6 sts, inc in next st around). If you want a smaller base, stop increasing earlier. The number of stitches at the end of your base should be a multiple of 6.
Part 2: Defining the Sides (The “Corner”)
This crucial step helps your basket stand up straight rather than just continuing as a flat circle.
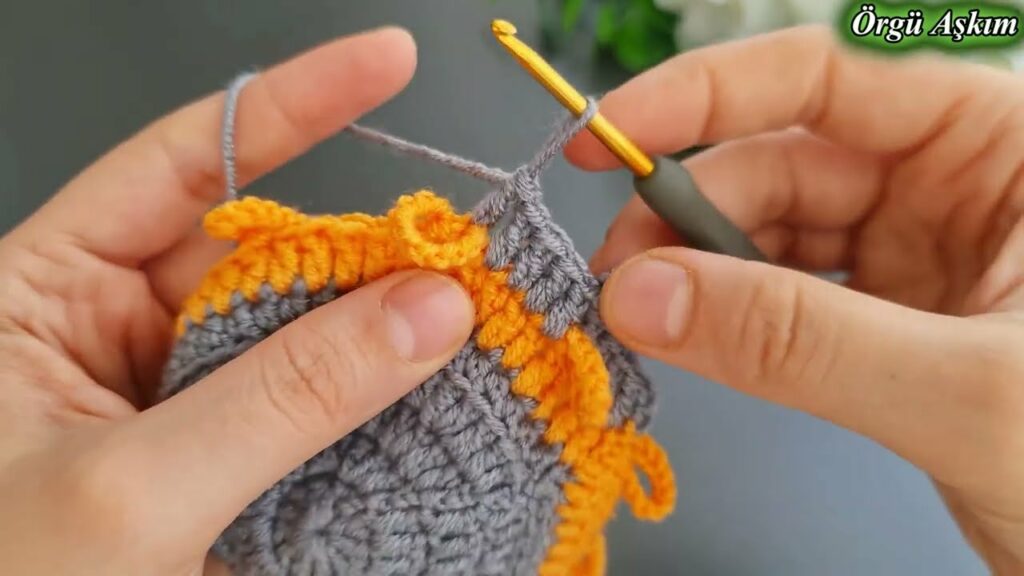
- Round 8 (Transition Round): Working into the back loop only (BLO) of each stitch, sc in each stitch around.
- (42 sts)
- Working in the BLO for this round creates a defined ridge that forms the bottom edge of your basket’s sides.
Part 3: Building the Sides
Now we’ll work straight rounds to build the height of your basket.
- Round 9: Working through both loops again as normal, sc in each stitch around.
- (42 sts)
- Rounds 10 – 15 (or to desired height): Repeat Round 9. Continue making rounds of sc in each stitch until your basket reaches the height you desire. For a typical small decorative basket, 6-8 rounds (including Round 9) for the sides is a good starting point.
- (42 sts per round)
Part 4: Adding Handles (Optional)
Handles make your basket functional and add to its decorative appeal.
- If adding handles (example for 42 stitches):
- Handle Round 1: Sc in the first 10 sts. Ch 6 (this is your handle chain). Skip the next 6 sts. Sc in the next 15 sts. Ch 6. Skip the next 6 sts. Sc in the remaining 5 sts.
- (Your starting and ending sc counts might need to be adjusted slightly to center the handles, depending on your total stitch count.)
- Handle Round 2: Sc in each sc stitch around. When you reach a chain-6 handle, sc 6 into the chain-6 space. Continue sc in each sc stitch until the next handle. Sc 6 into the next chain-6 space. Sc in remaining sc stitches.
- (This secures the handle loops.)
- Handle Round 1: Sc in the first 10 sts. Ch 6 (this is your handle chain). Skip the next 6 sts. Sc in the next 15 sts. Ch 6. Skip the next 6 sts. Sc in the remaining 5 sts.
- If not adding handles: Just continue with straight sc rounds until you reach your desired height.
Part 5: Finishing the Rim (Optional but Recommended)
A single round of slip stitches can create a clean, neat finish for the top edge.
- Final Round (Optional Rim): Sl st in each stitch around. Join with a sl st to the very first sl st of the round.
Part 6: Fasten Off and Weave in Ends
- Fasten Off: Cut your yarn, leaving a tail about 6-8 inches long. Yarn over and pull the tail completely through the loop on your hook to secure.
- Weave in Ends: Thread your yarn needle with the starting tail (from the magic ring) and the ending tail. Weave them securely into the inside of your basket stitches. For the ending tail, try to weave it invisibly along the top rim.
Congratulations! Your Beautiful Crochet Decorative Basket is Complete!
Tips for Making Your Basket Even More Beautiful:
- Consistent Tension: This is the most important factor for a sturdy and attractive basket. Aim for even stitches throughout.
- Yarn Choice: Experiment with different textures and colors! Variegated yarn can create lovely effects without needing to change colors.
- Stitch Definition: Using a slightly smaller hook than recommended for your yarn can result in a tighter, more defined stitch, which is excellent for baskets.
- Add a Liner: For plant pots or holding smaller items, consider sewing a fabric liner into your basket for a polished finish and to prevent small items from falling through.
- Embellishments:
- Attach a small leather tag or wooden button with your chosen word or logo.
- Tie a decorative ribbon around the top.
- Add a small tassel or pom-pom.
- Experiment with Base Shapes: Once you master the round base, try making oval or square bases for different basket styles.
- Blocking (Optional): If your basket seems a little wonky, you can lightly mist it with water, shape it, and let it air dry completely. For extra stiffness, some crafters use a mix of white glue and water, or fabric stiffener.
Video tutorial:
Enjoy your beautiful, handmade creation!