by
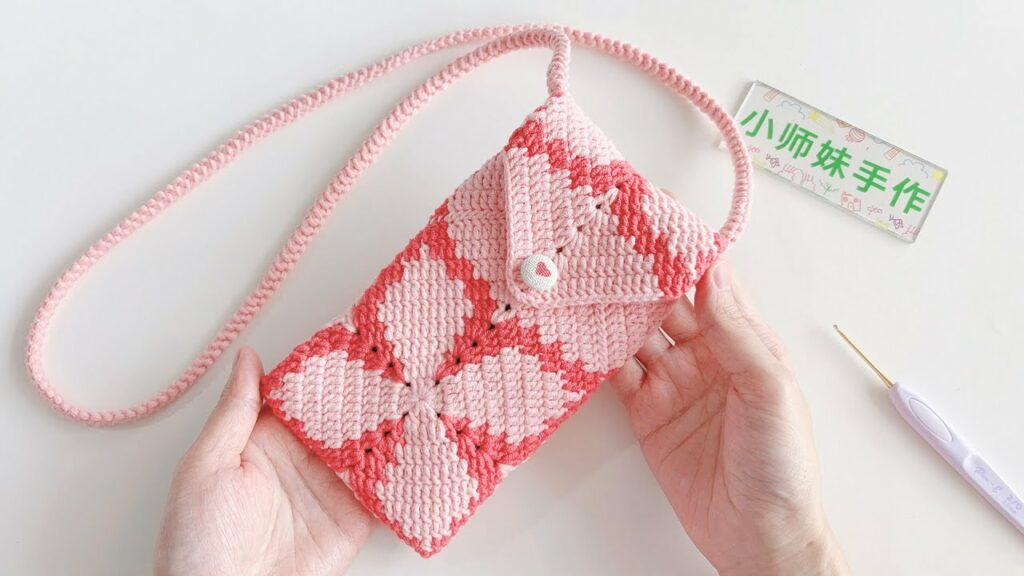
by In a world where our mobile phones are constant companions, why not give them a home that’s as unique and delightful as your personal style? A Crochet Mobile Phone Bag isn’t just a practical accessory for carrying your device; when adorned with fresh butterfly and flower accents, it transforms into a miniature work of art, bursting with whimsical charm.
This detailed article will guide you through creating such a captivating phone bag. We’ll focus on a sturdy yet aesthetically pleasing design, perfect for beginners and seasoned crocheters alike who want to infuse their everyday items with a touch of handmade beauty. Get ready to bloom with creativity and crochet a functional piece that reflects your fresh, artistic spirit!
Why Crochet a Mobile Phone Bag with Butterfly & Flower Accents?
- Stylish & Unique: Ditch the generic phone cases! A handmade bag offers unparalleled personalization and flair.
- Practical Protection: Provides a soft, protective layer for your phone, preventing scratches and minor bumps.
- Skill Builder: You’ll practice essential techniques like working in rows/rounds, creating a sturdy fabric, adding a flap, and attaching decorative appliqués.
- Perfect for Gifts: A thoughtful and customizable gift for friends, family, or anyone who loves handmade accessories.
- Scrap Buster: The butterfly and flower motifs are excellent for using up small amounts of colorful yarn.
- Express Your Style: Choose colors and motifs that truly reflect your personality and love for nature.
Key Considerations Before You Start:
- Phone Size & Fit:
- Measure your phone! This is crucial. Measure its height, width, and thickness. You’ll need to adjust your starting chain and row count to accommodate your specific device.
- Allow for ease: Add about 0.5 – 1 inch (1-2.5 cm) to the width and height measurements to ensure your phone slides in and out easily, especially after the fabric is crocheted.
- Yarn Choice:
- Bag Body: Choose a yarn that is durable, has good stitch definition, and isn’t too stretchy.
- Cotton or Cotton Blends: Excellent choice for their sturdiness, breathability, and ability to hold shape. They also create beautiful stitch definition.
- Mercerized Cotton: Offers a slight sheen and even better stitch definition.
- Acrylic: A good, affordable, and widely available option, especially if it’s a good quality, non-stretchy type.
- Butterfly/Flower Accents: Use small amounts of vibrant colors. Cotton or acrylic scraps are perfect.
- Weight: DK (Light Worsted/Category 3) or Worsted (Category 4) are ideal. DK will create a finer bag, while worsted will be quicker and more substantial.
- Quantity: Approximately 50-80 yards for the main bag, and very small amounts for the motifs.
- Bag Body: Choose a yarn that is durable, has good stitch definition, and isn’t too stretchy.
- Hook Size:
- Match your hook to your yarn weight, but consider going down half a size from the yarn label’s recommendation. This will create a denser fabric, providing better protection and ensuring the bag holds its shape well.
- For DK yarn: E/4 (3.5 mm) or F/5 (3.75 mm).
- For Worsted yarn: G/6 (4.0 mm) or H/8 (5.0 mm).
- Stitch Choice for Bag Body:
- Single Crochet (sc): Creates a dense, sturdy fabric, perfect for a phone bag.
- Half Double Crochet (hdc): Works up faster than sc, still offers good density.
- We’ll use single crochet for the body for maximum protection and structure.
Materials You’ll Need:
- Yarn:
- Main Bag Color (e.g., light green or beige): ~70 yards DK or Worsted Weight cotton.
- Accent Colors for Butterfly/Flowers (e.g., pink, purple, yellow, blue): Small amounts of DK or Worsted Weight cotton scraps.
- Crochet Hook: Size G/6 (4.0 mm) (adjust based on your yarn and phone size).
- Yarn Needle (Tapestry Needle): For weaving in ends and sewing on appliqués.
- Scissors: For cutting yarn.
- Button (optional): One small decorative button for the flap closure.
- Stitch Marker (optional): Useful for marking first stitch of rounds or rows.
Essential Crochet Abbreviations:
- ch: chain
- sl st: slip stitch
- sc: single crochet
- hdc: half double crochet
- dc: double crochet
- tr: treble crochet
- inc: increase (e.g., 2 sc in one st)
- dec: decrease (e.g., sc2tog – single crochet 2 together)
- st(s): stitch(es)
- MR: magic ring
- (): indicates instructions to be worked into the same stitch/space
- ***…***: repeat instructions within asterisks
Crochet Mobile Phone Bag Tutorial: Step-by-Step
This pattern will create a bag that fits a standard smartphone (approx. 3″ W x 6″ H x 0.3″ D, or 7.5cm W x 15cm H x 0.8cm D). Remember to adjust your starting chain and row count based on your phone’s specific dimensions.
Part 1: The Bag Body (Main Color)
We’ll start with a foundation chain and work around it to create the base and then build up the sides in continuous rounds.
- Starting Chain (Base Width): Ch 15. (This chain determines the width of your bag. For a 3″ wide phone, 15 ch should give you enough width once stitches are worked around it. Adjust by chaining a number that, when worked into, will be about 0.5-1 inch wider than your phone).
- Round 1 (Base):
- Sc in the 2nd ch from hook. Sc in each of the next 12 ch.
- Work 3 sc in the last ch (this forms the curve for the end of the base).
- Now, working along the opposite side of the starting chain: Sc in each of the next 12 ch.
- Work 2 sc in the last ch (the same ch as your very first sc – this forms the curve for the other end).
- Join with a sl st to the first sc of the round.
- [30 sc] (13 + 3 + 12 + 2 = 30)
- Round 2 (Sides – Establishing the Wall):
- Ch 1 (does NOT count as a st). Sc in the back loop only (BLO) of each st around.
- Join with a sl st to the first sc.
- [30 sc]
- Working in the BLO for this round creates a nice defined edge where the base transitions to the sides.
- Rounds 3 – 25 (Sides – Building Height):
- Ch 1. Sc in both loops of each st around.
- Join with a sl st to the first sc.
- [30 sc]
- Repeat this round until the bag reaches the desired height for your phone, ensuring it covers the top, leaving enough room for a flap if desired. For a 6″ high phone, 23-25 rounds of sc should be about right. Regularly insert your phone to check the fit and height.
- Fasten off Main Bag Color.
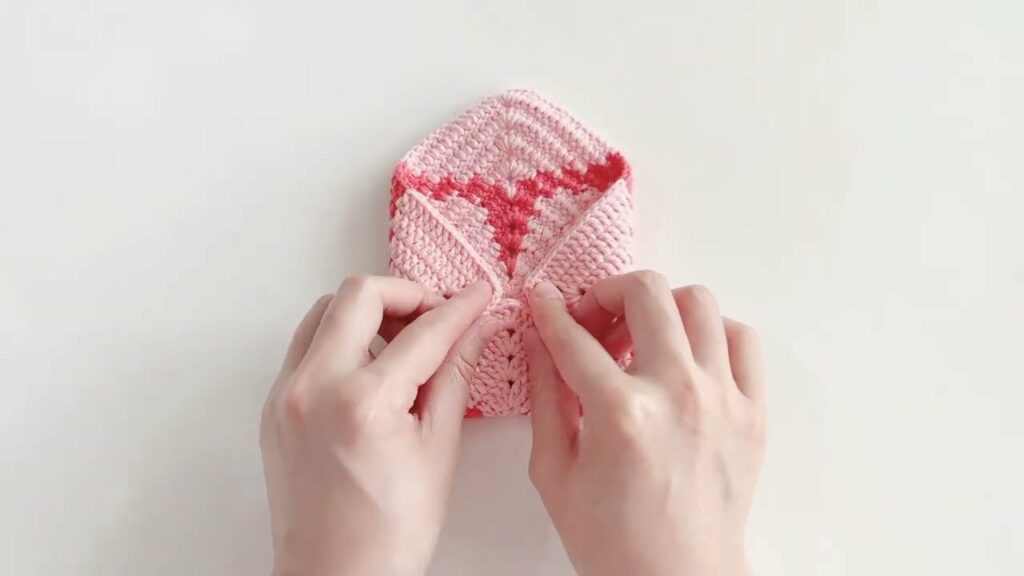
Part 2: The Flap (Main Color)
This is the top closure of your bag.
- Attach Yarn: With your bag facing you (seam/join at the back), attach your Main Bag Color with a sl st to the center-back stitch of the last round of the bag.
- Flap Row 1: Ch 1. Sc in the next 15 sts (this will be approximately half the circumference of your bag).
- [15 sc]
- Ch 1, turn.
- Flap Row 2: Sc in each st across.
- [15 sc]
- Ch 1, turn.
- Repeat Flap Row 2: Continue working straight sc rows until your flap measures approximately 2-2.5 inches (5-6 cm) in length.
- Buttonhole Row (Optional): If adding a button, find the center of your flap.
- Sc until you reach the center. Ch 2, skip 2 sts (or ch 3, skip 3 sts for a larger button). Sc in remaining sts.
- Ch 1, turn.
- Next Row (if buttonhole made): Sc in each sc, and sc 2 (or 3) into the ch-2 (or ch-3) space.
- Final Flap Row (Optional Border/Picot): Ch 1. Sc in each st across. For a decorative edge, you can add a picot:
(sc, ch 3, sl st into first ch)after every few stitches. - Fasten off and weave in ends.
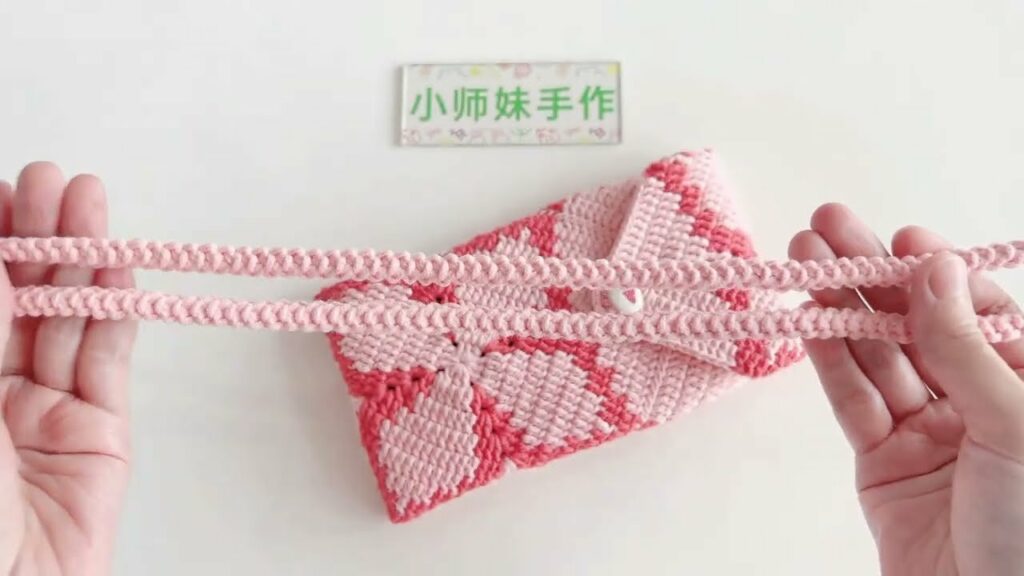
Part 3: The Shoulder Strap/Handle (Main Color)
You can make a simple chain strap or a crocheted strap.
Option A: Simple Chain Strap:
- Ch 120-150 (or desired length for shoulder strap).
- Sl st in 2nd ch from hook and in each ch across.
- Fasten off, leaving long tails.
- Sew one end to each side of the top back of the phone bag using your yarn needle.
Option B: Crocheted Strap (more durable):
- Ch 5.
- Row 1: Sc in 2nd ch from hook. Sc in next 3 ch.
- [4 sc]
- Ch 1, turn.
- Repeat Row 1: Sc in each st across.
- [4 sc]
- Ch 1, turn.
- Continue repeating this row until the strap reaches your desired length (approx. 24-30 inches for a shoulder bag, or shorter for a wristlet).
- Fasten off, leaving long tails.
- Sew one end to each side of the top back of the phone bag using your yarn needle.
Part 4: Fresh Butterfly and Flower Motifs
A. Simple Butterfly (Example):
- Start: Using an accent color, ch 4, sl st into first ch to form ring.
- Wing 1: Ch 3 (counts as dc). (Dc, ch 2, sl st) into ring.
- Wing 2: (Sl st, ch 2, dc, ch 3, sl st) into ring.
- Wing 3: (Sl st, ch 3, dc, ch 2, sl st) into ring.
- Wing 4: (Sl st, ch 2, dc, ch 3, sl st) into ring.
- (4 wings created)
- Fasten off, leaving a tail for weaving.
- Body: Take a small piece of black or brown yarn. Thread it through the center of the butterfly, making a small knot at the top for antennae, and a few stitches down the middle to form the body. Trim ends.
B. Small Flower (Example):
- Start: Using an accent color, create a MR (or ch 4, sl st to first ch to form ring).
- Round 1: Ch 1 (does NOT count as a st). Sc 10 into the MR. Sl st to first sc to join.
- [10 sc]
- Round 2 (Petals):Ch 2, (dc, ch 2, sl st) into the same sc. Sl st into the next sc. Repeat from * to * 4 more times to create 5 petals.
- [5 petals]
- Fasten off, leaving a tail for weaving.
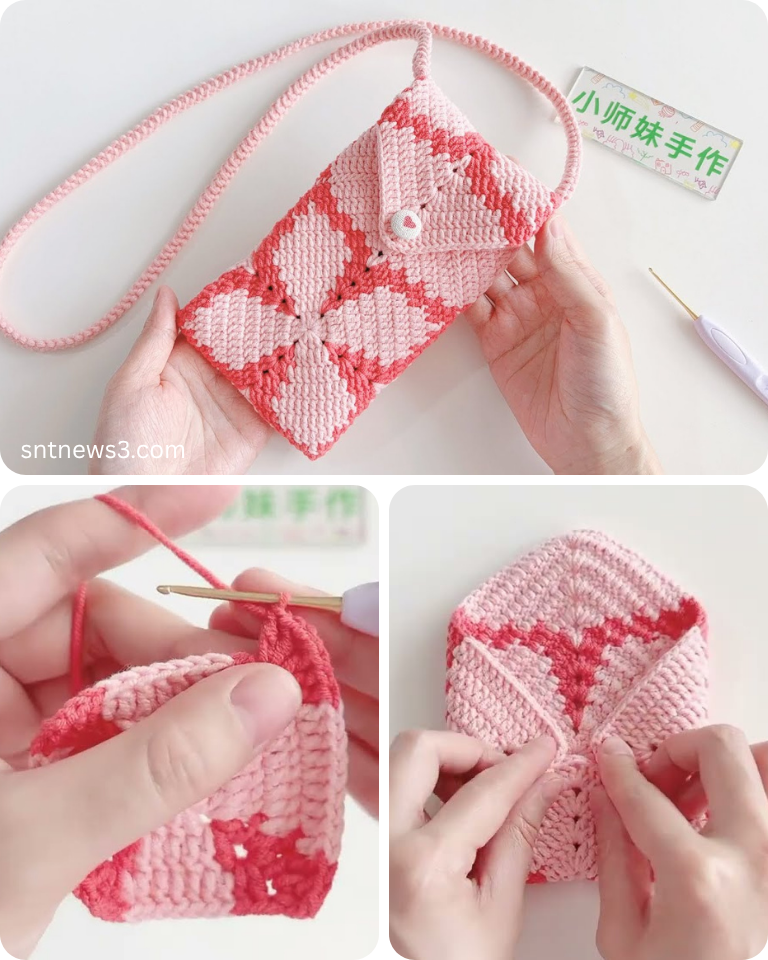
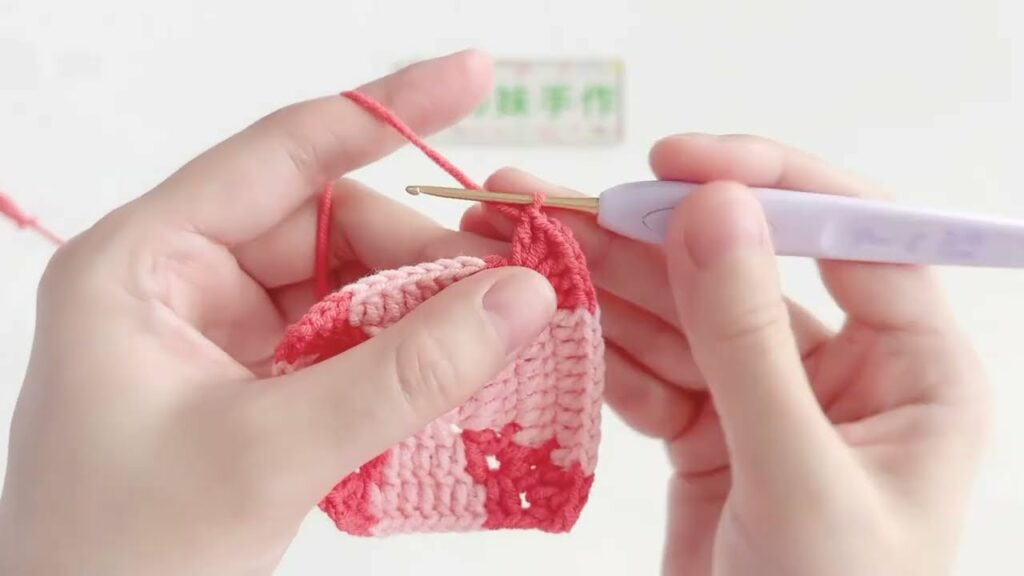
Part 5: Assembly & Finishing Touches
- Weave in All Ends: Use your yarn needle to neatly weave in all starting and ending tails from the bag body, flap, strap, and motifs.
- Attach Motifs: Arrange your crocheted butterfly and flowers onto the front of the phone bag. Use your yarn needle to neatly sew them onto the bag. Be careful that your stitches don’t go all the way through if you don’t want them visible on the inside.
- Attach Button (if applicable): Sew your chosen button onto the front of the bag, aligning it with the buttonhole you created on the flap.
- Optional: Lining: For extra protection and a super polished finish, you can sew a fabric lining into your phone bag.
- Optional: Starched/Stiffened: For a very rigid bag, you could lightly starch the finished piece and let it dry.
Your Crochet Mobile Phone Bag with Fresh Butterfly Flower Accents is Complete!
You now have a charming, handmade accessory that combines practicality with artistic flair. Enjoy carrying your phone in style, knowing it’s nestled in a piece crafted with love.
Tips for Success & Customization:
- Measuring is Key: Always measure your phone and adjust the pattern’s starting chain and row count accordingly.
- Stitch Definition: Using a slightly smaller hook than the yarn label recommends can help achieve a denser, firmer fabric for the bag body.
- Color Play: Experiment with contrasting colors for the bag body and the accents. You could even use a variegated yarn for the body for an easy, self-striping effect.
- Different Motifs: Explore other small crochet motifs like leaves, tiny hearts, or other simple flowers to add variety to your “patchwork.”
- Closure Options: Besides a button, you could use a magnetic snap, a zipper, or simply a drawstring closure at the top.
- Gift Ideas: Fill the bag with a small gift card or a fun lip balm to make it an even more special present.
- Care: Refer to your yarn label for specific washing instructions. Most cotton or acrylic items can be hand washed or machine washed on a gentle cycle.
Video tutorial:
Happy crocheting, and enjoy your beautiful new phone bag!