 by
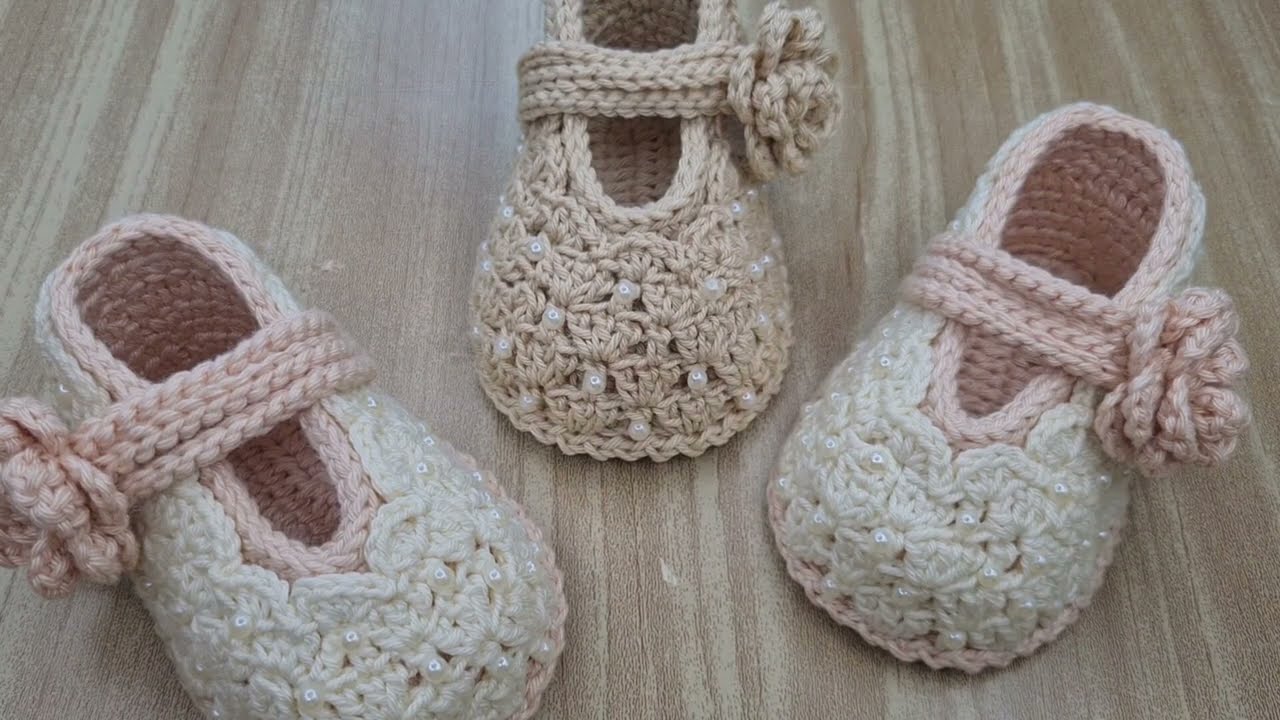
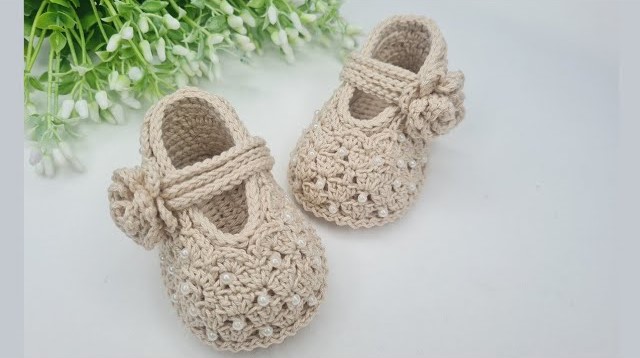
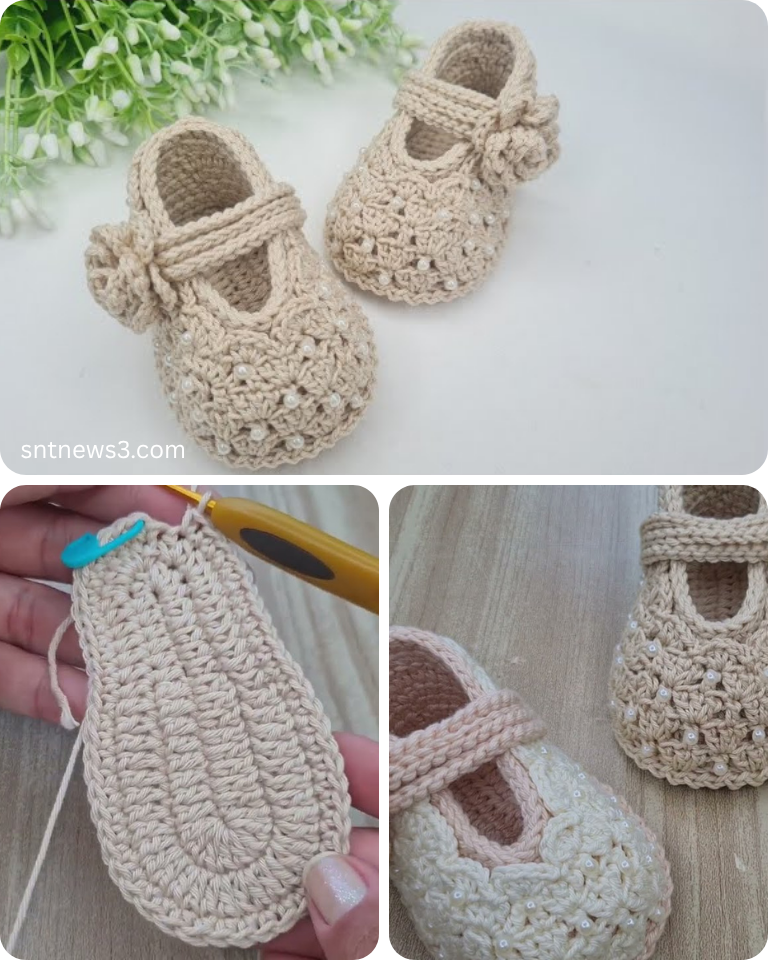
by There’s an undeniable allure to baby booties, and when crafted with a delicate lace pattern, they become truly exquisite. These Crochet Lace Booties, designed for a finished sole length of approximately 9 cm (3.5 inches) – ideal for 1 to 3 month old babies – offer a sophisticated touch to any baby’s wardrobe. Perfect for special occasions, photo shoots, or simply adding a touch of elegance to everyday wear, these booties combine warmth with a beautiful airy design.
This detailed tutorial will guide you through creating a pair of these charming lace booties. We’ll focus on a simple yet effective lace stitch that is beginner-friendly while still delivering that coveted delicate aesthetic. Get ready to crochet a gift that’s sure to be treasured!
Why Crochet Lace Baby Booties?
- Exquisite Gift: Handmade lace booties are a thoughtful, unique, and highly appreciated gift for baby showers, christenings, or welcoming a new arrival.
- Lightweight & Breathable: The openwork lace pattern makes them ideal for warmer climates (like Cambodia!) or for babies who tend to get warm easily, providing comfort without overheating.
- Skill Enhancer: Provides excellent practice in working with lighter yarns, maintaining tension for lace, and mastering basic shaping techniques.
- Visually Stunning: The intricate look of lace adds a touch of vintage charm and elegance.
- Relatively Quick Project: Despite their detailed appearance, booties are small and work up quickly.
- Heirloom Quality: With proper care, these booties can become a cherished keepsake.
Key Considerations Before You Start:
- Size (Crucial for Baby Items!):
- This pattern is specifically tailored for a 9 cm (3.5 inch) sole, typically fitting 1 to 3 month old babies.
- Baby foot sizes vary! While 9 cm is a good average for this age group, it’s always best to measure if possible.
- Gauge is vital! A slight difference in your tension can significantly alter the finished size of baby booties.
- Yarn Choice (Softness & Definition):
- Fiber: Opt for the softest, gentlest, and ideally hypoallergenic yarns.
- Baby Cotton or Cotton Blends: Excellent for softness, breathability, and stitch definition, especially for lace.
- Bamboo or Bamboo Blends: Incredibly soft, silky, and drapes beautifully.
- Fine Merino Wool (Superwash): Very soft, warm but breathable, and often machine washable.
- Weight: Fingering (Category 1) or Sport (Category 2) yarn weights are best for achieving a delicate lace look. Using a heavier yarn will result in a significantly larger and less dainty bootie.
- Color: Pastels, creams, white, or soft muted tones enhance the delicate lace appearance.
- Quantity: Very little yarn is needed – typically less than 50g (1.7 oz) for a pair.
- Fiber: Opt for the softest, gentlest, and ideally hypoallergenic yarns.
- Hook Size:
- Match your hook size to your chosen yarn weight. For lace, you generally want a hook that creates a slightly tighter fabric than normal to ensure the openwork holds its shape.
- For Fingering yarn: 2.0 mm (US B/1) or 2.25 mm (US B/1-C/2).
- For Sport yarn: 2.5 mm (US C/2) or 2.75 mm (US C/2).
- Gauge (Absolutely Essential!):
- Before you start, make a small swatch of your sole pattern (Part 1). Measure it carefully. If your sole is larger than 9 cm, go down a hook size. If it’s smaller, go up. This will ensure your booties fit the intended size.

Materials You’ll Need:
- Yarn: Approx. 30-40 yards of Fingering (Category 1) or Sport (Category 2) weight soft baby yarn (e.g., cotton, bamboo, fine merino).
- Crochet Hook: 2.5 mm (US C/2) (adjust as needed for gauge).
- Yarn Needle (Tapestry Needle): For weaving in ends.
- Scissors: For cutting yarn.
- Stitch Marker (optional): Helpful for marking the beginning of rounds.
- Optional: 1 yard of 1/4 inch (6mm) wide ribbon for threading through the ankle.
Essential Crochet Abbreviations:
- ch: chain
- sl st: slip stitch
- sc: single crochet
- hdc: half double crochet
- dc: double crochet
- ch-sp: chain space
- inc: increase (e.g., 2 sc in one st)
- sc2tog: single crochet 2 together (decrease)
- dc2tog: double crochet 2 together (decrease)
- st(s): stitch(es)
- BLO: back loop only
- (): indicates instructions to be worked into the same stitch/space
- ***…***: repeat instructions within asterisks
- []: indicates stitch counts at the end of a round
Crochet Lace Baby Booties Pattern (9 cm / 1-3 Months)
This pattern is worked seamlessly from the sole up, then the lace body is created, followed by shaping the toe and adding the cuff.
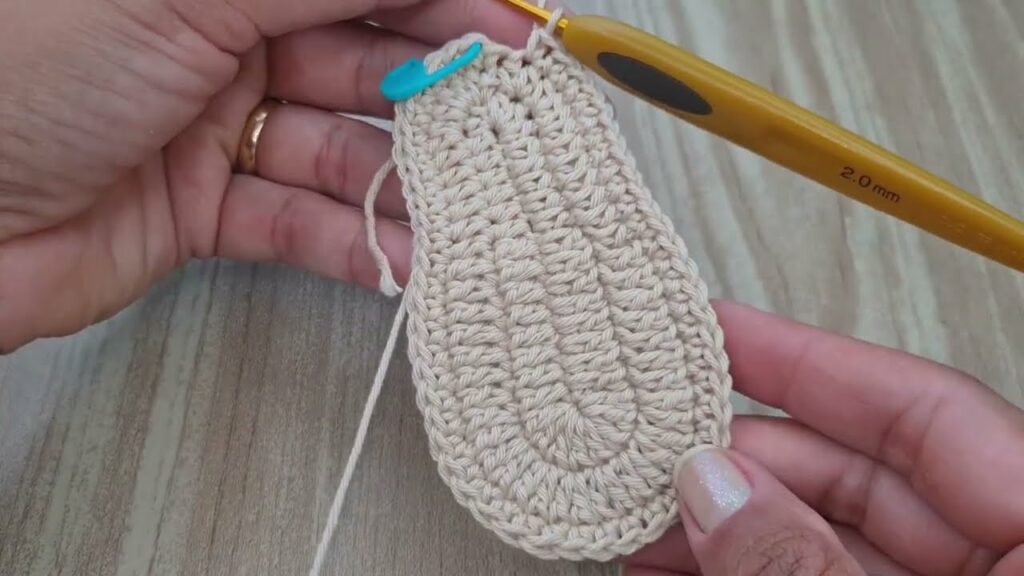
Part 1: The Sole
We’ll begin with a flat oval base for the bootie.
- Starting Chain: Ch 11.
- Round 1:
- Sc in the 2nd ch from hook. Sc in each of the next 8 ch.
- Work 3 sc in the last ch (toe end).
- Working along the opposite side of the starting chain: Sc in each of the next 8 ch.
- Work 2 sc in the last ch (heel end, same ch as your very first sc).
- Join with a sl st to the first sc of the round.
- [22 sc]
- Round 2:
- Ch 1 (does NOT count as a st). Sc inc in the first st. Sc in the next 8 sts.
- Sc inc in the next 3 sts. Sc in the next 8 sts. Sc inc in the next 2 sts.
- Join with a sl st to the first sc.
- [28 sc]
- Round 3:
- Ch 1. Sc in the first st. Sc inc in the next st. Sc in the next 8 sts.
- (Sc inc in next st, sc in next st) 3 times. Sc in the next 8 sts. (Sc inc in next st, sc in next st) 2 times.
- Join with a sl st to the first sc.
- [34 sc]
- CHECK SOLE LENGTH HERE: At this point, your sole should measure approximately 9 cm (3.5 inches) from toe to heel. Adjust hook size now if needed.
Part 2: Transition to Upper
This round creates the defined edge for the sides of the bootie.
- Round 4 (Establishing Wall):
- Ch 1 (does NOT count as a st). Sc in the back loop only (BLO) of each st around.
- Join with a sl st to the first sc.
- [34 sc]
- Working in BLO creates a neat ridge where the sole meets the upper, giving the bootie shape.
Part 3: The Lace Body (Simple V-Stitch Lace)
We’ll start building the height with our airy lace pattern, including toe shaping.
- Round 5 (Lace Row 1):
- Ch 3 (counts as first dc). Dc in the same st. Skip next st.
- (Dc in next st, ch 1, dc in same st). Skip next st. Repeat from * 7 more times.
- Toe Shaping (Decreases): (Dc2tog over next 2 stitches, ch 1, dc in same st as last leg of dc2tog) 3 times. (This forms 3 V-stitches over 6 stitches, pulling the toe in).
- Skip next st. (Dc in next st, ch 1, dc in same st). Skip next st. Repeat from * until 1 st remains. Dc in last st.
- Join with a sl st to the top of the beginning Ch 3.
- [Approx. 19 V-stitches + 1 dc] (the count might feel a bit abstract due to the V-stitches, but you’re working into approximately 34 sts with decreases).
- Round 6 (Lace Row 2):
- Ch 3 (counts as first dc). Dc in the first ch-1 space. Ch 1.
- (Dc in next ch-1 space, ch 1, dc in same ch-1 space). Ch 1. Repeat from * until you are directly over the decreases from the previous round.
- Continue the V-stitch pattern into the ch-1 spaces of the V-stitches from the previous round, including the decreased section.
- Join with a sl st to the top of the beginning Ch 3.
- [Approx. 19 V-stitches] (You should have 19 V-stitches with a ch-1 space between their two dc stitches).
- Round 7 (Lace Row 3 – Ankle Ribbon Round):
- Ch 3 (counts as first dc). Work 1 dc in the first ch-1 space.
- Ch 1, skip 1 st. Dc in next ch-1 space. Repeat from * around the entire bootie.
- Join with a sl st to the top of the beginning Ch 3.
- [Approx. 20-22 dc & ch-1 spaces] (This round creates the eyelets for the ribbon).
Part 4: The Ankle/Cuff
This forms the opening of the bootie and gives it a finished edge.
- Round 8 (Solid Edge):
- Ch 1 (does NOT count as a st). Sc in each dc and each ch-1 space around.
- Join with a sl st to the first sc.
- [Approx. 40-44 sc] (This count should be roughly double the number of dc/ch-1 spaces from the previous round).
- Round 9 (Picot Edge – Optional Decorative Finish):
- Ch 1. Sc in the first st.
- Sc in the next 2 sts. (Ch 3, sl st into the first of those 3 chains – this makes a picot).
- Repeat from * around the entire ankle opening.
- Join with a sl st to the first sc.
- Fasten off, leaving a tail to weave in.
Part 5: Finishing Touches
- Weave in All Ends: Use your yarn needle to neatly weave in all starting and ending tails from the sole, body, and cuff. Take your time to make them invisible, especially with delicate lace.
- Make a Second Bootie! Repeat all steps to create a matching pair.
- Blocking (Highly Recommended!): Gently wet your booties (or mist them with water). Carefully shape them, gently stretching the lace pattern to open up the stitches and define the shape. Pin them onto a foam mat or clean towel if desired. Allow them to air dry completely. Blocking makes a huge difference for lace.
- Add Ribbon (Optional): Cut a piece of ribbon about 18-20 inches long. Thread it through the eyelet holes created in Round 7, starting and ending at the front-center of the bootie. Tie a pretty bow.
Your Delicate Crochet Lace Baby Booties are Complete!
These little booties are a testament to your crochet skills and your love for handmade elegance. They are sure to add a touch of timeless charm to any baby outfit.
Tips for Success & Customization:
- Tension for Lace: Maintaining an even, slightly looser tension for the lace rounds compared to the solid base will help the “holes” open up nicely.
- Stitch Markers: Use a stitch marker to mark the first stitch of each round to avoid getting lost, especially when working the lace patterns.
- Customizing Lace: Once comfortable with the V-stitch, explore other simple lace patterns that are suitable for working in the round. Look for patterns that are a multiple of your starting stitch count.
- Embellishments: Besides ribbon, you could add tiny embroidered flowers, a small crocheted pearl, or a delicate satin rose. Ensure any embellishments are very securely attached if for a baby.
- Yarn Colors: While white and cream are classic for lace, soft pastels like baby blue, lavender, or mint green also look beautiful.
- Care: Always refer to your yarn label for specific washing instructions. Most delicate baby yarns will require hand washing and flat drying to maintain their shape and integrity.
Enjoy the beauty and satisfaction of your handmade lace booties – they are truly a work of love!
Video tutorial: