by
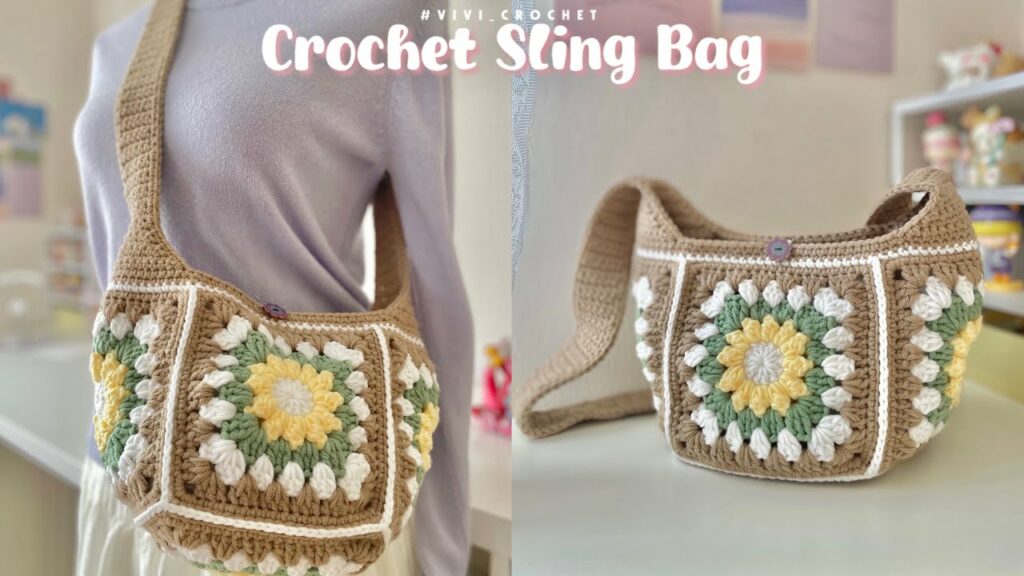
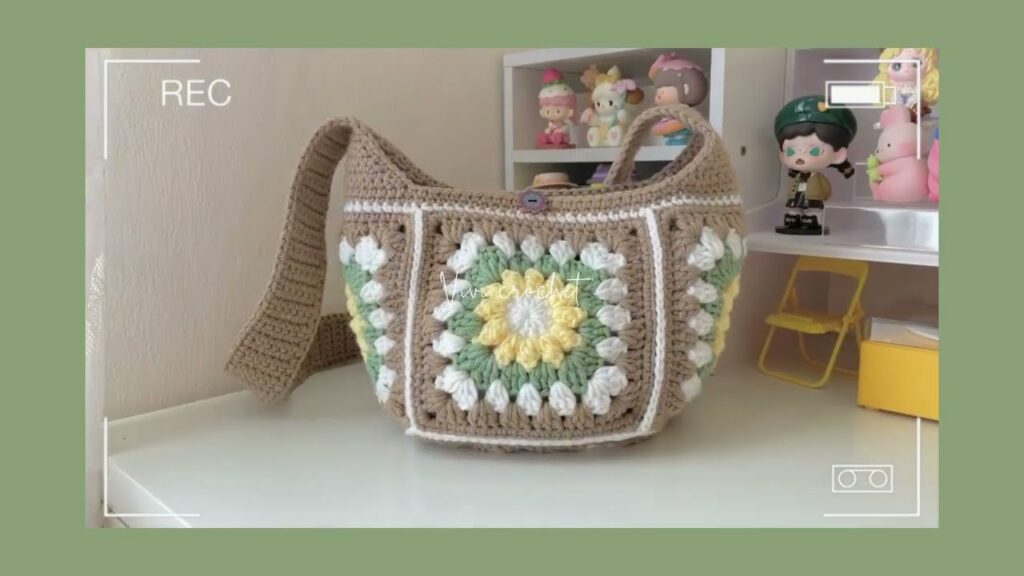
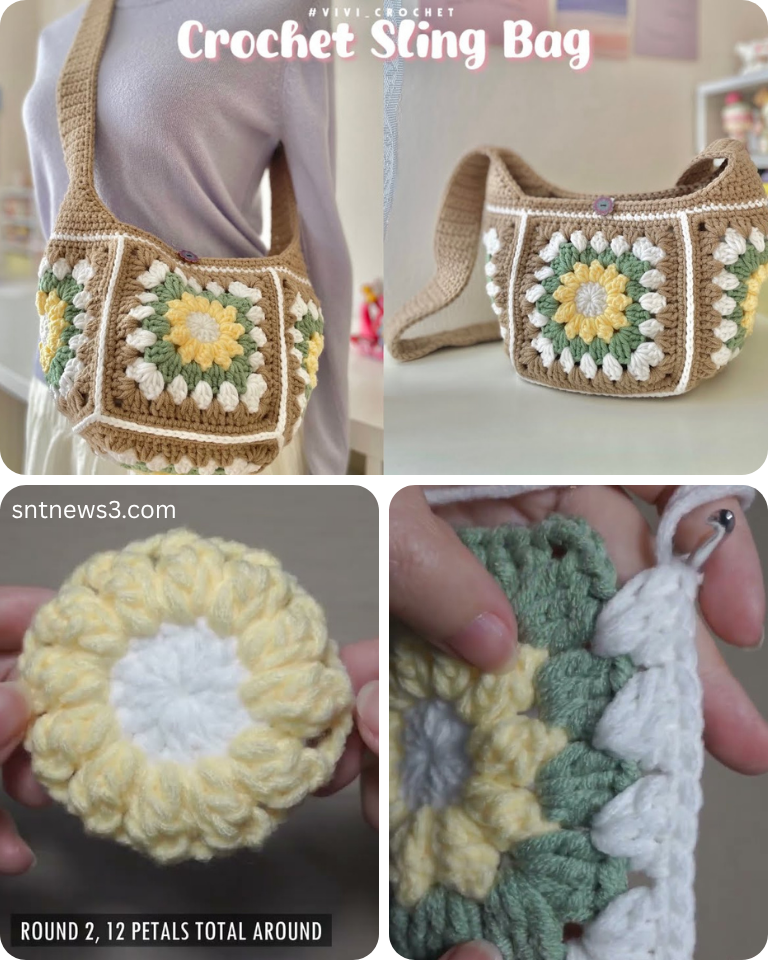
by The granny square is a timeless icon of crochet, renowned for its versatility and charming, often nostalgic, aesthetic. When reimagined as a sling bag, it transforms into a highly functional and incredibly stylish accessory that’s perfect for carrying your essentials with a touch of handmade flair. Whether you’re heading to a festival, a casual brunch, or simply want a hands-free way to carry your phone and wallet, a granny square sling bag is a fantastic project.
This detailed article will guide you step-by-step through the process of crocheting your very own unique Granny Square Sling Bag. We’ll cover everything from crocheting the individual squares to joining them, shaping the bag, and adding a comfortable strap. Get ready to unleash your creativity and construct a practical piece of wearable art!
Why Crochet a Granny Square Sling Bag?
- Ultimate Customization: Choose your own colors, square size, layout, and strap design for a truly unique bag that reflects your personality.
- Stash Buster: Granny squares are perfect for using up small amounts of leftover yarn in various colors.
- Skill Development: This project helps you master basic crochet stitches, learn to create consistent motifs, and practice joining techniques.
- Trendy & Timeless: Granny squares have a classic, retro appeal that cycles back into fashion, while a sling bag design is eternally practical.
- Portable Project: You can crochet squares on the go and assemble them later.
- Rewarding Result: A finished bag is a substantial and satisfying project that you can use or gift proudly.
Key Considerations Before You Start:
- Bag Size & Layout:
- The size of your bag will depend on the size of your granny squares and how many you choose to use. A common layout for a sling bag uses a row of squares for the body and a continuation for the strap.
- Visualize what you want to carry (phone, wallet, keys, small book). Measure these items to get an idea of the minimum size you need.
- For this tutorial, we’ll suggest a layout that creates a medium-sized sling bag (e.g., 13 squares for the body and flap/strap).
- Yarn Choice:
- Fiber: Durability is key for a bag. Cotton or cotton blends are excellent choices as they are sturdy, hold their shape well, and don’t stretch excessively. Strong acrylic yarn can also work. Avoid very stretchy or fluffy yarns that might not provide enough structure.
- Weight: Worsted weight (Category 4) is commonly used for granny squares and creates a nice, sturdy fabric for a bag. DK (Light Worsted/Category 3) can be used for a finer, lighter bag.
- Colors: This is where the fun begins!
- Scrapghan Style: Use a different color combination for each square from your stash.
- Coordinated Palette: Choose 3-5 colors that work well together and use them consistently across your squares.
- Single Color: For a more minimalist look, you can make all squares in one color.
- Hook Size:
- Match your hook to your chosen yarn weight. For bags, it’s often a good idea to go down half a size from the yarn label’s recommendation to create a denser fabric that holds its shape and prevents items from poking through the gaps.
- For Worsted weight yarn: 4.0 mm (US G/6) or 5.0 mm (US H/8).
- Granny Square Pattern:
- We’ll use the traditional granny square pattern, which builds clusters of double crochet stitches separated by chain spaces. Consistency in your squares is paramount for easy joining!
- Strap Construction:
- Crocheted Strap: The most common option, either integrated into the bag’s design or crocheted separately and sewn on. You’ll want it sturdy and comfortable.
- Lining (Optional but Highly Recommended): A fabric lining will add structure, prevent stretching, protect your items from falling through holes, and give your bag a professional finish.
Materials You’ll Need:
- Yarn: Worsted Weight (Category 4) yarn.
- Main Color(s) for squares: Approx. 20-30 yards per square. (Estimate total based on number of squares).
- Strap Color (can be one of your square colors or a new one): Approx. 100-150 yards.
- Crochet Hook: Size G/6 (4.0 mm) or H/8 (5.0 mm) (adjust to achieve desired fabric density).
- Yarn Needle (Tapestry Needle): For weaving in ends and joining squares.
- Scissors: For cutting yarn.
- Stitch Markers (optional): Helpful for marking corners or beginning of rows.
- For Optional Lining:
- Coordinating cotton fabric (approx. 1/2 yard).
- Sewing machine and thread OR needle and thread for hand-sewing.
- Pins.
Essential Crochet Abbreviations:
- ch: chain
- sl st: slip stitch
- sc: single crochet
- dc: double crochet
- ch-sp: chain space
- (): indicates instructions to be worked into the same stitch/space
- ***…***: repeat instructions within asterisks
How To Crochet a Sling Bag | Granny Square Bag: Step-by-Step Tutorial
This tutorial outlines a bag made from 13 traditional 3-round granny squares: a front, a back, a bottom, and a flap that extends into the strap.
Part 1: Crocheting Your Granny Squares (Make 13 identical 3-round squares)
Let’s make one square first. You’ll then repeat these steps 12 more times.
- Starting with Color 1:
- Ch 4, sl st into the first ch to form a ring. (Alternatively, use a magic ring for a tighter center).
- Round 1:
- Ch 3 (counts as first dc). Work 2 dc into the ring. (Ch 3, 3 dc) three times into the ring. Ch 3. Sl st to the top of the beginning Ch 3 to join.
- [4 dc clusters, 4 ch-3 corners]
- Fasten off Color 1, weave in ends.
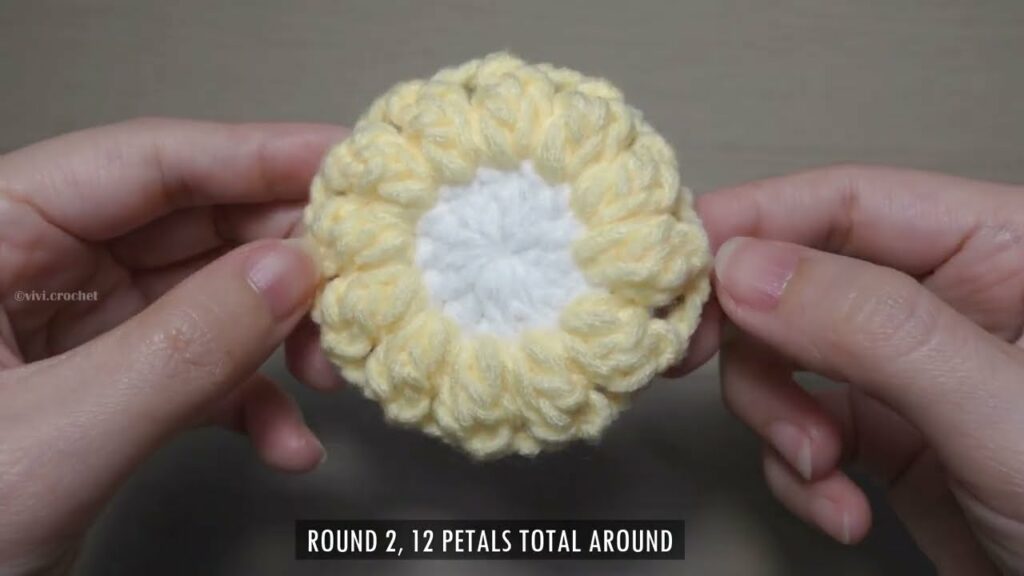
- Round 2 (Join Color 2 in any Ch-3 corner space):
- Ch 3 (counts as first dc). Work (2 dc, ch 3, 3 dc) into the same Ch-3 corner space. (This forms the first corner).
- Ch 1. Work (3 dc, ch 3, 3 dc) into the next Ch-3 corner space. Repeat from * two more times.
- Ch 1. Sl st to the top of the beginning Ch 3 to join.
- [8 dc clusters, 4 ch-3 corners, 4 ch-1 spaces]
- Fasten off Color 2, weave in ends.
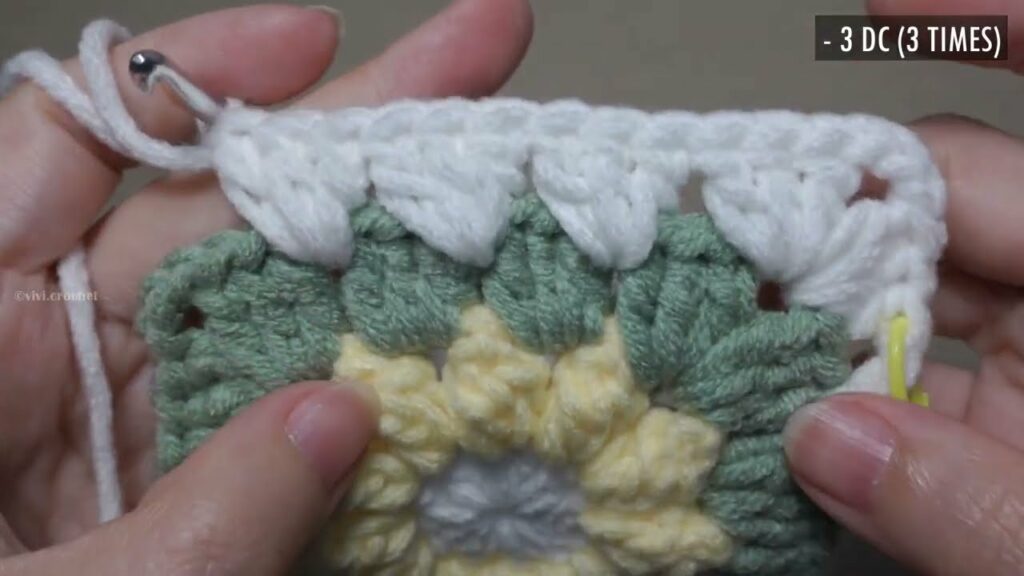
- Round 3 (Join Color 3 in any Ch-3 corner space):
- Ch 3 (counts as first dc). Work (2 dc, ch 3, 3 dc) into the same Ch-3 corner space.
- Ch 1. Work 3 dc into the next Ch-1 space.
- Ch 1. Work (3 dc, ch 3, 3 dc) into the next Ch-3 corner space. Repeat from * twice more, ending with 3 dc in the last Ch-1 space, Ch 1.
- Sl st to the top of the beginning Ch 3 to join.
- [12 dc clusters, 4 ch-3 corners, 8 ch-1 spaces]
- Fasten off Color 3, leaving a short tail. Weave in all remaining ends.
- Repeat these steps to make 12 more identical squares. Ensure consistent tension and size for all 13 squares.
Part 2: Planning Your Layout
Lay out your 13 squares on a flat surface to visualize the bag’s structure. A common layout for a sling bag would be:
- Body: 3 squares wide by 3 squares tall (9 squares total for the front and back).
- Bottom: 1 square (connecting front and back).
- Flap/Strap: A continuation of squares from the top back of the bag (2 squares for the flap + a chain section for the rest of the strap).
Example Layout (straight line of 13 squares): Square 1 (Bottom of Bag) Square 2 (Back of Bag) Square 3 (Back of Bag) Square 4 (Back of Bag) Square 5 (Front of Bag) Square 6 (Front of Bag) Square 7 (Front of Bag) Square 8 (Side of Bag – This square would be the top right side) Square 9 (Side of Bag – Top left side) Square 10 (Flap) Square 11 (Flap) Square 12 (Flap) Square 13 (Flap)
You can use a different layout, e.g., 3×3 for the main body (9 squares), then join 1 square for the bottom and 3-4 for the flap/strap. The principle is the same. For simplicity, let’s assume a layout that starts with a central spine and builds out.
Recommended Layout for a Beginner Sling Bag (easier joining):
- Body Panel: Join 5 squares in a straight line (e.g., A-B-C-D-E). This will be the back, bottom, and front of your bag.
- Side Panels: Join 2 squares together (F-G). Make another set (H-I). These will be the sides.
- Flap Panel: Join 4 squares in a straight line (J-K-L-M). This will be your flap.
Part 3: Joining the Squares
We’ll use the single crochet join as it’s sturdy and creates a neat ridge.
- Place two squares (e.g., A and B) right sides facing each other, aligning the edges you want to join.
- Insert your hook through both loops of the first stitch on the top square AND through both loops of the corresponding first stitch on the bottom square.
- Yarn over, pull up a loop through all layers. Yarn over, pull through both loops on hook (1 sc made).
- Continue making 1 sc through both loops of each corresponding stitch down the entire edge.
- When joining edges that have a ch-1 space, simply make 1 sc into the ch-1 space of both squares. When joining at a corner (ch-3 space), make (sc, ch 1, sc) in the corner space of both squares if you’re joining a corner-to-corner edge.
- Join your 5 body squares, 2 side squares sets, and 4 flap squares according to your chosen layout.
- Now, join the side panels (F-G and H-I) to the main body panel (A-E) along the edges where they meet, forming the “box” of the bag.
Part 4: Shaping the Bag Body
Once all your squares are joined into a continuous “tube” for the body.
- Bottom Seam: Fold the bottom square (Square 1 in the straight line example) to meet the front and back panels. Seam the bottom edges using single crochet join or whip stitch with your yarn needle.
- Side Seams: Seam the side edges of the bag, connecting the front and back panels. Ensure your seams are sturdy.
Part 5: The Flap
If your layout already includes squares for the flap (like the straight line example), then this part is integrated. If you have a separate flap panel:
- Attach Flap: Using your yarn needle or sc join, securely attach the bottom edge of your flap panel (J-K-L-M) to the top back edge of your bag body.
Part 6: Crocheting the Strap (Integrated with Flap)
This method creates a strong, continuous strap emerging from the flap.
- Continue from Flap: From the top-most granny square of your flap (e.g., Square M), you will now continue crocheting directly in rows.
- Row 1 (Strap Base): Ch 1 (does NOT count as a st). Sc in each stitch across the top edge of your flap square. (If your square has 3 clusters and 2 ch-1 spaces per side, that would be 3+3+3+2 = 11 sc across. Adjust if your squares are larger/smaller).
- [approx. 11 sc – width of your strap]
- Ch 1, turn.
- Row 2 and onwards: Sc in each stitch across.
- [approx. 11 sc]
- Ch 1, turn.
- Continue repeating this row until your strap reaches your desired length. A typical sling bag strap is quite long, usually 45-55 inches (115-140 cm), to be worn cross-body. Measure against yourself!
- Fasten off the strap yarn, leaving a very long tail (at least 15-20 inches) for attaching to the other side of the bag.
Part 7: Attaching the Strap to the Bag
- Position: Bring the end of the long strap to the other side of your bag, attaching it to the top corner of the bag’s opening (the front, opposite where the flap originates).
- Sew Securely: Using your yarn needle, carefully and securely sew the end of the strap to the bag. Stitch through multiple times to ensure it can bear weight. Weave in any remaining tail.
Part 8: Finishing Touches
- Weave in All Ends: This is the most crucial step for a professional finish. Using your yarn needle, weave in every single yarn tail from your squares and joins. Take your time to hide them neatly within the stitches.
- Optional Closure:
- Button: Sew a decorative button onto the front of the bag body. Create a simple loop using a chain on the underside of your flap that can go around the button.
- Magnetic Snap: Sew a magnetic snap closure to the inside of the flap and the corresponding spot on the bag body (this works best with a lining).
- Optional Fabric Lining (Highly Recommended for Structure & Durability):
- Measure: Measure the inside dimensions of your finished crocheted bag (width, height, and depth).
- Cut Fabric: Cut two pieces of fabric for the main bag body (adding seam allowance and top hem allowance). You may also need a separate bottom piece if your bag is boxy.
- Sew Lining: With right sides together, sew the fabric pieces to create a bag shape that matches your crochet bag. Hem the top edge of the fabric lining.
- Insert & Stitch: Place the fabric lining inside your crochet bag. Carefully hand-stitch the top edge of the lining to the inside top edge of your crocheted bag. This adds structure, prevents stretching, and ensures small items won’t fall through the “hollow” spaces of the granny squares.
Your Crochet Granny Square Sling Bag is Complete!
Take a step back and admire your creation! You’ve transformed simple squares into a unique, functional, and stylish accessory.
Tips for Success & Customization:
- Consistent Squares: Aim for identical tension and size in each granny square. This makes joining much easier.
- Joining Method: If single crochet join is too bulky, try the “join as you go” method (integrating squares as you make them) or the whip stitch with a yarn needle for a flatter seam.
- Strap Variations: Instead of a simple sc strap, you could crochet a wider strap in hdc or dc for more comfort. Or, use a purchased leather or fabric strap for a different look.
- Different Granny Squares: Once comfortable, explore variations of the granny square (solid granny squares, flower granny squares, sunburst grannies) for a different aesthetic.
- Add Pockets: Crochet small pockets and stitch them to the inside of the bag before adding the lining.
- Embellishments: Add tassels, pompoms, or charms to the bag for extra flair.
- Blocking: While not strictly necessary for individual squares in a bag (as they’ll be joined), blocking your finished bag (by gently misting and shaping) can help it lay flat and look more polished, especially if it feels a bit warped.
- Care: Refer to your yarn label for specific washing instructions. If you add a fabric lining, consider the lining’s care instructions too. Hand washing and air drying are often best for handmade crochet bags.
Enjoy carrying your one-of-a-kind, handmade granny square sling bag!
Video tutorial: