 by
by 🌟 “Only 1 Row” — Very Stylish & Simple Crochet Blouse
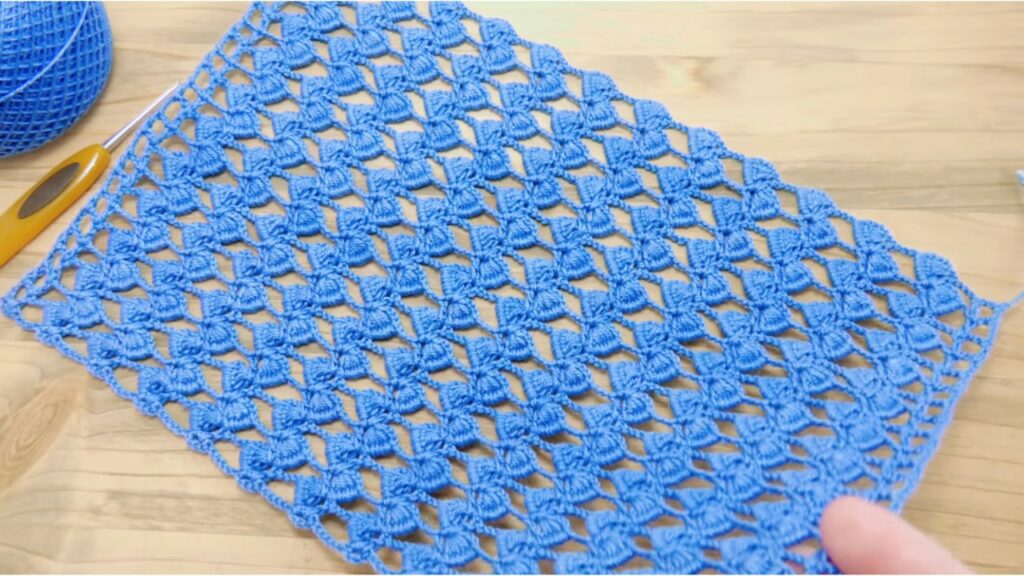
This pattern uses a single memorized row that’s repeated to build an open, lacy fabric — perfect for a lightweight blouse. I wrote it step-by-step (US terms) so you can work from the text without watching the video. The blouse is made from two identical rectangular panels (front + back) that are seamed at shoulders and sides — very beginner friendly.
Materials
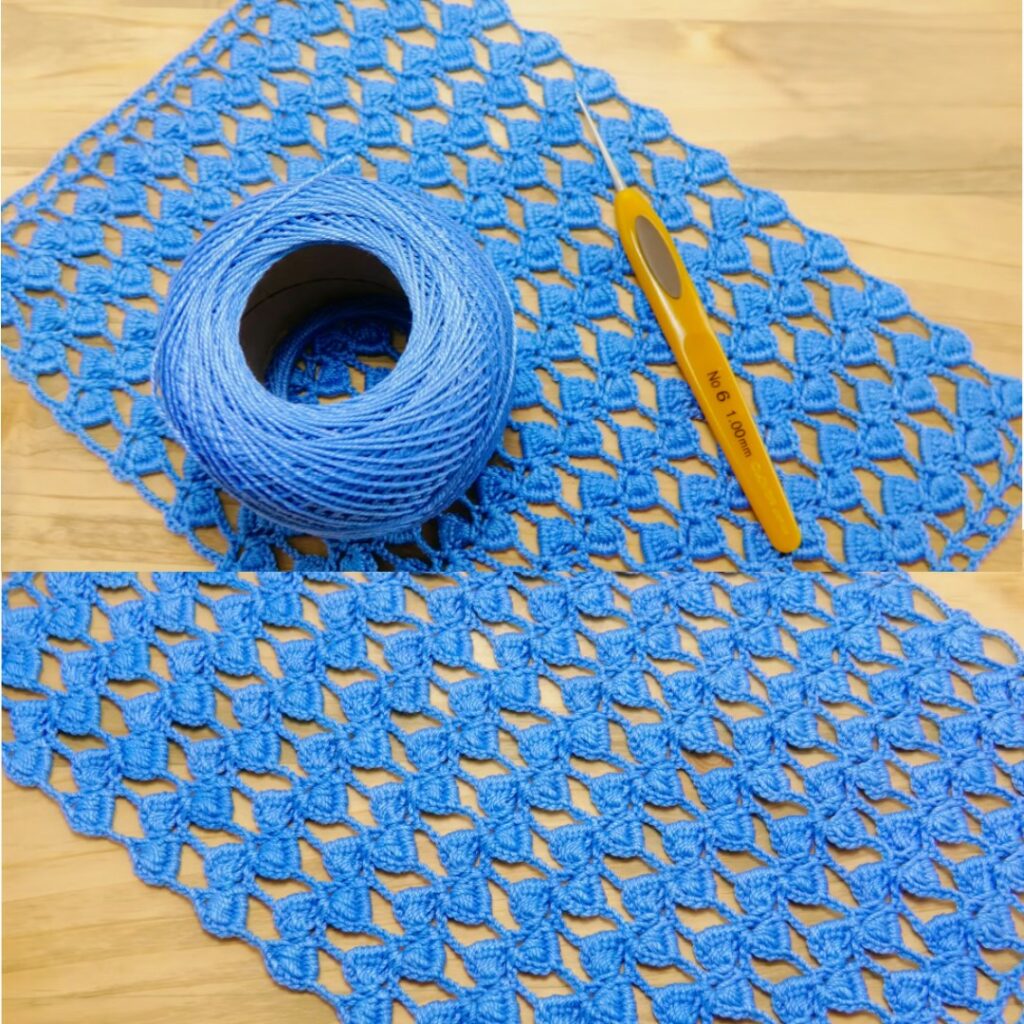
- Yarn: DK / light worsted (or sport for a lighter fabric). Sample uses DK cotton blend.
- Hook: 3.5 mm (adjust to match yarn & gauge)
- Tapestry needle, scissors, stitch markers, tape measure, blocking pins
- Optional: small buttons or tie closure (if you want a front opening)
Abbreviations (US terms)
- ch = chain
- sc = single crochet
- dc = double crochet
- tr = treble crochet (only if used)
- sl st = slip stitch
- sp = space
- st = stitch
- rep = repeat
- RS = right side
Overview & design notes
- Repeat: 1 row (the same row repeated) builds the whole fabric — the foundation row may differ only to set up the pattern.
- Multiple: foundation chain multiple of 6 + 3 (this is a common repeat for single-row leafy/arch patterns).
- The blouse is built as two rectangles (front/back). Sew shoulders and sides, leaving armholes. Add a neat single-crochet border.
Gauge (make a swatch)
Make a 10 cm × 10 cm swatch repeating the single row 12–16 times and blocking:
- Example target gauge (approx, DK + 3.5 mm): 18 sts × 10 rows = 10 cm.
If your gauge differs, change hook size or recalc chain counts (see sizing below).
Foundation chain
- Chain in multiples of 6 + 3.
- Example practice chain for sample small panel:
ch 63(6×10 = 60 + 3). Adjust to width you need.
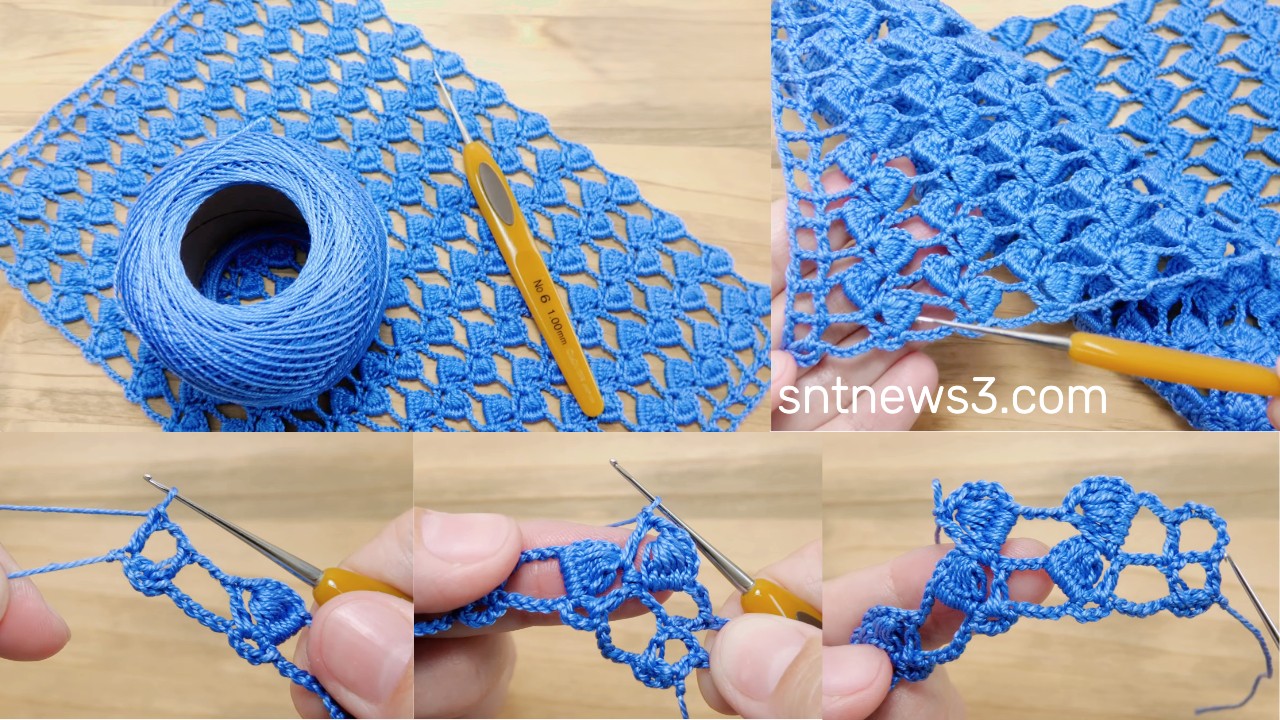
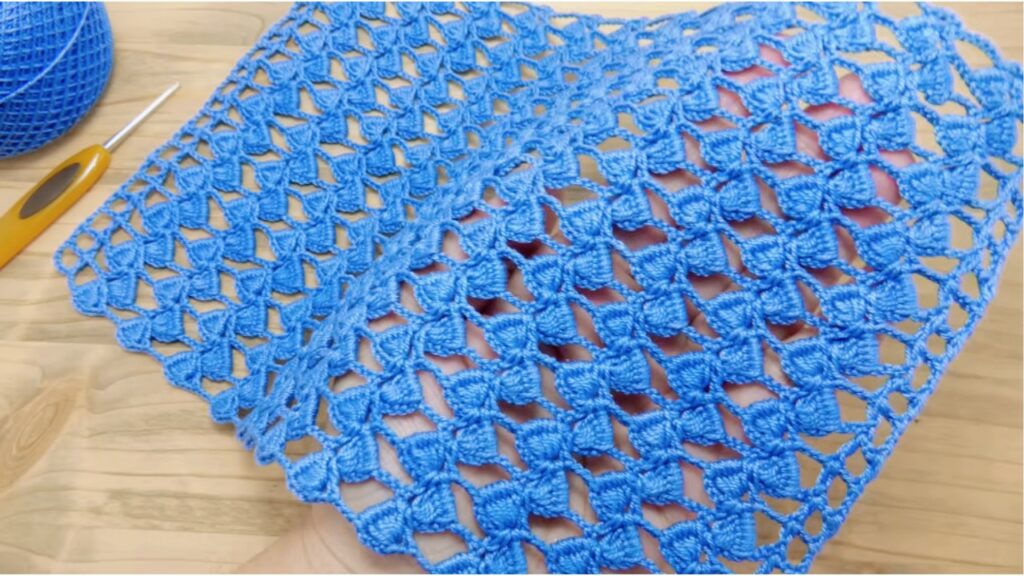
Stitch pattern — single row repeat (work back and forth, repeating the same row)
I’ll give a clear, single-row formula to memorize. Read the whole row once, then repeat it for the whole fabric.
Foundation (Row 0 — setup)
- Make foundation chain: multiple of 6 + 3. Example:
ch 63. - Row 1 (setup): dc in 4th ch from hook (counts as first dc), ch 1, skip 1 ch, dc in next ch — repeat to end. Turn.
You now have a base of double crochets separated by chain-1 spaces. The single repeating row builds the lace from here.
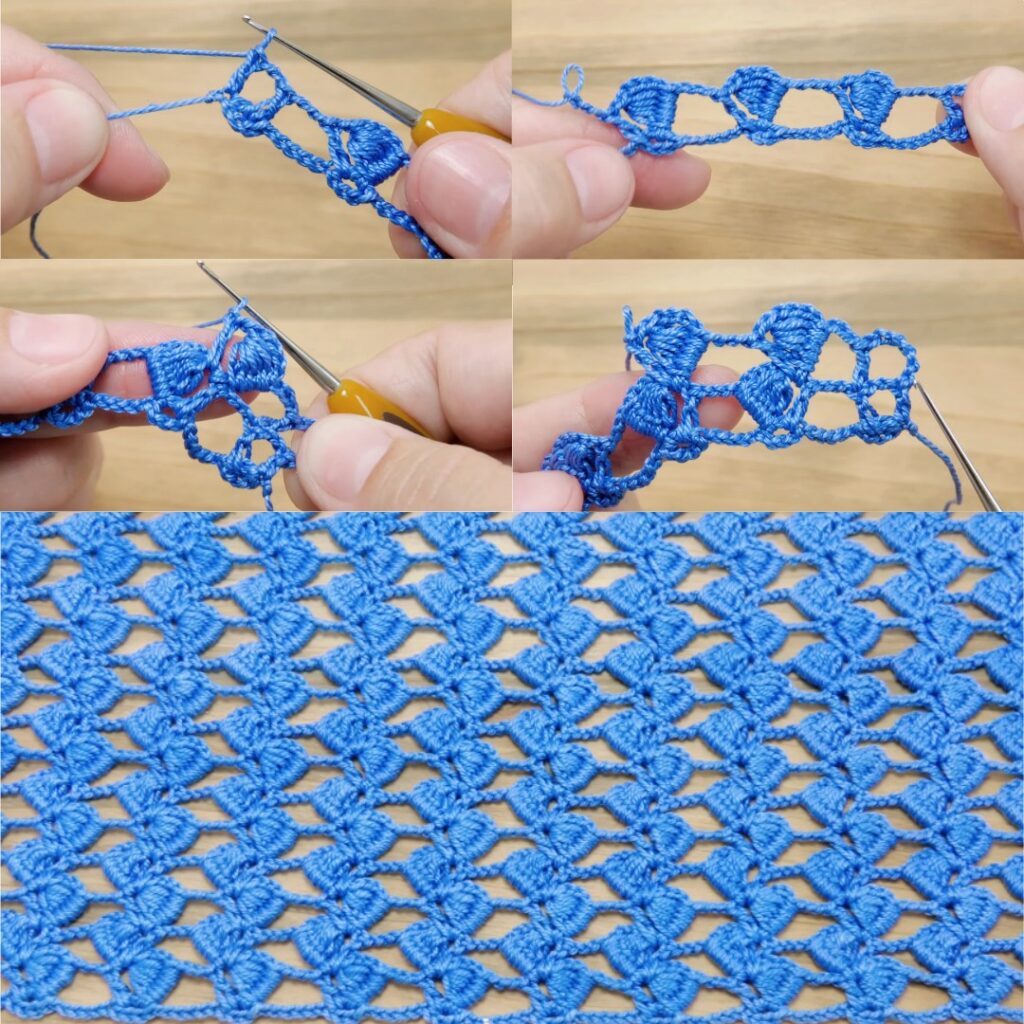
Single Repeat Row (Row R — the only row you repeat)
(Work this row across, then turn and repeat it again and again — it’s the entire pattern)
ch 3(counts as first dc), dc in next dc (so you have a pair of starting dc).- ch 3, skip next dc, into the ch-1 space from the setup row work: (dc, ch 1, dc) — a V-stitch; ch 3, dc in next two dc
- Repeat Step 2 across the row. End with dc in top of turning ch. Turn.
Pattern wording compact:(ch3, dc in next dc), *ch3, skip dc, V-st (dc,ch1,dc) in previous ch-1 sp, ch3, dc in next 2 dc* — repeat to end.
What this does:
- The
V-st (dc,ch1,dc)is always worked into the chain-1 spaces from the row below. - The
ch-3arches and pairs of dc between V-sts create the leafy/arched lacy look. - You only need to memorize this row — repeat it until your panel reaches the desired length.
Working the sample swatch (short example)
- ch 39 (6×6 + 3).
- Row 1 (setup): dc in 4th ch from hook, ch1, skip 1 ch, dc in next ch — repeat across. Turn.
- Row 2 (repeat row — the only row): ch3 (counts dc), dc in next dc, ch3, skip next dc, work (dc,ch1,dc) into the ch-1 sp below, ch3, dc in next 2 dc — repeat. Turn.
- Repeat Row 2 for desired height.
Panel size & blouse construction
You’ll make two panels (front + back) the same size. When joined they form the blouse.
Finished garment measurements (approx) — adjust to fit:
- Small (S): chest circumference 34–36″ (86–92 cm) → half width ≈ 17–18″ (43–46 cm) front panel width
- Medium (M): chest 38–40″ (96–102 cm) → half width ≈ 19–20″ (48–51 cm)
- Large (L): chest 42–44″ (106–112 cm) → half width ≈ 21–22″ (53–56 cm)
How to make panels:
- Decide finished half-width (half chest + 2 cm ease). Convert to stitches using your gauge:
stitches_needed = half_width_in_inches × sts_per_inch(or use rows/cm if metric). - Chain the number of stitches (nearest multiple of 6 + 3).
- Work the setup row then repeat the single row until panel height equals desired blouse length (shoulder to hem), e.g. 22–25″ (56–64 cm) for a tunic/blouse length — or shorter for cropped blouse (measure your desired length).
- Make two identical panels.
Assembly — folding & seaming into blouse
- Block both panels lightly to even edges.
- Place panels RS together. Decide neck opening: find the center of the top edge and mark neck width (e.g., 7–9″ / 18–23 cm adult). Mark shoulder seam widths from each side of center (example: leave 3–4″ / 8–10 cm shoulder seam each side — adjust by size).
- Seam shoulders: With RS together, align top edges and sew shoulder seams (mattress stitch or whipstitch) using yarn and tapestry needle. Leave the neck opening in the middle.
- Seam sides: Starting at bottom hem, sew up each side until you reach the desired armhole height (typically 7–9″ / 18–23 cm from shoulder seam for adult sizes). Leave that upper portion unsewn as the armhole opening.
- Turn RS out and check fit. Adjust if needed by unpicking small amounts.
Neckline & armhole finishing
A neat edge stops lace from stretching.
Simple sc edging (recommended)
- Join yarn at neckline seam with RS facing. Work 1 round sc evenly around neck. Place 3 sc in corners if your neckline has a sharper corner. Join with sl st.
- Round 2 (optional decorative): ch 3, skip 1 sc, sc in next sc repeat to create tiny arches; or do a shell round: skip 2 sc, 5 dc in next sc, skip 2 sc, sc in next sc for a scalloped look.
- Do the same around the armholes: join yarn and sc around each armhole (3 sc in corners), add a second round of sc or a small shell row if desired.
- Hem (optional): add one or two rounds of sc around bottom edge, or a shell scallop as above.
Variations & styling ideas
- V-neck or front opening: Instead of seaming shoulders, leave center front open and add button loops or tie closures.
- Longer sleeves: Pick up stitches around armhole and work simple rounds of dc or hdc to make short/long sleeves.
- More coverage: add a lining or a camisole underneath (pattern fabric is lacy).
- Short top / crop: stop panels earlier for a shorter top.
- Stripe version: change color every N rows (e.g., every 6 rows) for subtle stripes.
Troubleshooting & tips
- If edges ripple or pull, check first & last stitches each row — make sure you work the
2 dcat the edges (dc in turning chain top and dc in last real stitch) to stabilize edges. Some crocheters add a starting ch-3 + 1 extra dc at the end to square edges. - If pattern holes don’t line up, be sure the V-stitches are worked into the ch-1 spaces from the row below (not into dc tops). Use stitch markers for a few repeats until you memorize placement.
- For denser fabric (less see-through): use a smaller hook or substitute hdc for dc in the setup row.
- To lengthen quickly: repeat the row more times until desired length; it’s a single row — very fast to memorize.
Example quick recipe (to make a simple size S blouse)
- Gauge (example): 18 sts = 10 cm.
- Desired half-width: 44 cm →
stitches_needed = 44 × (18 / 10) ≈ 79 sts→ nearest multiple 6 + 3 = 81 chains. - Chain 81, do setup row, then repeat the single row until panel height ≈ 56 cm (rows ≈ 56 × (rows_per_10cm/10)). Make two panels and assemble as above.
Care & blocking
- When finished, gently block your panels to even stitches and open the lace. Pin to the finished dimensions, let dry.
- Wash per yarn instructions (cotton usually machine washable; block flat to dry). Avoid hot dryers for many fibers.
VIDEO: