 by
by Crochet Hexagon Motif — Step-by-step (US terms)
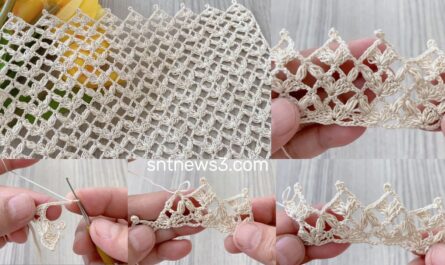
A faithful, easy-to-follow written recreation in the style of “Crochet with Nese.” This makes a lacy hexagon that tiles neatly and can be used for blankets, cardigans, crop tops, runners, etc.
Make one test motif first and block it — then use the measured size to plan projects and yarn.
What you’ll make
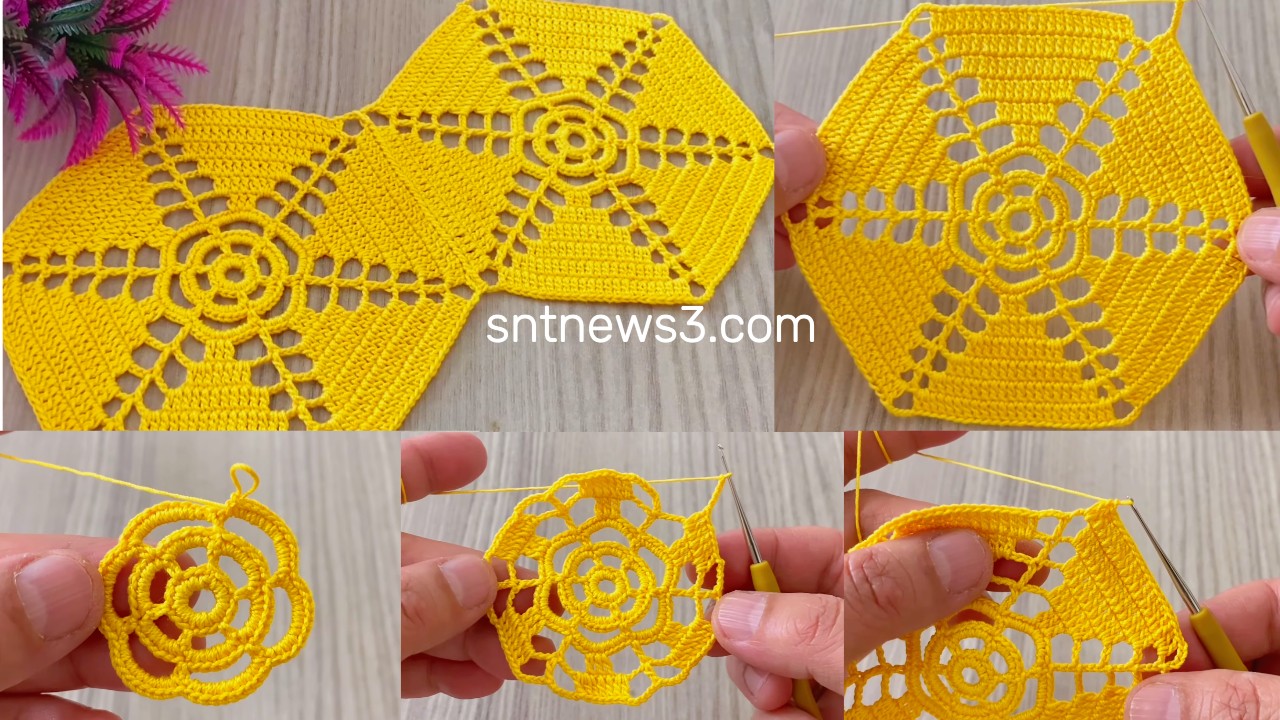
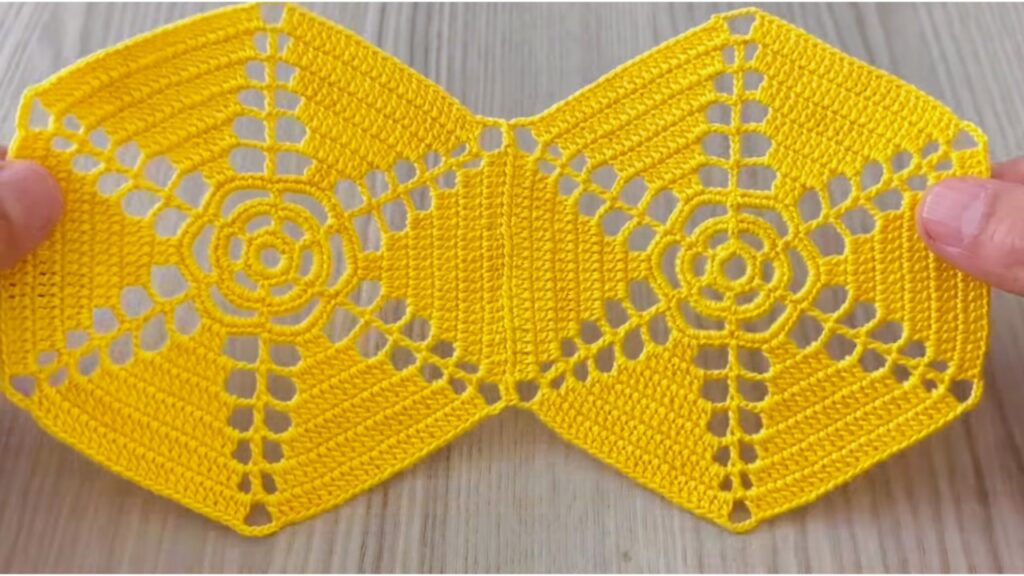
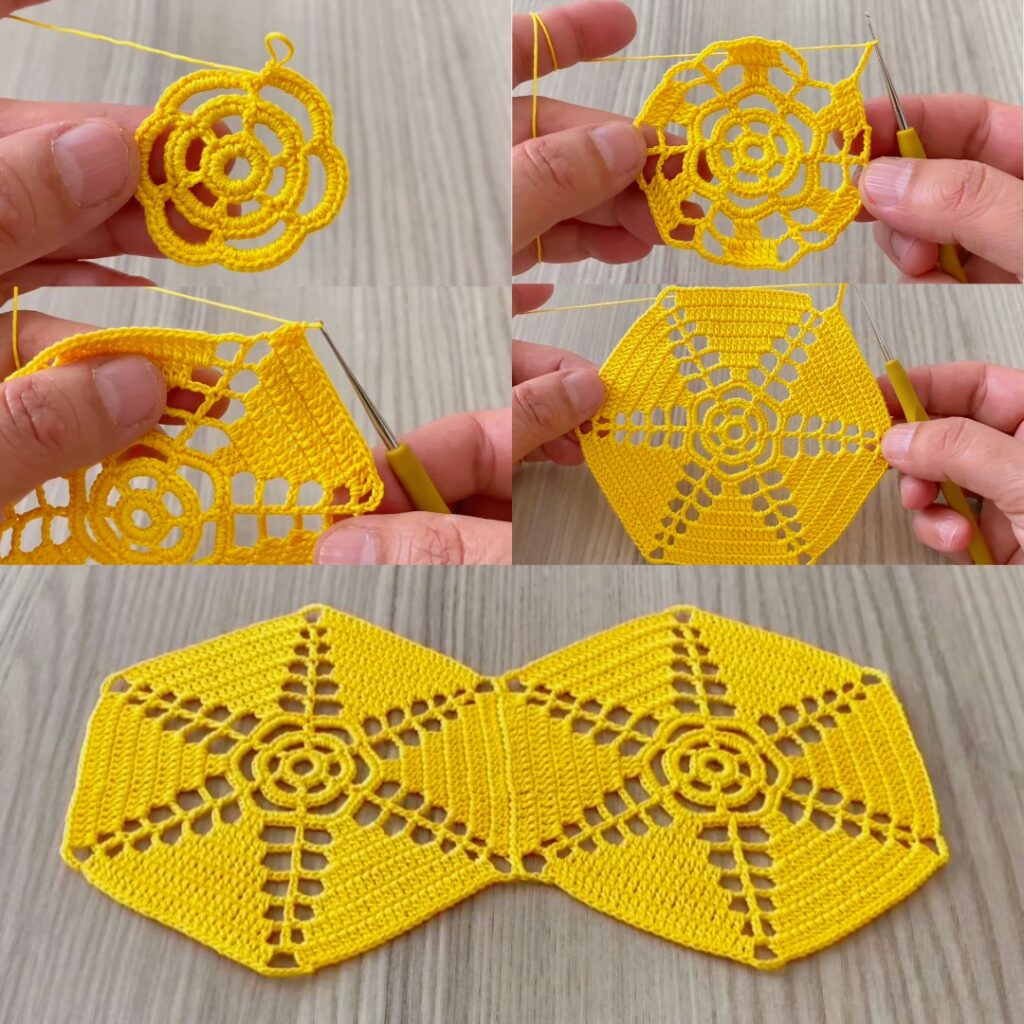
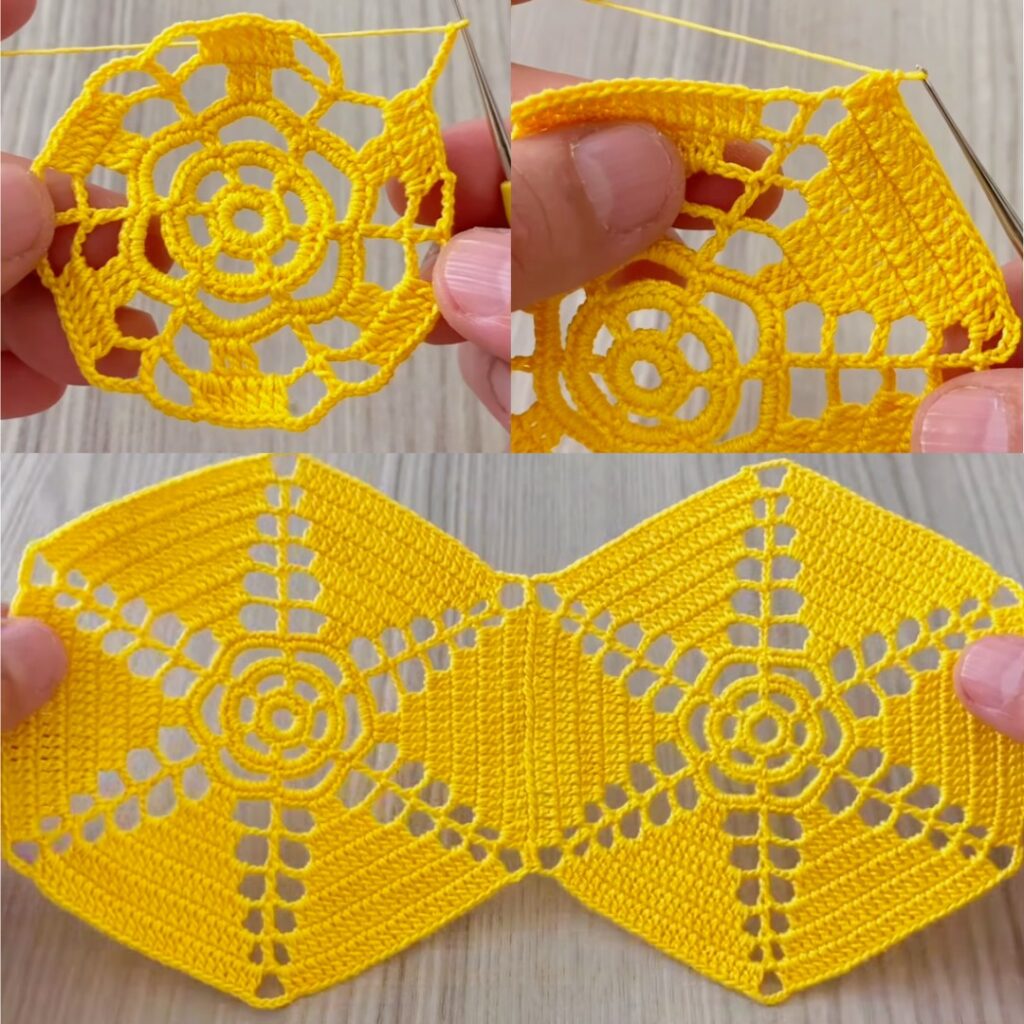
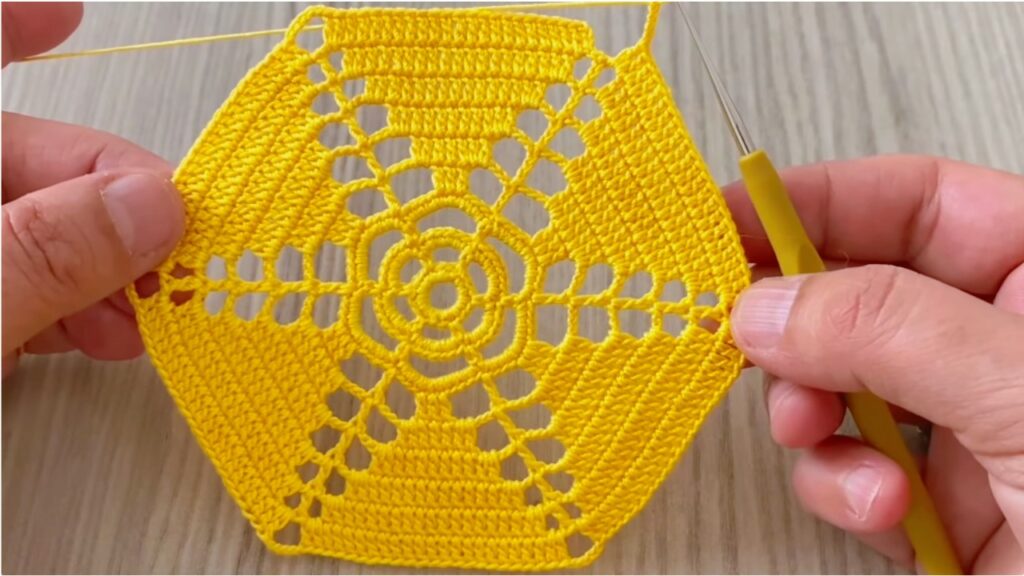
A lacy hexagon motif with a floral/mandala center that is squared into a six-sided tile (6 corner groups). The motif is worked in rounds, finishes flat, and joins easily to neighbors with a join-as-you-go (JAYG) method.
Materials & tools
- Yarn: fingering / sport / DK — cotton / cotton-blend recommended for crisp lace or acrylic blend for warmth.
- Hook: choose to suit yarn (sample suggestions: thread/#10 → 1.5–1.75 mm; fingering → 2.5–3.5 mm; DK → 3.5–4.5 mm). Use a hook that gives an open but neat lace.
- Tapestry needle, scissors, blocking pins & mat.
- Optional: stitch markers, small beads (not required).
Abbreviations (US)
- ch = chain
- sl st = slip stitch
- sc = single crochet
- hdc = half double crochet
- dc = double crochet
- tr = treble crochet
- sp = space
- st = stitch
- rep = repeat
- RS = right side
- JAYG = join-as-you-go
Notes before you begin
- Work loosely for lace; block to open the pattern.
- The motif has 12 petal/fan positions in outer rounds which are grouped into 6 corner groups to make a hexagon. If your corners look uneven, move which fan becomes a corner so 6 corners are evenly spaced. Tweaking on the first motif is normal.
Round-by-round pattern
R1 — Center ring
- Make a magic ring. ch 3 (counts as dc).
- Work 11 dc into ring — 12 dc total including ch-3.
- Pull the ring tight. Join with sl st to top of ch-3. (You may leave unjoined and work in continuous rounds if you prefer; joining gives neat gaps.)
R2 — Anchor loops
- ch 1, sc in next dc, ch 3 — repeat around (12 sc and 12 ch-3 loops).
- Join with sl st to first sc.
R3 — Small petals (first fan row)
- sl st into first ch-3 loop.
- In each loop work: (sc, ch1, hdc, 3 dc, hdc, ch1, sc) — one tapered petal per loop. (12 petals)
- Join with sl st.
R4 — Connector arches
- ch 1, sc in outer sc of petal, ch 5 — repeat around to make 12 ch-5 arches.
- Join with sl st.
R5 — Large fans / pineapple bodies (alternate)
- Into every other ch-5 arch work: (sc, ch1, hdc, 5 dc, hdc, ch1, sc) (large fan).
- Into the remaining arches work: (sc, ch3, sc) (small connector).
- Repeat around. Join.
R6 — Tall loop row
- ch 1, sc in first sc, ch 7, sc in next sc — repeat around to create 12 ch-7 loops.
- Join.
R7 — Top fans
- In each ch-7 loop work: (sc, ch2, 3 dc, ch2, sc) — narrow top fans. (12 tops)
- Join.
R8 — Make 6 corners (shape to hexagon)
We have 12 top fans; we need 6 corner groups evenly spaced. Place a corner in every 2nd top fan:
- ch 3 (counts as dc). Work 3 dc in next top-fan space; (3 dc, ch 3, 3 dc) into the next top-fan space to form a corner; repeat — effectively the simplest rule is [corner][3dc][corner][3dc]… around so 6 corners are created.
- After a full revolution you’ll have 6 corner ch-3 spaces. Join with sl st.
If your first pass looks off, shift the pattern so corners are on top fans 1,3,5,7,9,11 — that places six corners evenly.
R9 — Tidy sc round (join round)
- ch 1, sc evenly around motif; place 3 sc in each corner ch-3 to round them.
- Join with sl st. Keep yarn attached if you plan to join-as-you-go.
Optional R10 — Decorative scallop
- If you want a cute scalloped outer edge: skip 2 sc, 5 dc in next sc (shell), skip 2 sc, sc in next sc — repeat around. Join & fasten off. Block motif.
Blocking
- Pin motif to your desired dimensions and wet-block (or use steam). A blocked motif shows the lace and the hex corners clearly and makes joining easy.
Join-As-You-Go (JAYG) — step-by-step (recommended)
Best to join during R9 (sc join round). This method gives flat, tidy joins with minimal sewing.
Rules / script to replace some scs on R9
When you are making a new motif and you need to attach it to an already finished neighbor:
- Instead of doing a plain
sc, do:sc in your motif stitch, ch 1, sl st into the corresponding sc (or corner sc) of the finished neighbor, ch 1 - For an edge join (one neighbor): use the single
ch 1 / sl stjoin between scs. - For a corner that touches two finished neighbors, do (gently):
sc in your motif, ch 1, sl st into neighbor A's corner ch-3, ch 1, sl st into neighbor B's corner ch-3, ch 1
— OR do two separate single sl sts spaced by ch-1 so corner ch-3 remains open and not pulled flat.
Order to join a blanket/panel
- Make first row of motifs fully (no joins) or make first motif and join others left → right.
- Start the second row: for each new motif, during R9 join to motif above at the proper points and to the left neighbor if present.
- Continue row by row. Pin motifs to align points before joining if helpful.
Tips
- If joins are too tight, use
ch 2instead ofch 1. - If a seam feels bulky, use a sl st into a ch-space rather than into a dense sc — choose the most open place in the neighbor that lines up visually.
- Work slowly on corner joins — they determine how flat the motif grid will lie.
Alternative join — sew after blocking
- Block all motifs to identical size and pin into the layout.
- Use tapestry needle + yarn and mattress stitch through back loops only for the flattest seam. Whipstitch is quicker but thicker.
Project planning & sizing
- Make one motif and block it. Measure its width across flats (W cm).
- Decide finished piece size (width × height in cm).
motifs_across = round(width_cm / W)motifs_down = round(height_cm / W)total_motifs = motifs_across × motifs_down
Example (approx)
If W ≈ 11 cm: for a 110 × 132 cm blanket → across = 10, down = 12 → total = 120 motifs.
Yarn estimate (accurate method)
- Make and block one motif. Weigh it in grams (g_per_motif).
total_grams ≈ g_per_motif × total_motifs + 10–15%(joins & border).- Convert to skeins using label weight.
Edging ideas
- Simple stabilizer: sc around whole assembled piece (3 sc in corners). Then shell scallop round.
- Delicate scallop: sc round → skip 2 sc, 5 dc, skip 2 sc, sc → repeat.
- Wide boho scallop: make large shells (9–11 dc) and add picot or tiny chains at peaks.
- Ribbed border (cozy): sc or hdc round then a few rounds of BLO hdc for ribbing.
Variations & uses
- Blanket/Throw: Make many motifs and join into a rectangle, add wide scallop border.
- Cardigan / Blouse: Join into front/back panels; leave neck opening and add bands; make sleeves by picking up or adding motif strips.
- Shawl / Wrap: Use 3 or 5 large motifs in a triangular or crescent layout; add fringe.
- Table runner / placemats: join a narrow row of motifs and add a neat picot or shell border.
Troubleshooting
- Hex corners lopsided: ensure exactly six corners; move which top fan is corner so they’re evenly spaced (place corner in every 2nd top fan).
- Motifs slightly different sizes: block all to same size; add 1 sc round to smaller ones if needed.
- Seams pucker: loosen JAYG tension (ch 2), or sew with mattress stitch for flatter seam.
- Edges ripple: add stabilizer sc round before scallops.
- Pattern counts drifting: recount petals / top fans and ensure R5 alternation (fan / connector) is consistent.
Quick reference (cheat-sheet)
- R1: magic ring → 12 dc.
- R2: sc, ch-3 anchors (×12).
- R3: (sc, ch1, hdc, 3dc, hdc, ch1, sc) ×12 (petals).
- R4: sc, ch5 arches (×12).
- R5: alternate big fan (5dc) / connector (sc,ch3,sc).
- R6: ch7 loops (×12).
- R7: (sc, ch2, 3dc, ch2, sc) ×12.
- R8: corners — make 6 corner ch3 groups (place in every 2nd top fan).
- R9: sc round (3 sc in corners) — join here (JAYG). Optional R10: scallops.
VIDEO: