 by
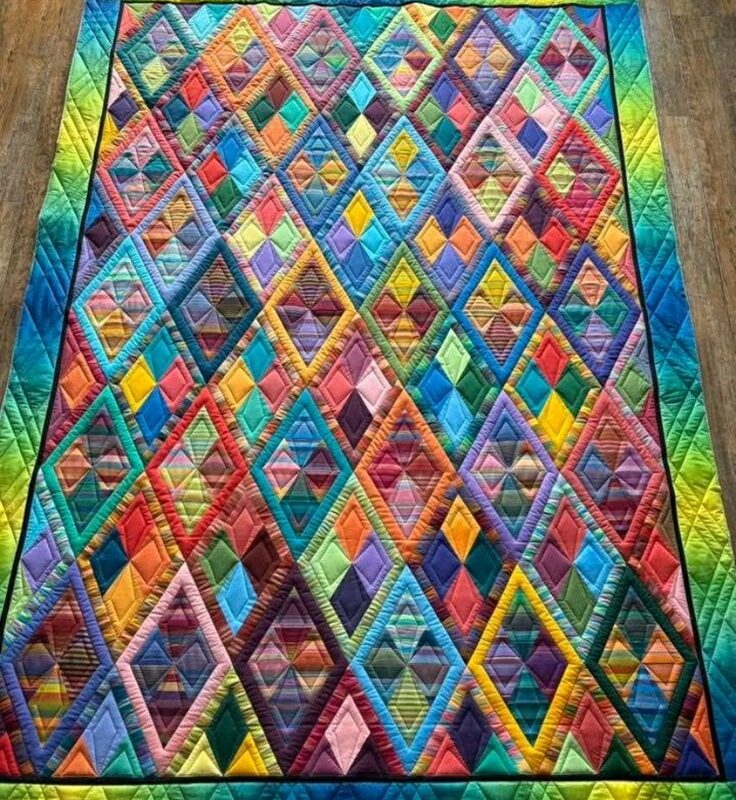
by Nice quilt — gorgeous colors and crisp diamond geometry. Below is a complete, step-by-step text tutorial to recreate the look and construction method used in that photo. I’ve written it so you can follow it with common tools (rotary cutter, ruler, sewing machine) and offered an alternate paper-piecing option for perfect points. I chose practical finished dimensions and modular block sizes so the math is straightforward; if you want a different final size I can re-scale the cutting for you.
Quick overview (what you’ll make)
- Finished quilt size: ~72″ × 96″ (throw / lap; similar to photo)
- Layout: Diamonds set on-point in an 8 (across) × 12 (down) grid = 96 diamonds
- Block unit: One diamond = a stacked, multi-colored diamond made from concentric diamond-shaped “rings” (strip-pieced or foundation paper pieced)
- Style notes: Rainbow/ombré fabrics, thin black inner border to frame the diamonds, wider multicolor gradient outer border, diagonal echo machine quilting.
Materials & tools
Fabric
- Assorted fat quarters or yardage in rainbow/tonal gradients — plan on 25–35 different fabrics (solids/gradients/stripes). Aim for a mix of saturated and muted colors like in photo.
- If using fat quarters: get ~30 fat quarters (will give lots of variety).
- Background/contrast fabric for small inner accents (optional): small amount (⅓–½ yd).
- Black (or very dark) fabric for thin inner frame: ½ yard.
- Outer border gradient fabric: 1½–2 yards (or make border from pieced gradient strips, see instructions).
- Backing: 4.5–5 yards (or two 44″–60″ wide backing pieces sewn).
- Batting: 80″ × 104″ (loft of your choice).
- Binding: 0.7–1 yard per 6–8″ of finished perimeter ≈ 1.25–1.5 yards total (or cut 2.5″ strips × enough length for binding, ~7/8 yd).
Tools
- Sewing machine with ¼” foot (or precise seam allowance)
- Rotary cutter, 24″ ruler (and 6″ / 12″ ruler), cutting mat
- Diamond / triangle rulers OR:
- Quilting ruler + square on point template OR
- Foundation paper piecing template (PDF) and printer
- Pins or glue stick for paper piecing
- Iron & pressing surface
- Marking tools (water soluble pencil)
- Walking foot (for quilting) recommended
Construction strategy (method choice)
Two practical methods:
A. Strip-pieced + diamond template method (faster, great for lots of color transitions) — recommended if you prefer rotary cutting and strip sets.
B. Foundation paper-pieced (FPP) diamond units (more precise points & perfect alignment) — recommended if you want exact sharp diamonds and don’t mind paper piecing.
I’ll give a detailed stepwise plan for Method A (strip-pieced diamonds) and add notes for Method B at the end.
Measurements used in this tutorial (key sizes)
- Finished diamond block (on point) = 8″ wide × 12″ tall (this is the diamond’s finished dimensions; unfinished before assembly + seam allowances).
- Unfinished (seams not yet sewn into quilt): add ½” total (¼” seam surround) to cuts where needed.
- Grid: 8 diamonds across = 8 × 8″ = 64″ finished diamond area width. Add a 3″ black inner frame + 4″ pieced/wide outer border to get ~72″ finished width. Vertical similarly yields ~96″.
- If you want a larger/smaller quilt, scale diamond size and number proportionally.
Step-by-step — Method A: Strip-pieced diamonds (fast & visual)
Step 1 — Choose and prepare fabrics
- Select ~25–35 fabrics: solids, tone-on-tone prints, stripes and plaids that blend well in a rainbow palette. Choose at least a couple darker and a couple lighter values for contrast inside diamonds.
- Press all fabrics.
Step 2 — Make rainbow strip sets
- Decide how many color rings each diamond will show. The quilt in the photo looks like each diamond has about 4–6 concentric color bands (center diamond + surrounding rings).
- Cut strips from each fabric in widths that will create those rings. Typical strip widths (finished) for concentric look:
- center small diamond: 1″–1.5″ finished (i.e., cut 1.5″–2.0″ strips)
- next ring: 1.5″–2.5″ finished
- next ring: 2.0″–3.0″ finished
- To create many varied strip sets quickly: cut 2.5″–3″ strips from many of your fabrics (fat quarters are great). Sew strip sets by stacking 5–7 strips in a pleasing color order (e.g., purple->blue->teal->green->yellow). Press seams toward darkest.
Tip: To mimic the photo’s variety, don’t make every strip set identical — vary the order and number of strips per set. Make at least 20–30 strip sets (each will yield several diamonds).
Step 3 — Sew strip sets and subcut parallelograms
- Sew the strips together along their long edges to form wide strip panels. Press well.
- From each strip panel, you will cut parallelogram pieces that form the diamond rings when pieced point-to-point.
- Using a 60° / 45° triangle ruler makes cutting diamonds/parallelograms easy. If you don’t have one, use a template: draw a diamond template on cardboard that equals the finished diamond rings’ widths plus seam allowance.
- Example: if final diamond width is 8″ finished, the parallelogram cut across the panel must be sized so after sewing to neighboring parallelograms it yields an 8″ wide diamond. This is a geometric step — if you prefer simpler: cut squares from strip panels and then cut them on the diagonal to form triangles; pair triangles to build diamond rings. (This is less efficient but straightforward.)
Alternate cutting technique (simpler)
- Cut square units of a size that will allow building an on-point diamond. For example, cut 9.5″ squares (unfinished). When you set a 9.5″ square on point, it approximately yields a diamond ~8″ × 12″ after trimming. This is forgiving and simpler for many quilters: create multiple strip-pieced squares, then subcut them and assemble to diamonds. (I’ll include trimming notes in Step 6.)
Step 4 — Assemble diamond ring units
- For each diamond, assemble concentric rings by sewing parallelogram or triangle segments together in rounds:
- Start with the center small diamond (make from a single small square or a set of four small triangles).
- Surround it with the next color ring: sew four trapezoids/parallelograms/triangles to make the ring.
- Continue outward until the diamond reaches your target finished size (8″×12″ finished).
- Press seams outward (or toward darker fabrics) to reduce bulk.
If you used square → diagonal triangle method: make four triangle segments for each side (top/bottom/left/right) and sew them around the center diamond.
Step 5 — Square and trim units
- Once a diamond is assembled, trim it to an 8.5″ wide × 12.5″ high unfinished rectangle on the square-on-point grid. This gives you a ¼” seam allowance around so the finished diamond measures 8″×12″.
- Use a square ruler or on-point trimming template to make sure points are centered and sharp.
Step 6 — Layout the quilt
- On a large surface or design wall, place your diamonds in an 8 × 12 layout. Alternate warm and cool colors for visual movement — the photo has an intentional diagonal flow of colors. Shuffle until you like the layout.
- Leave narrow sashing lines of black (or alternate dark) between diamonds if you want the framed look. The quilt in the photo has a thin black “frame” inside the green/teal border — plan a 1.5″ finished black sashing strip around the whole diamond field or between blocks as you prefer.
Step 7 — Join diamonds into rows and quilt center
- Sew diamonds together in rows, matching seam intersections carefully.
- Press seams in alternating directions on adjacent seams to reduce bulk and help matching.
- Join rows to make the full quilt center. Add the thin black inner border (cut 3″ wide strips, sew around quilt center; after sewing they will finish to ~2.5″ depending on your seam allowance decisions).
Step 8 — Add the outer pieced border
- The photo shows a wide gradient border. Easiest approach:
- Make long strip sets from leftover rainbow fabrics, press, and cut long 6″–8″ wide strips.
- Piece these strips end-to-end to create a long strip that transitions across the rainbow.
- Sew this long pieced strip around the quilt as the outer border. Cut border strip widths to give you desired finished width (I used 4″–5″ final; cut 4.5″–5.5″ unfinished).
- Press borders and square up the quilt top.
Step 9 — Make backing, layer & baste
- Prepare backing (seam two lengths if needed), press.
- Layer quilt top, batting, backing on a flat surface. Smooth and baste with safety pins every 4–6″.
Step 10 — Quilting
- The photo shows diagonal echo quilting that follows diamond shapes with approx. 1″ – 1.5″ spacing. Using a walking foot, quilt parallel diagonal lines across the quilt at 1″ spacing, then rotate and quilt the opposite diagonal for a cross-hatching effect (or) quilt concentric echoes inside each diamond by following the diamond outlines.
- Quilting thread: use a neutral or slightly contrasting thread (e.g., medium tone) so quilting shows but doesn’t fight with color.
Step 11 — Trim and bind
- Trim excess batting and backing even with quilt top.
- Attach binding (2.5″ strips joined on bias or straight grain) by machine and finish by hand or machine.
Step 12 — Final pressing & label
- Give the quilt a final press (on low heat, not over batting), stitch a label, and enjoy!
Method B — Foundation paper piecing (for perfect points)
If you want each diamond absolutely precise:
- Create a diamond FPP template: divide the diamond into wedges or strips like an envelope — each small triangle/diamond region becomes a paper piece unit.
- Print many copies of the template sized so the finished diamond equals 8″ × 12″.
- Sew fabric pieces directly onto the paper template in the order of the lines (start from center out or one side to the other).
- Trim each finished FPP diamond on the outside seam line to the exact unfinished dimension required (8.5″×12.5″).
- Assemble diamonds into the same 8×12 layout and proceed with borders, quilting as above.
FPP gives super-clean points and is my recommendation if you want the most geometric precision. It’s slower but yields crisp results.
Yardage summary (approximate)
- Rainbow fat quarters: 25–35 FQs (or ~8–10 yards assorted yardage cut into strips)
- Black inner frame: ½ yard
- Outer pieced border (or 2 yd if single fabric): 1½–2 yards or use pieced leftovers
- Backing: 4.5–5 yards (depending on backing width)
- Batting: 80″ × 104″
- Binding: 0.75–1.25 yards (or cut 2.5″ strips totaling ~270″ length)
Tips to recreate the exact look from the photo
- Use many small tone changes — the quilt’s effect comes from many slightly different hues, not just a few strong colors.
- Use plaids/stripes/gradients occasionally to add texture.
- Press seams to one side consistently (or toward dark) so the quilting lines stay crisp.
- Use a thin black outline between the diamond field and the outer border — this makes the central pattern “pop.”
- For the outer border, make a gradated pieced border (piece strips in rainbow order) rather than a single large solid for the same vibrant frame.
Common pitfalls & how to avoid them
- Points not matching when joining rows: pin very carefully at seam intersections and consider using a walking foot. If using FPP, trim units accurately.
- Bulky seam intersections: reduce bulk by clipping dog-ear seam allowances and pressing seams open where many seams meet.
- Color clustering: shuffle blocks on a design wall and step back frequently to avoid too many same-tone blocks in one area.